Introduction
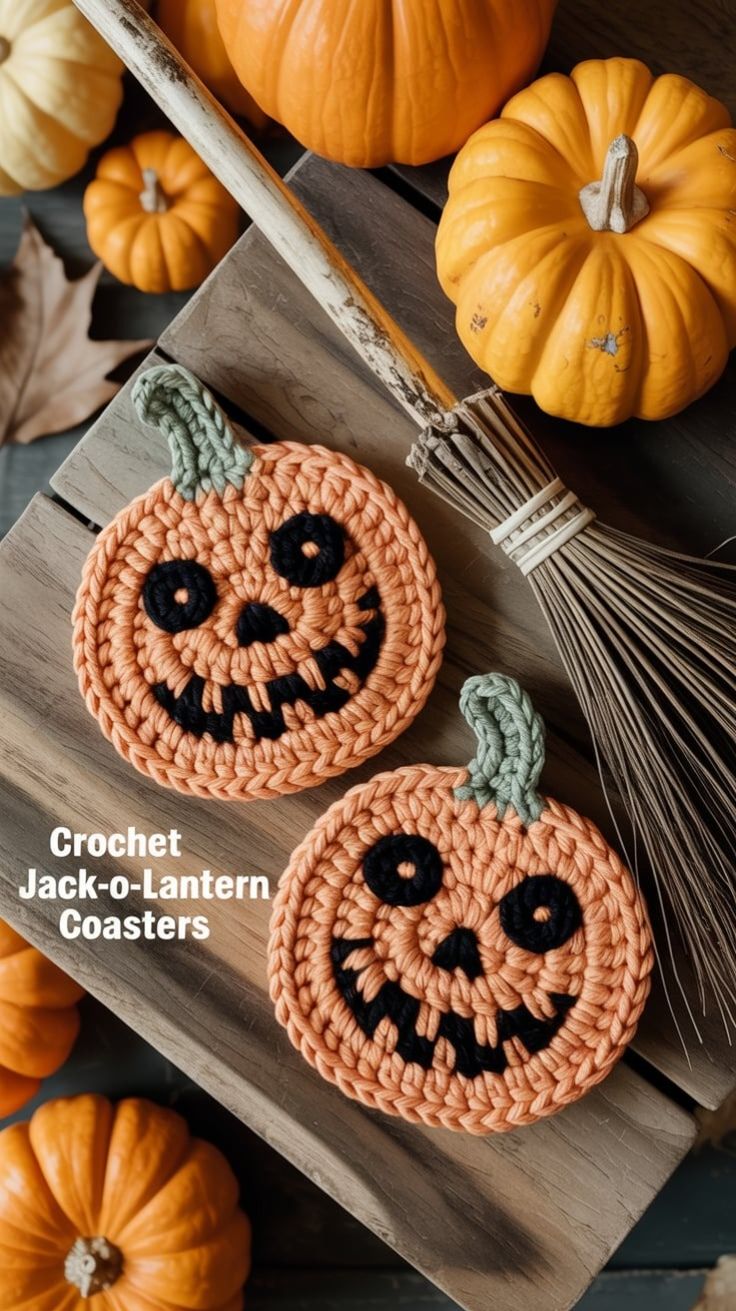
A Jack-o’-lantern grin with six orange tooth gaps can look crooked even when the coaster itself is perfectly round. This jack o lantern crochet coaster pattern uses worsted cotton and a 4 mm hook to make an approximately 11–13 cm Halloween coaster. A flat orange circle, raised black facial features and a curved sage stem create the easy-intermediate design shown in the reference.
The Design: What Makes This Jack O Lantern Coaster Different
The coaster begins as a conventional flat circle, but the face is assembled afterward instead of being carried through the orange rounds as colorwork. That choice keeps the drinking surface structurally simple and lets you adjust the eyes, nose and grin after the final diameter is known. Two black circle appliqués create large eyes, while a small triangular nose keeps the center from becoming crowded. The mouth is a separate curved black strip with orange spaces left visible as teeth, which produces the carved Jack-o’-lantern effect without changing the base stitches. A short sage stem overlaps the upper edge by only a small amount. One frequent error in a pumpkin face crochet coaster is placing the mouth too low. That leaves too little border below the grin and makes the circular base look vertically stretched.
Project Info at a Glance
| Skill Level | Time | Finished Size | Hook | Best For |
|---|---|---|---|---|
| Easy–Intermediate | 1.5–2.5 hours each | Approx. 11–13 cm across | 4.0 mm | Halloween mugs, fall tables and seasonal coaster sets |
Materials and Tools
Yarn
- Pumpkin orange — worsted / medium #4 cotton — approximately 25–30 g — circular coaster base.
- Black — worsted / medium #4 cotton — approximately 5–7 g — eyes, nose and grin.
- Muted sage green — worsted / medium #4 cotton — approximately 3–5 g — curved pumpkin stem.
Cotton is useful for drink coasters because the stitch surface remains comparatively firm and does not become overly springy. Keep all three colors close in thickness so the black facial pieces sit against the orange base instead of forming bulky raised lumps.
Tools
- 4.0 mm crochet hook
- Yarn needle
- Scissors
- Stitch marker
- Dressmaking pins
- Measuring tape
- Blocking mat
- Rust-resistant blocking pins
Abbreviations
- MR — magic ring
- sc — single crochet
- inc — two single crochets in one stitch
- dec — decrease
- sl st — slip stitch
- ch — chain
- hdc — half double crochet
- BLO — back loop only
An invisible decrease is made through the front loops of the next two stitches before completing one single crochet through both loops.
Pattern — Step by Step
Work the orange base in continuous rounds. Place a stitch marker in the first stitch of each round and move it upward as you work.
Orange Coaster Base
Yarn: pumpkin orange — original reconstruction using standard six-stitch flat-circle math.
R1: 6 sc in MR (6)
R2: inc ×6 (12)
R3: (sc, inc) ×6 (18)
R4: (2 sc, inc) ×6 (24)
R5: (3 sc, inc) ×6 (30)
R6: (4 sc, inc) ×6 (36)
R7: (5 sc, inc) ×6 (42)
R8: (6 sc, inc) ×6 (48)
R9: (7 sc, inc) ×6 (54)
R10: (8 sc, inc) ×6 (60)
Sl st into the first stitch of R10.
Fasten off and weave the tail toward the center.
Target diameter before blocking: approximately 10.5–12 cm. Individual gauge may shift that measurement slightly.
Check the Circle Before Adding the Face
Lay the orange base on a hard flat surface.
The center should remain flat and the perimeter should touch the surface around the complete circumference.
If the last round forms visible waves higher than approximately 5 mm, your gauge needs fewer increases. Remove R10 and work a modified final round with only three or four increases spaced evenly around.
If the base cups upward, the outer circumference is too short. Rework the final round with a slightly larger hook or add several extra increases distributed around the circle.
Do not attach the face until this geometry is corrected.
Optional Firm Outer Edge
Yarn: pumpkin orange.
Join in any stitch of R10.
R11: sl st loosely around. (60)
Fasten off.
The slip-stitch edging should define the perimeter without reducing its diameter. Skip this round if your coaster already feels firm enough.
Left Eye
Yarn: black.
R1: 6 sc in MR (6)
R2: inc ×6 (12)
Sl st to finish.
Fasten off with a 20 cm sewing tail.
Target diameter: approximately 2–2.5 cm.
Right Eye
Yarn: black.
R1: 6 sc in MR (6)
R2: inc ×6 (12)
Sl st to finish.
Fasten off with a 20 cm tail.
Make this eye the same diameter as the first within approximately 2 mm.
Eye Highlights
Yarn: pumpkin orange.
Thread approximately 20 cm of orange yarn onto a needle.
Make one small straight stitch through the center of each black eye.
Keep the highlight approximately 3–4 mm long.
The orange stitch creates the small center detail visible in the reference while keeping the eye completely flat.
Triangular Nose
Yarn: black.
Ch 4.
Row 1: starting in second ch, sc across. (3)
Ch 1 and turn.
Row 2: dec, sc. (2)
Ch 1 and turn.
Row 3: dec. (1)
Fasten off with a 15 cm sewing tail.
The finished piece should form a small rounded triangle approximately 1.5–2 cm wide.
Curved Mouth Foundation
Yarn: black.
Ch 22.
Starting in the second chain from the hook, sl st in 4 chains, sc in 4 chains, hdc in 5 chains, sc in 4 chains, sl st in the remaining 4 chains.
Fasten off with a 35 cm sewing tail.
The mixed stitch heights create a shallow curve rather than a straight black cord.
Target visible mouth width: approximately 7–8 cm.
Left Mouth Corner
Yarn: black.
Ch 5.
Starting in the second chain, sl st in 2 chains, sc in 2 chains.
Fasten off with a 12 cm tail.
This small extension turns upward from the left end of the grin.
Right Mouth Corner
Yarn: black.
Ch 5.
Starting in the second chain, sl st in 2 chains, sc in 2 chains.
Fasten off.
Curve the piece in the opposite direction when pinning.
Black Mouth Fill Sections — Make 5
Yarn: black.
Ch 4.
Starting in the second chain, sc in all 3 chains.
Fasten off with a short sewing tail.
These short pieces form the deeper black areas between the visible orange tooth gaps.
If your mouth is smaller than 7 cm after pinning, use four fill sections rather than five.
Building the Jack O Lantern Grin
Pin the long curved mouth foundation approximately 2–2.5 cm above the lower edge of the coaster.
Turn both mouth corners upward.
Place the five short black fill pieces above or below selected points of the foundation so orange sections remain exposed between them.
The goal is not a solid black semicircle. The orange gaps function as carved teeth.
Keep the tooth openings irregular. In the reference, the teeth do not form identical rectangular spaces, which prevents the face from looking mechanically symmetrical.
Leave approximately 4–6 mm of orange between neighboring black fill sections.
Green Stem
Yarn: muted sage green.
Ch 10.
Row 1: starting in second ch, sc in next 3, hdc in next 3, sc in next 3. (9)
Ch 1 and turn.
Row 2: sc in next 2, hdc in next 5, sc in next 2. (9)
Ch 1 and turn.
Row 3: sl st in next 2, sc in next 5, sl st in next 2. (9)
Fasten off with a 25 cm sewing tail.
Target approximately 4–5 cm long and 2–2.5 cm wide.
Shape the Stem
Curve the top third slightly to one side.
If the yarn immediately straightens, take one small hidden green stitch through the inside edge of the bend.
Do not fold the stem sharply.
The lower 10–15 mm should remain comparatively straight because that section overlaps the orange coaster.
Face Placement
Mark the vertical center of the orange circle.
Position the two eye centers approximately 4–4.5 cm apart.
Set them roughly 3.5–4 cm below the upper edge of the orange circle.
The nose should sit on the vertical center line, approximately 1–1.5 cm below the lower eye level.
Pin the grin last.
Leave approximately 15–20 mm between the lowest part of the mouth and the coaster edge.
Step back from the work before sewing. The face should read clearly as a Jack-o’-lantern without either eye touching the mouth area.
Attaching the Eyes
Sew each black circle through its outer round.
Take attachment stitches approximately 5–7 mm apart.
Do not pull until the black circle cups.
Check the center distance after the first eye is attached and before sewing the second.
If the two centers differ in height by more than approximately 3 mm, reposition the second eye.
Attaching the Nose
Place the triangle with one point facing downward.
Sew through the three outer edges using small black stitches.
Keep the piece flat.
A raised nose creates unnecessary thickness directly beneath a cup or mug.
Attaching the Mouth
Sew the curved foundation first.
Use one small stitch approximately every 10–12 mm.
Attach the two mouth corners next.
Add the five fill sections individually, preserving the orange tooth gaps between them.
Check the coaster on a flat surface after every two pieces.
If the base begins to cup, loosen the most recent black attachment rather than trying to flatten the coaster afterward.
Attaching the Stem
Position the stem at the upper edge, slightly left or right of exact center.
Overlap its lower 10–15 mm onto the orange circle.
Sew through only that lower section.
Leave the upper half unsupported so the curve remains visible.
The stem should extend beyond the coaster diameter without creating a thick lump beneath the mug area.
Making the Second Coaster
The reference shows two related faces rather than exact duplicates. Use the same orange base and stem construction for the second coaster but alter the facial spacing slightly.
Move one eye approximately 3–4 mm higher or rotate the grin a few degrees.
Change the number of orange tooth gaps from five to six if desired.
Keep the finished diameter identical so both pieces function as a matched coaster set.
Use the first completed coaster as the size template when blocking the second.
Assembly
- Crochet the orange base through R10 and correct any cupping or rippling before adding facial pieces.
- Make two 12-stitch black eyes and add one 3–4 mm orange center stitch to each.
- Crochet the triangular nose and pin it on the vertical center line below the eyes.
- Build the mouth from the curved 22-chain foundation, two corner sections and four or five short black fill pieces.
- Pin the complete face before sewing and leave approximately 15–20 mm of orange beneath the grin.
- Sew both eyes using attachment stitches approximately 5–7 mm apart without cupping the circles.
- Attach the nose and mouth while preserving 4–6 mm orange tooth gaps between neighboring black sections.
- Crochet the three-row sage stem and curve its upper third before attaching it.
- Sew only the lower 10–15 mm of the stem to the upper coaster edge and leave the remaining green section free.
- Block the finished coaster to approximately 11–13 cm across and allow it to dry flat before use.
The completed coaster should remain flat while the black face reads clearly from above and the green stem projects beyond the orange perimeter.
7 Technical Tips
- Base develops waves: Your final expansion round contains too much circumference for the working gauge. If the edge rises more than approximately 5 mm, remove R10 and reduce the number of increases.
- Coaster cups after the face is sewn: Facial pieces are being attached with excessive tension. Keep sewing stitches approximately 5–7 mm apart and stop tightening as soon as each appliqué lies flat.
- Eyes appear uneven: A difference of only a few millimeters becomes obvious on a simple face. Measure both eye centers from the top edge and keep their vertical positions within approximately 3 mm.
- Mouth looks like a solid stripe: The black fill pieces are too close together. Preserve approximately 4–6 mm of orange between selected sections to create visible carved tooth gaps.
- Grin sits too low: Less than 15 mm of orange beneath the mouth makes the base appear stretched. Pin the lowest mouth point approximately 15–20 mm above the perimeter before sewing.
- Stem lies completely flat: Sewing the full green piece removes the visible curve. Attach only its lower 10–15 mm and leave the upper section unsupported.
- Drink surface becomes bulky: Thick appliqués or heavy knots can destabilize a mug. Keep the eyes and nose unstuffed, bury all knots on the reverse and avoid stacking multiple layers beneath the central 7–8 cm drinking zone.
Adjusting the Coaster Size
The circular construction is easy to resize because every standard increase round adds six stitches.
For a smaller coaster, stop after R8 at 48 stitches. This produces a compact piece suited to espresso cups or narrow glasses, depending on yarn and tension.
For a larger mug mat, continue after R10 with (9 sc, inc) ×6 for 66 stitches and then (10 sc, inc) ×6 for 72 stitches.
Check flatness after every additional round. A mathematically correct circle can still ripple when yarn thickness and personal gauge differ.
Scale the face with the base. Eyes should remain roughly one-fifth of the coaster diameter rather than becoming tiny dots on a larger pumpkin.
Choosing Yarn for a Coaster
A smooth cotton yarn gives the most predictable table surface. It absorbs condensation and keeps the round edge comparatively firm.
Acrylic can also be used for decorative coasters, but it generally absorbs less moisture than cotton. Avoid very fuzzy yarn because the small black mouth details become difficult to distinguish.
Keep black yarn especially smooth. The face relies on crisp edges, and a halo of fibers can blur the individual tooth gaps.
Use the same yarn weight for orange and black whenever possible. A heavier black strand raises the face too far above the base.
Changing the Jack O Lantern Expression
The same jack o lantern crochet coaster pattern can produce several expressions without altering the orange circle.
For a wider grin, add two chains to the mouth foundation and spread the corners farther apart.
For a more crooked expression, position one eye approximately 4 mm higher and tilt the nose slightly.
A surprised face can replace the grin with a black oval made from a 6-stitch magic ring followed by one increase round.
Keep the facial features flat regardless of expression. The coaster still needs to support a drink without rocking.
Finishing and Blocking
Pin the orange perimeter into a circle rather than pulling individual sections outward.
Measure across the coaster in two directions. The two diameters should differ by no more than approximately 5 mm.
Adjust the stem separately so it retains its curve.
Let the piece dry completely on the blocking surface.
After removing the pins, place a mug on the center for a stability check. The vessel should contact the orange crochet rather than balancing on an eye, nose or mouth section.
Conclusion
Finish the orange circle before deciding the final face spacing because even a small gauge change affects where the grin should sit. Your next step is to crochet the 60-stitch base, lay both eyes and the nose on it, then pin the complete mouth while preserving the orange tooth gaps. Attach the curved green stem only after the face remains flat. Share the finished jack o lantern crochet coaster pattern project on Pinterest with both expressions together, then post a close view of the stitched grin on Instagram using #JackOLanternCrochetCoaster. For this coaster specifically, would you make the second pumpkin smile differently or keep both faces identical?









