Introduction
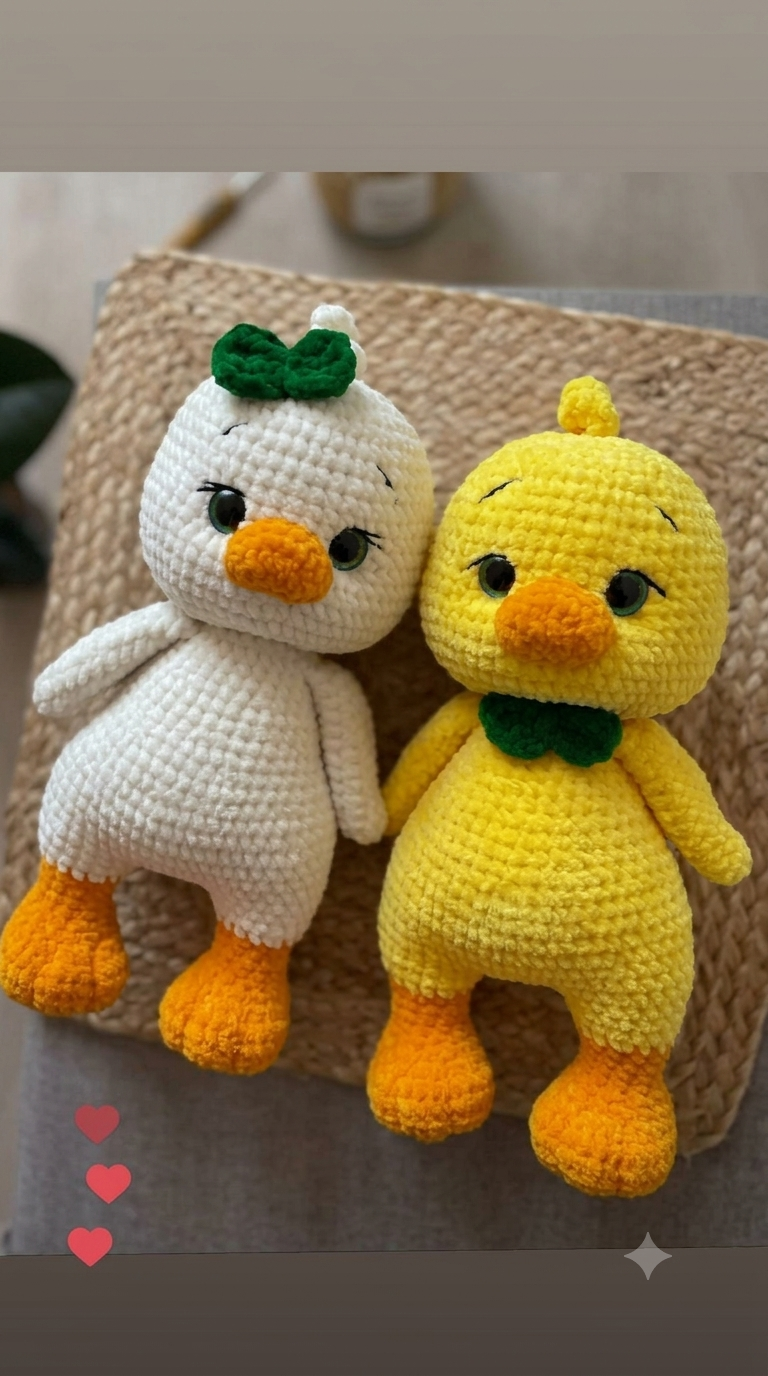
A duck’s orange bill has to read as a flat wedge, not a round muzzle. This duck amigurumi crochet pattern uses super-bulky chenille, a 4.5 mm hook, 12 mm safety eyes, and compact six-stitch shaping to build a roughly 22 cm seated toy. The skill level is beginner-intermediate. Separate feet make the finished duck easier to balance on a shelf, while the green bow can move from the neck to the crown for the white variation.
The Design: What Makes This Duck Different
The reference pair uses a very large head, a pear-shaped torso, and short orange feet that project forward. Head width matters because a duckling crochet pattern looks wrong when the bill extends beyond a narrow face; the 36-stitch plateau gives enough frontal width for both eyes and the bill. The body also holds 36 stitches through its lower section, then tapers toward the neck so the toy sits without a visible cylinder between head and chest.
Wings stay lightly flattened rather than stuffed, which keeps this plush duck crochet pattern close to the reference shape and prevents bulky shoulders. The green bow is built as two compact lobes, so it can sit at the throat on the yellow duck or at the crown on the white duck.
A frequent error is mounting the feet too far underneath the torso, which makes the toy roll backward instead of resting on the orange soles.
Project Info at a Glance
| Skill Level | Time | Finished Size | Hook | Best For |
|---|---|---|---|---|
| Beginner-intermediate | A few hours | About 22 cm | 4.5 mm | Seated plush toy / display duck |
A 22 cm finish, 4.5 mm hook, and super-bulky plush yarn match a comparable plush-duck construction.
Materials and Tools
Yarn
- Bright yellow — super-bulky chenille or velvet — allow about 50–60 g — Himalaya Dolphin Baby or comparable polyester plush yarn.
- Orange — super-bulky chenille or velvet — allow about 10–20 g for the bill and feet.
- Dark green — super-bulky chenille or velvet — allow about 5–10 g for the bow.
- Black — fine cotton or embroidery thread — small amount for eyelashes and brows.
- White — use instead of yellow when making the second duck shown in the reference image.
Tools
- 4.5 mm crochet hook
- 12 mm safety eyes — 2
- Polyester stuffing
- Tapestry needle
- Stitch markers
- Sewing pins
- Scissors
- Black embroidery needle and thread
Abbreviations
- MR — magic ring
- sc — single crochet
- inc — 2 sc in one stitch
- dec — single crochet decrease
- sl st — slip stitch
- ch — chain
- BLO — back loop only
- FO — fasten off
For an invisible decrease, insert the hook through the front loop of each of the next two stitches, draw up a loop, then complete one single crochet through both front loops.
Pattern — Step by Step
Work in a continuous spiral unless a section states otherwise. Mark the first stitch of every round.
The head and body use a 36-stitch plateau to produce a medium plush duck with the broad proportions visible in the reference image.
Head
Yarn: bright yellow
R1: 6 sc in MR (6)
R2: inc ×6 (12)
R3: (1 sc, inc) ×6 (18)
R4: (2 sc, inc) ×6 (24)
R5: (3 sc, inc) ×6 (30)
R6: (4 sc, inc) ×6 (36)
R7: 36 sc (36)
R8: 36 sc (36)
R9: 36 sc (36)
R10: 36 sc (36)
R11: 36 sc (36)
R12: 36 sc (36)
R13: (4 sc, dec) ×6 (30)
R14: (3 sc, dec) ×6 (24)
R15: (2 sc, dec) ×6 (18)
R16: (1 sc, dec) ×6 (12)
R17: dec ×6 (6)
Insert the 12 mm safety eyes between R9 and R10, about 8 stitches apart. Install the washers before the opening becomes too small. Start stuffing after R13, distributing small pieces around the outer wall before filling the center.
Fasten off. Thread the tail through the front loops of the final six stitches and close the opening.
Body
Yarn: bright yellow
R1: 6 sc in MR (6)
R2: inc ×6 (12)
R3: (1 sc, inc) ×6 (18)
R4: (2 sc, inc) ×6 (24)
R5: (3 sc, inc) ×6 (30)
R6: (4 sc, inc) ×6 (36)
R7: 36 sc (36)
R8: 36 sc (36)
R9: 36 sc (36)
R10: 36 sc (36)
R11: 36 sc (36)
R12: 36 sc (36)
R13: (4 sc, dec) ×6 (30)
R14: 30 sc (30)
R15: 30 sc (30)
R16: (3 sc, dec) ×6 (24)
R17: 24 sc (24)
R18: (2 sc, dec) ×6 (18)
R19: 18 sc (18)
R20: (1 sc, dec) ×6 (12)
R21: dec ×6 (6)
Stuff the lower half more firmly than the neck area. Keep the bottom broad so the duck has a stable seated base.
Fasten off and close the six remaining stitches. Leave approximately 30 cm of yarn for sewing.
Wings — Make 2
Yarn: bright yellow
R1: 6 sc in MR (6)
R2: inc ×6 (12)
R3: (1 sc, inc) ×6 (18)
R4: 18 sc (18)
R5: 18 sc (18)
R6: 18 sc (18)
R7: (1 sc, dec) ×6 (12)
R8: 12 sc (12)
Do not stuff. Flatten the opening so six stitches sit against the opposite six stitches.
Work 6 sc through both layers (6).
Fasten off. Leave approximately 20 cm of yarn for sewing.
Feet and Legs — Make 2
Yarn: orange
R1: 6 sc in MR (6)
R2: inc ×6 (12)
R3: (1 sc, inc) ×6 (18)
R4: 18 sc (18)
R5: 18 sc (18)
R6: (1 sc, dec) ×6 (12)
R7: 12 sc (12)
R8: 12 sc (12)
R9: 12 sc (12)
R10: dec ×6 (6)
Add a small amount of stuffing after R6. Concentrate most of it in the rounded foot and leave the upper leg softer so it can bend naturally against the body.
Fasten off and close. Leave approximately 25 cm of yarn for sewing.
Bill
Yarn: orange
Ch 5.
R1: Starting in the second ch from the hook, 3 sc, 3 sc in the last ch; rotate to the underside of the foundation chain, 2 sc, 2 sc in the final underside loop (10)
R2: inc, 2 sc, 3 inc, 2 sc, 2 inc (16)
R3: 16 sc (16)
R4: 16 sc (16)
Add only a small amount of stuffing. Flatten the back edge so the bill projects horizontally rather than turning into a round muzzle.
Fasten off. Leave approximately 25 cm of yarn for sewing.
Cheek Patches — Make 2
Yarn: main color or a slightly lighter matching shade
R1: 6 sc in MR (6)
R2: inc ×6 (12)
Fasten off. Leave approximately 15 cm of yarn.
The reference image does not show contrasting pink cheeks. For a closer visual match, use the main yarn color so the circles create only a slight raised face plane, or omit them after using them as placement guides.
Crown Tuft
Yarn: main color
R1: 6 sc in MR (6)
R2: 6 sc (6)
R3: 6 sc (6)
Do not stuff. Flatten the tube and pinch the upper section into a narrow teardrop shape.
Fasten off. Leave approximately 15 cm of yarn for sewing.
Green Bow — Make 2 Lobes
Yarn: dark green
Make 2.
R1: 6 sc in MR (6)
R2: inc ×6 (12)
R3: 12 sc (12)
R4: 12 sc (12)
Do not stuff. Flatten each lobe and work 6 sc through both layers (6).
Fasten off one lobe. Leave approximately 20 cm of yarn on the second lobe.
Bow Center Band
Yarn: dark green
Ch 5.
Row 1: Starting in the second ch from the hook, 4 sc (4)
Row 2: ch 1, turn, 4 sc (4)
Fasten off. Leave approximately 15 cm of yarn.
Place the two bow lobes side by side and pinch their narrow edges together. Wrap the center band around the joint and stitch it closed.
For the yellow duck, sew the bow directly below the head. For the white duck variation, use white yarn for the head and body and position the same green bow beside the crown tuft.
Assembly
- Join the head to the body. Center the closed base of the head over the narrow upper body and pin a circular sewing line approximately 12–14 stitches wide.
- Stabilize the neck. Sew twice around the attachment area using shallow stitches through the crochet fabric. Keep the second pass loose enough that it does not pull the head downward.
- Attach the bill. Position its top edge roughly one round below the lower eye line and center it between the two eyes.
- Finish the face. Add the cheek patches if used, then embroider two short upper lashes near each outer eye and one curved eyebrow above each eye.
- Mount both wings. Pin their upper edges about two rounds below the head-body join. Angle the lower ends slightly backward.
- Attach the feet. Sew each orange leg to the lower front third of the body with the rounded foot projecting beyond the torso.
- Add the crown tuft. Fix the flattened tuft at the top-center of the head with its narrow tip pointing upward.
- Position the bow. Place it under the chin for the yellow version or beside the crown tuft for the white variation.
- Hide sewing tails. Pass each tail through the stuffed body, bring it out several stitches away, trim it, and push the cut end back into the fabric.
- Check the sitting angle. Place the duck on a flat surface and redistribute the stuffing until both orange feet contact the surface evenly.
The target finished height with super-bulky chenille and a 4.5 mm hook is approximately 22 cm.
7 Technical Tips
- Marker drift: A spiral round that drifts by one unrecorded stitch can rotate the bill and eyes away from the body centerline. Move the marker immediately after completing the first stitch of every round.
- Stuffing firmness: A lumpy forehead appears when large pieces of stuffing are pushed into the head after the opening has narrowed below 18 stitches. Add small pieces gradually and keep visible surface indentations under approximately 5 mm.
- Invisible decreases: Standard decreases can leave horizontal bars that are visible through chenille yarn. Work head and body decreases through the front loops of the next two stitches before completing the single crochet.
- Eye placement: Eyes spaced much farther than eight stitches apart at this scale can make the orange bill appear too small. Install the 12 mm eyes between R9 and R10 before the head opening becomes difficult to access.
- Velvet tension: Gaps wider than approximately 2 mm can expose stuffing and distort the round shape. If the fabric remains loose with a 4.5 mm hook, test a 4.0 mm hook on a 12-stitch sample.
- Pinning: A wing attached even two rounds higher than the opposite wing produces an obvious shoulder tilt. Pin both wing tops at the same round and check the duck from the front before sewing.
- Tail weaving: Short yarn tails can work back through slippery polyester chenille. Bury each sewing tail through roughly 5 cm of stuffed fabric, exit at least 2 cm from the entry point, trim, and push the end back inside.
Conclusion
Amigurumi shaping comes from stuffing distribution, attachment placement, and the final sewing line. After assembling the duck, photograph it from the front and side, then compare eye spacing, bill angle, wing height, and foot projection with the reference image. Correct any visible alignment issue before hiding the final yarn tail.
For a second version, replace the yellow yarn with white and move the green bow from the neck to the crown. Save the finished duck to Pinterest and share the front view on Instagram with #PlushBowTieDuck. Which feature changes your duck’s silhouette more: the upright crown tuft or the forward-projecting orange bill? This duck amigurumi crochet pattern can then be tested again with your preferred chenille brand.









