Introduction
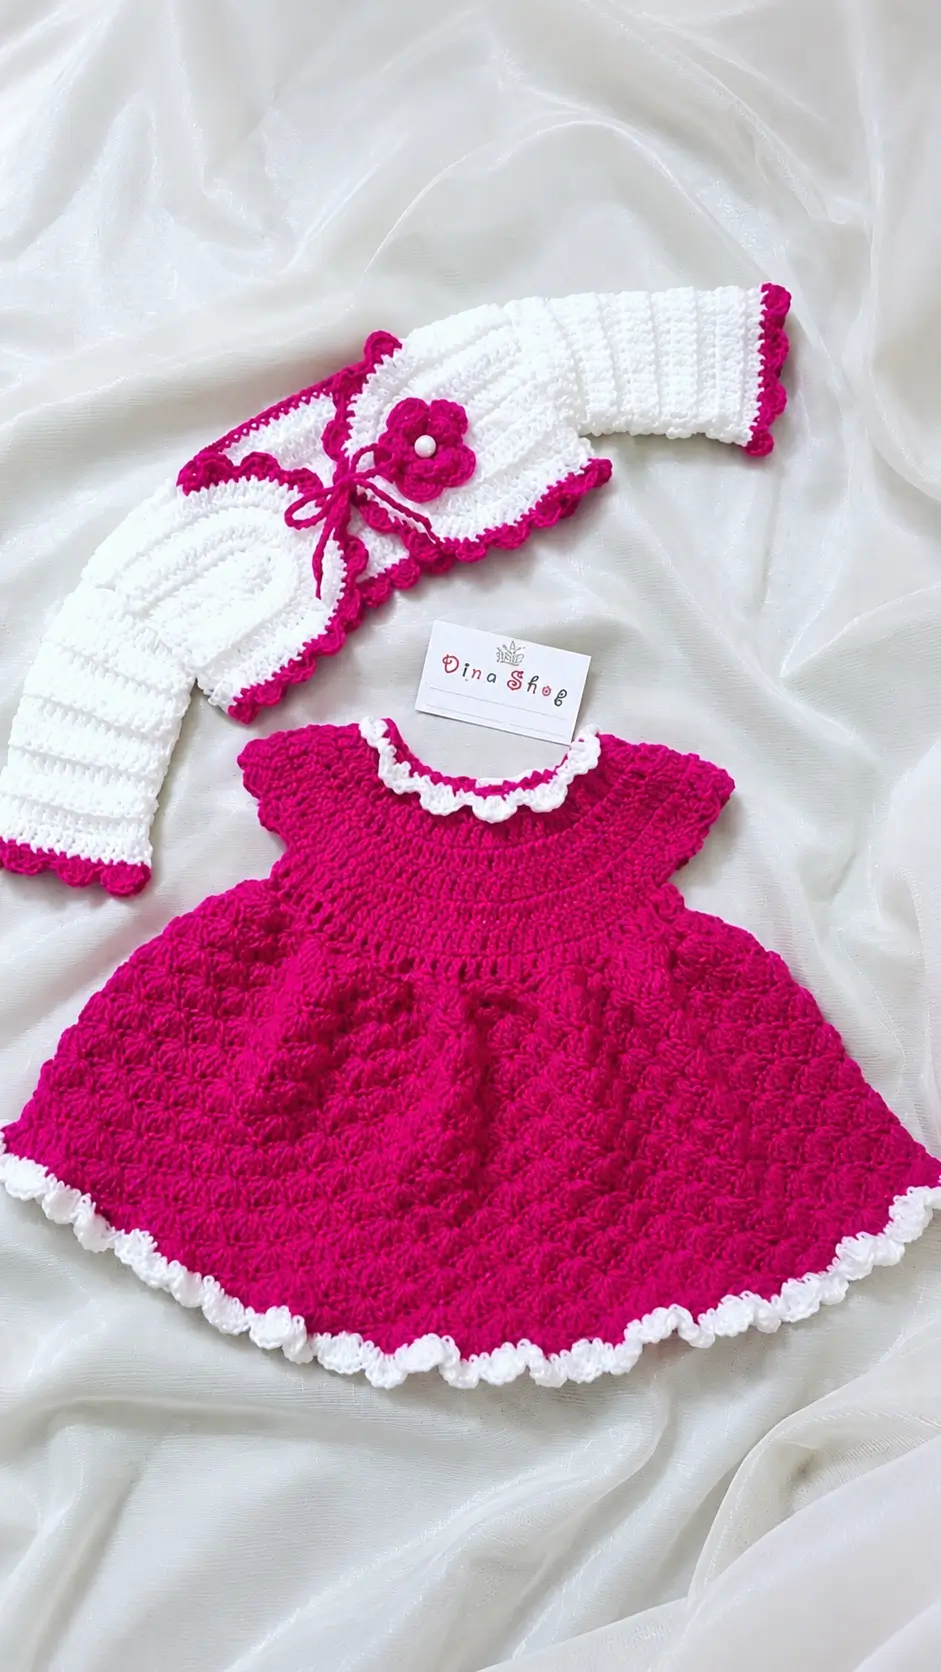
The white ruffle at the neckline has to sit flat while the fuchsia skirt flares below it; that contrast controls the whole design. This crochet baby dress with bolero pattern uses DK yarn, a 3.5 mm hook, and a 12–18 month target size of about 46 cm shoulder-to-hem. The intermediate construction separates the dress and jacket, so either piece can be washed, fitted, or replaced independently.
The Design: What Makes the Fuchsia Ruffle Set Different
Three structural choices define this pink crochet baby dress. First, the skirt grows from a 100-stitch upper band into progressively wider shell groups, producing flare without adding bulky gathers at the chest. Second, the dress bodice is worked upward from that band, allowing the neckline and cap sleeves to remain lighter than the textured skirt. Third, the baby bolero crochet pattern reverses the color balance: white forms the main fabric while fuchsia is restricted to the edging, ties and flower.
The common mistake is adding too many stitches to the first skirt round. That produces rippling directly below the bodice rather than controlled flare farther down. The contrast edging also needs a smaller visual footprint than the main fabric; otherwise the white collar and hem can overpower the raspberry-colored dress.
Project Info at a Glance
Comparable 12–18 month patterns give a 45.7 cm dress length, a 55.9 cm chest benchmark and a 23 cm bolero measurement. A 3.5 mm hook with DK/light yarn is documented for a similar set.
| Skill Level | Time | Finished Size | Hook | Best For |
|---|---|---|---|---|
| Intermediate | Not stated by verified sources | Dress approx. 45.7 cm; bolero approx. 23 cm; 12–18 months | 3.5 mm | Two-piece dress and jacket set |
Gauge target: about 20 dc × 10 rows = 10 cm after blocking. Make a swatch before using the numerical size labels.
Materials and Tools
Yarn
A comparable pink-and-white multi-piece baby set specifies 180 g of pink and 50 g of white yarn. Because that source also includes accessories beyond the dress and bolero, the figures work as conservative purchasing quantities for this two-piece project.
- Fuchsia / raspberry pink — DK/light #3 — 180 g available — smooth baby acrylic, cotton/acrylic or similar washable DK
- White — DK/light #3 — 50 g available — same fiber family and thickness as the main yarn
Tools
- 3.5 mm crochet hook
- Tapestry needle
- Locking stitch markers
- Scissors
- Flexible measuring tape
- Rust-proof pins
- Optional 12–15 mm button if a button closure is preferred over ties
- No safety eyes
- No loose bead for an infant garment; use a stitched yarn knot or tiny crocheted center instead of the pearl-like flower center visible in the photograph
Abbreviations
- ch — chain
- sl st — slip stitch
- sc — single crochet
- hdc — half double crochet
- dc — double crochet
- dc2tog — double crochet two together
- inc — 2 stitches worked into one stitch
- fpdc — front post double crochet
- bpdc — back post double crochet
- st/sts — stitch/stitches
- RS — right side
- WS — wrong side
Invisible decrease is not used in this garment; fitted reductions are made with dc2tog or by leaving designated stitches unworked.
Pattern — Step by Step
This is a photo-inspired independent pattern. It does not reproduce the row-by-row instructions of any linked commercial pattern. The 100-stitch circumference and 12–18 month metric targets are used as category benchmarks from comparable published projects.
Dress Upper Band
Yarn: fuchsia DK
Ch 100 loosely. Check that the chain lies flat and does not twist.
R1: Sl st to first ch. Ch 2, dc in each ch around, sl st to first dc. (100)
R2: Ch 2, *fpdc around next dc, bpdc around next dc* around; join. (100)
R3: Repeat R2. (100)
R4: Repeat R2. (100)
Do not cut the yarn. The lower edge becomes the skirt; the upper edge supports the bodice.
Textured Skirt
Yarn: fuchsia DK
Turn the dress so the unused side of the foundation chain is accessible.
R5: Join fuchsia. *Sc in next ch, skip 1 ch, 5 dc in next ch, skip 1 ch* ×25. Join. (25 shells; 150 worked sts)
R6: Sl st to center dc of first shell. *Sc in center dc of shell, 5 dc in next sc* ×25. (150)
R7: Repeat R6. (150)
R8: Repeat R6. (150)
R9: Repeat R6. (150)
R10: Repeat R6. (150)
R11: Repeat R6. (150)
R12: Repeat R6. (150)
The first section stays relatively controlled. Extra flare begins lower on the skirt.
R13: *Sc in center of next shell, 6 dc in next sc* ×25. (175)
R14: Repeat the established 6-dc shell placement. (175)
R15: Repeat R14. (175)
R16: Repeat R14. (175)
R17: Repeat R14. (175)
R18: Repeat R14. (175)
R19: Repeat R14. (175)
R20: Repeat R14. (175)
R21: *Sc in center of next shell, 7 dc in next sc* ×25. (200)
R22: Repeat the 7-dc shell placement. (200)
R23: Repeat R22. (200)
R24: Repeat R22. (200)
R25: Repeat R22. (200)
R26: Repeat R22. (200)
R27: Repeat R22. (200)
R28: Repeat R22. (200)
R29: *Sc in center of next shell, 8 dc in next sc* ×25. (225)
R30: Repeat the 8-dc shell placement. (225)
R31: Repeat R30. (225)
Check the shoulder-to-current-hem measurement after the bodice has been assembled. Add or remove one repeated shell round if gauge requires correction.
Fasten off.
Front Bodice
Yarn: fuchsia DK
On the upper edge of the 100-stitch band, mark two 46-stitch panels with four unused stitches at each side for the arm openings.
Row 1: Join yarn at first front marker. Dc across 46 sts. (46)
Row 2: Ch 2, dc2tog, dc across to final 2 sts, dc2tog. (44)
Row 3: Dc across. (44)
Row 4: Dc2tog at each edge. (42)
Row 5: Dc across. (42)
Row 6: Dc2tog at each edge. (40)
Row 7: Dc across. (40)
Row 8: Dc in first 12 sts; fasten off. Skip center 16 sts. Rejoin and dc across final 12 sts. (12 + 16 skipped + 12)
Row 9: Work each shoulder separately in dc. (12 each)
Row 10: Repeat Row 9. (12 each)
Fasten off, leaving 25 cm tails for shoulder joining.
Back Bodice
Yarn: fuchsia DK
Repeat Front Bodice Rows 1–6. (40 sts after Row 6)
Row 7: Dc across. (40)
Row 8: Dc across. (40)
Row 9: Dc in first 12, leave center 16 unworked, dc across final 12. (12 + 16 skipped + 12)
Row 10: Work each shoulder separately. (12 each)
Join the front and back shoulder sections across 8 sts per shoulder, leaving the remaining edge stitches available to soften the arm opening.
Cap Sleeves — Make 2
Yarn: fuchsia DK with white final trim
Pick up 36 sc evenly around one armhole.
R1: Sc around. (36)
R2: *Sc, skip 2 sts, 5 dc in next st, skip 2 sts* ×6. (36 worked sts)
R3: Work one sc between shells and 5 dc into each previous sc position. (36)
Change to white.
R4: Work a small picot-style edge across the six shell peaks: *sc, ch 2, sc* at each shell center. (6 trim motifs)
Fasten off. Repeat for the second sleeve.
White Neckline Ruffle
Yarn: white DK
Pick up 72 sc evenly around the complete neckline.
R1: Sc around. (72)
R2: *Sc, skip 1, 5 dc in next st, skip 1* ×18. (108 worked sts / 18 shells)
Fasten off. Block the ruffle outward by only 5–8 mm; excessive stretching makes the neckline stand away from the body.
White Hem Ruffle
Yarn: white DK
Join white at one lower-skirt shell valley.
R1: Work 1 sc into each shell valley and 5 dc around each shell peak, continuing around all 25 repeats. (25 scallops)
R2: Sl st loosely around the scallop edge only if the white yarn is noticeably thinner than the fuchsia yarn. Otherwise omit this row.
Fasten off and weave in the tail toward the inside of the skirt.
Bolero Body
Yarn: white DK
Ch 75.
Row 1: Dc in 4th ch from hook and across. (72)
Row 2: Ch 2, *dc in next 8 sts, 2 dc in next st* ×8. (80)
Row 3: Dc across. (80)
Row 4: *Dc in next 9 sts, 2 dc in next st* ×8. (88)
Row 5: Dc across. (88)
Row 6: *Dc in next 10 sts, 2 dc in next st* ×8. (96)
Row 7: Dc across. (96)
Row 8: *Dc in next 11 sts, 2 dc in next st* ×8. (104)
Row 9: Dc across. (104)
Row 10: *Dc in next 12 sts, 2 dc in next st* ×8. (112)
Row 11: Dc across. (112)
Mark the row as follows: 18 front / 22 sleeve / 32 back / 22 sleeve / 18 front.
Row 12: Dc across first 18 front sts, ch 14, skip 22 sleeve sts, dc across 32 back sts, ch 14, skip 22 sleeve sts, dc across final 18 front sts. (96)
Row 13: Hdc across, working one hdc into each underarm ch. (96)
Row 14: Hdc across. (96)
Row 15: Hdc across. (96)
Row 16: Hdc across. (96)
Row 17: Hdc across. (96)
Row 18: Hdc across. (96)
Row 19: Hdc across. (96)
Row 20: Hdc across. (96)
Row 21: Hdc across. (96)
Row 22: Hdc across. (96)
Measure from shoulder to lower edge. Aim near the 23 cm comparison measurement rather than relying on row count alone.
Fasten off white.
Bolero Sleeves — Make 2
Yarn: white DK with fuchsia cuff
Join white at the center of one underarm. Work around the 14 underarm stitches plus 22 held sleeve stitches.
R1: Dc evenly around. (36)
R2: Dc around. (36)
R3: Dc2tog at two opposite underarm-side points. (34)
R4: Dc around. (34)
R5: Dc around. (34)
R6: Repeat two evenly spaced decreases. (32)
R7: Dc around. (32)
R8: Dc around. (32)
R9: Repeat two evenly spaced decreases. (30)
R10: Dc around. (30)
R11: Dc around. (30)
R12: Dc around. (30)
Change to fuchsia.
R13: *Sc in next st, ch 2, 2 dc in same st, skip 1 st* around, adjusting the final repeat without adding width. (15 small scallops)
Fasten off. Repeat on the other sleeve.
Fuchsia Bolero Edging
Yarn: fuchsia DK
Join at the lower left front.
R1: Sc evenly up the left front, around the neckline, down the right front and across the lower edge. Place roughly 2 sc per dc-row edge and 1 sc per lower-edge stitch.
R2: Along the two front edges and lower edge, *skip 1 sc, 5 dc in next sc, skip 1 sc, sl st in next sc*. Keep the neckline in plain sc so it does not flare.
Fasten off.
Tie Cords — Make 2
Yarn: fuchsia DK
Ch 40.
Row 1: Sl st in each chain back to the beginning. (40 sl sts)
Fasten off with a 15 cm sewing tail. Make a second cord.
Five-Petal Flower
Yarn: fuchsia DK
R1: Make a magic ring, 10 sc in ring, join. (10)
R2: *Sl st in next st, ch 2, 2 dc in next st, ch 2, sl st in same st* ×5. (5 petals)
Fasten off with a 20 cm sewing tail.
The photograph appears to use a small pearl-like center. On an infant garment, replace that loose hard component with six to eight tightly packed white embroidery stitches or a tiny crocheted knot.
Assembly
- Join the dress shoulders across the designated 8 stitches on each side, keeping both seams equal in length.
- Lay the dress flat and compare the left and right arm openings before attaching the second cap sleeve.
- Finish the neckline with the white ruffle, keeping all 18 shells evenly spaced.
- Attach both cap sleeves with the sleeve center aligned to the shoulder seam.
- Add the white skirt edging only after measuring the complete shoulder-to-hem length.
- Work the bolero sleeves directly into their held sleeve sections and underarm chains.
- Apply the fuchsia bolero border around both fronts, neckline and lower edge.
- Sew one tie cord to each front edge at the same height, about 1–2 cm below the neckline shaping.
- Sew the flower to one bolero front, keeping every petal attached at two points; use the yarn center instead of a loose bead for baby wear.
- Weave each yarn tail through at least 4 cm of matching-color stitches, trim, wash according to the yarn label and dry the two pieces to their measured dimensions.
The completed set consists of one flared dress and one removable long-sleeve bolero with reversed contrast colors.
7 Technical Tips
- Mark the 100-stitch band at every 25 stitches. A one-stitch counting error here shifts the skirt shell repeats and produces a visible break in the hem pattern.
- Keep the first skirt section flat for eight rounds before increasing shell width. Adding the sixth double crochet too early causes rippling directly below the bodice.
- No stuffing is required in this garment. If a decorative flower is padded, even a 3–4 mm lump at its center can make the applique tilt away from the bolero.
- Check the armhole count before the cap sleeve is started. Picking up more than about 36 stitches at this gauge can create a ruffled sleeve seam instead of the shallow cap visible in the reference photo.
- Measure the bolero after Row 18 rather than waiting until the last row. If the piece is already close to 23 cm from shoulder to lower edge, remove later body rows instead of making the jacket too long.
- Pin the flower at all five petal tips before sewing its center. Sewing the center first commonly rotates one petal downward and makes the applique appear off-axis against the front edging.
- Weave contrast-color tails only through their own color. A white tail carried 10–15 mm into the fuchsia fabric can show as a pale line through the open shell structure.
Conclusion
Measure the finished dress from the shoulder seam to the lowest white scallop before cutting the final yarn tail; the 12–18 month research benchmark is about 45.7 cm. Next, record the blocked chest, bolero length and sleeve length so a second set can be resized from measured fabric rather than age labels alone. Save the finished crochet baby dress with bolero pattern to Pinterest with a full-length image, then post the dress and jacket separately on Instagram so the reversed color placement is visible. Use #FuchsiaRuffleBabySet for the project. Would you keep the bolero white with fuchsia trim, or reverse those colors so the jacket matches the dress body?









