Introduction
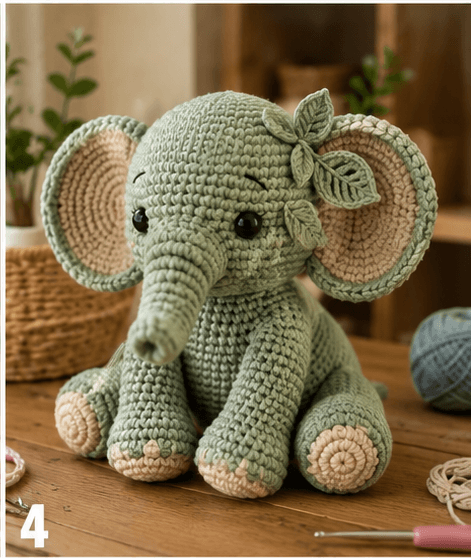
Four leaves beside one oversized elephant ear can pull the entire head visually off-center. This sage green elephant amigurumi crochet pattern uses worsted yarn, a 3.5 mm hook and 14–16 mm eyes to make an approximately 27–31 cm sitting elephant. Layered ears, a long tapered trunk, padded feet and an asymmetrical botanical crown make the project suitable for intermediate amigurumi construction.
The Design: What Makes This Elephant Different
The ears establish the scale before any botanical detail is added. Each outer sage circle reaches 36 stitches, while a smaller beige insert leaves a visible green border and keeps the ear from becoming a single flat color. The 42-stitch head supplies enough width for those ears, the long trunk and the off-center leaf cluster. A 36-stitch body remains smaller than the head, while large back legs create a stable seated triangle. The trunk narrows gradually from 18 stitches to six, which prevents a heavy cylindrical profile. Four separate crochet leaves are grouped near one ear rather than centered like a flower crown. A common mistake in a crochet elephant with big ears is sewing every ear edge to the head. Doing that removes the projecting silhouette and makes the face look narrower.
Project Info at a Glance
| Skill Level | Time | Finished Size | Hook | Best For |
|---|---|---|---|---|
| Intermediate | 9–12 hours | Approx. 27–31 cm sitting height | 3.5 mm | Display toys, botanical nursery decor and handmade gifts |
Materials and Tools
Yarn
- Sage green — worsted / medium #4 — approximately 180–210 g — head, outer ears, trunk, body and limbs.
- Warm beige — worsted / medium #4 — approximately 30–40 g — inner ears, foot pads and toe accents.
- Dark olive green — worsted / medium #4 — approximately 15–20 g — four botanical leaves and joining stems.
- Black — small quantity — eyebrows and optional embroidered eyes.
Use a tightly twisted yarn that produces compact single crochet with a 3.5 mm hook. The ear fabric must remain flexible, but the head and limbs need enough density that white filling cannot appear through stretched stitches.
Tools
- 3.5 mm crochet hook
- 14–16 mm safety eyes
- Polyester fiberfill
- Long tapestry needle
- Standard yarn needle
- Stitch markers
- Dressmaking pins
- Scissors
- Measuring tape
For a toy intended for a young child who may pull or chew components, substitute securely embroidered eyes for plastic safety eyes.
Abbreviations
- MR — magic ring
- sc — single crochet
- inc — increase
- dec — decrease
- sl st — slip stitch
- ch — chain
- hdc — half double crochet
- dc — double crochet
- tr — treble crochet
- BLO — back loop only
An invisible decrease is worked through the front loops of the next two stitches before completing one single crochet through both loops.
Pattern — Step by Step
Work stuffed parts in continuous spirals unless another method is stated. Move a stitch marker to the first stitch after every completed round.
Head
Yarn: sage green — original reconstruction using standard six-stitch amigurumi math.
R1: 6 sc in MR (6)
R2: inc ×6 (12)
R3: (sc, inc) ×6 (18)
R4: (2 sc, inc) ×6 (24)
R5: (3 sc, inc) ×6 (30)
R6: (4 sc, inc) ×6 (36)
R7: (5 sc, inc) ×6 (42)
R8: sc around (42)
R9: sc around (42)
R10: sc around (42)
R11: sc around (42)
R12: sc around (42)
R13: sc around (42)
R14: sc around (42)
R15: sc around (42)
R16: (5 sc, dec) ×6 (36)
R17: sc around (36)
R18: (4 sc, dec) ×6 (30)
R19: (3 sc, dec) ×6 (24)
R20: (2 sc, dec) ×6 (18)
R21: (sc, dec) ×6 (12)
R22: dec ×6 (6)
Place the eyes between R12 and R13 with approximately 9 stitches between their posts. Stuff the forehead and sides firmly. Leave the lower center about 10 percent softer so the trunk base can sit against the face without producing a hard bulge.
Fasten off and close the remaining six stitches.
Trunk
Yarn: sage green.
R1: 6 sc in MR (6)
R2: inc ×6 (12)
R3: (sc, inc) ×6 (18)
R4: sc around (18)
R5: (4 sc, dec) ×3 (15)
R6: sc around (15)
R7: (3 sc, dec) ×3 (12)
R8: sc around (12)
R9: sc around (12)
R10: 7 sc, dec, 3 sc (11)
R11: sc around (11)
R12: 6 sc, dec, 3 sc (10)
R13: sc around (10)
R14: 5 sc, dec, 3 sc (9)
R15: sc around (9)
R16: 4 sc, dec, 3 sc (8)
R17: sc around (8)
R18: 3 sc, dec, 3 sc (7)
R19: sc around (7)
R20: dec, 5 sc (6)
R21: sc around (6)
R22: sc around (6)
Stuff approximately the first half of the trunk. Keep the final 4–5 cm almost empty so the tip remains narrow and slightly flexible.
Fasten off with a 40 cm sewing tail.
Trunk Curve
Thread approximately 40 cm of sage yarn onto a needle.
Take one hidden stitch along the underside from approximately R17 toward R12.
Pull until the trunk develops a gentle downward curve.
Add a second shorter stitch if the lower section projects too far forward.
The reference trunk hangs toward the space between the front legs rather than curling sharply upward.
Outer Ears — Make 2
Yarn: sage green.
R1: 6 sc in MR (6)
R2: inc ×6 (12)
R3: (sc, inc) ×6 (18)
R4: (2 sc, inc) ×6 (24)
R5: (3 sc, inc) ×6 (30)
R6: (4 sc, inc) ×6 (36)
Fasten off with a 45 cm tail.
Target approximately 10–12 cm across. Shape each circle into a slight vertical oval with the inner attachment side marginally flatter than the outside edge.
Inner Ear Panels — Make 2
Yarn: warm beige.
R1: 6 sc in MR (6)
R2: inc ×6 (12)
R3: (sc, inc) ×6 (18)
R4: (2 sc, inc) ×6 (24)
R5: (3 sc, inc) ×6 (30)
Fasten off with a 30 cm sewing tail.
Center one beige panel over each sage ear. Leave approximately one visible round of sage around the outer edge.
Sew with relaxed stitches so the ear remains flat.
Cheek Patches — Make 2
Yarn: sage green.
R1: 6 sc in MR (6)
R2: inc ×6 (12)
Fasten off with a 15 cm tail.
These same-color circles provide subtle facial texture beside the trunk rather than a contrasting patch. Sew them flat below and slightly outside the eyes.
Body
Yarn: sage green.
R1: 6 sc in MR (6)
R2: inc ×6 (12)
R3: (sc, inc) ×6 (18)
R4: (2 sc, inc) ×6 (24)
R5: (3 sc, inc) ×6 (30)
R6: (4 sc, inc) ×6 (36)
R7: sc around (36)
R8: sc around (36)
R9: sc around (36)
R10: sc around (36)
R11: sc around (36)
R12: sc around (36)
R13: (4 sc, dec) ×6 (30)
R14: sc around (30)
R15: (3 sc, dec) ×6 (24)
R16: sc around (24)
R17: (2 sc, dec) ×6 (18)
R18: (sc, dec) ×6 (12)
R19: dec ×6 (6)
Stuff the lower body firmly. Leave the final 3–4 cm slightly softer so the neck compresses beneath the large head instead of producing a visible gap.
Fasten off and close.
Front Legs — Make 2
Yarn: begin with warm beige, then change to sage green.
R1: 6 sc in MR (6)
R2: inc ×6 (12)
R3: (sc, inc) ×6 (18)
R4: (2 sc, inc) ×6 (24)
Change to sage green.
R5: sc around (24)
R6: (2 sc, dec) ×6 (18)
R7: sc around (18)
R8: sc around (18)
R9: sc around (18)
R10: sc around (18)
R11: sc around (18)
R12: (sc, dec) ×6 (12)
R13: sc around (12)
R14: sc around (12)
Stuff the foot firmly and the upper leg lightly.
Fasten off with a 35 cm tail.
Front Toe Bumps — Make 6
Yarn: warm beige.
R1: 6 sc in MR (6)
Fasten off without closing into a ball.
Fold each tiny circle slightly and sew three across the front edge of each forefoot.
Target each visible toe bump at approximately 8–10 mm.
Back Legs — Make 2
Yarn: sage green.
R1: 6 sc in MR (6)
R2: inc ×6 (12)
R3: (sc, inc) ×6 (18)
R4: (2 sc, inc) ×6 (24)
R5: (3 sc, inc) ×6 (30)
R6: sc around (30)
R7: (3 sc, dec) ×6 (24)
R8: sc around (24)
R9: (2 sc, dec) ×6 (18)
R10: sc around (18)
R11: (sc, dec) ×6 (12)
R12: sc around (12)
Stuff the rounded lower section firmly and leave the final two rounds less dense.
Fasten off with a 40 cm tail.
Back Foot Pads — Make 2
Yarn: warm beige.
R1: 6 sc in MR (6)
R2: inc ×6 (12)
R3: (sc, inc) ×6 (18)
Fasten off with a 25 cm tail.
Sew one circle to the forward-facing end of each back foot.
Back Toe Bumps — Make 6
Yarn: warm beige.
R1: 6 sc in MR (6)
Fasten off.
Attach three small bumps around the lower edge of each circular foot pad.
Tail
Yarn: sage green.
Ch 10.
Beginning in the second chain from the hook, sl st through all 9 chains.
Fasten off with a 20 cm attachment tail.
Cut three sage strands approximately 5 cm long and knot them through the tip.
Trim the tassel to approximately 15–20 mm.
Large Botanical Leaf — Make 2
Yarn: dark olive green.
Ch 10.
Starting in the second chain:
sl st, sc, hdc, dc, 2 tr, dc, hdc, sc.
Work 3 sc in the final foundation point.
Rotate and work along the opposite side:
sc, hdc, dc, 2 tr, dc, hdc, sc, sl st.
Fasten off with a 25 cm tail.
Target approximately 5–6 cm long.
Small Botanical Leaf — Make 2
Yarn: dark olive green.
Ch 8.
Beginning in the second chain:
sl st, sc, hdc, dc, hdc, sc.
Work 3 sc into the final point.
Rotate and work:
sc, hdc, dc, hdc, sc, sl st.
Fasten off with a 20 cm tail.
Target approximately 3.5–4.5 cm long.
Leaf Veins
Yarn: matching dark olive.
Thread approximately 25 cm onto a needle for each leaf.
Make one relaxed surface stitch from the base toward the tip.
Add two short diagonal stitches on each side.
Do not tighten the embroidery enough to fold the leaf.
Leaf Joining Stems
Yarn: dark olive green.
For the upper pair, ch 8 and sl st back through all chains.
For the lower pair, ch 6 and sl st back through all chains.
Fasten off with long sewing tails.
These narrow cords create the branching appearance between the leaves without adding a bulky crown piece.
Face Placement
Place the eyes between R12 and R13 of the head with approximately nine stitches between the posts. Pin both ears temporarily before locking the eye positions because the large ear diameter changes the apparent width of the face.
Center the trunk below the midpoint between the eyes. Its 18-stitch upper section should overlap the lower face enough that no gap appears around the base.
Embroider one short black eyebrow above each eye. Keep each line around 10–13 mm long and angle the inner ends slightly downward.
Attaching the Oversized Ears
Place the beige inner panels toward the front.
Pin the top of each ear around R7–R8 of the head.
Start the inner edge only a few stitches behind the eye position.
Sew through approximately 35–40 percent of the ear circumference.
Leave the remaining edge unsupported.
This partial attachment allows the outer ear to project sideways and preserves the wide elephant silhouette.
Building the Botanical Crown
The leaf arrangement is intentionally asymmetrical. Place the two larger leaves first near the upper side of one ear.
Angle one large leaf upward and the second outward.
Fit the two small leaves below them so their tips point in different directions.
Place the joining cords beneath the leaves before sewing.
The entire cluster should occupy approximately 7–9 cm from top to bottom but should not extend across the forehead center.
Sew each leaf only through its base and lower center. Leave the tips and side edges raised.
Positioning the Legs
Attach the front legs low on the body with approximately 4–5 stitches between their upper edges.
Angle the forefeet slightly outward so the beige toe bumps remain visible.
Place the larger back legs on the lower sides of the torso.
Rotate the circular pads toward the camera-facing side of the elephant.
The back feet need to project farther outward than the front legs because they form the broad sitting base.
Assembly
- Complete and stuff the 42-stitch head, then position the 14–16 mm eyes between R12 and R13 approximately nine stitches apart.
- Sew the head to the 36-stitch body through a neck attachment area approximately 4–5 cm wide.
- Attach the trunk centrally below the eyes and use one or two concealed underside stitches to create its gentle downward curve.
- Sew the beige panels onto both sage ears, then attach only the inner 35–40 percent of each ear circumference to the head.
- Place the two subtle cheek patches beside the trunk and embroider 10–13 mm black eyebrows above the eyes.
- Sew the front legs low on the chest and keep the beige toe details facing forward.
- Attach both larger back legs to the lower sides with their circular foot pads rotated toward the front.
- Sew the tail approximately 2–3 cm above the sitting surface and trim the tassel to 15–20 mm.
- Arrange the four olive leaves beside one ear, position the short joining stems underneath and tack only the leaf bases to the head.
- Set the elephant on a level surface, correct any head or leg imbalance and weave every remaining tail through at least 4 cm of matching stitches.
The completed elephant should sit without external support while the ears project beyond the head, the trunk hangs forward and the four-leaf cluster remains clearly offset toward one side.
7 Technical Tips
- Head tips toward the leaf side: Four leaves plus one oversized ear create uneven visual and physical load. Attach the head through a neck area at least 4–5 cm wide and keep the leaf cluster below approximately 20 g.
- Trunk projects horizontally: Dense stuffing through all 22 rounds prevents a natural drop. Leave the final 4–5 cm almost empty and use a concealed underside stitch to create approximately 20–30 degrees of downward curvature.
- Ears lie flat against the head: Sewing the full 36-stitch perimeter removes the free outer edge. Attach only about 35–40 percent of the circumference and leave the remaining section unsupported.
- Eyes appear crowded: Wide ears visually narrow the face once attached. Test 14–16 mm eyes at roughly nine stitches apart with both ears pinned before locking their backs.
- Elephant falls backward: Rear feet attached beside the body rather than forward of it do not create a stable sitting triangle. Rotate both 18-stitch pads forward and let the back feet project approximately 3–4 cm beyond the torso.
- Foot pads pucker: Tight sewing contracts the flat 18-stitch beige circles. Attach at approximately 6–8 mm intervals and stop pulling when the edge first lies against the green foot.
- Leaf cluster collapses: Sewing around the complete perimeter makes all four leaves lie flat. Fix only the lower 10–15 mm of each leaf and leave at least two-thirds of each outer edge free.
Adjusting the Elephant Size
This sage green elephant amigurumi crochet pattern is engineered for a medium-large sitting toy. To make a smaller version, use DK yarn with a 2.75–3 mm hook and stop the head at 36 stitches. Reduce the body to 30 stitches and stop the outer ears at 30 stitches.
For a larger version, continue the head to 48 stitches with (6 sc, inc) ×6. Increase the body from 36 to 42 stitches using (5 sc, inc) ×6, then add two extra straight rounds before decreasing.
Scale the leaves after measuring the finished head. A cluster wider than roughly one-third of the head diameter can obscure the ear attachment and make the crown look like a hat rather than a branch.
Choosing the Sage and Beige Colors
The supplied design depends on low-contrast natural colors rather than a bright accessory palette. Sage covers nearly the entire animal, while beige is limited to the ear centers and feet. Dark olive leaves provide enough difference to remain visible without breaking the botanical color scheme.
A warmer version can substitute eucalyptus green, oatmeal and moss. For stronger contrast, use pale mint with camel inner ears and forest-green leaves.
Keep the leaf yarn darker than the head by at least one visible shade. If both greens are nearly identical, the leaf outlines disappear against the crown from a normal viewing distance.
Controlling the Ear Shape
Large flat circles can ripple if the yarn gauge is looser than expected. Lay each ear on a table immediately after R6.
If the perimeter rises and falls by more than approximately 5 mm, remake the final round with fewer increases. If the edge cups inward instead, increase the hook size by 0.25–0.5 mm for the ear alone.
Do not make both inner and outer layers overly stiff. The finished ear should bend slightly under finger pressure and return to a broad oval when released.
Finishing the Leaf Cluster
Pin all four leaves before sewing any one permanently. Start with the largest upper leaf, then place the second large leaf outward toward the ear.
Fit one small leaf near the forehead edge and the other below the branch junction.
Check the elephant from directly above. The cluster should remain to one side of the center line.
After attachment, curve the leaf tips outward by approximately 5–10 mm. That separation prevents the four pieces from merging visually into one solid green patch.
Conclusion
Pin the ears before building the crown because their final projection controls how much space the leaves can occupy. Your next step is to complete the 42-stitch head, test the eye spacing and attach both layered ears before positioning the four botanical pieces. Add the trunk and legs only after the head remains balanced on the body. Share the finished sage green elephant amigurumi crochet pattern project on Pinterest with a front portrait, then post an overhead view of the leaf arrangement on Instagram using #SageLeafCrochetElephant. For this elephant specifically, would you keep all four leaves dark olive or make the two smaller leaves the same sage as the body?









