Introduction
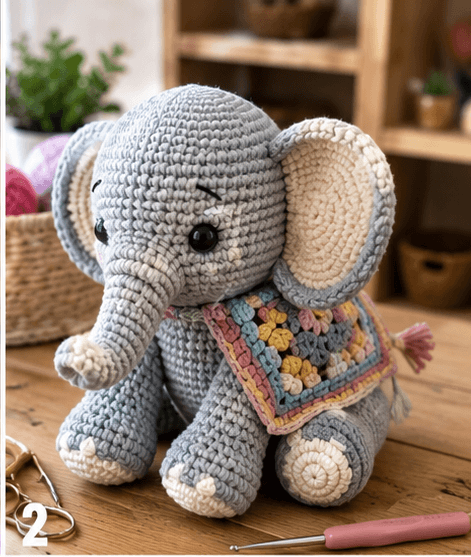
An elephant trunk that drops between the front legs needs a different curve from one held straight ahead. This elephant amigurumi crochet pattern uses worsted yarn, a 3.5 mm hook and 18 mm eyes to make an approximately 24–28 cm sitting elephant. Oversized ears, cream foot pads and a multicolor granny-square shawl make this an intermediate project with several useful shaping techniques.
The Design: What Makes This Elephant Different
The head is proportionally large, reaching a 42-stitch plateau so the broad forehead can support both oversized ears and a long trunk without appearing narrow. Each ear is made as a separate flat circle with a smaller cream inner panel, which keeps the edge gray while preserving the pale center visible in the reference. The trunk begins wider at the face, narrows into a tube and bends downward through offset decreases rather than being sewn into a forced curve. Seated back legs are larger than the front legs because they carry the visual weight of the lower body. Finally, a small crochet elephant granny shawl crosses the shoulders and introduces muted pink, blue, mustard and cream without changing the animal construction. A common mistake is attaching the ears too low; that makes the forehead look tall and shifts the elephant’s expression downward.
Project Info at a Glance
| Skill Level | Time | Finished Size | Hook | Best For |
|---|---|---|---|---|
| Intermediate | 8–11 hours | Approx. 24–28 cm sitting height | 3.5 mm | Display toys, nursery décor and handmade gifts |
Materials and Tools
Yarn
- Soft gray — worsted / Aran — approximately 160–190 g — head, body, ears and legs.
- Warm cream — worsted / Aran — approximately 30–40 g — inner ears, trunk tip, foot pads and cheek patches.
- Dusty pink — worsted / Aran — approximately 8–10 g — granny shawl.
- Muted blue — worsted / Aran — approximately 8–10 g — granny shawl.
- Mustard — worsted / Aran — approximately 5–8 g — granny shawl.
- Charcoal — worsted / Aran — approximately 5–8 g — shawl accents and facial embroidery.
Keep the gray fabric dense enough that white stuffing cannot be seen when the head is compressed. The accessory yarns may be slightly lighter, but their combined thickness should remain close to the gray yarn so the shawl does not become stiff.
Tools
- 3.5 mm crochet hook
- 18 mm safety eyes
- Polyester fiberfill
- Long tapestry needle
- Standard yarn needle
- Stitch markers
- Dressmaking pins
- Scissors
- Measuring tape
For a toy intended for a child who may pull or chew components, embroidered eyes are a practical alternative to plastic safety eyes.
Abbreviations
- MR — magic ring
- sc — single crochet
- inc — increase
- dec — decrease
- sl st — slip stitch
- ch — chain
- hdc — half double crochet
- dc — double crochet
- BLO — back loop only
An invisible decrease is worked through the front loops of the next two stitches before completing one single crochet through both loops.
Pattern — Step by Step
Work all stuffed parts in continuous spirals unless another method is stated. Mark the first stitch of every round.
Head
Yarn: soft gray — original reconstruction using standard amigurumi geometry.
R1: 6 sc in MR (6)
R2: inc ×6 (12)
R3: (sc, inc) ×6 (18)
R4: (2 sc, inc) ×6 (24)
R5: (3 sc, inc) ×6 (30)
R6: (4 sc, inc) ×6 (36)
R7: (5 sc, inc) ×6 (42)
R8: sc around (42)
R9: sc around (42)
R10: sc around (42)
R11: sc around (42)
R12: sc around (42)
R13: sc around (42)
R14: sc around (42)
R15: sc around (42)
R16: (5 sc, dec) ×6 (36)
R17: sc around (36)
R18: (4 sc, dec) ×6 (30)
R19: (3 sc, dec) ×6 (24)
R20: (2 sc, dec) ×6 (18)
R21: (sc, dec) ×6 (12)
R22: dec ×6 (6)
Insert the eyes between R12 and R13, approximately 9–10 stitches apart, before the opening becomes too small. Stuff firmly around the forehead and sides while keeping the central lower face slightly softer for trunk attachment.
Fasten off and close the final six stitches.
Trunk
Yarn: soft gray, changing to cream at the tip.
R1: 6 sc in MR (6)
R2: inc ×6 (12)
R3: sc around (12)
R4: sc around (12)
R5: 8 sc, dec, 2 sc (11)
R6: sc around (11)
R7: 7 sc, dec, 2 sc (10)
R8: sc around (10)
R9: 6 sc, dec, 2 sc (9)
R10: sc around (9)
R11: 5 sc, dec, 2 sc (8)
R12: sc around (8)
R13: sc around (8)
R14: sc around (8)
Change to cream.
R15: sc around (8)
R16: sc around (8)
R17: dec ×4 (4)
Fasten off and close.
Stuff only the first half lightly. Keep the final 4–5 cm nearly empty so the trunk can bend downward.
Shape the Trunk Curve
Thread gray yarn through a needle.
Take two short hidden stitches along the underside between approximately R7 and R12.
Pull until the trunk bends downward by roughly 30–40 degrees.
Do not fold one round sharply. Spread the curve over several rounds.
Outer Ears — Make 2
Yarn: soft gray.
R1: 6 sc in MR (6)
R2: inc ×6 (12)
R3: (sc, inc) ×6 (18)
R4: (2 sc, inc) ×6 (24)
R5: (3 sc, inc) ×6 (30)
Fasten off with a 35 cm tail.
Block each ear into a slightly oval circle approximately 9–10 cm high.
Inner Ear Panels — Make 2
Yarn: warm cream.
R1: 6 sc in MR (6)
R2: inc ×6 (12)
R3: (sc, inc) ×6 (18)
R4: (2 sc, inc) ×6 (24)
Fasten off with a 25 cm tail.
Position each cream circle in the center of a gray ear and sew around its edge with relaxed stitches.
Cheek Patches — Make 2
Yarn: warm cream.
R1: 6 sc in MR (6)
R2: inc ×6 (12)
Fasten off with a 15 cm tail.
These small tonal patches sit low beneath the eyes. If you want the face to remain closer to the reference, sew them very flat so only a subtle cream edge remains visible beside the trunk.
Body
Yarn: soft gray.
R1: 6 sc in MR (6)
R2: inc ×6 (12)
R3: (sc, inc) ×6 (18)
R4: (2 sc, inc) ×6 (24)
R5: (3 sc, inc) ×6 (30)
R6: (4 sc, inc) ×6 (36)
R7: sc around (36)
R8: sc around (36)
R9: sc around (36)
R10: sc around (36)
R11: sc around (36)
R12: sc around (36)
R13: (4 sc, dec) ×6 (30)
R14: sc around (30)
R15: (3 sc, dec) ×6 (24)
R16: sc around (24)
R17: (2 sc, dec) ×6 (18)
R18: (sc, dec) ×6 (12)
R19: dec ×6 (6)
Stuff firmly through the lower half and slightly less densely around the neck area.
Fasten off and close.
Front Legs — Make 2
Yarn: begin with cream, then switch to soft gray.
R1: 6 sc in MR (6)
R2: inc ×6 (12)
R3: (sc, inc) ×6 (18)
Change to gray.
R4: (2 sc, inc) ×6 (24)
R5: sc around (24)
R6: (2 sc, dec) ×6 (18)
R7: sc around (18)
R8: sc around (18)
R9: sc around (18)
R10: sc around (18)
R11: (sc, dec) ×6 (12)
R12: sc around (12)
R13: sc around (12)
Stuff the foot firmly and the upper leg lightly.
Fasten off with a 30 cm sewing tail.
Back Legs — Make 2
Yarn: begin with cream, then change to soft gray.
R1: 6 sc in MR (6)
R2: inc ×6 (12)
R3: (sc, inc) ×6 (18)
R4: (2 sc, inc) ×6 (24)
Change to gray.
R5: (3 sc, inc) ×6 (30)
R6: sc around (30)
R7: (3 sc, dec) ×6 (24)
R8: sc around (24)
R9: (2 sc, dec) ×6 (18)
R10: sc around (18)
R11: (sc, dec) ×6 (12)
R12: sc around (12)
Stuff firmly through the rounded foot section and lightly near the attachment opening.
Fasten off with a 35 cm tail.
Cream Foot Pads — Make 2
Yarn: warm cream.
R1: 6 sc in MR (6)
R2: inc ×6 (12)
R3: (sc, inc) ×6 (18)
Fasten off with a 20 cm tail.
Sew one pad onto the exposed end of each back foot.
Tail
Yarn: soft gray.
Ch 9.
Starting in the second chain from the hook, sl st through all 8 chains.
Cut three short gray strands approximately 6 cm long and knot them through the tip.
Trim the tassel to approximately 20 mm.
Granny Square Shawl — Center
Yarn: mustard.
In MR work:
R1: ch 3, 2 dc, ch 2, 3 dc, ch 2, 3 dc, ch 2, 3 dc, ch 2. Join.
Fasten off.
Granny Square Shawl — Round 2
Yarn: dusty pink.
Join in a corner.
Work (3 dc, ch 2, 3 dc) into each corner space.
Join and fasten off.
Granny Square Shawl — Round 3
Yarn: muted blue and cream accents.
Join in any corner.
Work (3 dc, ch 2, 3 dc) in each corner.
Work 3 dc in every side space.
Change accent colors between cluster groups if desired.
Join and fasten off.
Granny Square Shawl — Round 4
Yarn: charcoal with dusty pink edging.
Repeat the standard granny expansion, working one cluster in each side space and (3 dc, ch 2, 3 dc) in each corner.
Fasten off.
Target approximately 11–13 cm square.
Shawl Border
Yarn: dusty pink.
Join in any corner.
Work sc evenly around all four sides.
In each corner work (sc, ch 1, sc).
Fasten off.
Shawl Tassels — Make 2
Cut six strands approximately 12 cm long for each tassel.
Fold the strands in half and pull the loop through one lower shawl corner.
Pass the loose ends through the loop.
Trim each tassel to approximately 5 cm.
Face Placement
Place the eyes between R12 and R13 of the head, approximately 9–10 stitches apart. The trunk should attach centrally below them, with its upper edge beginning about two rounds beneath the eye line.
Use charcoal yarn to embroider one short eyebrow above each eye. Keep each brow approximately 12–15 mm long and angle it slightly downward toward the center.
Pin the ears before sewing. Their upper edges should begin around R7–R8 of the head, while their lower edges extend below eye level.
Attaching the Large Ears
Place the cream inner panels toward the front.
Sew each ear through only the inner 35–40 percent of its diameter.
Leave the outer edge unsupported so it projects away from the head.
If the entire ear perimeter is sewn down, the head becomes visually narrow and the large-ear silhouette disappears.
Positioning the Seated Legs
Attach the front legs low on the body approximately 4–5 stitches apart.
Angle them slightly outward so the cream tips remain visible from the front.
Place each back leg against the lower side of the body with its foot facing partly forward.
The rounded back feet should extend wider than the front legs. That width creates the stable seated base visible in the photograph.
Assembly
- Stuff and close the 42-stitch head, then place the eyes between R12 and R13 approximately 9–10 stitches apart.
- Sew the head to the 36-stitch body through a neck attachment area approximately 4–5 cm wide.
- Attach the trunk centrally beneath the eyes and use concealed underside stitches to establish its 30–40 degree downward curve.
- Sew the cream inner panels to the gray ears, then attach each ear through only its inner 35–40 percent.
- Position the two tonal cheek patches low beside the trunk and embroider the short charcoal eyebrows above the eyes.
- Sew the front legs low on the chest approximately 4–5 stitches apart with both cream tips facing forward.
- Attach the larger back legs to the lower sides and rotate each foot until its cream pad remains visible from the front.
- Sew the tail to the rear approximately 2–3 cm above the sitting surface and trim its tassel to about 20 mm.
- Drape the completed granny square across the shoulders, fold the upper corners slightly around the neck and tack them with two or three concealed stitches.
- Place the elephant on a flat surface, correct any head tilt or leg imbalance, then weave all remaining tails through at least 4 cm of matching crochet.
The completed elephant should sit without support while the trunk hangs between the front legs, the large ears project from the head and the multicolor shawl rests across the shoulders.
7 Technical Tips
- Head tilts forward: The 42-stitch head is heavy compared with the body. Sew through a neck area at least 4–5 cm wide and add several concealed vertical stitches between the back of the head and upper body.
- Trunk sticks straight outward: Dense stuffing through all 17 rounds prevents the tube from bending. Stuff only the upper half and pull two underside shaping stitches until the trunk drops approximately 30–40 degrees.
- Ears collapse against the head: Sewing around the entire 30-stitch ear removes its projecting edge. Attach only the inner 35–40 percent and leave the remaining circumference free.
- Eyes appear too close: Oversized ears can make a narrow eye gap look even smaller. For 18 mm eyes, start at approximately 9–10 stitches between the posts and check placement before locking the washers.
- Elephant falls backward: Back legs placed too high do not create a stable sitting triangle. Attach their lowest surfaces at the same level as the body base and let the feet project several centimeters forward.
- Foot pads pucker: Tight stitches around the 18-stitch cream disc contract the gray foot surface. Sew at approximately 6–8 mm intervals and stop tightening as soon as the edge lies flat.
- Shawl pulls the ears inward: A tight neck attachment transfers tension into the sides of the head. Tack only the top corners with two or three stitches and leave at least 2 cm of free fabric between the shawl edge and either ear.
Adjusting the Elephant Size
The reference is a substantial sitting elephant, but the same proportions can be reduced. For a smaller version, use DK yarn with a 2.75–3 mm hook and stop the head at a 36-stitch plateau. Reduce the body to 30 stitches and make the ears only through the 24-stitch round.
For a larger elephant, continue the head to 48 stitches with (6 sc, inc) ×6. The body can increase to 42 stitches with (5 sc, inc) ×6. Add two plateau rounds to each section before beginning decreases.
Resize the eyes cautiously. Published elephant patterns vary from 6 mm eyes on 10 cm miniatures to 18 mm eyes on larger sitting toys, so eye diameter should follow head scale rather than yarn label alone.
Shawl Color Planning
The accessory is small enough that five colors remain readable without dominating the elephant. Gray connects the shawl to the body, cream repeats the inner ears and feet, while dusty pink, muted blue and mustard introduce contrast.
Keep the final square around 11–13 cm. A larger square drops too far over the front legs and can hide their attachment points.
For a more neutral version, substitute rust, oatmeal and sage for the pink, blue and mustard. Keep one dark border color so the edge remains distinct against the gray body.
Finishing the Elephant
Check the toy from the side before burying the assembly tails. The forehead should sit nearly above the body center rather than projecting far in front of the chest.
Press the lower back legs outward until both foot pads make visual contact with the sitting plane.
Shape the ears by hand instead of wet-blocking the assembled head. Lightly curve their outer edges forward by approximately 10–15 mm.
Finally, adjust the trunk so its cream tip turns slightly upward after the main downward curve. That small change prevents the trunk from appearing like a straight tapered tube.
Conclusion
Set the elephant upright before fixing the shawl because the oversized head, ears and back feet determine its balance more than the accessory does. Your next step is to pin the 42-stitch head, trunk and four legs in place and test the sitting position before sewing any joint permanently. Add the granny square only after the elephant stands without support. Share the finished elephant amigurumi crochet pattern project on Pinterest with a front view, then post a side photograph showing the curved trunk and layered ear construction on Instagram using #GrannyShawlElephant. For this elephant specifically, would you keep the inner ears cream or change them to dusty pink to match the shawl?









