Introduction
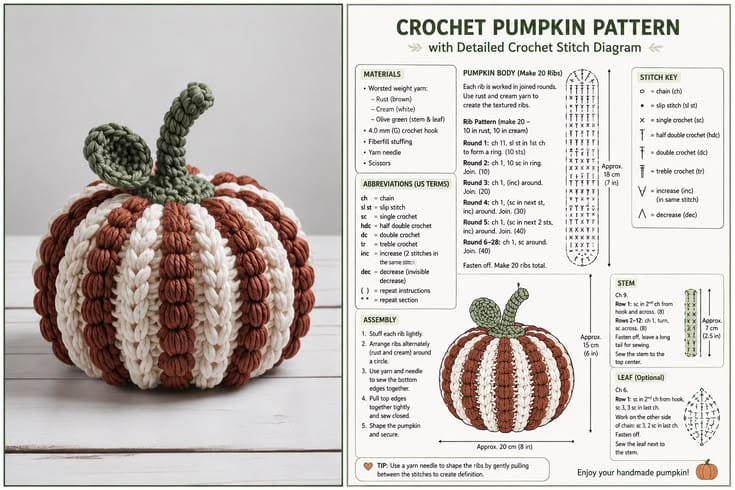
Twenty pumpkin ribs leave almost no tolerance for one cream panel finishing shorter than the rust panel beside it. This striped ribbed crochet pumpkin pattern uses worsted yarn and a 4 mm hook to build an approximately 20 cm pumpkin from alternating narrow sections. Ten cream ribs, ten rust ribs, a curved olive stem, pointed leaf and curled vine reproduce the strongly segmented construction shown in the reference.
The Design: What Makes This Pumpkin Different
The body is assembled from twenty individual elongated ribs instead of one large rectangle. Ten rust sections alternate with ten cream sections, so every seam becomes part of the pumpkin’s vertical structure rather than disappearing inside a continuous fabric. Each rib is formed as a narrow oval around a foundation chain, giving it rounded ends that naturally converge toward the crown and base. Joining the twenty sections creates a hollow shell that can be stuffed only after most of the circumference is assembled. The alternating colors amplify every groove without requiring additional surface embroidery. A flared green stem covers the crown join, while one leaf and curled vine break up the strict vertical rhythm. One common failure is changing hook tension between colors; even a 5 mm difference in rib length can twist the final crown.
Project Info at a Glance
| Skill Level | Time | Finished Size | Hook | Best For |
|---|---|---|---|---|
| Intermediate | 8–10 hours | Approx. 20 cm wide × 19–21 cm high including stem | 4.0 mm | Autumn shelves, table displays and Thanksgiving decor |
Materials and Tools
Yarn
- Rust / chestnut brown — worsted / medium #4 — approximately 90–110 g — 10 pumpkin ribs.
- Warm cream / ivory — worsted / medium #4 — approximately 90–110 g — 10 pumpkin ribs.
- Muted olive green — worsted / medium #4 — approximately 20–25 g — stem, leaf and curled vine.
Use rust and cream yarn from the same yarn line when possible. Different fiber content can produce ribs with the same stitch count but different finished lengths.
Tools
- 4.0 mm crochet hook
- Polyester fiberfill — approximately 180–220 g
- Long yarn needle
- Standard tapestry needle
- Locking stitch markers
- Dressmaking pins
- Scissors
- Measuring tape
Abbreviations
- MR — magic ring
- ch — chain
- sc — single crochet
- hdc — half double crochet
- dc — double crochet
- inc — two single crochet stitches in one stitch
- sl st — slip stitch
- BLO — back loop only
When decreasing any optional shaping round, work through the front loops of the next two stitches before completing one single crochet through both loops.
Pattern — Step by Step
The pumpkin is constructed from twenty matching elongated oval ribs. Work ten in rust and ten in cream, then alternate the colors during assembly.
Rust Pumpkin Rib (Make 10)
Yarn: rust / chestnut brown.
Ch 25.
Round 1: Sc in second ch from hook and in next 22 ch, 3 sc in final ch. Continue along the unused side of the foundation chain, sc in next 22 ch, 2 sc in the first foundation chain. Join with sl st. (50)
Round 2: Ch 1, inc, sc in next 22 sts, inc in each of next 3 sts, sc in next 22 sts, inc in each of final 2 sts. Join with sl st. (56)
The finished piece should form a long narrow oval approximately 15–16 cm long and 2.5–3 cm wide.
Fasten off. Leave a 35 cm sewing tail.
Cream Pumpkin Rib (Make 10)
Yarn: warm cream.
Repeat the complete Rust Pumpkin Rib through Round 2.
Measure every cream rib against a finished rust rib.
Do not accept more than approximately 5 mm difference in finished length. Rework a rib if necessary rather than stretching it during assembly.
Fasten off. Leave a 35 cm sewing tail.
Optional Raised Center Ridge
The reference shows a strong raised line through many rib sections. Add this step when a more pronounced texture is wanted.
Thread a matching strand onto the yarn needle.
Work a chain-style surface line directly along the foundation chain running through the center of each oval.
Begin approximately 8 mm from one rounded end and stop the same distance from the opposite end.
Keep the surface stitches relaxed. A tight center ridge can shorten the rib and curl both ends upward.
Arrange the Twenty Ribs
Lay all rib pieces flat in the following repeating sequence:
Rust, cream, rust, cream.
Continue until all twenty pieces are positioned.
The first and twentieth ribs must be opposite colors so the final seam continues the alternating sequence.
Mark the crown end of every panel with a removable marker.
Join Rib 1 to Rib 2
Place one rust rib beside one cream rib with right sides facing upward.
Using the rust or a neutral sewing tail, mattress stitch the long adjacent edges together.
Begin approximately 10 mm below the rounded top and sew to approximately 10 mm above the rounded bottom.
Do not sew across the rounded ends yet. They must remain flexible for crown and base gathering.
Continue Joining Ribs
Add the next rust rib to the free side of the cream rib.
Continue in alternating colors.
After every fifth rib, lay the growing fabric flat and compare its top and bottom edges.
If one seam is pulling upward, remove several stitches and resew it before proceeding.
Join the First 10 Ribs
After ten pieces are connected, the joined section should form approximately half the pumpkin circumference.
Lay the assembly flat.
The center seams should remain roughly parallel.
A fan shape at this stage usually means one rounded end has been sewn more tightly than the opposite end.
Join Ribs 11–19
Continue the same rust-and-cream sequence until nineteen ribs are connected.
Leave the final opening between Rib 19 and Rib 20 unsewn.
This opening is used for stuffing.
Close the Pumpkin Base
Thread approximately 100 cm of rust or cream yarn through a long tapestry needle.
Run the yarn through the lower rounded end of every rib.
Catch one secure stitch from each panel.
After all twenty rib ends are threaded, pull gradually.
Reduce the opening to approximately 1.5–2 cm.
Pass across the center several times and knot securely.
Do not pull until the lower center becomes a hard point. The pumpkin should rest on the bottoms of several ribs.
Initial Stuffing
Add fiberfill through the remaining side opening.
Push small pieces into the outer circumference first.
Fill behind each alternating rib rather than placing one large ball of stuffing in the center.
Rotate the pumpkin every few handfuls.
The cream and rust ribs should project by approximately the same amount.
Shape the Broad Pumpkin Body
Continue stuffing until the circumference is firm but compressible.
Keep the central axis roughly 15–20 percent softer than the outer shell.
Firm thumb pressure should create approximately 10–15 mm of temporary indentation.
Overstuffing makes the twenty rib seams flatten and turns the body into a smooth ball.
Close the Final Side Seam
Pin Rib 20 to Rib 1.
Check that the alternating color sequence remains uninterrupted.
Mattress stitch from approximately 10 mm above the base to approximately 10 mm below the crown.
Pause halfway and add the final small amounts of stuffing.
Complete the seam.
Gather the Crown
Thread another approximately 100 cm strand through one secure stitch at the top of every rib.
Pull the twenty ends inward evenly.
Reduce the opening to approximately 2 cm.
Push a small amount of stuffing under the outer crown if any ribs collapse.
Pull to approximately 1–1.5 cm and knot securely.
Keep the color panels evenly spaced around the crown. One rib trapped beneath another creates a visible missing stripe.
Vertical Compression
Pass the long crown tail through the exact center of the pumpkin and exit through the lower center.
Return through the same axis.
Pull until the body loses approximately 1–1.5 cm of height.
This broadens the silhouette and deepens the twenty vertical seams.
Secure the strand at the base and bury the tail.
Olive Stem
Yarn: muted olive green.
R1: 6 sc in MR. (6)
R2–R8: Sc around. (6)
R9: Inc ×6. (12)
R10: (sc, inc) ×6. (18)
R11: Sc around. (18)
Stuff the lower R8–R11 lightly. Leave most of the six-stitch upper stem empty so it can curve.
Fasten off. Leave a 35 cm sewing tail.
Shape the Stem
Bend the narrow upper stem gradually across approximately 3–4 cm.
If the tube returns to vertical, make one concealed green stitch on the inside of the bend.
The final tip should shift approximately 10–15 mm from the center axis.
Olive Leaf
Yarn: muted olive green.
Ch 9.
Starting in second ch from hook:
sl st, sc, hdc, dc, dc, hdc, sc, sl st.
Work 3 sc into the final chain.
Continue along the opposite side:
sl st, sc, hdc, dc, dc, hdc, sc, sl st.
Pinch the starting chain lightly to form a central vein.
Fasten off. Leave a 20 cm sewing tail.
Curled Vine
Yarn: muted olive green.
Ch 18.
Starting in second ch from hook, work 3 sc in each of the next 14 chains.
Work 1 sc in each of the final 3 chains.
The increased section should coil automatically.
Fasten off. Leave a 15 cm tail.
Assembly
- Measure all twenty completed ribs and remove any panel that differs from the group by more than approximately 5 mm in length.
- Arrange ten rust and ten cream pieces in a strict alternating sequence before sewing the first long seam.
- Join nineteen side seams while leaving the twentieth opening available for stuffing.
- Gather the lower ends of all twenty ribs to approximately 1.5–2 cm and secure the base before adding fiberfill.
- Stuff behind the rib panels first, then fill the center more lightly so the vertical seams remain visible.
- Close the final side seam, gather the crown and compress the pumpkin vertically by approximately 1–1.5 cm.
- Sew the 18-stitch lower stem edge over the crown opening, catching several different pumpkin ribs rather than one color panel only.
- Attach the olive leaf beside the stem through its lower 10–15 mm and leave most of the leaf free.
- Sew the vine beside the leaf, fixing only its final straight section so the spiral remains raised.
- Place the pumpkin on a hard surface, correct any uneven rib by redistributing stuffing, then weave all structural tails through at least 4 cm of matching crochet.
The completed pumpkin should display twenty alternating cream and rust ribs, an evenly recessed crown and base, one curved green stem, one pointed leaf and one free-standing spiral tendril.
7 Technical Tips
- Ribs ending at different crown heights: A difference greater than approximately 5 mm creates a stepped top edge. Measure every rib before assembly and remake the outlier rather than stretching it during sewing.
- Alternating stripes twisting: Tight mattress stitching can shorten one seam and rotate the next rib around the pumpkin. Keep the joining thread relaxed enough that two attached panels can still lie flat.
- Twenty ribs becoming visually flat: Excess fiberfill presses the seams outward until the body looks spherical. Stop filling while firm pressure still produces roughly 10–15 mm of temporary compression.
- Base forming a hard point: Pulling the twenty lower ends into a completely closed knot creates an unstable center. Stop around 1.5–2 cm, secure across the opening and distribute filling around that point.
- Cream ribs looking wider: Light colors can visually expand even when stitch counts match. Measure actual panel width and keep both color groups within approximately 3 mm before assembly.
- Stem folding instead of curving: Filling the entire six-stitch tube creates one abrupt hinge. Stuff only the widened lower rounds and spread the curve across approximately 3–4 cm.
- Leaf and vine covering the striped crown: Attaching both decorations across their full length hides several alternating ribs. Sew only the first 10–15 mm of the leaf and the straight end of the vine.
Conclusion
Check all twenty rib lengths before the first seam because the alternating colors make even small alignment errors visible at the crown. The next practical step is to arrange the ten cream and ten rust pieces in sequence, photograph the layout for reference, then join them without stretching the rounded ends. Add stuffing gradually so the seams remain recessed. Share the finished striped ribbed crochet pumpkin pattern project on Pinterest with a photograph that clearly shows the alternating panels, then post a crown close-up on Instagram using #TwentyRibCrochetPumpkin. For this pumpkin specifically, would you keep the ten-and-ten cream/rust balance or replace two cream ribs with muted mustard?









