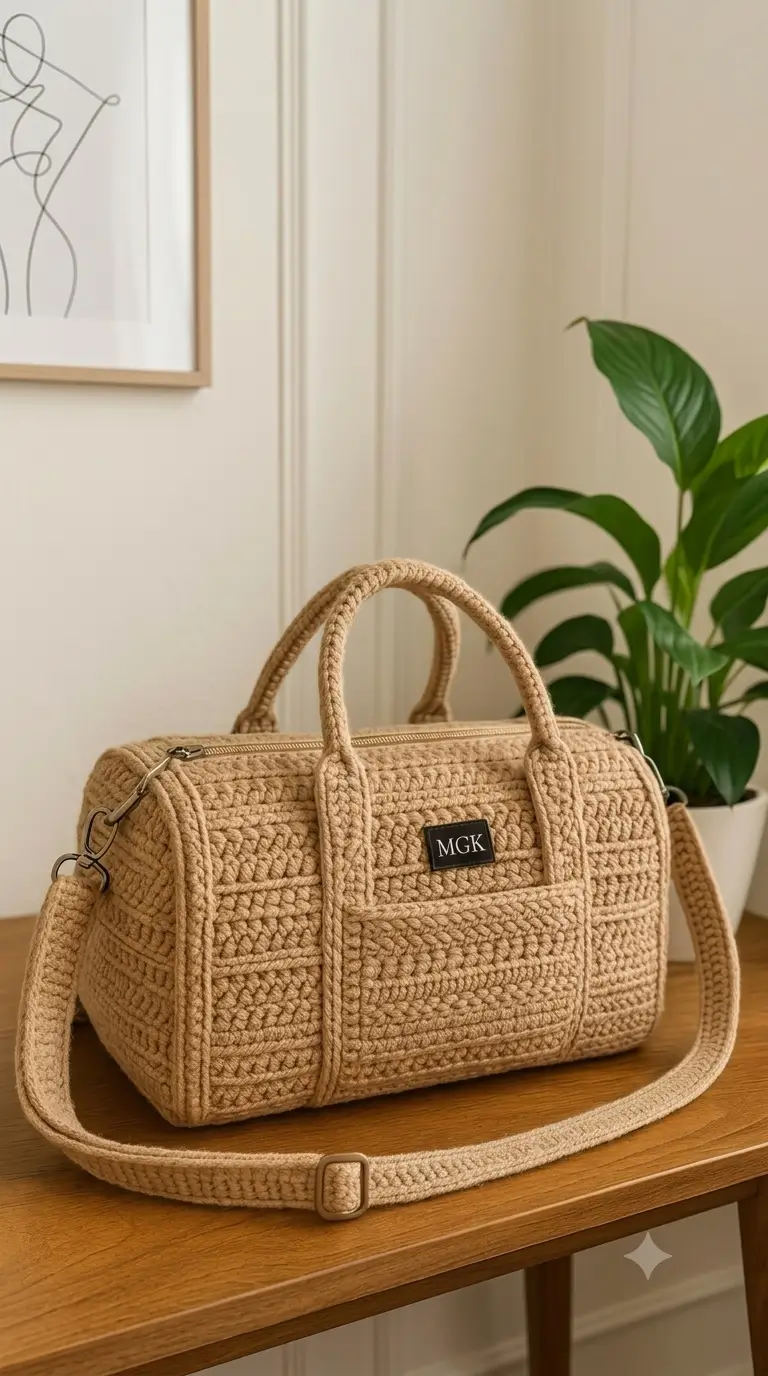
Introduction
A barrel-shaped crochet duffel fails first at the zipper line, not at the base. This crochet duffel bag pattern builds the opening around reinforced zipper bands, dense cotton stitches, and long handle anchors so the finished bag keeps its rectangular form. The target size is approximately 40 × 26 × 18 cm, worked with bulky cotton cord and a 5 mm hook. The construction suits an intermediate maker who needs a practical travel, gym, or project bag.
The Design: What Makes This Crochet Duffel Different
The bag is built from one long body panel rather than separate front, back, and bottom rectangles. That choice removes two horizontal seams from the load-bearing area and gives the base a cleaner structure. Two shaped end panels create the rounded duffel profile visible from the sides.
The handles use long sewn-down sections instead of small attachment tabs. Weight is therefore distributed over several centimeters of crochet rather than concentrated at four small points. A pair of zipper facings also keeps the upper edge from stretching when the zipper is opened repeatedly.
The most common construction error with a crochet weekender bag is attaching the side panels before marking the center points. Even a difference of three or four stitches can twist the body. Pin or clip all quarter points before sewing. The adjustable crochet shoulder bag strap is added only after the main shell has been assembled.
Project Info at a Glance
| Detail | Specification |
|---|---|
| Skill Level | Intermediate |
| Working Time | Approximately 10–14 hours |
| Finished Size | Approx. 40 × 26 × 18 cm |
| Crochet Hook | 5 mm |
| Construction | Long body panel + 2 shaped end panels |
| Closure | 45–50 cm zipper |
| Handles | 2 reinforced crochet handles |
| Shoulder Strap | Adjustable or fixed, up to 125 cm |
| Best For | Travel, gym equipment, yarn projects, daily carry |
Finished dimensions can change with yarn construction and personal tension. Check the gauge before cutting the zipper or lining fabric.
Materials and Tools
Yarn
- Camel or tan bulky cotton cord — approximately 750–900 g
- Matching yarn for sewing — taken from the main quantity
- Optional dark accent yarn — approximately 10–15 g for a small label patch
A dense cotton, cotton-polyester cord, tubular yarn, or firm home-decor yarn works better than a soft draping fiber for this construction. The fabric needs enough body to support the zipper and metal hardware.
Tools
- 5 mm crochet hook
- 45–50 cm zipper
- 2 D-rings, approximately 30–40 mm
- 2 swivel hooks if making a removable shoulder strap
- 1 strap slider for an adjustable strap
- Yarn needle
- Stitch markers or locking clips
- Sharp scissors
- Sewing needle
- Heavy polyester sewing thread
- Fabric lining, optional but recommended for frequent use
- Pins or sewing clips
- Measuring tape
- Bag base insert, optional
Gauge
Work the gauge swatch in the body texture.
13 stitches × approximately 14 rows = 10 × 10 cm
The fabric should be dense enough that the stuffing or lining color would not show clearly through the stitches. If 13 stitches measure more than 10 cm, move down a hook size. If they measure less, move up by 0.5 mm.
The exact row gauge matters less than the stitch gauge because the body panel can be adjusted before assembly.
Abbreviations
- ch — chain
- sc — single crochet
- hdc — half double crochet
- hhdc — herringbone half double crochet
- BLO — back loop only
- sl st — slip stitch
- st / sts — stitch / stitches
- dec — single crochet decrease
- inc — 2 single crochet in the same stitch
For a herringbone half double crochet, yarn over, insert the hook into the stitch, yarn over and pull through the stitch and the first loop on the hook, then yarn over and pull through the remaining two loops.
Work decreases by inserting the hook through the front loops of the next two stitches before completing one single crochet. This reduces bulk along the shaped ends.
Pattern Notes
The main shell is worked flat. Turn at the end of every row unless another instruction is given.
Chain stitches at the beginning of a row do not count as stitches.
Keep the first and last stitch of every row firm. Loose edge stitches make the side seams appear wavy after assembly.
The long body panel wraps from the top back edge, down the back, across the bottom, up the front, and back to the zipper opening.
Mark both long sides of the body panel at Rows 36 and 61. These markers identify the transitions between back, bottom, and front.
Pattern — Step by Step
Main Body Panel
Yarn: camel or tan.
Ch 53.
Row 1: Sc in second ch from hook and across. (52)
The following 12-row texture sequence creates the horizontal ridges visible across the bag.
Rows 2–4: Sc across. (52)
Row 5: Hhdc across. (52)
Row 6: Sc across. (52)
Row 7: Sc BLO across. (52)
Row 8: Sc across. (52)
Row 9: Hhdc across. (52)
Rows 10–12: Sc across. (52)
Repeat the 12-row texture sequence until the panel reaches 96 rows total.
Keep 52 stitches in every row.
At the end of Row 36, place a marker at both side edges.
At the end of Row 61, place a second pair of markers.
Rows 1–36 form one main side of the bag.
Rows 37–61 form the bottom section.
Rows 62–96 form the opposite main side.
Do not fasten the first and last rows together. They remain separated for the zipper opening.
Fasten off, leaving a 40 cm sewing tail.
The panel should measure approximately 40 cm wide and 68–70 cm long before assembly.
Side Panels — Make 2
Yarn: camel or tan.
The gradual increases and decreases give each side a rounded rectangular shape.
Ch 13.
Row 1: Sc in second ch from hook and across. (12)
Row 2: Inc, sc 10, inc. (14)
Row 3: Inc, sc 12, inc. (16)
Row 4: Inc, sc 14, inc. (18)
Row 5: Inc, sc 16, inc. (20)
Row 6: Inc, sc 18, inc. (22)
Row 7: Inc, sc 20, inc. (24)
Rows 8–30: Sc across. (24)
Begin shaping the opposite end.
Row 31: Dec, sc 20, dec. (22)
Row 32: Dec, sc 18, dec. (20)
Row 33: Dec, sc 16, dec. (18)
Row 34: Dec, sc 14, dec. (16)
Row 35: Dec, sc 12, dec. (14)
Row 36: Dec, sc 10, dec. (12)
Fasten off. Leave approximately 80 cm of yarn for assembly.
Lightly shape each panel by hand without stretching the center section.
The finished panel should sit close to 18 cm wide and 26 cm high once sewn into the body.
Zipper Facings — Make 2
Yarn: camel or tan.
Ch 53.
Row 1: Sc in second ch from hook and across. (52)
Rows 2–4: Sc across. (52)
Fasten off and leave a 50 cm tail.
Make the second facing in the same way.
These narrow strips sit behind the opening and give the zipper tape a stable crochet edge.
Crochet Handles — Make 2
Yarn: camel or tan.
Ch 7.
Row 1: Sc in second ch from hook and across. (6)
Rows 2–96: Sc BLO across. (6)
Fasten off and leave a 60 cm tail.
Each finished handle strip should measure approximately 65–70 cm before installation.
The BLO construction creates a visible linear ridge while keeping the strap relatively thick.
If the handle stretches easily when pulled, add a second strip behind it or sew cotton webbing to the wrong side before attachment.
Handle Reinforcement
Each handle is installed with a long section sewn directly against the body rather than attached only at its ends.
Lay the body panel flat.
On the front section, identify Rows 62–96.
Position one end of the first handle approximately 7–8 cm from the left side edge. Position its second end the same distance from the right edge.
About 18–20 cm of each handle end should lie flat against the body. The remaining center section forms the handle loop.
Pin the entire attachment area before sewing.
Repeat on the back section with the second handle.
Do not sew across the free center loop.
D-Ring Tabs — Make 2
Yarn: camel or tan.
Ch 6.
Row 1: Sc in second ch from hook and across. (5)
Rows 2–14: Sc across. (5)
Fasten off with a 40 cm tail.
Insert one tab through a D-ring and fold it in half.
The folded tab should have approximately 7 rows on each side.
Sew through both tab layers and into the side panel several times. The D-ring needs to sit close to the upper third of the bag rather than at the center of the end panel.
Make and attach the second tab to the opposite end.
Removable Shoulder Strap
Yarn: camel or tan.
Ch 7.
Row 1: Sc in second ch from hook and across. (6)
Rows 2–175: Sc BLO across. (6)
Measure the strap before fastening off.
For a fixed shoulder strap, stop when the piece measures approximately 110–125 cm.
For an adjustable version, crochet approximately 135–145 cm so there is enough length to pass through the slider and fold around the hardware.
Fasten off with a 40 cm tail.
Sew the strap end around one swivel hook.
Pass the opposite end through the strap slider, through the second swivel hook, and back through the slider. Fold and sew the final end securely.
If the crochet strap stretches more than 3–4 cm under moderate pulling, sew cotton webbing to its wrong side.
Optional Decorative Label Patch
Accent yarn or main yarn.
Ch 11.
Row 1: Sc in second ch from hook and across. (10)
Rows 2–6: Sc across. (10)
Fasten off.
Place the patch at the center of the front panel between the two handle attachment lines.
A monogram may be embroidered after the patch has been attached. Use an original monogram rather than copying a commercial brand label.
Raised Side Seam Edging
The photographed style uses pronounced lines around the side panels. Surface crochet can reproduce that effect after assembly.
Join the main yarn at the lower edge of one side seam.
Work surface slip stitches around the complete seam where the body meets the side panel.
Keep each slip stitch the same size.
Fasten off and repeat around the second end.
Do not pull the surface crochet tightly. A contracted seam will distort the rounded side panel.
Installing the Handles
Before assembling the shell, sew the handle ends to the body panel.
Place the first handle on the section formed by Rows 62–96.
Keep both attachment lines parallel.
The lower ends should extend toward the base section, while the center loop remains free above the future zipper edge.
Using matching yarn and a yarn needle, stitch around both long edges of each attached section. Add a second line of stitching through the center.
Repeat on the opposite main side with the second handle.
The four handle attachment areas should mirror one another when the body panel is folded around the base.
Check the handle lengths before proceeding. Both loops should rise to the same height when the bag is held upright.
Installing the Zipper
Lay one zipper facing against Row 1 of the body panel with the wrong sides together.
Join the pieces with a row of slip stitches or sew them together using matching yarn.
Attach the second facing to Row 96 in the same way.
Center the zipper between the two facing strips.
The zipper should extend almost the complete 40 cm width of the bag opening. A slightly longer zipper can extend into the side seams at both ends.
Pin or clip the zipper tape every 2–3 cm.
Open the zipper completely before sewing the first side.
Use heavy sewing thread and small backstitches to attach the zipper tape to the crochet facing.
Close the zipper and check that both body edges meet at the same height.
Open it again before attaching the second side.
After sewing several centimeters, test the slider. Crochet fibers caught too close to the zipper teeth can block the pull.
When both sides have been stitched, open and close the zipper several times before assembling the end panels.
Assembly
- Mark the body panel. Fold the long body panel at the markers after Rows 36 and 61. Confirm that the 25-row bottom section sits flat and that the two main sides rise to similar heights.
- Prepare the side panels. Fold each shaped panel vertically and horizontally to locate four center points. Mark the same four reference points around each open end of the body shell.
- Pin the first side. Match the bottom center of the side panel to the center of the bag base. Match the upper center to the zipper end, then connect the two side markers.
- Sew the first end. Use mattress stitch or a firm whipstitch through corresponding edge stitches. Work from one marker to the next rather than sewing the full perimeter in one pass.
- Attach the second side. Repeat the quarter-marking method on the opposite end. Compare both sides before tying off the sewing yarn.
- Install the zipper. If it was only basted earlier, complete the permanent backstitching now. Keep the zipper tape flat rather than stretching the crochet around it.
- Attach the D-rings. Place one reinforced tab near the upper section of each side panel. Sew through the tab, side panel, and surrounding stitches several times.
- Add the shoulder strap. Clip the swivel hooks to the D-rings and adjust the slider. Check that the strap does not twist between the two ends.
- Add the raised edging and optional lining. Surface crochet around both side seams, then fit the fabric lining inside the finished shell. Hand-sew the lining just below the zipper tape so the stitches remain hidden from the exterior.
- Finish the structure. Weave every yarn tail through at least 5 cm of dense crochet, reverse direction, and weave through another section before trimming. Place an optional removable base insert inside the lining if the bag will carry heavier items.
The completed bag should stand with a rectangular base, rounded ends, two balanced handles, and a centered zipper opening.
7 Technical Tips
- Mark every structural transition. Missing the Row 36 or Row 61 marker can shift the bottom section by several centimeters, which causes one face of the bag to sit higher than the other. Count the rows again before any side seam is sewn.
- Do not stretch the zipper edge during installation. A 40 cm crochet opening pulled to 43 cm while sewing will contract afterward and produce a rippled zipper. Lay the edge flat on the table and place clips approximately every 2–3 cm.
- Reinforce each handle over at least 18 cm. Sewing only the final 3–5 cm of a handle concentrates the load in a small patch of stitches. Long attachment zones spread tension farther down the body panel.
- Check the side panels at four points before sewing. Beginning at one corner and stitching continuously can leave several centimeters of excess crochet near the final quarter. Match top, bottom, left, and right centers first.
- Keep seam stitches firm but not tight. Pulling the joining yarn hard enough to reduce the side circumference by 1 cm can buckle the body panel. The seam should hold both pieces together without gathering either edge.
- Test shoulder-strap stretch before adding hardware. A strap that grows more than 3–4 cm under load will continue to lengthen during use. Back it with cotton webbing or work a second crochet layer before attaching the swivel hooks.
- Place the D-rings above the horizontal midpoint. Hardware positioned too low pulls the bag sideways when carried by the shoulder strap. Mount each ring in the upper third of the side panel and stitch the folded tab through several adjacent rows.
Optional Fabric Lining
A lining is useful when the bag will carry keys, pens, crochet hooks, toiletries, or other objects that can push through the crocheted fabric.
Measure the completed interior only after the side seams have been sewn.
For this pattern, begin with approximate finished lining dimensions of:
- 40 cm length
- 25 cm height
- 17–18 cm depth
Add the required seam allowance to every cut edge.
A simple lining can be made from two main rectangles and a bottom/gusset section. Cotton canvas or medium-weight cotton provides more support than thin quilting fabric.
Sew the lining separately and test it inside the bag before attaching it.
The lining should sit against the crochet without pulling the shell inward. Excess fabric at the base creates folds, while a lining that is too small transfers the bag’s load directly to the hand-sewn upper edge.
Fold the upper raw edge inward.
Pin it a few millimeters below the zipper tape and hand-sew it around the interior using small stitches.
Keep all lining stitches away from the zipper teeth.
Adjusting the Bag Size
The pattern can be resized by changing the width and length of the main body panel.
For a wider bag, add stitches to the starting chain. At the stated gauge, approximately 13 additional stitches add 10 cm to the bag length.
For a taller bag, add rows equally to the two main side sections. Do not add the extra rows only to one end of the long panel.
To increase the depth, enlarge the bottom section and adjust the side-panel width at the same time.
For example, adding approximately 7 rows to the bottom section adds around 5 cm of depth at the stated row gauge.
The side panels must then be widened by the corresponding amount.
Recalculate the zipper length only after the new bag width has been established.
Keeping the Duffel Structured
Crochet fabric does not behave like woven luggage fabric. The stitches can move under load, particularly around handles and hardware.
Cotton cord limits some of that movement, while closely packed stitches reduce gaps. Construction matters just as much as fiber choice.
A removable base insert can be cut from plastic canvas, bag-bottom board, or another lightweight material sized slightly smaller than the finished base.
Round the corners before placing it inside the lining.
For additional side support, plastic canvas pieces can also be inserted between the crochet shell and lining. Keep them several centimeters below the zipper so the upper section can still flex when the bag opens.
Do not permanently glue stiff inserts directly to the crochet. Removable pieces make washing and repair easier.
Conclusion
This crochet duffel bag pattern uses a continuous body panel, shaped side pieces, long handle anchors, zipper facings, metal hardware, and an optional lining to reproduce the structured look of the reference bag. Before cutting fabric or sewing the final hardware, complete the crocheted shell and record its actual measurements. That single step gives the zipper, lining, and base insert accurate dimensions. Save the finished construction to Pinterest and share the completed version on Instagram with #StructuredCrochetDuffel. For the next modification, decide whether the adjustable shoulder strap should remain near 125 cm or be shortened for a higher carry position. Which strap length would suit this specific duffel best?









