Introduction
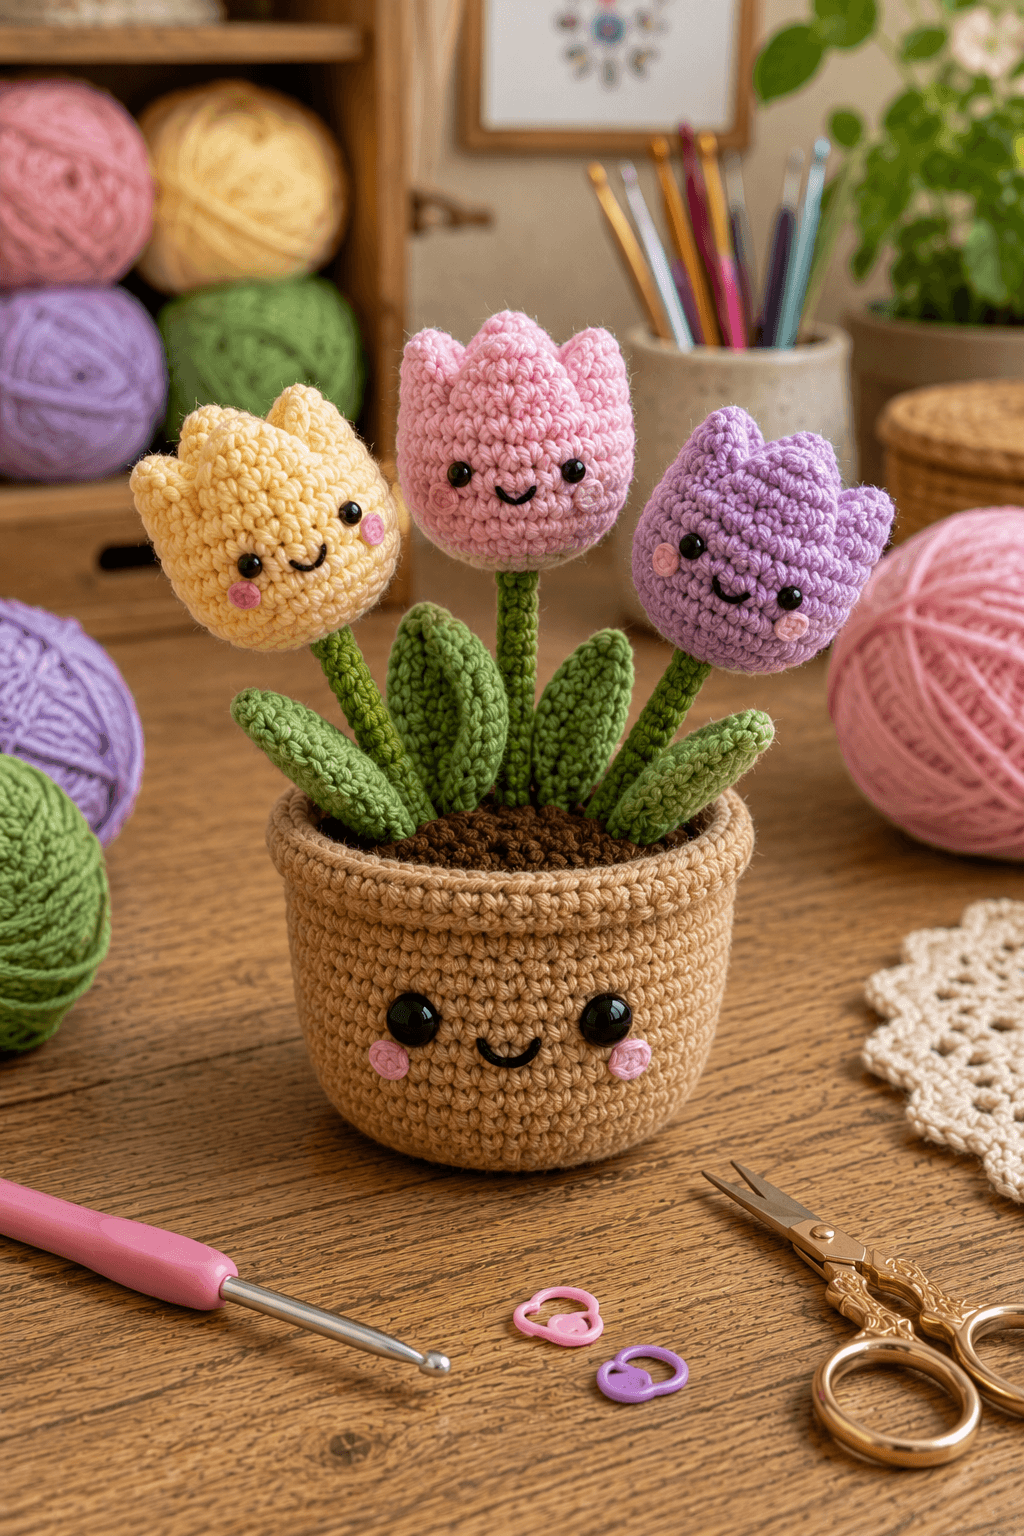
Three tulips cannot share one small crochet pot unless the center stem rises above the two side flowers without pulling the soil disc upward. This potted tulip amigurumi crochet pattern uses worsted yarn, a 4 mm hook and two eye sizes to build an approximately 27–31 cm arrangement. Three pointed tulips, six leaves, reinforced stems, crochet soil and a smiling planter form the intermediate project.
The Design: What Makes This Tulip Pot Different
The arrangement uses three different stem heights because equal stems would hide the center flower behind the two side tulips. Each flower reaches a 30-stitch plateau, giving enough face area for small safety eyes while keeping the heads proportionate to the pot. The planter expands to 42 stitches at the base, then settles to a 36-stitch upper wall so the finished piece remains broad and stable. A separate brown soil disc carries the stems and leaves; this prevents their attachment stitches from distorting the pot rim. Six pointed leaves fill the spaces between stems and also conceal structural joins. This kawaii tulip crochet design depends on controlled placement. One common error is clustering all leaves in front. Spread them around the full soil circumference or the arrangement becomes visually heavy on one side and may tip forward.
Project Info at a Glance
| Skill Level | Time | Finished Size | Hook | Best For |
|---|---|---|---|---|
| Intermediate | 11–14 hours | Approx. 27–31 cm tall | 4.0 mm | Spring decor, desks, shelves and crochet flower collections |
Materials and Tools
Yarn
- Warm tan / caramel — worsted / Aran #4 — approximately 80–100 g — used for the flowerpot.
- Leaf green — worsted / Aran #4 — approximately 80–100 g — used for stems and six leaves.
- Soft pink — worsted / Aran #4 — approximately 25–30 g — used for the center tulip.
- Lavender — worsted / Aran #4 — approximately 25–30 g — used for the right tulip.
- Pale yellow — worsted / Aran #4 — approximately 25–30 g — used for the left tulip.
- Dark soil brown — worsted / Aran #4 — approximately 25–35 g — used for the soil insert.
- Blush pink — scrap yarn — used for the pot cheeks and six flower cheeks.
- Black embroidery yarn — small amount — used for four smiles.
Tools
- 4.0 mm crochet hook
- 6–8 mm safety eyes — six for the tulips
- 12–14 mm safety eyes — two for the pot
- Polyester stuffing — approximately 170–210 g
- Yarn needle
- Long tapestry needle
- Locking stitch markers
- Dressmaking pins
- Scissors
Use embroidered eyes instead of plastic fittings when the completed arrangement is intended for a child under three.
Abbreviations
- MR — magic ring
- sc — single crochet
- inc — two single crochet stitches in one stitch
- dec — invisible single crochet decrease
- sl st — slip stitch
- ch — chain
- hdc — half double crochet
- dc — double crochet
- tr — treble crochet
- BLO — back loop only
- FLO — front loop only
An invisible decrease is worked through the front loops of the next two stitches before one single crochet is completed through both loops.
Pattern — Step by Step
Work stuffed components in continuous spirals unless rows or joined rounds are stated. Mark the first stitch of every round.
Yellow Tulip Head
Yarn: pale yellow — original 30-stitch reconstruction using standard six-stitch amigurumi math.
R1: 6 sc in MR (6)
R2: inc ×6 (12)
R3: (sc, inc) ×6 (18)
R4: (2 sc, inc) ×6 (24)
R5: (3 sc, inc) ×6 (30)
R6–R10: sc around (30)
R11: (3 sc, dec) ×6 (24)
R12: sc around (24)
R13: (2 sc, dec) ×6 (18)
Insert 6–8 mm eyes between R8 and R9 with approximately five visible stitches between the posts. Stuff through R12.
Do not fasten off. Continue with the crown.
Yellow Tulip Crown
Divide the 18 stitches into three six-stitch sections.
For each section:
sc in next st,
hdc in next st,
dc in next st,
tr in next st,
dc in next st,
sl st in next st.
Repeat three times to form three high points.
Cut a 30 cm tail. Thread the tail through the inner edges of the three points and draw the center slightly inward.
Do not close the tips together. The three points should remain visible as separate tulip petals.
Pink Tulip Head
Yarn: soft pink.
Repeat the Yellow Tulip Head from R1–R13.
Install the eyes at the same round and spacing.
Work the same three-point crown.
Fasten off. Leave a 25 cm tail.
Lavender Tulip Head
Yarn: lavender.
Repeat R1–R13 of the Yellow Tulip Head and work the same three-point crown.
Keep all three flower heads within approximately 5 mm of the same finished width.
Fasten off. Leave a 25 cm tail.
Flower Cheeks (Make 6)
Yarn: blush pink.
R1: 6 sc in MR (6)
Join with sl st.
Do not add an increase round; these patches should remain small relative to the flower eyes.
Fasten off. Leave a 10 cm sewing tail.
Center Stem
Yarn: leaf green.
R1: 6 sc in MR (6)
R2–R26: sc around (6)
Add a narrow amount of stuffing through approximately the lower 18 rounds. Leave the upper section less firm so the flower can angle slightly.
Fasten off. Leave a 30 cm sewing tail.
Left Stem
Yarn: leaf green.
R1: 6 sc in MR (6)
R2–R21: sc around (6)
Stuff lightly through the lower two-thirds.
Fasten off. Leave a 30 cm tail.
Right Stem
Yarn: leaf green.
R1: 6 sc in MR (6)
R2–R22: sc around (6)
Stuff lightly.
Fasten off. Leave a 30 cm tail.
Large Leaves (Make 4)
Yarn: leaf green.
Ch 14.
Starting in second ch from hook:
sl st, sc, hdc, dc, dc, 2 tr, dc, dc, hdc, sc, sl st; work 3 sc in final chain.
Continue down the opposite side:
sl st, sc, hdc, dc, dc, 2 tr, dc, dc, hdc, sc, sl st.
Pinch the foundation chain into a shallow ridge to create the center vein.
Fasten off. Leave a 25 cm attachment tail.
Medium Leaves (Make 2)
Yarn: leaf green.
Ch 11.
Starting in second ch from hook:
sl st, sc, hdc, dc, 2 dc, hdc, sc, sl st; work 3 sc in final chain.
Continue along the opposite side:
sl st, sc, hdc, 2 dc, dc, hdc, sc, sl st.
Fasten off. Leave a 20 cm sewing tail.
Flowerpot Base
Yarn: warm tan — original large-base reconstruction.
R1: 6 sc in MR (6)
R2: inc ×6 (12)
R3: (sc, inc) ×6 (18)
R4: (2 sc, inc) ×6 (24)
R5: (3 sc, inc) ×6 (30)
R6: (4 sc, inc) ×6 (36)
R7: (5 sc, inc) ×6 (42)
R8: BLO sc around (42)
R9–R13: sc around (42)
R14: (5 sc, dec) ×6 (36)
R15–R20: sc around (36)
Insert 12–14 mm safety eyes between R14 and R15 with approximately nine visible stitches between the posts.
Do not fasten off.
Flowerpot Rim
R21: FLO (5 sc, inc) ×6 (42)
R22: sc around (42)
R23: BLO sc around (42)
R24: sc around (42)
The FLO increase creates the projecting upper lip visible on the pot.
Fasten off. Leave a 35 cm tail.
Pot Cheeks (Make 2)
Yarn: blush pink.
R1: 6 sc in MR (6)
R2: inc ×6 (12)
Flatten.
Fasten off. Leave a 12 cm tail.
Pot Bottom Insert
Yarn: warm tan.
R1: 6 sc in MR (6)
R2: inc ×6 (12)
R3: (sc, inc) ×6 (18)
R4: (2 sc, inc) ×6 (24)
R5: (3 sc, inc) ×6 (30)
R6: (4 sc, inc) ×6 (36)
R7: (5 sc, inc) ×6 (42)
Fasten off. Leave a 35 cm sewing tail.
Soil Disc
Yarn: dark brown.
R1: 6 sc in MR (6)
R2: inc ×6 (12)
R3: (sc, inc) ×6 (18)
R4: (2 sc, inc) ×6 (24)
R5: (3 sc, inc) ×6 (30)
R6: (4 sc, inc) ×6 (36)
Keep the disc flat. It should sit slightly inside the 42-stitch pot rim rather than covering the rim itself.
Fasten off. Leave a 40 cm sewing tail.
Textured Soil Surface
Join brown yarn anywhere on the soil disc.
Work approximately 30–36 short surface slip stitches in irregular arcs across the disc.
Add a few small knots or single-stitch bobbles between them.
The surface should look granular without becoming thick enough to push the stems upward.
Fasten off.
Flower Smiles (Make 3)
Yarn: black embroidery yarn.
Position each smile approximately one round below the midpoint between the eyes.
Work a shallow curve approximately 10–12 mm wide.
Secure the ends inside each flower.
Pot Smile
Yarn: black embroidery yarn.
Center the smile approximately two rounds below the eye line.
Work a curve approximately 20–22 mm wide.
Keep both ends inside the inner edges of the pink cheeks.
Secure inside the pot.
Assembly
- Finish all three tulip heads first, attach their cheek circles and embroider the smiles before connecting any stems.
- Sew the 26-round stem to the pink center tulip, the 21-round stem to the yellow left tulip and the 22-round stem to the lavender right tulip.
- Attach all six leaves to the stems before inserting them into the soil, keeping the lower 15–20 mm of each leaf free for structural stitching.
- Arrange the three stems through the soil disc with the tallest stem at the rear center and the two shorter stems angled outward approximately 10–15 degrees.
- Sew each stem base through several soil stitches, then stitch the lower leaf bases to the soil so the leaves help brace the stems.
- Complete the pot face, sew the two large cheek patches below the eyes and embroider the curved smile.
- Sew the tan bottom insert into the lower pot opening after filling the pot firmly around the outer wall and more lightly through the central upper section.
- Lower the completed stem-and-soil unit into the pot and add stuffing beneath the soil until the disc rests approximately 5–10 mm below the upper rim.
- Sew the 36-stitch soil edge to the inside of the pot using evenly spaced hidden stitches, checking that the tallest tulip remains vertical before completing the seam.
- Weave every structural tail through at least 4 cm of matching crochet, reverse direction once and trim after the yarn retracts beneath the stitches.
The completed arrangement should stand without support, with the pink tulip highest in the center, yellow and lavender flowers angled outward, and the six leaves distributed around the visible soil.
7 Technical Tips
- Tall center flower leaning: A 26-round six-stitch stem can bend at its soil connection. Bury at least 15–20 mm of the lower stem through the soil area and anchor it through several pot-side stitches beneath the surface.
- Pot tipping forward: Placing every leaf toward the front shifts the visual and physical weight away from the base center. Position at least two leaves toward the rear and keep the 42-stitch lower pot firmly stuffed.
- Visible decrease holes: Loose decreases expose stuffing through pale yellow, pink and lavender yarn. Work each decrease through the two front loops and match its tension to surrounding single crochet stitches.
- Tulip crown collapsing: Pulling the closing tail too tightly draws all three crown points into one peak. Cinch only the inner edges and leave approximately 10–15 mm between the visible petal tips.
- Eyes crowded by petals: Installing flower eyes above R9 puts them too close to the narrowing crown. Place the eyes between R8 and R9 and keep approximately five visible stitches between the posts.
- Leaf curling: A tight stitch sequence along the foundation chain pulls one side shorter than the other. Work both sides with matching tension and keep large leaves approximately 8–10 cm long after light shaping.
- Soil disc bulging: Excess stuffing directly beneath the brown insert makes the stems look as if they are emerging from a dome. Keep the upper central filling slightly softer and set the soil approximately 5–10 mm below the pot rim.
Conclusion
Check the three stem angles before closing the soil seam because leaf placement can hide a stem that is already pulling sideways. Next, place the finished pot on a hard surface and compare flower height, leaf distribution and eye alignment from the front. Correct any leaning stem before burying its structural tail. Share the finished potted tulip amigurumi crochet pattern project on Pinterest with a vertical image, then post a close view of the three flower faces and textured soil on Instagram using #KawaiiTulipPotAmigurumi. For this arrangement specifically, would you keep the yellow, pink and lavender combination or replace one tulip with white?









