Introduction
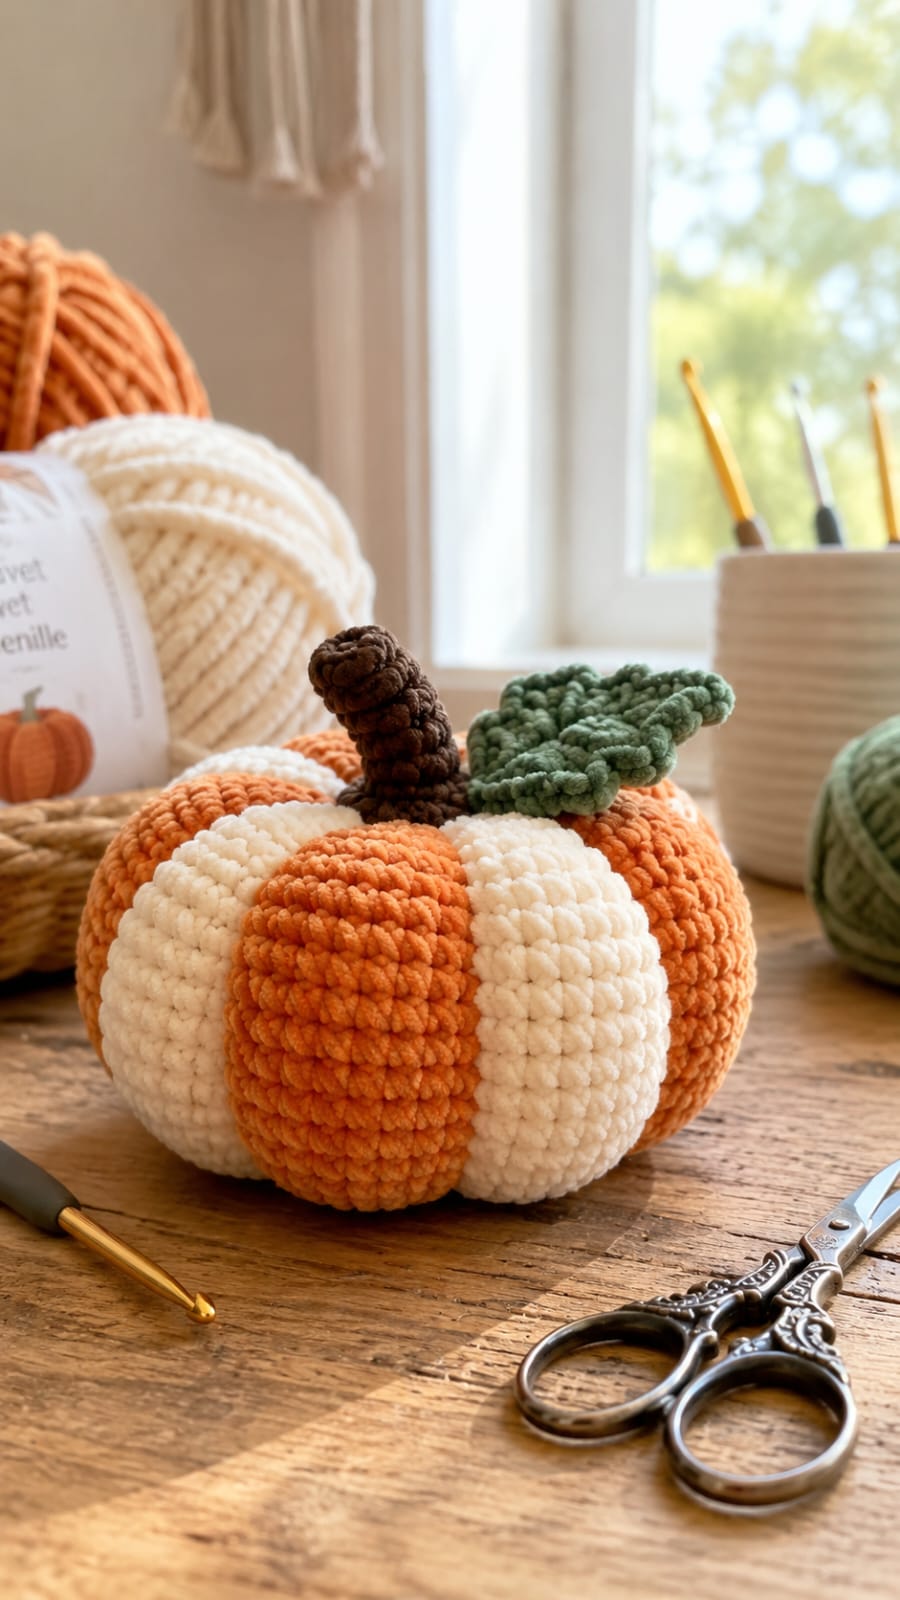
Orange-and-white bands have to cross eight pumpkin grooves without breaking their horizontal rhythm. This orange and white striped crochet pumpkin pattern uses worsted or Aran yarn, a 4.5 mm hook and post-stuffing sculpting to make an approximately 22–24 cm pumpkin. Alternating color rounds, deep vertical lobes and a long curved green stem reproduce the graphic structure shown in the reference.
The Design: What Makes This Striped Pumpkin Different
The body is crocheted as one continuous stuffed form so every orange and white stripe travels around the entire circumference at the same height. That matters because the reference does not use separate colored lobes; the color bands run horizontally while the rib channels cut vertically through them. A 42-stitch plateau creates enough width for eight substantial lobes without making the pumpkin excessively tall. Stripe bands vary slightly in depth, which prevents the surface from looking like a mechanical two-round repeat. The long moss-green stem adds vertical height after the body has been compressed into a broad profile. One frequent mistake in a striped crochet pumpkin is adding the sculpting strands before checking the color transitions. A rib that drifts sideways makes the horizontal bands appear tilted even when every crochet round was worked correctly.
Project Info at a Glance
| Skill Level | Time | Finished Size | Hook | Best For |
|---|---|---|---|---|
| Intermediate | 6–8 hours | Approx. 22–24 cm wide × 23 cm high including stem | 4.5 mm | Fall displays, Halloween decor and Thanksgiving centerpieces |
Materials and Tools
Yarn
- Pumpkin orange — worsted / Aran #4 — approximately 100–120 g — used for the dominant body bands.
- Bright white / soft ivory — matching worsted / Aran #4 — approximately 70–90 g — used for contrasting horizontal bands.
- Moss / olive green — matching worsted yarn — approximately 20–25 g — used for the long stem and stem base.
Use orange and white yarns with similar fiber content and twist. A softer or thicker white yarn can expand more than the orange after stuffing and make the pale bands project beyond the surrounding surface.
Tools
- 4.5 mm crochet hook
- Polyester stuffing, approximately 160–190 g
- Long tapestry or doll needle, preferably 12–15 cm
- Standard yarn needle
- Locking stitch marker
- Eight removable stitch markers or pins
- Scissors
- Measuring tape
Abbreviations
- MR — magic ring
- sc — single crochet
- inc — two single crochet stitches in one stitch
- dec — invisible single crochet decrease
- sl st — slip stitch
- ch — chain
- BLO — back loop only
- FLO — front loop only
An invisible decrease passes through the front loops of the next two stitches before one single crochet is completed through both loops.
Pattern — Step by Step
Work the pumpkin body and stem in continuous spirals unless stated otherwise. Mark the first stitch of every round. When changing color, complete the final yarn-over of the previous stitch with the new color so the transition stays compact.
Striped Pumpkin Body
Yarn: orange and white — Source: original 42-stitch reconstruction using standard six-stitch amigurumi arithmetic.
R1: With orange, 6 sc in MR (6)
R2: inc ×6 (12)
R3: (sc, inc) ×6 (18)
R4: (2 sc, inc) ×6 (24)
R5: Change to white, (3 sc, inc) ×6 (30)
R6: (4 sc, inc) ×6 (36)
R7: sc around (36)
R8: Change to orange, (5 sc, inc) ×6 (42)
R9–R10: sc around (42)
R11–R13: Change to white, sc around (42)
R14–R16: Change to orange, sc around (42)
R17–R18: Change to white, sc around (42)
R19: Change to orange, (5 sc, dec) ×6 (36)
R20: sc around (36)
R21: Change to white, (4 sc, dec) ×6 (30)
R22: Change to orange, (3 sc, dec) ×6 (24)
R23: Change to white, (2 sc, dec) ×6 (18)
Begin stuffing after R19. Pack the widest orange-and-white band area firmly and use smaller pieces of filling near the crown.
Continue:
R24: Change to orange, (sc, dec) ×6 (12)
R25: dec ×6 (6)
Add the final stuffing before R25 closes. Keep the top and bottom center approximately 2 cm softer than the broad middle.
Fasten off. Leave a 40 cm tail and close the six remaining front loops.
Managing the Stripe Joins
Carry unused yarn only across a short one-round interval. For wider three-round bands, cut the previous color and knot the two tails on the inside before continuing.
Keep every color transition near the same rear line of the pumpkin.
The visible step created by spiral color changes should face the rear. Sculpting can hide part of that transition inside one recessed groove.
Initial Vertical Compression
Yarn: orange or another body color matching the lower center.
Cut approximately 110 cm of yarn and thread the long needle.
Enter through the bottom center and pass through the complete pumpkin to the top center.
Return through the same vertical channel and pull gradually until the body loses approximately 1–1.5 cm of height.
The widest circumference should expand slightly while the top and bottom become flatter.
Tie temporarily at the lower center. Leave the tail accessible until all eight rib positions are checked.
Mark Eight Rib Positions
Set the pumpkin upright and view it directly from above.
Place eight removable markers around the widest circumference, spacing them as evenly as possible.
Check that each marked path runs visually from the top center to the bottom center without drifting across the horizontal stripes.
Correct the spacing before adding the first sculpting strand. A crooked channel becomes more visible against alternating colors than against a solid pumpkin.
Rib 1
Yarn: orange.
Cut approximately 130 cm of yarn. Anchor it at the bottom center and carry it over the exterior along the first marked line.
Enter at the top center, pass through the entire pumpkin and exit at the bottom.
Pull slowly until the groove sits approximately 10–12 mm below the fullest part of the neighboring lobes.
Do not knot permanently yet.
Rib 2
Work the groove directly opposite Rib 1 using the same method.
Place the pumpkin on the table and compare the two opposite sides.
If either lobe flattens, loosen its nearest shaping strand and move stuffing into that section before retightening.
Ribs 3 and 4
Add the second opposite pair at approximately 90 degrees to the first two grooves.
Carry each strand across the body surface from bottom to top, then pass through the central filling.
Four completed grooves should divide the pumpkin into broad quarters when viewed from above.
Ribs 5 and 6
Place these channels halfway between two existing grooves.
Work one side first, rotate the body 180 degrees and complete its opposite groove.
Check that the white stripes remain level around both newly shaped sections.
Ribs 7 and 8
Add the final pair through the two remaining broad spaces.
Rotate the pumpkin repeatedly and compare all eight sections.
Each lobe should have a similar projected width even though the stripe bands change color across its height.
Tie all shaping strands securely at the bottom center and bury the tails through the stuffing.
Refine the Lower Center
If the pumpkin rocks on the table, press the lower center upward slightly with both thumbs.
Thread a short orange strand through the center and pull only enough to create a shallow flat base.
Do not deepen this lower indentation beyond approximately 10 mm; excessive compression makes the lobes flare outward at the base.
Long Green Stem
Yarn: moss green — original tapered curved-stem construction.
R1: 6 sc in MR (6)
R2–R6: sc around (6)
R7: (2 sc, inc) ×2 (8)
R8–R10: sc around (8)
R11: (3 sc, inc) ×2 (10)
R12–R14: sc around (10)
R15: (4 sc, inc) ×2 (12)
R16–R17: sc around (12)
Stuff R11–R17 lightly. Leave R1–R10 almost empty so the upper stem can bend through a gradual arc.
Fasten off. Leave a 40 cm sewing tail.
Stem Base Disc
Yarn: moss green.
R1: 6 sc in MR (6)
R2: inc ×6 (12)
R3: (sc, inc) ×6 (18)
Do not stuff. Flatten the disc.
Fasten off. Leave a 30 cm sewing tail.
Stem Base Points
Yarn: moss green.
Join yarn to the edge of the stem base disc.
Repeat three times around the disc:
Sl st in next stitch,
ch 4,
sl st in second ch from hook,
sc in next ch,
hdc in final ch,
sl st into next disc stitch.
The three short extensions spread the green crown across several orange-and-white rib intersections.
Fasten off. Leave a 20 cm attachment tail.
Shape the Curved Stem
Hold the stem by its wider lower section.
Bend the nearly unstuffed upper half gradually toward one side over approximately 6–8 cm of length.
Make two or three small hidden stitches along the inside of the curve when the yarn naturally springs back to vertical.
The reference stem finishes with the tip angled slightly forward rather than standing rigidly upright.
Assembly
- Complete the full striped pumpkin body, keeping all orange-to-white joins close to one rear line before closing and stuffing the final rounds.
- Compress the pumpkin vertically by approximately 1–1.5 cm so its unsculpted profile becomes broader than a sphere.
- Mark eight equally spaced groove positions around the widest circumference and inspect them from directly above.
- Create the first four ribs as two opposite pairs, redistributing stuffing whenever a white or orange band begins to flatten.
- Add the remaining four channels in opposite pairs and adjust individual tension until all eight lobes project similarly.
- Place the pumpkin on a level surface and correct the lower center if the body rocks by more than approximately 5–8 mm.
- Sew the 18-stitch green base disc over the top center so it covers the meeting point of all eight sculpting strands.
- Attach the long green stem through its 12-stitch lower edge, centering it over the base disc.
- Shape the upper stem into a gradual forward curve and add hidden holding stitches only on the inside of the bend when required.
- Weave every structural tail through at least 4–5 cm of dense crochet, reverse direction once and trim after the ends retract beneath the stitches.
The completed pumpkin should stand on a broad eight-lobed base with level horizontal color bands, evenly recessed grooves and a curved green stem centered over the crown.
7 Technical Tips
- Stripe jog at the rear: Spiral color changes produce a small vertical step where one band meets the next. Keep every change within the same 10–15 mm rear zone and position one sculpting groove directly over that line.
- White bands bulging: A thicker white yarn can make pale rounds project beyond the orange surface. Match yarn weight closely and keep gauge within approximately one stitch per 10 cm between both colors.
- Visible decrease holes: Loose decreases expose filling through both orange and white fabric. Work each decrease through the two front loops and match its tension to the surrounding single crochet stitches.
- Crooked rib channels: A groove drifting more than about 10 mm sideways makes horizontal bands appear tilted. Mark all eight paths from the top view before inserting the first sculpting strand.
- Collapsed lobes: Eight tight shaping strands can compress an underfilled center into a hard column. Stop tightening when each channel sits approximately 10–12 mm below the neighboring lobe surfaces.
- Stem kinking: Firm stuffing through all 17 stem rounds creates one sharp bend rather than a gradual curve. Leave roughly the upper 10 rounds almost empty and shape the arc across 6–8 cm.
- Stem wobble: Sewing the 12-stitch stem directly onto the six-stitch body closure concentrates its weight at one point. Add the 18-stitch base disc first so the attachment spans approximately 3–4 cm.
Conclusion
Inspect every orange-and-white band before attaching the stem because the green base will cover the upper endpoints of several sculpting grooves. The next practical step is to rotate the pumpkin on a level table and compare lobe width, stripe height and groove depth from all sides. Correct any channel that makes a horizontal band slope noticeably before burying its yarn tail. Share the finished orange and white striped crochet pumpkin pattern project on Pinterest with a vertical fall photograph, then post a close view of the intersecting stripes and ribs on Instagram using #StripedRibbedCrochetPumpkin. For this pumpkin specifically, would you keep the equal orange-and-white contrast or make the white bands half as wide?









