Introduction
A square-neck crochet camisole with a scalloped peplum and a bow-trimmed shell skirt needs three different kinds of edge control. This crochet toddler ruffle top and skirt set pattern uses sport/light-DK yarn, 3.5–4 mm hooks, and a 1–2 year fit benchmark. The project is intermediate because fit, ruffle density, and applique placement all matter. Make it when you need one coordinated design whose pieces can also be worn separately.
The Design: What Makes the Blue Ruffle Set Different
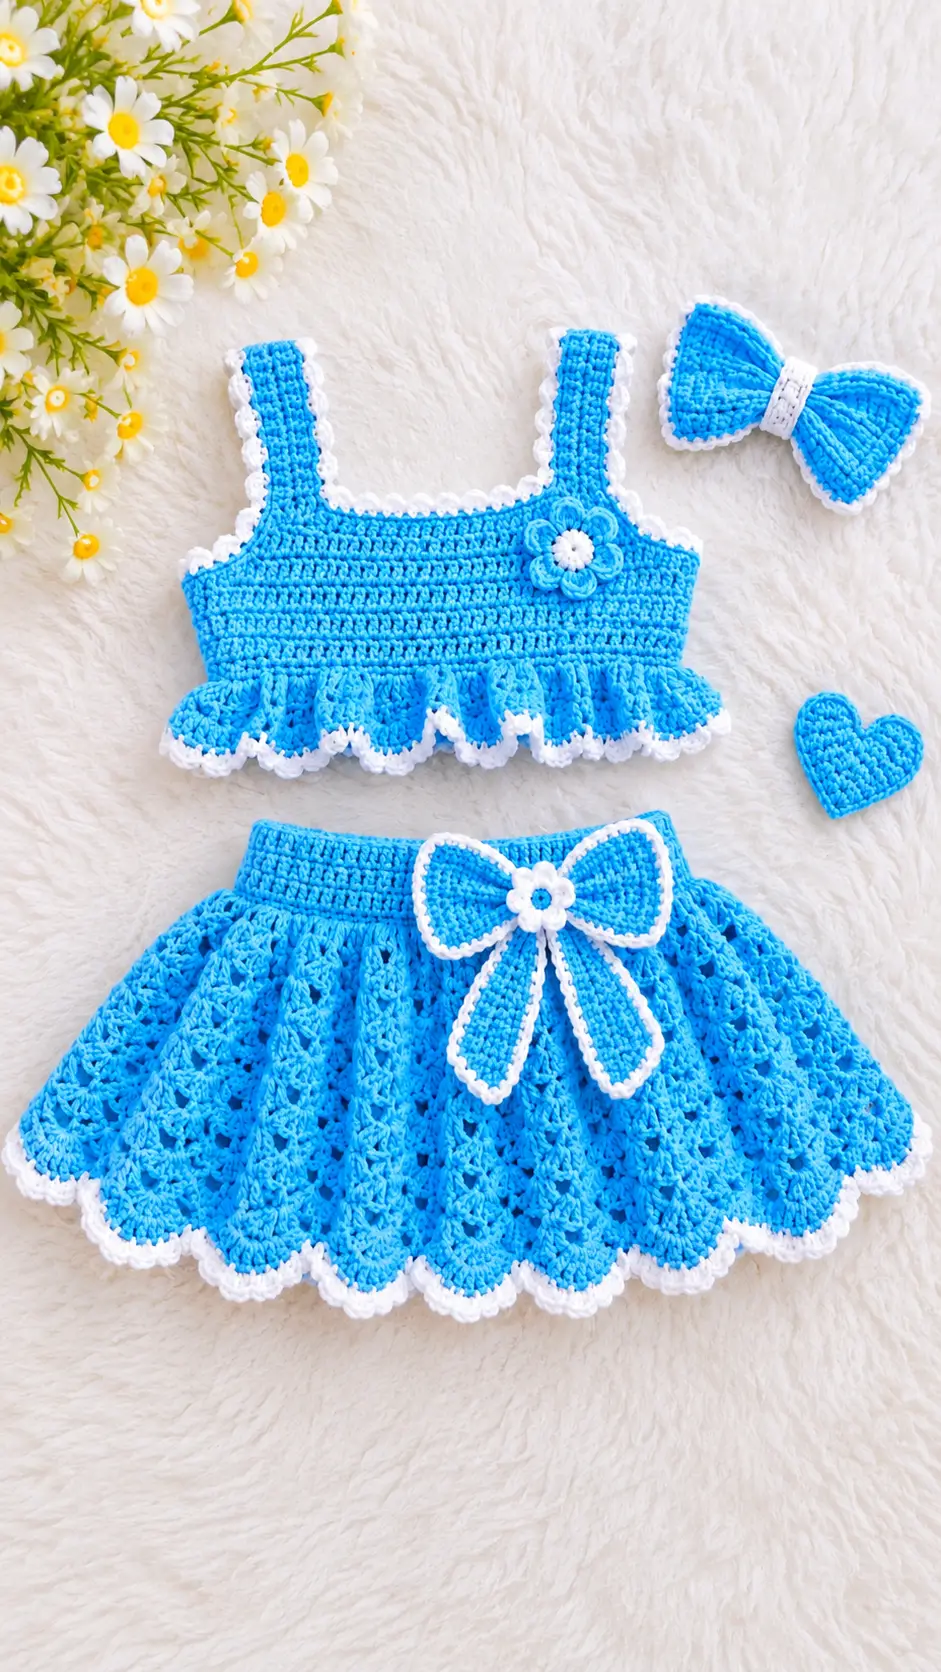
The photo is built around a compact square-neck bodice, a high-volume skirt, and white edging that visually connects both garments. The bodice stays mostly solid so the straps resist stretching; its ruffle begins below the main body instead of across the chest. Meanwhile, the skirt changes from a firm waistband into repeated fan columns, producing width without placing extra bulk at the waist.
A large bow interrupts those vertical shell lines and covers the center-front join. For a crochet baby girl top and skirt set, that proportion matters: excessive bodice ruffling can make the top tip upward, while a skirt increased too early can pull downward at the waistband. The smaller hair bow, flower, and heart repeat the blue-and-white color plan. Many crochet toddler skirt pattern designs treat accessories as extras; here they form part of the image match.
Project Info at a Glance
| Skill Level | Time | Finished Size | Hook | Best For |
|---|---|---|---|---|
| Intermediate | Multi-session project | 1–2 years; approximately 50.8 cm chest and 30.5 cm top length | 4.0 mm main / 3.5 mm trim | 18–24 month toddler sizing benchmark |
Gauge: 20 dc × 8 rows = approximately 10 cm / 4 in with the 4 mm hook.
This crochet toddler ruffle top and skirt set pattern is an original construction developed from the supplied image and public toddler sizing references. It is not a transcription of another designer’s pattern.
Materials and Tools
Yarn
- Turquoise blue — sport/light DK — approximately 200 g for the complete set.
- White — matching sport/light DK — approximately 30 g for borders, flowers, and bow details.
- Suggested yarn type — smooth baby yarn with good stitch definition and enough flexibility for shell stitches.
Tools
- 4.0 mm crochet hook for the main garment pieces
- 3.5 mm crochet hook for borders and appliques
- 1 cm elastic for the skirt waistband
- Tapestry needle
- Stitch markers
- Scissors
- Measuring tape
- Sewing pins
No safety eyes, stuffing, buttons, beads, or hard decorative parts are required.
Abbreviations
- MR — magic ring
- ch — chain
- sc — single crochet
- hdc — half double crochet
- dc — double crochet
- tr — treble crochet
- inc — two stitches in one stitch
- dec — decrease
- sl st — slip stitch
- BLO — back loop only
- sk — skip
- st / sts — stitch / stitches
- rep — repeat
For an invisible decrease, insert the hook through the front loops of the next two stitches and complete one sc through both; it is relevant only if you substitute sc shaping in an applique.
Pattern — Step by Step
Construction note: This project is a garment rather than amigurumi. The top uses rows, the skirt uses joined rounds, and the small appliques use flat rounds or rows.
Front Bodice
Yarn: turquoise blue
Ch 52.
R1: Dc in 3rd ch from hook and in each remaining ch. (50)
R2–R14: Ch 2, turn, dc in each st. (50 each row)
The panel should measure approximately 25 cm wide. Two 50-stitch panels produce roughly a 50–51 cm chest circumference after seaming and normal fabric relaxation.
Left Strap
Join blue to stitch 5 of R14.
R15: Dc across sts 5–12. (8)
R16–R21: Ch 2, turn, dc across. (8)
Fasten off. Leave a 20 cm sewing tail.
Right Strap
Join blue to stitch 39 of R14.
R15: Dc across sts 39–46. (8)
R16–R21: Ch 2, turn, dc across. (8)
Fasten off. Leave a 20 cm sewing tail.
The four unused stitches at each outside edge form a shallow armhole step. The 26 unworked center stitches create the square neckline.
Back Bodice
Yarn: turquoise blue
Repeat the Front Bodice construction.
R1: 50 dc. (50)
R2–R14: 50 dc. (50)
Left Strap R15–R21: 8 dc. (8)
Right Strap R15–R21: 8 dc. (8)
Fasten off with long tails.
Place the front and back right sides together. Seam the 14-row side edges, then join each eight-stitch shoulder strap across its top edge.
White Neckline and Strap Trim
Yarn: white — 3.5 mm hook
Join white at the center back.
R1: Work 26 sc across the back neckline, 7 sc along each inner back strap edge, 7 sc along each inner front strap edge, and 26 sc across the front neckline. (80)
R2: *Sc in next 3 sts, sc in next st, ch 3, sl st into the same st* around. (80 sc + 20 picots)
Fasten off.
For each armhole, work 22 sc around the four-stitch front step, seven front strap row ends, seven back strap row ends, and four-stitch back step. (22)
On the second pass, work sc around and add a ch-3 picot after base stitches 4, 8, 12, 16, and 20. (22 sc + 5 picots per armhole)
Top Ruffle
Yarn: turquoise blue, then white
Join blue at the lower side seam of the bodice. The two 50-stitch foundation edges provide 100 base stitches.
R1: 2 dc in each base st around. (200)
R2: *Sk 3 sts, 5 dc in next st* ×50. (250 dc / 50 shells)
R3: *Sk 2 dc, 5 dc in center dc of shell, sk 2 dc* ×50. (250 dc / 50 shells)
Change to white.
R4: Sc in every dc; after the center stitch of each five-dc shell, ch 3 and sl st into the same sc to form a picot. (250 sc + 50 picots)
Fasten off.
Skirt Waistband
Yarn: turquoise blue
Ch 110 loosely and sl st to the first ch without twisting.
R1: Ch 2, dc in every ch, sl st to first dc. (110)
R2–R4: Ch 2, dc around. (110)
Cut 1 cm elastic to the wearer’s measured waist, approximately 1–2 cm shorter than the relaxed waist measurement. Overlap and sew the elastic ends, then tack the elastic evenly to the inside of the four-round crochet waistband.
Skirt Flare and Fan Section
R5: *Dc in next st, inc in next st* ×55. (165)
R6: *Dc in next 2 sts, inc in next st* ×55. (220)
R7: *Sk 2 sts, 5 dc in next st, sk 2 sts* ×44. (220 dc / 44 shells)
R8–R22: *Sk first 2 dc of shell, 5 dc in center dc, sk final 2 dc* around. (220 dc / 44 shells each round)
Keep one stitch marker in the first shell and a second marker at the 22nd shell. Those markers make it easier to detect a shifted shell column before several rounds have been completed.
Skirt Scalloped Hem
R23: *Sk 2 dc, 7 dc in center dc, sk 2 dc* ×44. (308 dc / 44 scallops)
Change to white.
R24: Sc in each dc. At the center, fourth dc of each seven-dc scallop, ch 3 and sl st into the same sc. (308 sc + 44 picots)
Fasten off. Check the wearer’s preferred skirt length before completing the final rounds if you need to shorten or lengthen the piece.
Flower Applique
Make 1. White center with turquoise petals.
With white:
R1: 6 sc in MR. (6)
R2: Inc ×6. (12)
Fasten off white and join turquoise.
R3: *Sl st in next st; in next st work ch 2, 3 dc, ch 2, sl st* ×6. (6 petals / 18 dc)
Fasten off with a 25 cm sewing tail. Sew the flower slightly right of center on the top to match the photographed placement.
Heart Applique
Make 1 in turquoise blue.
Ch 2.
R1: 2 sc in 2nd ch from hook. (2)
R2: Ch 1, turn, inc ×2. (4)
R3: Ch 1, turn, inc, sc 2, inc. (6)
R4: Ch 1, turn, inc, sc 4, inc. (8)
R5: Ch 1, turn, sc across. (8)
First Lobe
R6A: Sc across first 3 sts only. (3)
R7A: Dec, sc. (2)
R8A: Dec. (1)
Fasten off.
Second Lobe
Join at the final three stitches of R5.
R6B: Sc across. (3)
R7B: Sc, dec. (2)
R8B: Dec. (1)
Fasten off. Work one loose round of sl st around the outside edge if the heart needs a firmer outline.
Large Waist Bow Wings
Make 2 in turquoise blue.
Ch 15.
R1: Sc from 2nd ch across. (14)
R2: Inc, sc 12, inc. (16)
R3: Inc, sc 14, inc. (18)
R4–R6: Sc across. (18)
R7: Dec, sc 14, dec. (16)
R8: Dec, sc 12, dec. (14)
Fasten off blue.
Join white and work approximately 42 evenly spaced sc around each wing: 14 along the top, 14 along the bottom, and 7 along each shaped side. (42)
Fasten off.
Waist Bow Center Band
Make 1 in white.
Ch 7.
R1: Sc from 2nd ch across. (6)
R2–R10: Ch 1, turn, sc across. (6)
Fasten off with a 30 cm tail.
Waist Bow Tails
Make 2 in turquoise blue.
Ch 7.
R1: Sc from 2nd ch across. (6)
R2–R15: Ch 1, turn, sc across. (6)
R16: Dec, sc 2, dec. (4)
R17: Sc across. (4)
Fasten off blue.
Work one white sc border around each tail, placing one sc in each stitch and one in each row end. Fasten off.
Hair Bow
Make 2 small wings in turquoise and one white center band.
For each wing, ch 11.
R1: Sc across from second ch. (10)
R2: Inc, sc 8, inc. (12)
R3–R5: Sc across. (12)
R6: Dec, sc 8, dec. (10)
Fasten off.
With white, work 30 evenly spaced sc around each wing. (30)
Hair Bow Center Band
Ch 5.
R1: Sc across. (4)
R2–R8: Ch 1, turn, sc across. (4)
Wrap the white band around both bow wings and sew it at the back. Attach the finished bow to a soft crocheted headband, fabric-covered clip, or another age-appropriate accessory.
Assembly
- Block the front and back top panels to the 25 cm flat-width target before sewing.
- Seam both 14-row bodice sides with the row ends aligned one-for-one.
- Join the eight-stitch shoulder straps and check the square neckline before adding white trim.
- Crochet the neckline, armhole, and lower ruffle borders after all structural seams are complete.
- Sew the skirt elastic to the inside waistband at four quarter points first, then add intermediate tacks.
- Pin the flower to the upper-right front of the bodice and sew around its white center rather than through the petal tips.
- Place the heart separately unless you want it fixed to the skirt; the supplied photograph shows it as a loose coordinating piece.
- Overlap the two large bow wings at the center, place the two tails behind them, and wrap the white center band tightly around all four layers.
- Sew the completed large bow to the skirt center front, then assemble the smaller hair bow without tails.
- Weave every yarn tail through at least 4 cm of matching-color stitches, reverse direction once, trim, and lightly block the scalloped edges.
The completed set contains the crocheted garment and accessory elements visible in the reference image.
7 Technical Tips
- Stitch markers — waistband twist: Place a marker every 22 stitches across the 110-stitch starting chain before closing the skirt round. A twisted chain discovered after R2 requires the waistband to be undone.
- Stuffing firmness — bow distortion: Keep both bows completely unstuffed. Even a small amount of filling makes the center band bulge and changes the flat bow profile.
- Invisible decrease — applique ridge: If you replace the standard heart decreases with sc decreases, use the invisible method through front loops. A conventional two-stitch sc decrease can leave a visible diagonal ridge on a small applique.
- Eye placement timing — not applicable: This design has no safety eyes, so no eye-placement stage belongs in the assembly sequence. Hard eye components are unnecessary for this toddler garment.
- Velvet tension — shell loss: Do not substitute velvet yarn at the same gauge without making another 10 cm swatch. Its pile can hide the shell structure and change the waistband circumference.
- Pinning — bow rotation: Pin the large waist bow at its center plus all four wing and tail corners before sewing. A bow attached only through its center band can rotate downward under the weight of the tails.
- Tail weaving — white-edge failure: Weave white edging tails for at least 4 cm, reverse direction, and pass through another 2 cm before trimming. Short tails at the skirt scallops can work loose because those edges move more than the solid waistband.
Conclusion
This set works because the bodice, skirt, trims, and accessories repeat the same proportions instead of competing for attention. Before making the full garment, crochet a 10 cm gauge swatch and check the wearer’s chest and waist against the sizing benchmark. Make the top first; its finished width establishes the visual scale for the large waist bow. Pin the flower and heart before sewing either piece so their positions remain balanced against the skirt shells. Share the finished project on Pinterest and Instagram with #BlueRuffleSet, and link back to this crochet toddler ruffle top and skirt set pattern. Would you leave the blue heart separate, or attach it to the waistband?









