Introduction
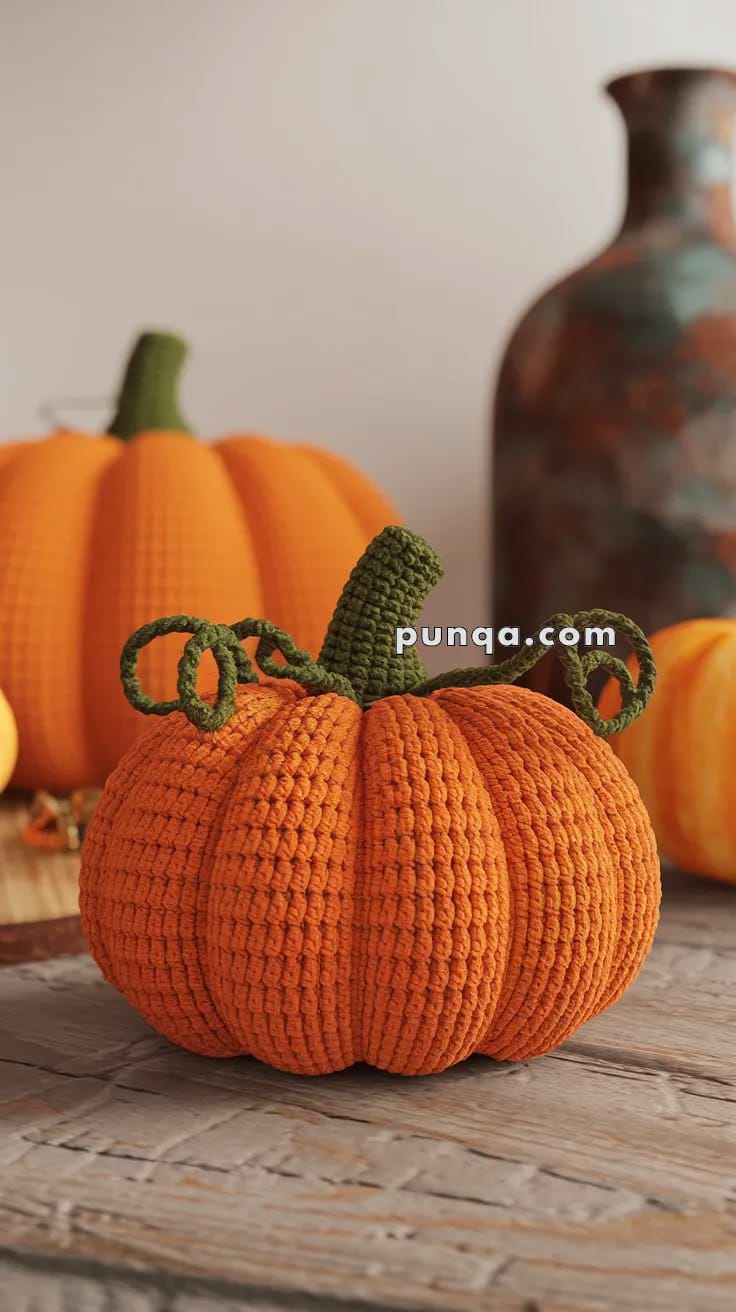
A pumpkin becomes a melon the moment its ribs lose contact with the top and bottom centers. This crochet pumpkin amigurumi pattern uses worsted or Aran yarn, a 3.5 mm hook and post-stuffing cinching to make a pumpkin about 20 cm wide. Six deep lobes, a tall green stem and three spiral tendrils reproduce the broad seasonal shape shown in the reference.
The Design: What Makes This Crochet Pumpkin Different
The body is crocheted first as a 42-stitch stuffed form, but it is deliberately kept broader through the middle than a standard amigurumi sphere. External shaping strands are then passed repeatedly through the top and bottom centers to compress the surface into six pronounced lobes. This construction produces a realistic crochet pumpkin without forcing every ridge into the round-by-round stitch sequence. The stem is taller than the short stems used on many miniature pumpkins, and its 12-stitch lower section gives it enough visual weight for the 20 cm body. Three spiral tendrils break up the center line around the stem. One common failure in a ribbed crochet pumpkin is pulling every sculpting strand as tightly as possible. That creates narrow grooves and a hard center. Each strand should indent the stuffing while leaving the lobe surfaces rounded.
Project Info at a Glance
| Skill Level | Time | Finished Size | Hook | Best For |
|---|---|---|---|---|
| Intermediate | 5–7 hours | Approx. 20 cm wide × 17 cm high | 3.5 mm | Fall table decor, shelf styling and pumpkin displays |
Materials and Tools
Yarn
- Burnt pumpkin orange — worsted / Aran yarn — approximately 140–170 g — used for the complete pumpkin body and sculpting strands.
- Deep olive green — matching worsted / Aran yarn — approximately 20–30 g — used for the tall stem and three tendrils.
Tools
- 3.5 mm crochet hook
- Polyester stuffing, approximately 130–170 g
- Long tapestry or doll needle, preferably 12–15 cm
- Standard yarn needle
- Locking stitch marker
- Dressmaking pins
- Scissors
Published DK and light-worsted pumpkin patterns use 3.5 mm hooks for dense stuffed fabric. The same principle applies here: the hook should produce stitches tight enough that white filling cannot appear between them.
Abbreviations
- MR — magic ring
- sc — single crochet
- inc — two single crochet stitches in one stitch
- dec — invisible single crochet decrease
- sl st — slip stitch
- ch — chain
- hdc — half double crochet
- BLO — back loop only
- FLO — front loop only
An invisible decrease is worked through the front loops of the next two stitches before completing one single crochet through both loops.
Pattern — Step by Step
Work the pumpkin body and stem in continuous spirals unless a joined round is specified. Mark the first stitch of every round and check the count before moving the marker.
Pumpkin Body
Yarn: burnt pumpkin orange — Source: original 42-stitch reconstruction using standard six-stitch amigurumi math.
R1: 6 sc in MR (6)
R2: inc ×6 (12)
R3: (sc, inc) ×6 (18)
R4: (2 sc, inc) ×6 (24)
R5: (3 sc, inc) ×6 (30)
R6: (4 sc, inc) ×6 (36)
R7: (5 sc, inc) ×6 (42)
R8–R14: sc around (42)
R15: sc around (42)
R16: (5 sc, dec) ×6 (36)
R17: (4 sc, dec) ×6 (30)
R18: (3 sc, dec) ×6 (24)
R19: (2 sc, dec) ×6 (18)
R20: (sc, dec) ×6 (12)
R21: dec ×6 (6)
Begin stuffing after R16. Pack the middle firmly but leave the final 2–3 cm at the top and bottom slightly softer so the centers can be compressed during sculpting.
Fasten off. Leave a 35 cm tail and draw it through the six remaining front loops.
Central Top-and-Bottom Indentation
Yarn: matching orange.
Cut approximately 90 cm of orange yarn and thread it onto a long needle. Insert at the bottom center, pass through the entire stuffed body and exit through the top center.
Return through the same central channel to the bottom. Pull until both poles move inward by approximately 1–1.5 cm.
The body should become slightly flatter and wider. Stop before the center compresses into a hard knot.
Secure the strand temporarily but do not trim it until the rib layout has been checked.
First Pair of Pumpkin Ribs
Yarn: matching orange.
Cut a strand approximately 120 cm long. Anchor it at the bottom center. Carry the strand up the outside of the pumpkin to the top center, pass the needle through the stuffed body and return to the bottom.
Pull gradually until a vertical groove forms. Rotate the pumpkin exactly 180 degrees and repeat the same operation on the opposite side.
The two grooves must finish at the same top and bottom centers.
Second Pair of Pumpkin Ribs
Rotate the pumpkin approximately 60 degrees from the first groove. Carry a new shaping strand from the bottom center over the outside to the top, pass through the body and tension it.
Repeat on the opposite side.
Check the lobe width from above before tying off. Four completed grooves should create four evenly spaced divisions.
Third Pair of Pumpkin Ribs
Add the final pair of sculpting strands halfway between the remaining wide spaces.
When all six grooves are complete, view the pumpkin from directly above and adjust individual strand tension until the six lobes appear similar in width.
Do not tighten one strand solely because its groove looks shallow. Redistribute the stuffing beneath that groove first, then retension.
Knot the sculpting tails at the bottom center and bury them through the body.
Stem
Yarn: deep olive green — tall tapered stem based on the photographed proportion.
R1: 6 sc in MR (6)
R2–R5: sc around (6)
R6: (2 sc, inc) ×2 (8)
R7–R9: sc around (8)
R10: (3 sc, inc) ×2 (10)
R11: sc around (10)
R12: (4 sc, inc) ×2 (12)
R13–R14: sc around (12)
Stuff the lower half lightly. Leave the top third nearly empty so the stem can lean several degrees instead of standing as a rigid vertical cylinder.
Fasten off. Leave a 35 cm sewing tail.
Stem Base Disc
Yarn: deep olive green.
R1: 6 sc in MR (6)
R2: inc ×6 (12)
R3: (sc, inc) ×6 (18)
Do not stuff. This flat piece spreads the stem attachment across the compressed top center.
Fasten off. Leave a 25 cm tail.
Long Curly Tendril
Yarn: deep olive green.
Ch 31.
Starting in the second chain from the hook, work 2 sc in each chain across.
The excess stitches should force the strip into a spiral automatically. Twist only enough to arrange the natural curl.
Fasten off. Leave a 20 cm attachment tail.
Medium Curly Tendril
Yarn: deep olive green.
Ch 24.
Starting in the second chain from the hook, work 2 sc in each chain across.
Fasten off. Leave a 20 cm tail.
Short Curly Tendril
Yarn: deep olive green.
Ch 18.
Starting in the second chain from the hook, work 2 sc in every chain.
Keep this tendril closest to the stem so the three curls finish at visibly different distances from the center.
Fasten off. Leave an 18 cm tail.
Optional Stem Surface Ridges
Yarn: matching olive green.
Thread a needle with approximately 45 cm of yarn. Starting at the stem base, make three or four long vertical surface stitches from R13 toward R3.
Pull only enough to create shallow channels.
Deep compression will collapse the narrow stem tube.
Secure and bury the yarn inside the stem.
Assembly
- Complete and fully stuff the orange body before beginning any exterior sculpting, leaving the top and bottom centers slightly softer than the middle.
- Compress the body through its central axis until the pumpkin becomes approximately 1–1.5 cm shorter and correspondingly wider.
- Create the first two opposite rib grooves, then add the second and third pairs so six exterior divisions meet at identical top and bottom centers.
- Place the pumpkin on a level table, inspect all six lobes and redistribute stuffing before making the final shaping knots.
- Center the green stem base disc over the top indentation and stitch through both the disc and several orange body stitches around its complete circumference.
- Position the tall stem over the disc and sew around the 12-stitch stem base, keeping a slight natural lean rather than forcing it perfectly vertical.
- Attach the longest tendril beside the back-left stem edge and allow most of its spiral to remain free.
- Sew the medium and short tendrils at different points around the stem so the three curls overlap only near their bases.
- Set the pumpkin down again and correct any lobe that lifts away from the table by adjusting nearby sculpting tension rather than compressing the entire base.
- Weave all structural tails through at least 4–5 cm of dense crochet, reverse direction once and trim only after the yarn retracts beneath the fabric.
The completed pumpkin should sit on a broad six-lobed base with every groove running continuously between the same top and bottom centers.
7 Technical Tips
- Melon-shaped body: Shallow or misplaced sculpting strands leave the 42-stitch sphere almost round. Pass every rib strand through the exact top and bottom centers and compress the finished height by roughly 10 percent.
- Hard center: Pulling all six strands at maximum tension creates a dense knot beneath the stem. Tighten each groove only until it sits approximately 8–12 mm below the fullest point of the neighboring lobes.
- Visible decrease holes: Loose decreases can expose white stuffing against orange yarn. Work through the two front loops and match the tension of every decrease to the surrounding single crochet stitches.
- Uneven rib spacing: Sculpting by eye from only the front produces narrow and wide lobes around the back. Mark six positions around the circumference before placing the first exterior strand.
- Leaning stem base: Sewing a 12-stitch stem directly over the tiny center closure concentrates the attachment on too little fabric. Add the 18-stitch green base disc first so the seam spreads across approximately 3–4 cm.
- Loose tendril curl: Working one single crochet per chain produces a straight cord rather than a spiral. Place two single crochet stitches into every foundation chain and use different chain counts for the three tendril lengths.
- Raised bottom: Too much stuffing directly beneath the lower center prevents the pumpkin from sitting flat. Move roughly a walnut-sized amount of filling outward into the surrounding lobes before making the final sculpting knots.
Conclusion
Inspect the pumpkin from above before trimming any sculpting yarn because top-view spacing reveals rib errors that are difficult to detect from the front. The next practical step is to compare all six lobe widths and correct any groove that sits more than about 1 cm away from the average position. Attach the stem and tendrils only after that shaping is stable. Share the completed crochet pumpkin amigurumi pattern project on Pinterest with a vertical fall photograph, then post a close view of the rib construction and curled vines on Instagram using #LargeRibbedCrochetPumpkin. For this pumpkin specifically, would you keep three green tendrils or reduce the top to one long spiral vine?









