Introduction
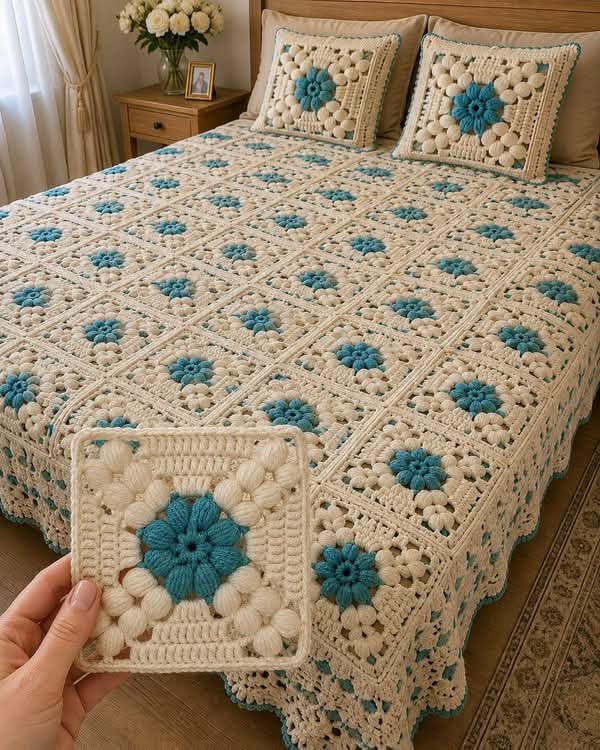
Eight turquoise petals have to remain visible after eight much larger cream puffs are added around them, so the spacing between those two flower layers controls the entire square. This turquoise puff flower granny square bedspread uses DK yarn, a 4 mm hook, approximately 21–22 cm motifs, and a cream-dominant palette. The project combines dimensional flowers, openwork squares, flat joining, matching pillows, and a deep scalloped border.
The Design: What Makes This Puff Flower Bedspread Different
The square uses two different kinds of floral volume. A compact turquoise flower defines the center, while a second ring of eight cream puff clusters creates a wider raised halo around it. The remaining rounds become progressively flatter. That structural change matters because a puff flower crochet bedspread made entirely from thick clusters would become heavy at every joining line. The cream field provides negative space, and small turquoise stitches near the outer rounds repeat the center color without turning the whole square blue. Matching joins make the finished grid visible but restrained. One common error with a dimensional flower crochet square is placing the outer cream puffs too close to the center. When that happens, they overlap the turquoise petals and the two-layer flower reads as one bulky circle rather than two separate rings.
Project Info at a Glance
| Skill Level | Time | Finished Size | Hook | Best For |
|---|---|---|---|---|
| Intermediate | 85–115 hours | Approx. 170 × 200 cm | 4.0 mm | Full bedspread, queen topper, coordinated pillow set |
The dimensions assume 72 blocks arranged eight squares across and nine squares long. A finished block near 21 cm creates a 168 × 189 cm field before seams and border. Final measurements depend on yarn, blocking, joining tension, and border depth.
Materials and Tools
Yarn
- Warm cream / ivory — DK #3 — approximately 1,700–2,000 g — outer petals, square fields, joining, border, and pillow backgrounds
- Turquoise / medium teal — DK #3 — approximately 350–450 g — central flowers and border accents
- Pale aqua — DK #3 — approximately 100–150 g — optional outer-square and border highlights
A smooth acrylic or cotton-acrylic blend keeps the puff stitches defined without creating the weight associated with a full cotton bedspread. Buy the cream yarn from one dye lot because it covers most of the finished surface.
Tools
- 4.0 mm crochet hook
- 4.5 mm hook for joining if the seam contracts
- Yarn needle
- Sharp scissors
- Locking stitch markers
- Blocking mats
- Rust-resistant T-pins
- Measuring tape
- Kitchen scale
- 21.5 cm square blocking template
Abbreviations
MR — magic ring
sc — single crochet
hdc — half double crochet
dc — double crochet
tr — treble crochet
sl st — slip stitch
ch — chain
sp — space
ch-sp — chain space
puff — puff stitch
RS — right side
WS — wrong side
For this pattern, a puff stitch is worked by drawing up four elongated loops from the same space, yarn over, drawing through all loops, and securing the puff with ch 1.
Pattern — Step by Step
The following motif is an original photo-matched construction based on standard puff-stitch and granny-square geometry. Crochet one complete square, wash it, and block it before calculating the full blanket.
Turquoise Flower Center
Yarn: turquoise.
R1: 16 dc in MR (16)
Join with sl st to the first dc.
Pull the center closed firmly.
Turquoise Puff Petals — Make 8
R2: *ch 2, puff in next st, ch 2, sl st in next st* ×8.
(8 puff petals)
Join with sl st.
Fasten off.
The eight turquoise puffs should form one compact flower with clear spaces between the petals.
Cream Anchor Round
Yarn: cream.
Join cream behind any turquoise petal.
R3: *ch 5, sl st around the base between the next two turquoise petals* ×8.
(8 ch-5 loops)
Keep the loops behind the turquoise flower rather than pulling them through the front.
Large Cream Puff Petals — Make 8
R4: in each ch-5 loop work:
(sc, ch 2, large puff, ch 2, sc)
Repeat around.
(8 cream puff petals)
A large puff is worked by drawing up five elongated loops rather than four.
Join with sl st.
Fasten off.
Cream Transition Round
Yarn: cream.
Join behind any cream puff.
R5: *ch 5, sc around the base between the next two cream petals* ×8.
(8 ch-5 spaces)
This round moves the working edge away from the dimensional center.
First Cream Foundation Round
R6: in each ch-5 space work:
(2 sc, 2 hdc, 3 dc, 2 hdc, 2 sc)
Repeat around.
Join with sl st.
The motif should now lie flatter around the raised flower.
Square Conversion Round
Yarn: cream.
Mark four evenly spaced sections as corners.
At each marked corner work:
(2 hdc, 2 dc, 2 tr, ch 3, 2 tr, 2 dc, 2 hdc)
Across each side, work dc evenly so the fabric lies flat.
Join with sl st.
Place the motif on a table. Four corners should now be clearly visible.
First Openwork Square Round
R8: ch 1, sc in the same stitch.
*ch 3, skip 2 sts, sc in next st* across each side.
At every corner work:
(sc, ch 4, sc)
Repeat around.
Join.
Turquoise Accent Round
Yarn: turquoise.
Join turquoise in any side ch-3 space.
R9: *sc in next ch-sp, ch 2* across each side.
At each corner work:
(sc, ch 3, sc)
Join.
Fasten off.
This round should remain narrow. It functions as a color line rather than a second field.
Cream Cluster Round
Yarn: cream.
Join cream in any ch-2 space.
R10: work 3 dc in every ch-2 space.
At each corner ch-3 space work:
(3 dc, ch 2, 3 dc)
Join.
Second Cream Openwork Round
R11: ch 1, sc in same stitch.
*ch 3, skip 2 sts, sc in next st* across.
At each corner work:
(sc, ch 4, sc)
Repeat around.
Join.
Outer Cream Frame
R12: work 3 dc in every ch-3 space.
At each corner ch-4 space work:
(3 dc, ch 2, 3 dc)
Join.
Firming Round
R13: sc in every stitch across each side.
At every corner work:
(2 sc, ch 2, 2 sc)
Join and fasten off.
Block the square to approximately 21–22 cm.
Pin the outer cream frame. Do not compress the turquoise or cream puff petals.
Motif Layout
Make 72 complete squares.
Arrange the motifs:
8 squares across × 9 squares long
At 21 cm per blocked block:
8 × 21 cm = 168 cm before the border.
9 × 21 cm = 189 cm before the border.
The joining process can alter these dimensions slightly. A border approximately 5–7 cm deep on every side brings the finished dimensions near 178 × 199–203 cm.
If the finished square measures 22 cm instead, the same layout becomes significantly larger. Measure the washed test motif before producing all 72 squares.
Keeping the Turquoise Centers Consistent
The photograph uses nearly identical center flowers throughout the bedspread. This repetition creates the strongest color rhythm.
Make the turquoise centers in batches of eight or twelve rather than finishing one entire square at a time.
Compare the puff height before beginning the cream flower ring.
A finished turquoise puff should project approximately the same distance from the center as its seven neighbors. If one puff contains a shorter drawn-up loop, remake it before continuing.
Consistent central flowers matter because the rest of every square is predominantly cream.
Flat Joining Method
Yarn: cream.
Block all motifs first.
Arrange the complete 8 × 9 grid on a clean floor or large table.
Place two squares RS up with their corresponding edges touching.
Insert the hook through the outer loop of the first stitch on each square.
Work one loose sl st.
Continue through matching outer loops across the full edge.
Do not pull the joining yarn tighter than the cream frame stitches.
If two blocked 21 cm motifs measure less than approximately 41.5 cm after joining, use the 4.5 mm hook for the seams.
Join eight-square horizontal strips first.
Make nine strips.
Connect those strips vertically.
At each four-square intersection, pass through the shared corner spaces once rather than stacking multiple slip stitches into the same point.
Border
Border Round 1 — Cream Foundation
Yarn: cream.
Join at any corner.
Sc evenly around the complete bedspread.
Work 3 sc in each corner.
Count opposite edges before moving to the next round.
Border Round 2 — Cream Double Crochet
Ch 3.
Dc in each stitch around.
At each corner work:
(2 dc, ch 2, 2 dc)
Border Round 3 — Turquoise Accent
Yarn: turquoise.
*sc in next st, ch 2, skip 1 st* around.
At each corner work:
(sc, ch 3, sc)
Fasten off.
Border Round 4 — Cream Mesh
Yarn: cream.
Join cream in any ch-2 space.
*sc in ch-sp, ch 4* around.
At each corner work ch 6.
Border Round 5 — Cream Shells
In each ch-4 space work:
(sc, 5 dc, sc)
At each ch-6 corner work:
(sc, 7 dc, sc)
Repeat around.
Border Round 6 — Aqua Scalloped Edge
Yarn: turquoise or pale aqua.
Across each 5-dc shell work:
sl st in first dc, sc in next dc, hdc in next dc, (dc, ch 2, dc) in center dc, hdc in next dc, sc in next dc, sl st after shell.
At each corner shell, distribute stitches evenly around the seven dc while keeping the ch-2 point centered.
Fasten off.
Block the border outward without pinning through the raised flower centers.
Matching Pillow Front — Make 2
The two pillows in the photograph use a larger central flower surrounded by additional cream rounds rather than several small bedspread squares.
Begin with one bedspread motif and work through R13.
Pillow Expansion Round 1
Yarn: cream.
Dc in every stitch around.
At each corner work:
(2 dc, ch 2, 2 dc)
Pillow Expansion Round 2
*ch 3, skip 2 sts, sc in next st* around.
At each corner work ch 5.
Pillow Expansion Round 3
Yarn: pale aqua.
Work 3 dc into each side ch-3 space.
At each corner work:
(3 dc, ch 2, 3 dc)
Pillow Expansion Round 4
Yarn: cream.
Sc in each stitch around.
At each corner work:
(2 sc, ch 2, 2 sc)
Pillow Scallop
*skip 2 sts, 5 dc in next st, skip 2 sts, sl st in next st* around.
Adjust the final repeat slightly at each corner so a full shell sits near the corner point.
Continue expansion rounds until the blocked panel measures approximately 45–48 cm.
Pillow Backs
Make two overlapping back panels for each cushion.
Using cream yarn, chain to the blocked width of the pillow front.
Work rows of hdc until the first panel measures approximately 30 cm deep.
Make a second identical panel.
Overlap the two pieces by approximately 10–12 cm.
Place them against the WS of the flower front.
Sc through both layers around the entire outer edge.
Insert a 45 cm cushion form after assembly.
Assembly
- Complete all 72 turquoise flower centers first and compare their puff height before adding the cream layers.
- Finish all square rounds, weave in color-change tails, and block every motif to 21–22 cm with a tolerance no greater than approximately 5 mm.
- Arrange eight squares across and nine squares long, keeping the turquoise centers oriented consistently and checking the overall dimensions before joining.
- Join each group of eight motifs into a horizontal strip with loose cream slip stitches worked through matching outer loops.
- Connect the nine strips vertically and keep each four-square intersection flat rather than adding several extra joining stitches.
- Measure both diagonals of the joined field; correct seam tension if the measurements differ by more than approximately 2 cm.
- Work the first two cream border rounds, count opposite edges, and correct any discrepancy before beginning the turquoise accent round.
- Add the mesh, cream shells, and aqua scalloped edge while checking all four corners after every border round.
- Make two enlarged pillow fronts, block both to equal dimensions, attach overlapping cream back panels, and add matching scalloped edging.
- Weave remaining tails through the WS, raise every turquoise and cream puff by hand, and complete final blocking on the flat cream sections and lace perimeter only.
The completed bedspread should show a regular cream grid with a turquoise flower centered inside every square and a second ring of raised cream puffs visible around each blue center.
7 Technical Tips
- Turquoise petal collapse: Cream puffs positioned too close to the center can cover the blue flower. Maintain enough anchor-chain length that at least 60–70% of every turquoise puff remains visible from directly above.
- Uneven puff height: Pulling one puff loop 5 mm shorter than its neighbors produces an obvious low petal. Draw every loop to approximately the same hook-height before closing the stitch.
- Square cupping: If all four corners lift after the square-conversion round, the circular foundation has insufficient circumference. Add one dc to each side section before continuing rather than trying to flatten the problem during blocking.
- Join contraction: A tight slip-stitch seam can shorten an eight-square strip by several centimeters. Move from a 4 mm to a 4.5 mm hook if the joined strip loses more than approximately 2 cm from its calculated width.
- Border ruffling: Excess stitches in the first border round multiply through the mesh and shells. Count opposite edges and keep their totals identical before working Border Round 2.
- Puff flattening: Heavy blocking over the flower removes the depth that defines this motif. Position pins at least 15–20 mm beyond the outer cream puff tips and apply pressure only to the square frame.
- Pillow warping: Joining a 45 cm front to a smaller unblocked back pulls the corners inward. Block both panels first and keep their side measurements within approximately 5 mm of one another.
How the Two-Level Flower Works
The central motif is not one flower worked in two colors. Structurally, it behaves more like two stacked rings.
The turquoise section occupies the smallest radius and uses compact puffs. Cream anchor loops are then placed behind those stitches rather than through their top edges. This allows the second flower ring to begin farther from the center.
Because the cream puffs use one additional drawn-up loop, they become slightly larger than the turquoise petals.
That difference is visible in the photograph. The center remains distinctly turquoise, while the cream ring appears more rounded and substantial.
Do not use identical puff dimensions for both layers if matching the reference is the objective.
Controlling Puff-Stitch Tension
Puff stitches expose tension differences faster than ordinary double crochet.
Insert the hook into the required space, yarn over, and draw each loop to the same height. Hold the loops against the hook shaft with one finger while drawing up the next loop.
If the yarn is very springy, measure the first completed puff. Use that height as a visual reference throughout the remaining seven petals.
The cream puffs can be slightly larger, but all eight cream elements should match one another.
Inconsistent puff height becomes more noticeable once dozens of identical cream squares are joined side by side.
Why the Neutral Field Is Important
The flower occupies only the central portion of each square. Most of the visible surface is cream.
That proportion prevents the 72 raised motifs from making the finished bedspread visually dense. It also makes the turquoise centers repeat like small points of color across the bed.
The cream field performs a practical role as well. Flat dc, sc, and chain-space rounds are easier to join than thick puff stitches.
Keep the outer two or three rounds free of bulky texture. A flat perimeter produces straighter seams and makes the modular grid more regular.
Using Turquoise as an Accent
The reference does not spread turquoise evenly across every round.
Most of the color is concentrated in the flower center. A much smaller amount returns in the square field and outer border.
This is more effective than alternating complete cream and turquoise rounds because it preserves the light appearance of the bedspread.
If substituting another color, maintain the same value relationship. Navy would create stronger contrast, while pale mint would produce a softer center.
Whatever color is selected, repeat it in the border so the perimeter visually connects with the flower centers.
Calculating Another Bed Size
Always work from the washed square measurement.
With a 21 cm motif:
- 6 squares = 126 cm
- 7 squares = 147 cm
- 8 squares = 168 cm
- 9 squares = 189 cm
- 10 squares = 210 cm
Add roughly 10–14 cm to both finished dimensions for a 5–7 cm border on every side.
A seven-square-wide version can work as a narrower full-bed topper. Eight squares produces a broader bedspread. Nine may be appropriate when a substantial side drop is required.
Measure the actual mattress and decide how much fabric should hang below the top surface before choosing the motif count.
Estimating Yarn from One Square
Published puff-flower motifs show wide material variation because density and finished dimensions differ. One 23 cm DK square uses roughly 95–110 m, while a lighter 2026 Aran motif lists 27–46 m.
The best calculation for this project is therefore based on a finished sample.
Weigh one washed and blocked square.
Then separate the estimate by color if possible.
For example, if one motif uses:
- 21 g cream
- 4 g turquoise
- 1 g pale aqua
Seventy-two motifs require approximately:
1,512 g cream before joining and border.
288 g turquoise.
72 g pale aqua.
Add at least 15–20% to the cream requirement because seams, border rounds, pillow fronts, and pillow backs consume additional yarn.
Keeping 72 Squares the Same Size
Do not wait until all motifs are complete before checking dimensions.
Measure the first block after washing and blocking. Then create a cardboard or foam template at the target dimension.
Every five or six motifs, place a fresh square over that template.
If the block is already more than 5 mm oversized before blocking, check hook tension rather than stretching the other motifs to match.
Consistent squares reduce the amount of correction required at the joining stage.
Joining Without a Heavy Ridge
The central flower already gives the blanket substantial texture. A thick seam would compete with it.
Joining only through matching outer loops creates a relatively flat cream line between motifs. The grid remains visible, but it does not become a raised cord.
Do not make the slip stitches tight.
After joining two squares, place them flat. Their outer edges should remain level with each other and the seam should not cause either motif to fold upward.
A hook 0.5 mm larger than the motif hook is often enough to correct an overly firm seam.
Constructing the Deep Border
The internal grid is geometric, while the outer edge is softer and more decorative.
Solid cream rounds first stabilize the joined blocks. A narrow turquoise line then echoes the central flowers.
Open mesh decreases visual density near the edge, and the shell rounds create the scalloped silhouette visible in the photograph.
Do not add the decorative shell layer before checking all four corners. Any error in the foundation round becomes increasingly obvious as the border widens.
After the final round, block each scallop outward individually rather than stretching the whole blanket edge in one direction.
Matching the Pillow Covers
The pillow fronts should clearly belong to the same set without looking like miniature sections cut from the blanket.
One enlarged flower square achieves that result.
Retain the turquoise central puff flower and cream outer puffs, then continue adding flat cream rounds until the required cushion dimension is reached.
The pillow in the supplied photograph has a stronger concentration of raised cream elements than a typical blanket square. Extra puff accents may therefore be added around the center before the outer frame if a closer visual match is desired.
Finish the pillows with the same turquoise or pale-aqua edge used around the bedspread.
Competition Gap
Current puff-flower patterns commonly focus on one motif, small afghans, baby blankets, bags, or decorative cushions. Published squares range from approximately 10 cm to 23 cm, and construction methods vary from open granny frames to solid square backgrounds.
The supplied design combines several elements that are less often presented together: large bed sizing, a turquoise eight-puff center, a second cream dimensional ring, an almost monochrome square field, tiny turquoise accents, coordinated pillow fronts, and a multi-round scalloped edge.
That combination gives the project a distinct search position between a standard cream flower granny square blanket and a highly colorful floral afghan.
Finishing Checks
Spread the completed bedspread on a flat surface before the final blocking session.
Measure both diagonals. A difference greater than approximately 2 cm indicates that one joining direction is tighter than the other.
Inspect the center of every square next. Eight turquoise puffs should remain visible, followed by eight separate cream puffs.
Check the outer grid. No seam should pull two neighboring square corners together.
Run a hand along the border from the WS and locate any yarn tails that have not been woven through several directional changes.
Finish by reshaping each turquoise and cream puff with the fingers after the blanket is completely dry.
Conclusion
Make one complete motif first, wash it, and record its blocked width before calculating the 72-square field. That measurement determines the final bed size, seam length, yarn requirement, and border depth for this turquoise puff flower granny square bedspread. Keep the turquoise puffs compact, give the larger cream ring enough spacing, and flatten the outer rounds before joining. The next practical step is to produce eight identical centers and compare their dimensions before batch-making the remaining motifs. Share a close-up on Pinterest and the complete bed-and-pillow set on Instagram with #TurquoisePuffFlowerBedspread. Would you keep the center turquoise or replace it with navy blue?









