Introduction
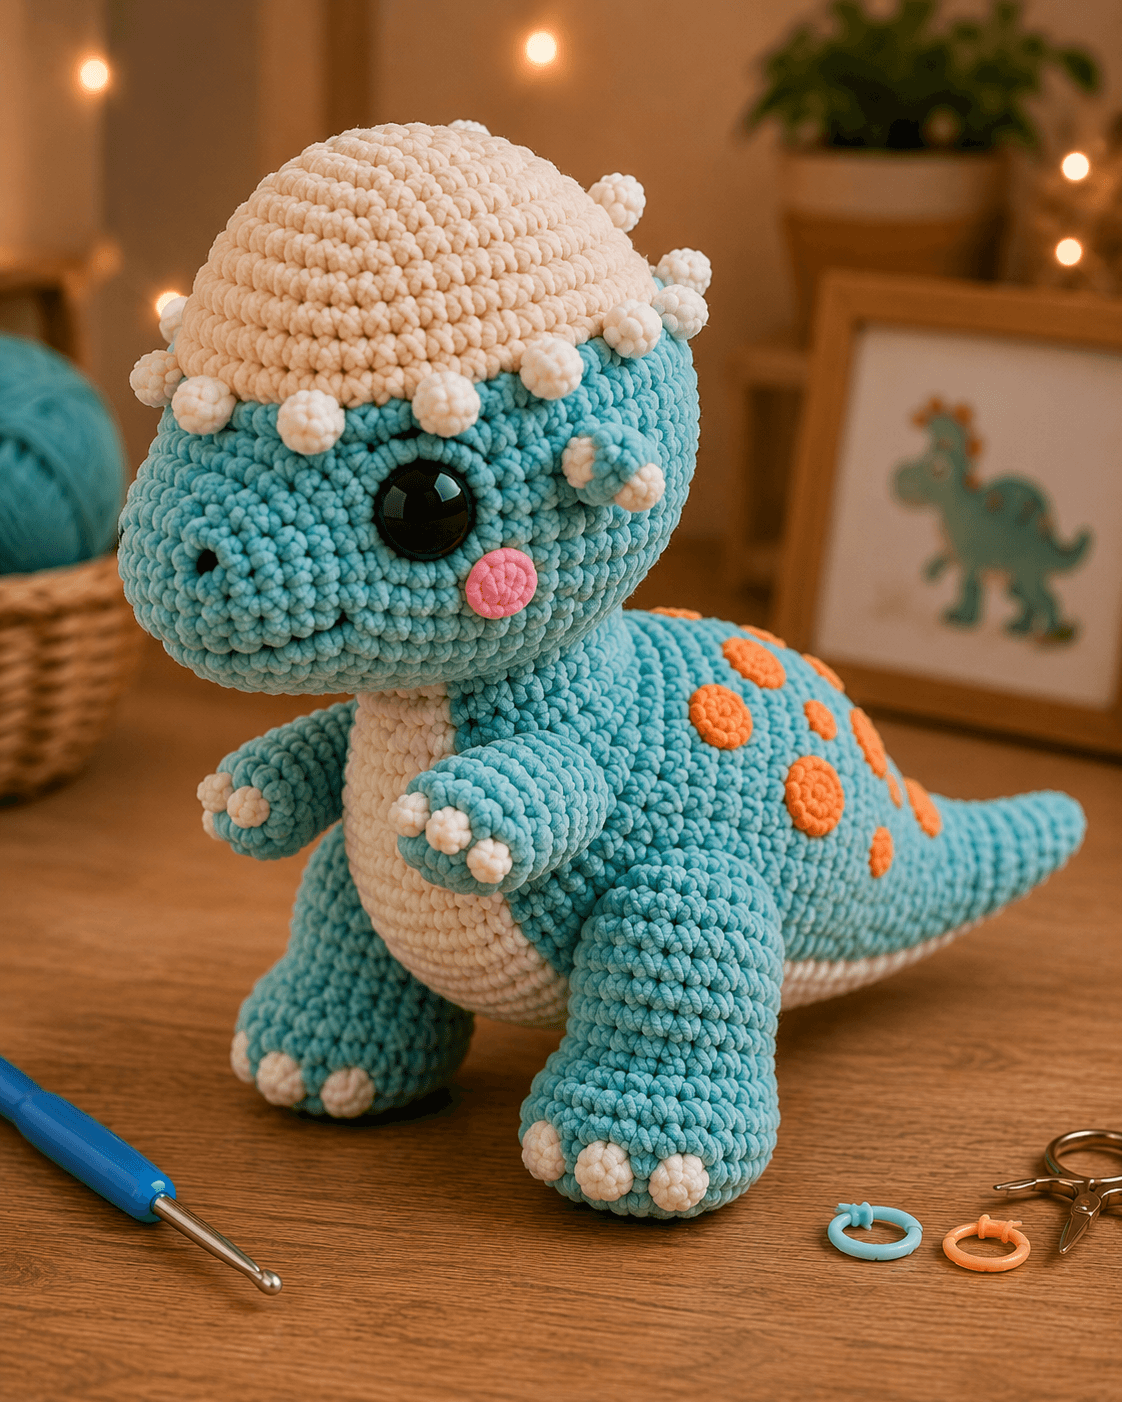
An Ankylosaurus normally carries its armor across the back, but this plush shifts the visual weight into a large white dome wrapped around the crown. This ankylosaurus amigurumi crochet pattern uses #6 chenille, a 5 mm hook, 18 mm eyes, oversized feet, a cream belly, coral spots, and twelve armor bumps. The finished dinosaur measures approximately 27–30 cm high and 40–45 cm long.
The Design: What Makes This Armored Dinosaur Different
The white head armor is constructed as a separate shallow dome rather than color-changing directly inside the blue skull. That choice keeps the cap edge defined and allows the small cream nodules to form an even rim. The body stays comparatively simple: a 42-stitch oval torso, short front arms, large rear legs, and a tapered tail. Coral circles interrupt the turquoise surface without adding more stuffed pieces, while a cream chest panel connects visually with the head armor and claws. This chunky ankylosaurus crochet pattern therefore depends on layered surface pieces more than realistic spikes. One frequent error is positioning the armor cap too far forward. When its lower edge drops toward the eyes, the head looks compressed and the large safety eyes lose the clear blue space visible in the reference.
Project Info at a Glance
| Skill Level | Time | Finished Size | Hook | Best For |
|---|---|---|---|---|
| Intermediate | 11–15 hours | Approx. 27–30 cm high × 40–45 cm long | 5.0 mm | Large dinosaur plush, display toy, dinosaur collection |
Materials and Tools
Yarn
- Aqua / turquoise — #6 super-bulky chenille — approximately 300–360 g — head, body, arms, legs, tail, and side horn bases
- Cream / warm white — matching chenille — approximately 110–140 g — armor dome, armor bumps, belly panel, horn tips, and claws
- Coral orange — matching chenille — approximately 40–60 g — body spots
- Pink — matching chenille — approximately 10 g — cheek patches
- Black embroidery yarn — small amount — nostrils and mouth
Tools
- 5.0 mm crochet hook
- 18 mm safety eyes ×2
- Polyester stuffing
- Large-eye yarn needle
- Locking stitch markers
- Straight pins
- Sharp scissors
Use embroidered eyes instead of plastic safety eyes when the finished plush is intended for a child under three.
Abbreviations
MR — magic ring
sc — single crochet
inc — increase, 2 sc in one stitch
dec — invisible decrease
sl st — slip stitch
ch — chain
hdc — half double crochet
dc — double crochet
BLO — back loop only
For an invisible decrease, insert the hook through the front loops of the next two stitches, yarn over, draw through both front loops, then complete one single crochet.
Pattern — Step by Step
Work all stuffed pieces in continuous spirals unless stated otherwise. Move the stitch marker after every completed round. The following construction is photo-matched to the supplied reference and uses standard amigurumi shaping rather than copying a searched commercial pattern.
Head
Yarn: aqua.
R1: 6 sc in MR (6)
R2: inc ×6 (12)
R3: (sc, inc) ×6 (18)
R4: (2 sc, inc) ×6 (24)
R5: (3 sc, inc) ×6 (30)
R6: (4 sc, inc) ×6 (36)
R7: (5 sc, inc) ×6 (42)
R8: sc around (42)
R9: sc around (42)
R10: sc around (42)
R11: sc around (42)
R12: sc around (42)
R13: sc around (42)
Insert the 18 mm safety eyes between R9 and R10, approximately 8 visible stitches apart. Keep the eye line below the midpoint so enough crown space remains for the armor cap.
R14: sc around (42)
R15: (5 sc, dec) ×6 (36)
R16: (4 sc, dec) ×6 (30)
R17: (3 sc, dec) ×6 (24)
Stuff firmly around the eye posts and muzzle.
R18: (2 sc, dec) ×6 (18)
R19: (sc, dec) ×6 (12)
R20: dec ×6 (6)
Fasten off and close.
Short Rounded Muzzle
Yarn: aqua.
R1: 6 sc in MR (6)
R2: inc ×6 (12)
R3: (sc, inc) ×6 (18)
R4: sc around (18)
R5: sc around (18)
R6: sc around (18)
R7: (sc, dec) ×6 (12)
Stuff firmly at the front and lightly at the sewing edge.
Fasten off with a 30 cm tail.
Body
Yarn: aqua.
R1: 6 sc in MR (6)
R2: inc ×6 (12)
R3: (sc, inc) ×6 (18)
R4: (2 sc, inc) ×6 (24)
R5: (3 sc, inc) ×6 (30)
R6: (4 sc, inc) ×6 (36)
R7: (5 sc, inc) ×6 (42)
R8: sc around (42)
R9: sc around (42)
R10: sc around (42)
R11: sc around (42)
R12: sc around (42)
R13: sc around (42)
R14: sc around (42)
R15: sc around (42)
R16: sc around (42)
R17: sc around (42)
R18: sc around (42)
Begin stuffing. Keep the lower belly rounded and the upper body slightly flatter where the head will attach.
R19: (5 sc, dec) ×6 (36)
R20: (4 sc, dec) ×6 (30)
R21: (3 sc, dec) ×6 (24)
R22: (2 sc, dec) ×6 (18)
R23: (sc, dec) ×6 (12)
R24: dec ×6 (6)
Finish stuffing firmly.
Fasten off and close.
Front Arms — Make 2
Yarn: aqua.
R1: 6 sc in MR (6)
R2: inc ×6 (12)
R3: (sc, inc) ×6 (18)
R4: sc around (18)
R5: sc around (18)
R6: sc around (18)
R7: (sc, dec) ×6 (12)
R8: sc around (12)
R9: sc around (12)
R10: sc around (12)
Stuff the hand firmly and the upper section lightly. Flatten the final opening.
Fasten off with a 30 cm sewing tail.
Back Legs — Make 2
Yarn: aqua.
R1: 6 sc in MR (6)
R2: inc ×6 (12)
R3: (sc, inc) ×6 (18)
R4: (2 sc, inc) ×6 (24)
R5: sc around (24)
R6: sc around (24)
R7: sc around (24)
R8: sc around (24)
R9: sc around (24)
R10: (2 sc, dec) ×6 (18)
R11: sc around (18)
R12: sc around (18)
R13: (sc, dec) ×6 (12)
R14: sc around (12)
Pack the foot densely enough to create a flat base. Reduce stuffing through R12–14 so the top can conform to the body.
Fasten off with a 35 cm sewing tail.
Tapered Tail
Yarn: aqua.
R1: 6 sc in MR (6)
R2: inc ×6 (12)
R3: (sc, inc) ×6 (18)
R4: sc around (18)
R5: sc around (18)
R6: sc around (18)
R7: (sc, dec) ×6 (12)
R8: sc around (12)
R9: sc around (12)
R10: sc around (12)
R11: sc around (12)
R12: sc around (12)
R13: (sc, dec) ×4 (8)
R14: sc around (8)
R15: sc around (8)
R16: sc around (8)
R17: sc around (8)
R18: (2 sc, dec) ×2 (6)
R19: sc around (6)
R20: sc around (6)
R21: sc around (6)
Stuff firmly through R10, lightly through R17, and leave the last three rounds almost empty.
Fasten off with a 40 cm tail.
White Armor Dome
Yarn: cream / white.
R1: 6 sc in MR (6)
R2: inc ×6 (12)
R3: (sc, inc) ×6 (18)
R4: (2 sc, inc) ×6 (24)
R5: (3 sc, inc) ×6 (30)
R6: (4 sc, inc) ×6 (36)
R7: (5 sc, inc) ×6 (42)
R8: sc around (42)
R9: sc around (42)
R10: sc around (42)
Do not stuff.
Fasten off with a 50 cm sewing tail.
The finished piece should resemble a shallow bowl. Place it over the crown with the lower edge sitting well above the eyes.
Armor Rim Bumps — Make 12
Yarn: cream / white.
R1: 6 sc in MR (6)
R2: inc ×6 (12)
R3: dec ×6 (6)
Stuff with a very small amount of fiberfill.
Fasten off with a 15 cm sewing tail.
Side Horn Nubs — Make 2
Begin with aqua.
R1: 6 sc in MR (6)
R2: inc ×6 (12)
R3: sc around (12)
Change to cream.
R4: (sc, dec) ×4 (8)
R5: dec ×4 (4)
Stuff lightly.
Fasten off with a 25 cm sewing tail.
Cream Belly and Chest Panel
Yarn: cream. Work flat.
Row 1: ch 9, sc in second ch from hook and across (8)
Row 2: ch 1, turn, 8 sc (8)
Row 3: ch 1, turn, 8 sc (8)
Row 4: ch 1, turn, 8 sc (8)
Row 5: ch 1, turn, 8 sc (8)
Row 6: ch 1, turn, inc, 6 sc, inc (10)
Row 7: ch 1, turn, 10 sc (10)
Row 8: ch 1, turn, 10 sc (10)
Row 9: ch 1, turn, inc, 8 sc, inc (12)
Row 10: ch 1, turn, 12 sc (12)
Row 11: ch 1, turn, 12 sc (12)
Row 12: ch 1, turn, 12 sc (12)
Row 13: ch 1, turn, 12 sc (12)
Row 14: ch 1, turn, dec, 8 sc, dec (10)
Row 15: ch 1, turn, 10 sc (10)
Row 16: ch 1, turn, dec, 6 sc, dec (8)
Fasten off with a long sewing tail.
Large Coral Body Spots — Make 4
Yarn: coral orange.
R1: 6 sc in MR (6)
R2: inc ×6 (12)
R3: (sc, inc) ×6 (18)
Join with sl st.
Fasten off with a 20 cm sewing tail.
Small Coral Body Spots — Make 3
Yarn: coral orange.
R1: 6 sc in MR (6)
R2: inc ×6 (12)
Join with sl st.
Fasten off with a sewing tail.
Pink Cheek Patches — Make 2
Yarn: pink.
R1: 6 sc in MR (6)
R2: inc ×6 (12)
Join with sl st.
Fasten off with a 20 cm tail.
Front Claws — Make 6
Yarn: cream / white.
R1: 6 sc in MR (6)
R2: sc around (6)
Fasten off.
Do not stuff.
Back Toe Claws — Make 6
Yarn: cream / white.
R1: 6 sc in MR (6)
R2: sc around (6)
Fasten off.
Do not stuff.
Face Details
Yarn: black embroidery yarn.
Embroider two short nostrils near the upper-front edge of the muzzle. Each nostril should measure approximately 5 mm.
Work a shallow curved smile beneath the muzzle, keeping the line below the eye level and clear of the cheek patches.
Assembly
- Pin the short muzzle to the lower-front head and sew around its 12-stitch attachment edge, keeping both safety eyes equally visible from the front.
- Place the white armor dome over the crown with its lower edge approximately 2–2.5 cm above the eye centers, then stitch the complete rim to the head.
- Distribute the 12 white armor bumps around the lower dome edge, beginning at the center front and spacing the remaining pieces symmetrically toward the rear.
- Attach one aqua-and-white horn nub to each side of the head just behind the cheek line, then sew the two pink cheek patches below the eyes.
- Sew the head to the upper-front body with a slight downward facial angle, and pin the cream chest panel from below the chin down the center of the belly.
- Attach both front arms high on the torso and sew three white claw pieces to each hand before fixing the arms into their final forward-facing position.
- Attach both back legs low and slightly forward on the body, test the plush on a hard surface, then sew three white claws across the front of each foot.
- Sew the tapered tail centrally to the rear body and angle its final third slightly upward rather than allowing it to drag flat on the table.
- Arrange the four large and three small coral circles across the visible upper body and rear flank, leaving at least 1.5–2 cm between neighboring spots.
- Embroider the nostrils and smile, weave every loose tail into matching-color stitches, and check head, armor, arms, feet, spots, and tail alignment from the front, side, and top.
The finished plush should stand securely on the two oversized rear feet while the front arms project forward, the cream armor remains centered over the skull, and the tapered tail balances the body visually from behind.
7 Technical Tips
- Armor-cap slippage: A 42-stitch dome can rotate on a heavily stuffed chenille head. Pin the cap at four quarter points first and keep its lower rim no closer than approximately 2 cm to either eye.
- Head tipping: Packing the muzzle harder than the rear skull shifts weight forward. Keep the muzzle firm but remove excess fiberfill if the finished head drops more than roughly 10 degrees after attachment.
- Leg rocking: Unequal foot depth prevents both back feet from contacting the table. Compress the two finished legs side by side and keep their base thickness within approximately 5 mm.
- Chenille holes: Visible stuffing between the 42-stitch head rounds indicates that the fabric is too loose. Move to a 4.5 mm hook if stretched openings approach 2 mm.
- Armor-bump crowding: Twelve bumps packed too tightly create a ruffled cap edge. Pin all twelve before sewing and leave approximately one visible blue stitch between neighboring bases where possible.
- Spot distortion: Pulling the coral sewing yarn tightly turns flat circles into cups. Stitch only through their outer loops and keep each 18-stitch spot lying flat against the blue torso.
- Tail droop: Dense stuffing in the final six-stitch section makes the tapered tip heavy. Leave the last three rounds nearly empty and shape the bend before closing the body seam.
Constructing the White Armor Dome
The white cap is the defining feature of this version. It should look layered over the blue skull rather than crocheted as part of the same sphere.
The dome expands through the standard six-stitch progression to 42 stitches, then holds that circumference for three rounds. Stopping there leaves the lower edge open and produces a shallow helmet shape.
Do not add stuffing between the dome and head. Extra filling creates a second round skull on top of the first and raises the cap too high.
Instead, pin the dome directly against the blue stitches. The crown should retain a rounded profile while the lower white edge forms a clear horizontal boundary above the eyes.
Spacing the Armor Bumps
The small white nodules create the bead-like border visible in the reference. Their spacing matters more than exact stitch alignment.
Begin with one bump at the center front of the dome and another at the center rear. Add one at each side. Those four pieces establish the main spacing.
Distribute the remaining eight between them.
Each bump uses a 12-stitch maximum but closes back to six stitches, creating a rounded piece without a wide sewing base. Use a small amount of stuffing; an overfilled bump becomes taller than the surrounding armor and interrupts the smooth rim.
Shaping the Oversized Head
The photographed dinosaur uses a large head relative to its torso. That proportion is intentional.
A 42-stitch head provides enough surface for 18 mm eyes, the separate muzzle, cheek patches, side nubs, and armor cap. Reducing the head to 30 or 36 stitches would crowd those components together.
Keep the eyes below the vertical midpoint. This reserves the upper crown for the white dome while leaving blue fabric visible between the eyes and armor edge.
After installing the eyes, add stuffing around the posts first. Then fill the center of the skull. This helps maintain an even surface around the large plastic washers.
Building the Standing Base
The rear legs carry most of the weight in this armored dinosaur crochet pattern. Each reaches a 24-stitch maximum before narrowing to a 12-stitch sewing edge.
That wide base is important because the upper body, head, and armor contain considerably more yarn than the short front arms.
Pin both legs before sewing either one permanently. Place the dinosaur on a rigid table and adjust their angle until both feet contact the surface evenly.
The feet should sit slightly forward of the body midpoint. Moving them too far toward the tail makes the head pull the plush forward.
Positioning the Front Arms
The front limbs are smaller and raised rather than supporting the torso.
An 18-stitch hand provides enough width for three white claw bumps, while the 12-stitch upper arm keeps the attachment compact. Stuff the lower half more firmly than the upper half.
Attach both arms at the same body round.
Before completing the seams, view the dinosaur directly from the front. The hands should project at similar angles and end at approximately the same height.
Uneven arms become particularly noticeable because the cream belly panel creates a strong center line between them.
Creating the Cream Belly Panel
The belly panel ties the white head armor to the feet without turning the whole underside cream.
Its width increases from eight to twelve stitches through the central section, then narrows again near the lower belly. That shape follows the rounded front of the body.
Pin the upper end directly beneath the head seam. The lower edge should end above the legs rather than disappearing between them.
Do not stretch the panel while sewing. If it has to be pulled to reach the planned lower position, move the starting point instead.
Arranging the Coral Spots
The orange spots are deliberately irregular in size.
Four 18-stitch circles form the main markings, while three 12-stitch circles fill smaller spaces toward the rear. This variation prevents the flank from looking like a repeated polka-dot grid.
Attach the legs and tail before pinning any spots. Those seams define how much visible blue area remains.
Keep the largest circles across the upper side of the torso. Smaller circles work better near the tail base and between larger markings.
No spot should cross a limb seam because that creates unnecessary bulk where multiple chenille layers overlap.
Choosing Yarn and Hook Size
A 5 mm hook pairs well with many current super-bulky chenille dinosaur patterns, but chenille thickness varies considerably between brands.
Make the first seven head rounds before committing to the complete plush.
Stretch the 42-stitch section gently over two fingers. Stuffing should not be visible through the fabric. If gaps appear, reduce the hook by 0.5 mm.
If the stitches become difficult to enter or the chenille core repeatedly catches on the hook, the tension is too tight.
Use the same hook for the aqua, cream, coral, and pink pieces so the small surface elements remain proportional to the body.
Estimating Yarn Quantity
The most reliable project estimate comes from weighing finished components.
After completing the head, muzzle, and body, weigh those aqua pieces together. Then weigh one rear leg and one front arm.
Multiply each paired component by two and add the tail requirement.
For example, if the head, muzzle, and body consume 210 g, each back leg uses 30 g, each arm uses 15 g, and the tail uses 35 g, the main-color total reaches 335 g before sewing allowance.
Keep an additional quantity from the same dye lot available because replacing turquoise chenille later can produce an obvious shade change.
Why the Tail Is Tapered
A realistic Ankylosaurus would normally have a heavy tail club. The photographed plush does not. Its tail narrows continuously and rises slightly near the tip.
Retaining that shape matters if the goal is to match the supplied image rather than reconstruct the animal anatomically.
The 18-stitch base gives the tail enough volume to merge into the body. Reductions to 12, eight, and six stitches form the taper without a sudden change in diameter.
Leave the final rounds lightly filled. This permits a gentle upward bend and reduces weight behind the dinosaur.
Competition Gap
Many Ankylosaurus patterns concentrate their detail across the back: plates, spikes, bobble textures, or a clubbed tail. Others reduce sewing by working the armor directly into a compact body.
This design uses a different visual hierarchy. The main armor feature is the large cream cranial dome. Twelve rounded nodules frame its edge, while coral circles provide body detail without turning the torso into a heavily plated surface.
The oversized eyes, pink cheeks, short forearms, and broad feet also shift the project toward plush character design rather than paleontological realism.
That creates a useful distinction for readers searching for a blue dinosaur amigurumi with a recognizable armored theme but softer proportions.
Finishing Checks
Set the completed plush on a hard, level surface.
Both rear feet should make full contact. If one foot floats, alter its sewing angle before changing the stuffing.
View the head from the front. The dome should sit centrally, the armor bumps should form a balanced arc, and both horn nubs should leave the head at similar heights.
Check the belly panel next. Its center line should point toward the space between the rear feet.
Finally, look down from above. The head, body, and tail should share one longitudinal axis, while the orange spots remain distributed on both visible sides rather than clustering in one area.
Conclusion
Complete the head and white armor dome before fixing the limbs because those pieces establish the weight and scale of this ankylosaurus amigurumi crochet pattern. Pin the rear legs on a hard surface, add the smaller front arms, then position the cream belly and coral spots only after the stance is stable. Record the finished armor diameter and body length before making another color version, since chenille gauge can change both measurements quickly. Share the armor close-up on Pinterest and the full side profile on Instagram with #BlueArmoredAnkylosaurus. Would you keep the armor cream, or make the dome coral to match the body spots?









