Introduction
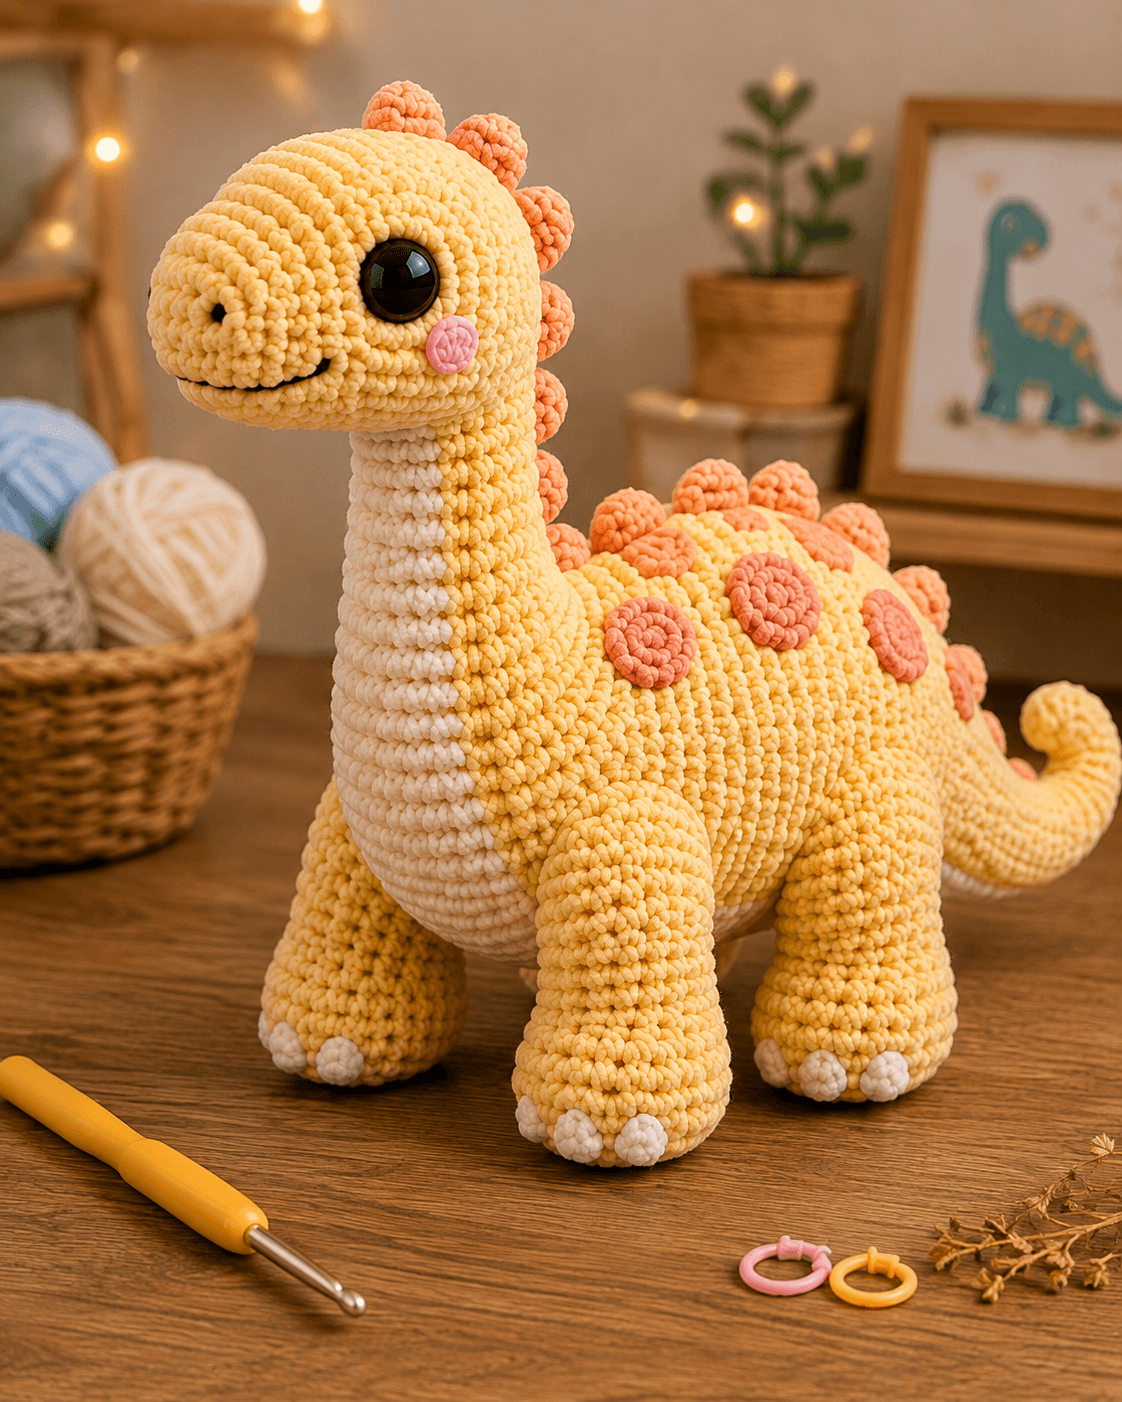
A Brontosaurus neck this tall has to support a 42-stitch head without folding where it meets the shoulders. This brontosaurus amigurumi crochet pattern uses super-bulky chenille, a 5 mm hook, 18 mm eyes, four weight-bearing legs, a cream chest panel, and coral back markings. The finished dinosaur measures approximately 30–33 cm tall and is built for a stable four-legged stance rather than a seated pose.
The Design: What Makes This Brontosaurus Different
The neck controls the entire structure. It widens gradually into the shoulders instead of using a narrow tube attached to a heavy head, which reduces sideways collapse after stuffing. A cream throat panel visually lengthens the neck and continues down the chest, while coral nodules trace the crown, rear neck, and upper back. Large flat coral circles add a second type of marking to the body. This gives the chunky brontosaurus crochet pattern more surface detail than a plain one-color sauropod. Four broad feet provide the stance required by the long neck, and the curled tail shifts some visual mass toward the rear. One common maker error is placing the front legs too far back. The dinosaur then becomes front-heavy and the chest drops toward the table.
Project Info at a Glance
| Skill Level | Time | Finished Size | Hook | Best For |
|---|---|---|---|---|
| Intermediate | 12–16 hours | Approx. 30–33 cm tall | 5.0 mm | Large dinosaur plush, nursery display, dinosaur collection |
Materials and Tools
Yarn
- Butter yellow — #6 super-bulky chenille — approximately 300–400 g — head, neck, body, four legs, and tail
- Coral / orange — matching chenille — approximately 70–100 g — dorsal bumps, body spots, and crown markings
- Cream / ivory — matching chenille — approximately 40–60 g — throat panel and toe claws
- Pink — matching chenille — approximately 10–15 g — cheek patches
- Black yarn — small amount — nostrils and smile
Tools
- 5.0 mm crochet hook
- 18 mm safety eyes ×2
- Polyester stuffing
- Large yarn needle
- Locking stitch marker
- Straight pins
- Scissors
For toys intended for children under three, replace hard plastic eyes with embroidered eyes.
Abbreviations
MR — magic ring
sc — single crochet
inc — increase, 2 sc in one stitch
dec — invisible decrease
sl st — slip stitch
ch — chain
hdc — half double crochet
dc — double crochet
BLO — back loop only
For an invisible decrease, work through the front loops of the next two stitches before completing one single crochet.
Pattern — Step by Step
Work stuffed pieces in continuous spirals unless stated otherwise. The stitch counts below form an original photo-matched construction rather than a reproduction of any searched commercial pattern.
Head
Yarn: butter yellow.
R1: 6 sc in MR (6)
R2: inc ×6 (12)
R3: (sc, inc) ×6 (18)
R4: (2 sc, inc) ×6 (24)
R5: (3 sc, inc) ×6 (30)
R6: (4 sc, inc) ×6 (36)
R7: (5 sc, inc) ×6 (42)
R8: sc around (42)
R9: sc around (42)
R10: sc around (42)
R11: sc around (42)
R12: sc around (42)
R13: sc around (42)
Insert 18 mm safety eyes between R9 and R10, approximately 8 visible stitches apart. Keep them toward the front half of the head.
R14: (5 sc, dec) ×6 (36)
R15: (4 sc, dec) ×6 (30)
R16: (3 sc, dec) ×6 (24)
Stuff the muzzle and eye area firmly. Keep the rear opening slightly softer for the neck seam.
R17: (2 sc, dec) ×6 (18)
R18: (sc, dec) ×6 (12)
R19: dec ×6 (6)
Fasten off and close.
Long Neck
Yarn: butter yellow.
R1: 6 sc in MR (6)
R2: inc ×6 (12)
R3: (sc, inc) ×6 (18)
R4: (2 sc, inc) ×6 (24)
R5: sc around (24)
R6: sc around (24)
R7: sc around (24)
R8: sc around (24)
R9: sc around (24)
R10: sc around (24)
R11: sc around (24)
R12: sc around (24)
R13: sc around (24)
R14: sc around (24)
R15: sc around (24)
R16: sc around (24)
R17: sc around (24)
R18: sc around (24)
R19: (3 sc, inc) ×6 (30)
R20: sc around (30)
R21: sc around (30)
R22: sc around (30)
R23: sc around (30)
R24: sc around (30)
Stuff every four or five rounds. The upper neck needs firm support, but do not stretch the chenille stitches until stuffing shows through.
Fasten off with a 45 cm sewing tail.
Body
Yarn: butter yellow.
R1: 6 sc in MR (6)
R2: inc ×6 (12)
R3: (sc, inc) ×6 (18)
R4: (2 sc, inc) ×6 (24)
R5: (3 sc, inc) ×6 (30)
R6: (4 sc, inc) ×6 (36)
R7: (5 sc, inc) ×6 (42)
R8: sc around (42)
R9: sc around (42)
R10: sc around (42)
R11: sc around (42)
R12: sc around (42)
R13: sc around (42)
R14: sc around (42)
R15: sc around (42)
R16: sc around (42)
R17: sc around (42)
R18: sc around (42)
R19: sc around (42)
R20: sc around (42)
Stuff firmly through the belly and back.
R21: (5 sc, dec) ×6 (36)
R22: (4 sc, dec) ×6 (30)
R23: (3 sc, dec) ×6 (24)
R24: (2 sc, dec) ×6 (18)
R25: (sc, dec) ×6 (12)
R26: dec ×6 (6)
Finish stuffing.
Fasten off and close.
Front Legs — Make 2
Yarn: butter yellow.
R1: 6 sc in MR (6)
R2: inc ×6 (12)
R3: (sc, inc) ×6 (18)
R4: (2 sc, inc) ×6 (24)
R5: sc around (24)
R6: sc around (24)
R7: sc around (24)
R8: sc around (24)
R9: (2 sc, dec) ×6 (18)
R10: sc around (18)
R11: sc around (18)
R12: sc around (18)
R13: sc around (18)
R14: (sc, dec) ×6 (12)
R15: sc around (12)
Stuff the foot firmly and reduce the stuffing in the upper two rounds.
Fasten off. Leave a 35 cm tail.
Back Legs — Make 2
Yarn: butter yellow.
R1: 6 sc in MR (6)
R2: inc ×6 (12)
R3: (sc, inc) ×6 (18)
R4: (2 sc, inc) ×6 (24)
R5: sc around (24)
R6: sc around (24)
R7: sc around (24)
R8: sc around (24)
R9: sc around (24)
R10: (2 sc, dec) ×6 (18)
R11: sc around (18)
R12: sc around (18)
R13: (sc, dec) ×6 (12)
R14: sc around (12)
Stuff firmly at the base. The rear legs are one round shorter than the front legs to support the slightly rising shoulder line.
Fasten off with a long tail.
Curved Tail
Yarn: butter yellow.
R1: 6 sc in MR (6)
R2: inc ×6 (12)
R3: (sc, inc) ×6 (18)
R4: sc around (18)
R5: sc around (18)
R6: sc around (18)
R7: (sc, dec) ×6 (12)
R8: sc around (12)
R9: sc around (12)
R10: sc around (12)
R11: sc around (12)
R12: sc around (12)
R13: (sc, dec) ×4 (8)
R14: sc around (8)
R15: sc around (8)
R16: sc around (8)
R17: sc around (8)
R18: sc around (8)
R19: (2 sc, dec) ×2 (6)
R20: sc around (6)
R21: sc around (6)
R22: sc around (6)
Stuff firmly through R10, lightly through R18, and leave the final tip nearly empty. Curve the tail upward while sewing.
Fasten off with a 40 cm tail.
Cream Throat and Chest Panel
Yarn: cream. Work flat.
Row 1: ch 9, sc in second ch from hook and across (8)
Row 2: ch 1, turn, 8 sc (8)
Row 3: ch 1, turn, 8 sc (8)
Row 4: ch 1, turn, 8 sc (8)
Row 5: ch 1, turn, 8 sc (8)
Row 6: ch 1, turn, 8 sc (8)
Row 7: ch 1, turn, 8 sc (8)
Row 8: ch 1, turn, 8 sc (8)
Row 9: ch 1, turn, 8 sc (8)
Row 10: ch 1, turn, 8 sc (8)
Row 11: ch 1, turn, inc, 6 sc, inc (10)
Row 12: ch 1, turn, 10 sc (10)
Row 13: ch 1, turn, 10 sc (10)
Row 14: ch 1, turn, inc, 8 sc, inc (12)
Row 15: ch 1, turn, 12 sc (12)
Row 16: ch 1, turn, 12 sc (12)
Row 17: ch 1, turn, 12 sc (12)
Row 18: ch 1, turn, 12 sc (12)
Fasten off with a long sewing tail.
The narrow section runs beneath the head and down the neck. The wider section lies across the upper chest.
Coral Dorsal Bumps — Make 12
Yarn: coral / orange.
R1: 6 sc in MR (6)
R2: inc ×6 (12)
R3: sc around (12)
R4: dec ×6 (6)
Stuff lightly.
Fasten off with a 20 cm tail.
Use the bumps from the crown of the head down the rear neck and across the upper body.
Large Coral Body Spots — Make 6
Yarn: coral / orange.
R1: 6 sc in MR (6)
R2: inc ×6 (12)
R3: (sc, inc) ×6 (18)
Join with sl st.
Fasten off with a sewing tail.
Do not stuff.
Pink Cheek Patches — Make 2
Yarn: pink.
R1: 6 sc in MR (6)
R2: inc ×6 (12)
Join with sl st.
Fasten off with a sewing tail.
White Toe Claws — Make 12
Yarn: cream / white.
R1: 6 sc in MR (6)
R2: sc around (6)
Fasten off.
Do not stuff.
Face Details
Yarn: black.
Embroider two nostrils approximately 5–7 mm long near the front of the muzzle.
Work a shallow curved smile beneath the muzzle, beginning approximately one stitch behind the first nostril and ending at a matching point on the opposite side.
Assembly
- Pin the head to the narrow 24-stitch end of the neck, checking the eye line from the front before sewing around the complete opening.
- Attach the wider 30-stitch neck base to the front-upper body so the neck rises vertically with a slight forward curve.
- Center the cream throat panel beneath the head, run it down the front of the neck, and stitch its wider lower section across the upper chest.
- Sew the two pink cheek patches below and slightly behind the eyes, then embroider the nostrils and curved mouth.
- Attach the front legs beneath the shoulder area and the back legs beneath the rear half of the body; set the dinosaur on a table repeatedly while sewing.
- Sew three cream toe claws across the front of each foot, positioning the middle claw first and spacing the outer claws approximately 8–10 mm away.
- Attach the tail to the rear center of the body, curve its final third upward, and tack the inside of the curve with one hidden stitch if necessary.
- Pin the 12 coral dorsal bumps from the crown of the head down the back of the neck and across the spine, then sew each base twice around.
- Distribute the six flat coral spots across both sides of the body, avoiding the leg seams and keeping at least 2 cm between adjacent spots.
- Weave every remaining tail into matching-color stitches, stand the Brontosaurus on a level surface, and correct any leg or neck seam that prevents all four feet from bearing weight.
The finished dinosaur should stand on four feet with an upright neck, forward-facing head, visible cream chest, and a tail that curves upward behind the body.
7 Technical Tips
- Neck collapse: A 24-stitch neck that is filled only after completion develops a soft hinge near the middle. Add stuffing every four or five rounds and keep the central column uniformly firm.
- Head tipping: If the head projects more than approximately 4 cm in front of the neck centerline, the plush can become front-heavy. Pin the head before sewing and shift the neck seam forward rather than adding excessive stuffing to the rear body.
- Leg rocking: A difference of even one heavily packed stuffing layer between the four feet can lift one leg from the table. Compress all four finished legs side by side before attachment and match their base depth.
- Chenille gaps: Stuffing visible between stitches means tension is too loose for the selected hook. Test the 42-stitch head at maximum stretch and move to a 4.5 mm hook if openings exceed roughly 2 mm.
- Dorsal bump rotation: A six-stitch closing base can turn after attachment if sewn only once. Stitch each coral bump around its base twice, then bury the tail at least 3 cm into the yellow fabric.
- Chest-panel puckering: Pulling the cream sewing thread tightly shortens the neck front. Pin the complete 18-row panel before stitching and keep the finished panel length within approximately 5 mm of its unsewn measurement.
- Eye distortion: Dense fiberfill pushed directly against an 18 mm eye post can spread chenille stitches. Pack stuffing around the washer first, then fill the center of the head.
Building a Neck That Stays Upright
The neck is the primary technical problem in this chenille dinosaur amigurumi. A short dinosaur can tolerate a soft neck because the head sits close to the torso. This design cannot.
The upper section holds at 24 stitches for eighteen rounds. That keeps the silhouette narrow without reducing the circumference enough to create a weak column. The final increase to 30 stitches forms a broader shoulder attachment.
Stuffing should be layered rather than pushed into the finished tube from one end. Add a compact amount, press it evenly against the walls, then continue crocheting. The goal is a continuous support column rather than several dense lumps separated by soft sections.
Before attaching the head, bend the neck forward by only a few degrees. A large forward curve shifts too much weight beyond the front feet.
Shaping the Rounded Sauropod Head
The photographed head is large relative to the neck, which gives the dinosaur its plush character. A 42-stitch plateau provides enough volume for the large black eyes while preserving a rounded muzzle.
Eye placement should happen before the decrease sequence. Place the posts through the chenille, add the washers, then view the head from the front and side before locking them completely.
The cheeks sit below the eyes rather than directly beside them. This keeps the facial features away from the mouth line.
Keep the nostrils short. Large dark nostrils dominate the pale yellow muzzle and change the expression.
Positioning the Four Standing Legs
The photographed Brontosaurus stands rather than sits, so four-point contact matters.
Attach the front legs close to the shoulder line. Their centers should sit slightly ahead of the midpoint of the body. The rear legs can sit farther apart because the tail occupies the center-back seam.
Pin all four legs before sewing any one piece completely.
Set the body on a rigid table. Adjust until all four feet touch. Sew only a few stitches into each leg first, test again, and then complete the seams.
This method catches a tilted leg before a full chenille seam has to be removed.
Planning the Coral Back Markings
The coral markings use two separate constructions.
Rounded dorsal bumps create a raised line from the crown to the back. Flat circles create larger side markings across the torso. Using the same coral yarn ties both elements together without making them identical.
Start the first bump near the rear crown rather than directly between the eyes. Continue down the central rear neck.
Spacing can widen slightly across the body because that area has greater circumference.
Place the flat spots only after the legs and tail have been attached. Otherwise a body spot may land beneath a seam and become partly hidden.
Making the Cream Chest Stripe
The cream panel prevents a large yellow dinosaur from becoming one uninterrupted block of color. It also emphasizes the height of the neck.
The panel starts eight stitches wide and increases to twelve across the chest. That widening mirrors the neck’s change from 24 to 30 stitches.
Do not stretch the panel while pinning.
Place its upper end just below the underside of the head. Continue directly down the center of the neck and allow the final rows to rest on the chest.
Sew through the edge loops rather than across the middle of the cream stitches so the seam remains narrow.
Choosing Chenille Yarn
Current Brontosaurus patterns use bulky and super-bulky chenille with hooks ranging from approximately 4 to 6 mm. For this photo-matched construction, a 5 mm hook produces dense fabric while still allowing a 42-stitch head and body to remain flexible.
Premier Parfait Chunky is one useful benchmark: each skein contains 100 g / 120 m of #6 polyester chenille. A project of this scale should have several main-color skeins available from the same dye lot.
Chenille thickness differs substantially between brands. Crochet the first six head rounds and stretch the fabric gently. If stuffing would show through, reduce the hook size before continuing.
Estimating Yarn More Accurately
Manufacturer ball weight is more useful than estimating solely from the photographed size.
Weigh the completed head and neck together. Then weigh the body. Those three pieces represent most of the yellow yarn used by the project.
Four legs and the tail add a substantial second group.
For example, if the head, neck, and body use 220 g of yellow yarn and one complete leg uses 25 g, four legs add another 100 g before the tail and sewing allowance.
Buy at least one additional main-color skein beyond the calculated requirement when color matching matters.
Controlling the Tail Curve
A completely stuffed tail tends to remain straight.
The photographed version rises at the tip, so the final third needs less stuffing than the base. That allows the six- and eight-stitch sections to bend without producing a hard crease.
Shape the curve before sewing the tail to the body.
If the tip falls after assembly, pass a matching yellow yarn strand through the inside of the curve, draw the two points slightly closer, and knot the strand inside the fabric. Only a small adjustment is required.
Competition Gap
Current Brontosaurus crochet patterns cover a broad range of constructions. Some are tiny one-piece designs, some minimize sewing for market production, and others use plain bodies with little surface decoration. Current finished sizes run from small hand-sized amigurumi to chenille dinosaurs around 25–30 cm tall.
The supplied image places more emphasis on markings and standing anatomy. The cream throat extends nearly the full neck length. Coral bumps continue from the head onto the back, while separate flat coral spots cover the torso. Four large feet carry visible cream claws.
Those features create a useful distinction for a long neck dinosaur crochet pattern aimed at readers who want a larger display plush instead of a miniature no-sew dinosaur.
Finishing Checks
Stand the completed dinosaur on a hard, level surface.
All four feet should touch simultaneously. If one does not, adjust the corresponding leg seam rather than adding more stuffing.
Look at the dinosaur from the front. The neck should rise from the body center without leaning left or right.
View it from above next. The head, neck, spine bumps, body center, and tail base should form one continuous axis.
Inspect the coral markings last. The dorsal bumps should read as one line, while the flat body spots should remain independent circles rather than touching one another.
Conclusion
Finish the neck and head before attaching the legs because their combined weight determines where the standing base needs to sit. Test all four feet on a hard surface, attach the curled tail, then add the cream chest and coral markings to complete this brontosaurus amigurumi crochet pattern. Record the finished neck length and standing height before making another version, since chenille gauge can change the proportions substantially. Share a full side view on Pinterest and a close-up of the coral spine on Instagram with #YellowBrontosaurusPlush. Would you keep the back markings coral, or change them to mint green or lavender?









