Introduction
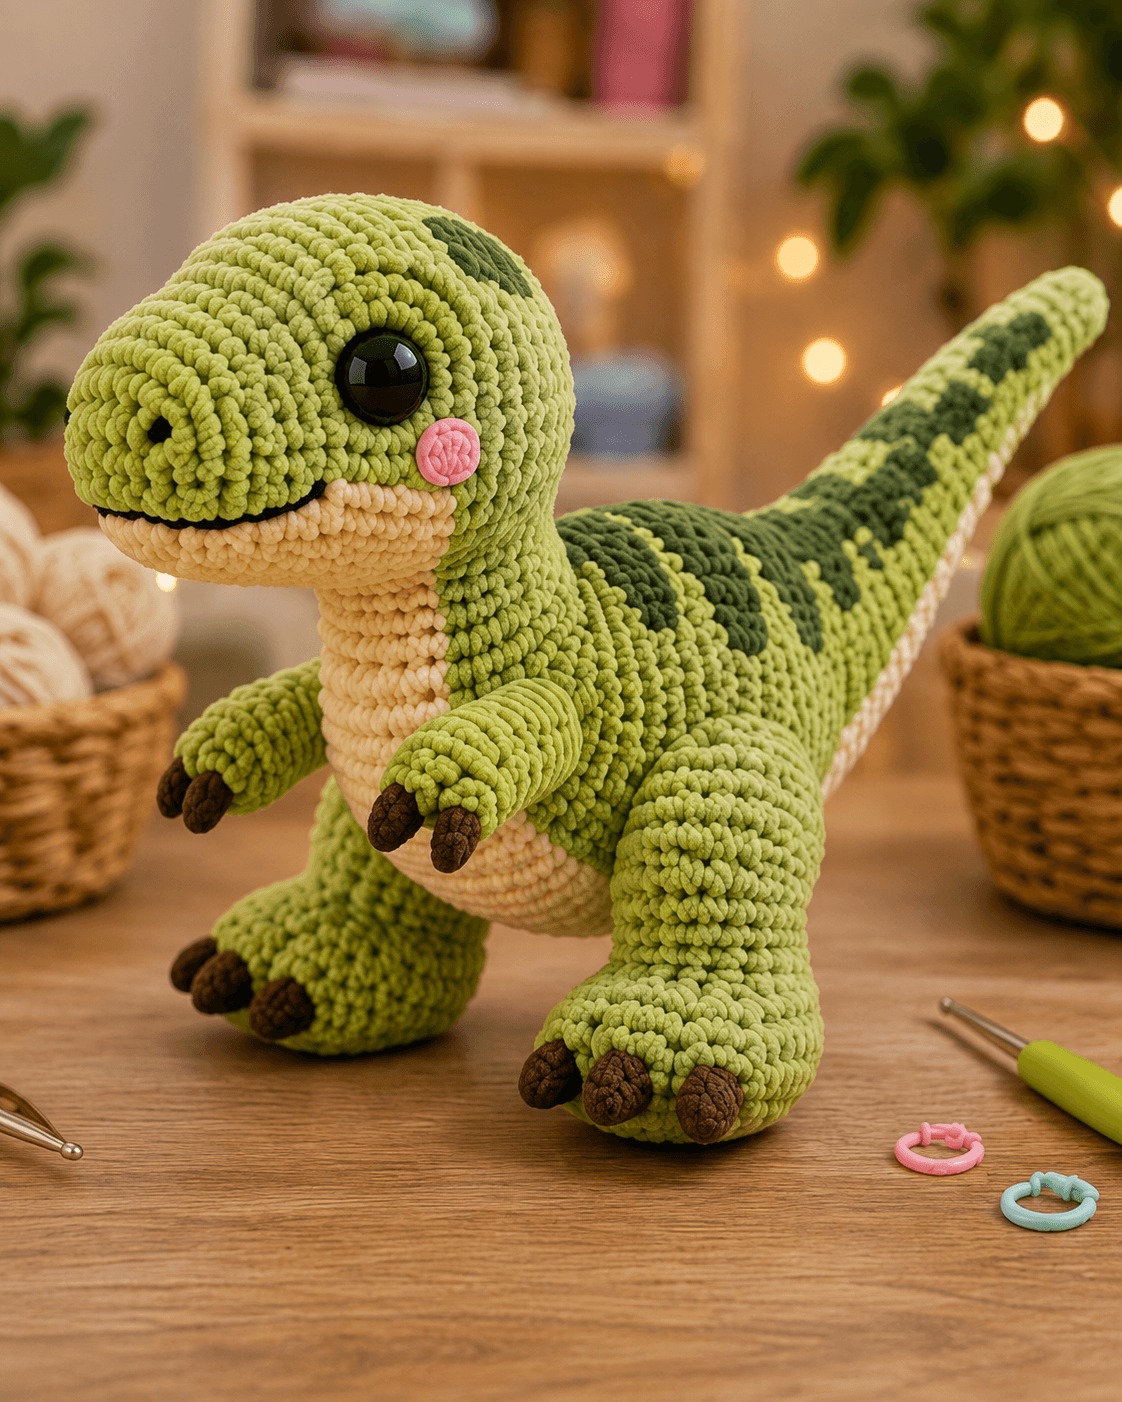
A Velociraptor needs three visible fingers before its long tail even starts to identify the silhouette. This Velociraptor amigurumi crochet pattern uses plush chenille, a 4 mm hook, and approximately 16–18 mm safety eyes for a dinosaur about 30–32 cm tall. The intermediate build combines an elongated muzzle, cream underside, short clawed arms, heavy hind legs, irregular dorsal markings, and a tapered balancing tail.
The Design: What Makes This Velociraptor Different
The first structural decision is the tail. It begins almost as wide as the rear body and narrows slowly because a short cone would make the head-heavy dinosaur pitch forward. Large hind legs form the second support system; they are broader than the arms and positioned low enough for the toes to share the table plane with the lower body. The third feature is the cream underside. Instead of frequent color changes through stuffed rounds, this crochet Velociraptor plush uses a separate shaped panel from jaw to belly, keeping the main green fabric continuous. Irregular dark-green markings turn the basic body into a more detailed raptor amigurumi pattern without complicating every round. One frequent maker error is sizing the forearms like T. rex arms. The photo requires longer forearms with three clearly separated claws.
Project Info at a Glance
| Skill Level | Time | Finished Size | Hook | Best For |
|---|---|---|---|---|
| Intermediate | 9–12 hours | Approx. 30–32 cm tall × 48–52 cm long | 4.0 mm | Large dinosaur plush, nursery display, dinosaur collection |
A current tested Velociraptor pattern made in worsted yarn measures about 30.5 cm tall and 50.8 cm long with a 4 mm hook. That published proportion closely matches the supplied chenille reference, although the plush yarn produces a softer, rounder surface.
Materials and Tools
Yarn
- Light lime green plush / chenille — approximately 300–350 g — head, muzzle, neck, body, arms, legs, and tail
- Warm cream plush / chenille — approximately 55–70 g — lower jaw, throat, belly, and toe accents
- Dark forest green plush yarn — approximately 35–45 g — dorsal patches and tail markings
- Dark brown plush or smooth yarn — approximately 15–20 g — foreclaws and hind claws
- Pink yarn — approximately 5 g — cheek patches
- Black yarn — approximately 3–5 g — nostrils and mouth
Tools
- 4.0 mm crochet hook
- 16–18 mm safety eyes
- Polyester stuffing
- Yarn needle
- Long doll needle
- Locking stitch markers
- Sharp scissors
- Optional smooth green yarn for reinforcing chenille magic rings
Abbreviations
MR — magic ring
sc — single crochet
inc — increase
dec — invisible decrease
sl st — slip stitch
ch — chain
hdc — half double crochet
dc — double crochet
BLO — back loop only
FLO — front loop only
An invisible decrease is worked through the front loops of the next two stitches before completing one single crochet, which reduces the open gaps that standard decreases can leave in stuffed chenille fabric.
Pattern — Step by Step
Work stuffed sections in a continuous spiral unless stated otherwise. Use a stitch marker at the first stitch of every round.
Head
Yarn: light lime green — original standard amigurumi math.
R1: 6 sc in MR (6)
R2: inc × 6 (12)
R3: (sc, inc) × 6 (18)
R4: (2 sc, inc) × 6 (24)
R5: (3 sc, inc) × 6 (30)
R6: (4 sc, inc) × 6 (36)
R7–R13: sc around (36)
Insert the safety eyes between R9 and R10, approximately 9 stitches apart. Do not lock the backs until both eyes have been measured from the muzzle center line.
R14: (4 sc, dec) × 6 (30)
R15: (3 sc, dec) × 6 (24)
Stuff firmly around and behind the safety-eye washers.
R16: (2 sc, dec) × 6 (18)
R17: (sc, dec) × 6 (12)
R18: dec × 6 (6)
Fasten off. Leave a 30 cm tail.
Elongated Muzzle
Yarn: light lime green.
R1: 6 sc in MR (6)
R2: inc × 6 (12)
R3: (sc, inc) × 6 (18)
R4–R7: sc around (18)
R8: (2 sc, inc) × 6 (24)
R9–R11: sc around (24)
R12: (2 sc, dec) × 6 (18)
R13–R14: sc around (18)
Stuff the tip firmly and the rear section moderately so the muzzle can flatten slightly against the head.
Fasten off. Leave a 35 cm sewing tail.
Lower Jaw Panel
Yarn: cream. Work flat.
Ch 7.
Row 1: sc in second ch and across (6)
Row 2: inc, 4 sc, inc (8)
Rows 3–8: sc across (8)
Row 9: dec, 4 sc, dec (6)
Rows 10–11: sc across (6)
Fasten off. Leave a 25 cm tail.
Pin this panel beneath the green muzzle before sewing the muzzle to the head.
Body
Yarn: light lime green.
R1: 6 sc in MR (6)
R2: inc × 6 (12)
R3: (sc, inc) × 6 (18)
R4: (2 sc, inc) × 6 (24)
R5: (3 sc, inc) × 6 (30)
R6: (4 sc, inc) × 6 (36)
R7: (5 sc, inc) × 6 (42)
R8–R18: sc around (42)
R19: (5 sc, dec) × 6 (36)
R20–R22: sc around (36)
R23: (4 sc, dec) × 6 (30)
R24–R25: sc around (30)
Stuff the lower body firmly. Add extra stuffing along the rear half because the tail seam will pull on this area.
R26: (3 sc, dec) × 6 (24)
R27: (2 sc, dec) × 6 (18)
R28: (sc, dec) × 6 (12)
R29: dec × 6 (6)
Fasten off.
Neck
Yarn: light lime green.
R1: 6 sc in MR (6)
R2: inc × 6 (12)
R3: (sc, inc) × 6 (18)
R4: (2 sc, inc) × 6 (24)
R5–R11: sc around (24)
R12: (2 sc, dec) × 6 (18)
R13–R15: sc around (18)
Stuff the lower two-thirds firmly enough that the neck does not fold under the finished head.
Fasten off. Leave a 40 cm sewing tail.
Front Arms — Make 2
Yarn: light lime green.
R1: 6 sc in MR (6)
R2: inc × 6 (12)
R3: (sc, inc) × 6 (18)
R4–R6: sc around (18)
R7: (sc, dec) × 6 (12)
R8–R13: sc around (12)
R14: (sc, dec) × 4 (8)
R15–R16: sc around (8)
Stuff the hand and lower arm lightly. Leave the upper 2 cm almost unstuffed so the arm can angle forward.
Fasten off. Leave a 30 cm tail.
Foreclaws — Make 6
Yarn: dark brown.
R1: 6 sc in MR (6)
R2: sc around (6)
R3: (sc, dec) × 2 (4)
Fasten off. Leave a 12 cm tail.
Sew three claws to each hand. The center claw can project approximately 5 mm farther than the outer two.
Hind Legs — Make 2
Yarn: light lime green.
R1: 6 sc in MR (6)
R2: inc × 6 (12)
R3: (sc, inc) × 6 (18)
R4: (2 sc, inc) × 6 (24)
R5: (3 sc, inc) × 6 (30)
R6–R10: sc around (30)
R11: (3 sc, dec) × 6 (24)
R12–R15: sc around (24)
R16: (2 sc, dec) × 6 (18)
R17–R20: sc around (18)
Stuff firmly. Pack the foot densely enough that it keeps a broad flat base.
Fasten off. Leave a 40 cm tail.
Hind Claws — Make 6
Yarn: dark brown.
R1: 6 sc in MR (6)
R2: sc around (6)
R3: sc around (6)
R4: (sc, dec) × 2 (4)
Fasten off. Leave a 12 cm tail.
Sew three claws across each front foot. Angle the middle claw slightly forward.
Tail
Yarn: light lime green.
R1: 6 sc in MR (6)
R2: inc × 6 (12)
R3: (sc, inc) × 6 (18)
R4: (2 sc, inc) × 6 (24)
R5: (3 sc, inc) × 6 (30)
R6: (4 sc, inc) × 6 (36)
R7: (5 sc, inc) × 6 (42)
R8–R13: sc around (42)
R14: (5 sc, dec) × 6 (36)
R15–R19: sc around (36)
R20: (4 sc, dec) × 6 (30)
R21–R25: sc around (30)
R26: (3 sc, dec) × 6 (24)
R27–R31: sc around (24)
R32: (2 sc, dec) × 6 (18)
R33–R38: sc around (18)
R39: (sc, dec) × 6 (12)
R40–R47: sc around (12)
R48: dec × 6 (6)
R49–R55: sc around (6)
Stuff the first 20 cm firmly. Reduce the stuffing gradually so the last third can angle upward without forming a rigid rod.
Fasten off. Leave a 45 cm sewing tail.
Cream Throat and Belly Panel
Yarn: warm cream. Work flat in rows.
Ch 9.
Row 1: sc in second ch and across (8)
Row 2: inc, 6 sc, inc (10)
Row 3: inc, 8 sc, inc (12)
Rows 4–10: sc across (12)
Row 11: inc, 10 sc, inc (14)
Rows 12–18: sc across (14)
Row 19: dec, 10 sc, dec (12)
Rows 20–22: sc across (12)
Row 23: dec, 8 sc, dec (10)
Rows 24–25: sc across (10)
Row 26: dec, 6 sc, dec (8)
Fasten off. Leave a 60 cm sewing tail.
The narrow end belongs near the throat. The wider section should cross the fullest part of the abdomen.
Dark-Green Back Patches
Yarn: dark forest green. Make 8–12 mixed shapes.
Small patch:
R1: 6 sc in MR (6)
Fasten off.
Medium patch:
R1: 6 sc in MR (6)
R2: inc × 6 (12)
Fasten off.
Large patch:
R1: 6 sc in MR (6)
R2: inc × 6 (12)
R3: (sc, inc) × 6 (18)
Fasten off.
For elongated markings, flatten a medium circle and tack it into an oval during sewing rather than making every marking perfectly round.
Tail Bands
Yarn: dark forest green.
Ch 13–19 depending on the tail circumference at the chosen position.
Row 1: sc across.
Fasten off.
Make 4–6 short strips in decreasing lengths and sew them around only the upper and side surfaces of the tail rather than forming complete rings.
Cheek Patches — Make 2
Yarn: pink.
R1: 6 sc in MR (6)
R2: inc × 6 (12)
Fasten off. Leave a 12 cm sewing tail.
Nostrils — Make 2
Yarn: black.
Embroider one short stitch on each side of the muzzle approximately 2 cm behind the front tip.
Mouth
Yarn: black.
Embroider a curved horizontal mouth line along the seam between the green muzzle and cream lower-jaw section.
Keep the visible line approximately 6–7 cm long.
Assembly
- Sew the cream lower-jaw panel beneath the muzzle, then attach the stuffed muzzle to the lower front of the head with the nostrils level.
- Attach the neck to the rear underside of the head and add stuffing through the seam until the head remains upright without folding forward.
- Sew the neck to the front of the body, keeping the head slightly raised and the muzzle approximately parallel to the table.
- Pin the cream throat-and-belly panel from the lower jaw through the center abdomen, then sew around its complete edge with matching cream yarn.
- Attach the two hind legs low on the body so all six brown claws sit on the same horizontal surface when the dinosaur is upright.
- Sew the forearms high on the chest, angled slightly forward, and position the three claws on each hand where they remain visible from the front.
- Attach the tail across a broad rear-body seam and test the dinosaur on a flat surface before closing the final 3–4 cm of the seam.
- Pin the largest dark-green patches across the shoulders and upper torso, then distribute smaller patches toward the rear without making a symmetrical spot pattern.
- Sew the shortened dark-green strips across the top and sides of the tail, decreasing their visual size toward the tail tip.
- Attach the pink cheek circles, embroider the nostrils and mouth, bury every sewing tail inside the body, and reshape the hind feet and tail curve.
The completed dinosaur should rest primarily on both hind feet and the lower body while the extended tail prevents the heavy head from pulling the figure forward.
7 Technical Tips
- Tail droop: A tail packed equally firmly from base to tip becomes too heavy and falls to the table. Stuff the first 20 cm firmly, then reduce the filling until the final six-stitch section contains almost none.
- Head collapse: A loosely filled neck will buckle where it joins the body. The lower 6–8 cm should resist compression when pressed gently between the thumb and forefinger.
- Three-claw loss: Chenille hand stitches can hide small brown claws. Leave at least 7–10 mm between adjacent claw attachment points so all three remain individually visible.
- Eye placement error: One stitch difference in thick chenille can shift an eye several millimeters. Measure both eye centers from the muzzle seam before installing the washers permanently.
- Belly-panel skew: A cream panel sewn 5 mm off the body center becomes more obvious as it reaches the abdomen. Pin the throat, midpoint, and lower edge first, then fill the spaces between those anchors.
- Invisible-decrease holes: Standard two-loop decreases can expose stuffing in plush yarn. Work through front loops only and keep the decrease tension equal to the surrounding single crochet stitches.
- Leg instability: Hind legs attached even 10–15 mm too high can leave the feet suspended. Pin both legs with the dinosaur standing before sewing the first complete attachment seam.
Why the Tail Controls the Entire Pose
The tail is nearly as important as the hind legs in this construction. A long raptor body places considerable visual and physical weight in front of the hips because the head, muzzle, neck, and forearms all extend forward.
A tail that reaches only a short distance behind the body cannot offset that distribution. The gradual 42-to-6-stitch taper produces enough length without ending in an oversized point.
Do not force a dramatic upward bend while stuffing. The photo shows a tail that rises gently from the body before tapering outward. Shape that curve during attachment and final stuffing rather than by packing one side more tightly.
Building the Raptor Forearms
Three visible claws distinguish the photographed arms from simplified dinosaur plush designs.
The forearms should project far enough from the torso that the hands can be seen in front view. If they are sewn flat against the chest, the individual claws disappear and the dinosaur begins to resemble a stylized T. rex.
Leave the upper portion of each arm almost unstuffed. That creates a flatter sewing surface and allows the hand to turn slightly inward.
Attach all six claws before sewing the arms to the body. Their orientation is easier to correct while the arm remains loose.
Working With Plush Chenille Yarn
Chenille gives the dinosaur the rounded texture visible in the photo, but it also hides individual stitch legs.
Keep a marker in every first stitch. Count at the end of each increase and decrease round rather than trusting the visible shape.
A 4 mm hook produces a dense fabric with many common plush yarns. If the hook scrapes or breaks the core strand, move up by 0.5 mm rather than pulling each stitch harder.
Magic rings are another weak point. A matching smooth yarn can be used as the ring foundation, with the plush stitches crocheted over it.
Placing the Dark-Green Markings
The supplied dinosaur uses irregular camouflage-like areas rather than perfect spots.
Concentrate the largest dark patches along the shoulders and upper torso. Decrease both size and spacing as the markings move along the tail.
A perfectly mirrored layout from left to right will look less organic than the reference. Pin all pieces first, then rotate several ovals or move one patch forward by 1–2 cm before sewing.
Keep the cream underside free from dark markings. That clear division makes the belly panel easier to read from the side.
Choosing the Eye Size
A verified worsted Velociraptor pattern uses 12 mm safety eyes for a dinosaur about 30.5 cm tall. The photo uses much thicker chenille and proportionally larger glossy eyes, so approximately 16–18 mm is a better visual match for this version.
Test the eyes before locking the washers.
The lower eye edge should remain clearly above the mouth line. Eyes placed too low make the muzzle appear shorter and reduce the raptor-like head profile.
For toys intended for children who may remove small parts, replace plastic eyes with securely embroidered alternatives.
Estimating Yarn Requirements
A tested commercial Velociraptor pattern publishes part-specific consumption of 48 yards for the arms, 74 yards for the rear legs, 80 yards for the body, and 25 yards for the head in worsted yarn. Plush chenille has a different mass-per-meter value, so converting those figures directly into grams would be unreliable.
For the photo-matched chenille project, approximately 300–350 g of light green is a practical starting estimate.
Weigh the finished head and muzzle before continuing. If those pieces consume more than roughly one-fifth of the available green yarn, purchase additional yarn before making the tail, which is one of the largest consumers in this design.
Changing the Finished Size
The verified commercial reference measures approximately 12 inches tall and 20 inches long using worsted yarn and a 4 mm hook. The image falls close to those proportions but uses a much thicker surface texture.
For a smaller dinosaur, switch to DK or worsted yarn while keeping the same stitch counts.
For a larger plush, change yarn thickness rather than adding uncontrolled increase rounds. Adding six stitches to only the body or head changes the proportion of the whole animal.
Use one yarn category for the green, cream, and dark-green sections so all parts respond similarly to stuffing.
Balancing the Hind Legs
The rear legs are deliberately much larger than the forearms.
Position them low enough that the widest section of each foot reaches the table. The body can touch the surface lightly, but it should not carry all the weight.
Pin both legs before sewing either one completely. View the dinosaur from the front, rear, and side.
If one foot points farther outward than the other by more than approximately 10 degrees, reposition the leg before closing the seam.
Competition Gap
Current Velociraptor crochet competition is strong in realistic paid patterns. Existing listings include feathered options, poseable designs, giant versions, detailed baby raptors, and patterns with extensive photographic instruction.
The useful distinction in this project is different. The supplied character is intentionally simplified into a large chenille plush while retaining specific raptor markers: three-clawed hands, a long counterbalancing tail, oversized hind feet, cream ventral coloring, and irregular dorsal markings.
That combination makes the project more visually detailed than a basic round dinosaur while avoiding the complex feather and wire construction used by some realistic competitors.
Finishing Checks
Place the finished dinosaur on a level surface before cutting any remaining long sewing tails.
Both hind feet should contact the table. The tail should extend behind the hips without dragging the rear body sideways.
Count the claws: three on each forearm and three on each visible hind foot. Check the cream underside from the front; its left and right edges should remain approximately symmetrical from the jaw through the belly.
Inspect the dark markings from above. They should continue onto the tail rather than ending abruptly at the body seam.
Finish by reshaping the muzzle, feet, cheek patches, and final tail curve with the fingers.
Conclusion
Build and attach the head, neck, body, and hind legs before committing to the final tail angle because those parts determine the balance of the finished dinosaur. Keep the forearms long enough to display three separate claws, maintain the cream jaw-to-belly line, and reduce the dark markings gradually toward the tail tip. Those details preserve the recognizable proportions of this Velociraptor amigurumi crochet pattern. Photograph one side view for Pinterest and share the completed plush on Instagram with #GreenVelociraptorAmigurumi. Would you keep the irregular forest-green markings or replace them with narrow raptor-style stripes?









