Introduction
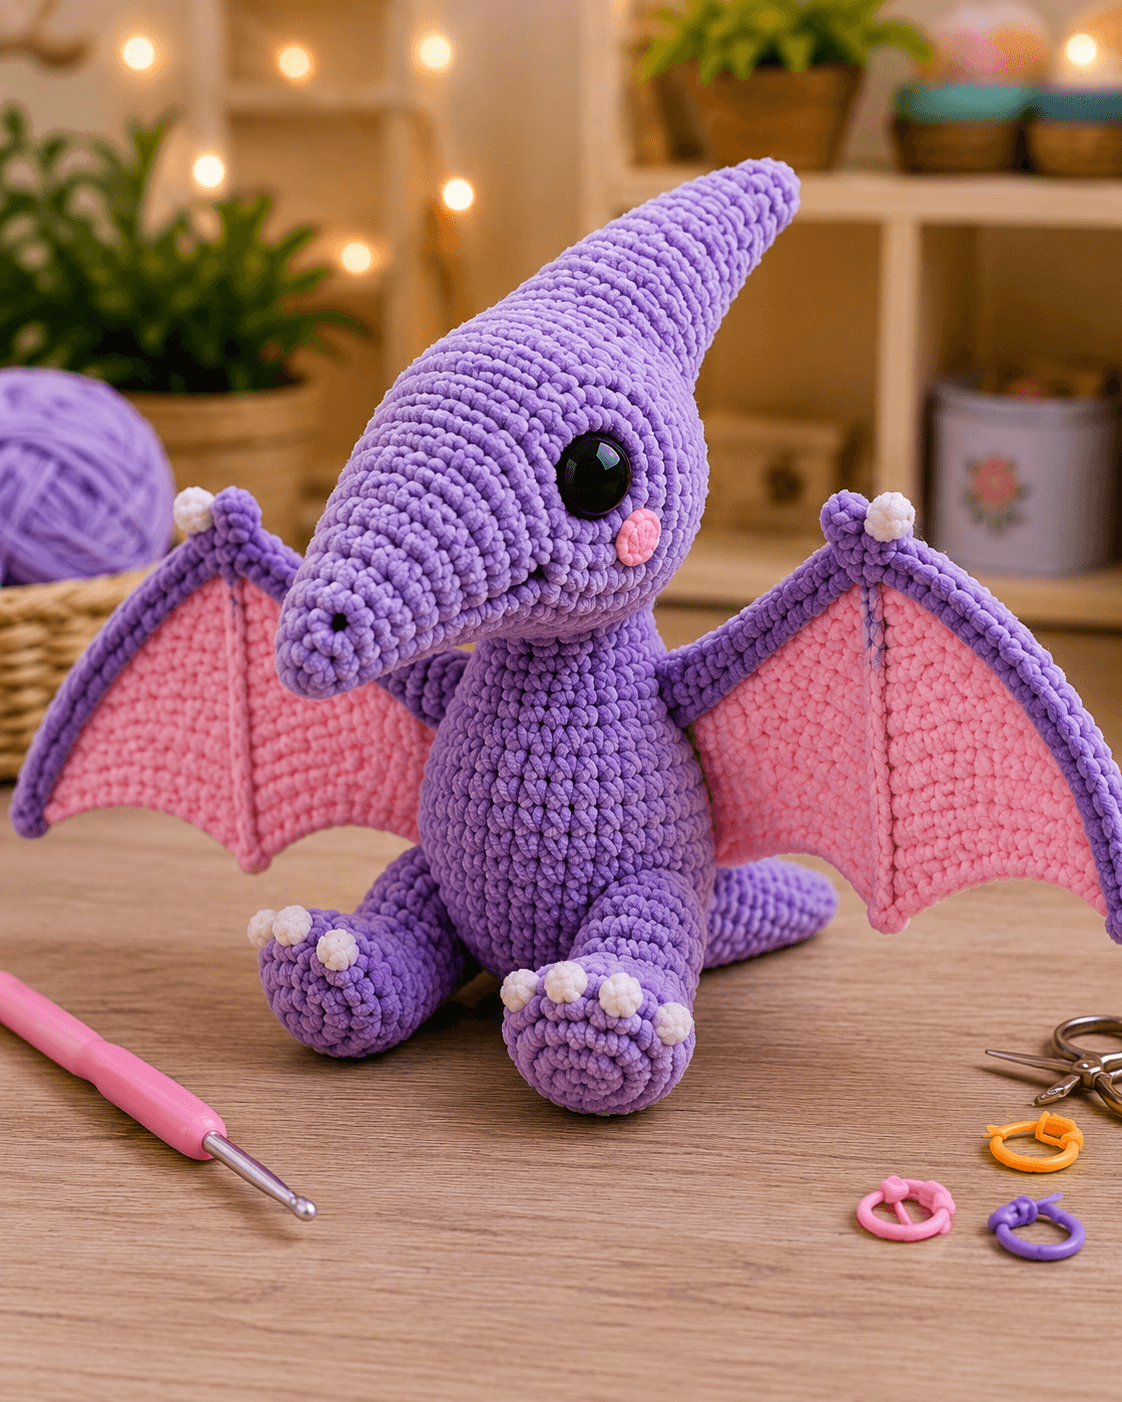
A pterosaur with a crest longer than its snout needs that head weight balanced before either wing is attached. This pterodactyl amigurumi crochet pattern uses #6 chenille, a 5 mm hook, 18 mm eyes, broad pink wing membranes, and a long tapered purple crest. The finished plush is approximately 24–28 cm tall with a wingspan near 48–55 cm, making it a substantial display-scale project.
The Design: What Makes This Pterodactyl Different
The head establishes the silhouette. Instead of a round dinosaur head with a small beak, this design combines a full 42-stitch skull, a long tapered muzzle, and a separate backward crest whose base is broad enough to merge cleanly into the head. The wings use two structures as well: a purple upper edge carries the wing shape while the flat pink membrane fills the triangular area underneath. That gives the plush pterodactyl crochet pattern the open-wing profile visible in the photograph. A compact pear-shaped torso keeps the center of gravity below the head, while the large hind feet form a wide sitting base. One frequent mistake is overstuffing the crest. Too much fiberfill behind the skull can rotate the head backward and force the wings to compensate for the imbalance.
Project Info at a Glance
| Skill Level | Time | Finished Size | Hook | Best For |
|---|---|---|---|---|
| Intermediate | 10–14 hours | Approx. 24–28 cm tall; 48–55 cm wingspan | 5.0 mm | Large plush display, dinosaur collection, gift project |
Materials and Tools
Yarn
- Medium lavender / purple — #6 super bulky chenille — approximately 250–320 g — head, crest, body, wing edges, legs, and tail
- Bubblegum pink — #6 super bulky chenille — approximately 100–140 g — two wing membranes and cheeks
- White / ivory — matching chenille — approximately 15–25 g — toe claws and wing-tip accents
- Black embroidery yarn — small amount — nostrils and optional mouth details
Tools
- 5.0 mm crochet hook
- 18 mm safety eyes ×2
- Polyester fiberfill
- Large-eye yarn needle
- Locking stitch markers
- Rust-resistant pins
- Sharp scissors
Use embroidered eyes instead of plastic safety eyes when the finished toy is intended for a child under three.
Abbreviations
MR — magic ring
sc — single crochet
inc — increase, 2 sc in one stitch
dec — invisible decrease
sl st — slip stitch
ch — chain
hdc — half double crochet
dc — double crochet
BLO — back loop only
For an invisible decrease, insert the hook through the front loops of the next two stitches, yarn over, draw through both front loops, then complete the single crochet.
Pattern — Step by Step
Work stuffed pieces in continuous spirals unless a section states otherwise. Move the stitch marker after every completed round.
Head
Yarn: medium lavender.
R1: 6 sc in MR (6)
R2: inc ×6 (12)
R3: (sc, inc) ×6 (18)
R4: (2 sc, inc) ×6 (24)
R5: (3 sc, inc) ×6 (30)
R6: (4 sc, inc) ×6 (36)
R7: (5 sc, inc) ×6 (42)
R8: sc around (42)
R9: sc around (42)
R10: sc around (42)
R11: sc around (42)
R12: sc around (42)
R13: sc around (42)
Insert the 18 mm eyes between R10 and R11, approximately 8–9 visible stitches apart. Position both eyes toward the forward half of the head because the long crest adds substantial volume behind them.
R14: (5 sc, dec) ×6 (36)
R15: (4 sc, dec) ×6 (30)
R16: (3 sc, dec) ×6 (24)
Stuff firmly around the eyes and upper skull.
R17: (2 sc, dec) ×6 (18)
R18: (sc, dec) ×6 (12)
R19: dec ×6 (6)
Fasten off and close.
Long Snout
Yarn: medium lavender.
R1: 6 sc in MR (6)
R2: inc ×6 (12)
R3: sc around (12)
R4: (sc, inc) ×6 (18)
R5: sc around (18)
R6: sc around (18)
R7: sc around (18)
R8: sc around (18)
R9: sc around (18)
R10: sc around (18)
R11: (sc, dec) ×6 (12)
R12: sc around (12)
Stuff progressively. The tip should remain firm, while the final two rounds should contain slightly less filling so the snout can be compressed where it meets the head.
Fasten off with a 35 cm sewing tail.
Backward Cranial Crest
Yarn: medium lavender.
R1: 6 sc in MR (6)
R2: inc ×6 (12)
R3: (sc, inc) ×6 (18)
R4: (2 sc, inc) ×6 (24)
R5: sc around (24)
R6: sc around (24)
R7: (2 sc, dec) ×6 (18)
R8: sc around (18)
R9: sc around (18)
R10: sc around (18)
R11: (sc, dec) ×6 (12)
R12: sc around (12)
R13: sc around (12)
R14: sc around (12)
R15: sc around (12)
R16: sc around (12)
R17: sc around (12)
R18: (sc, dec) ×4 (8)
R19: sc around (8)
R20: sc around (8)
R21: (2 sc, dec) ×2 (6)
R22: sc around (6)
Stuff the 24-stitch base firmly, then reduce filling through the final third. The crest should taper without becoming heavy at its point.
Fasten off with a 45 cm sewing tail.
Body
Yarn: medium lavender.
R1: 6 sc in MR (6)
R2: inc ×6 (12)
R3: (sc, inc) ×6 (18)
R4: (2 sc, inc) ×6 (24)
R5: (3 sc, inc) ×6 (30)
R6: (4 sc, inc) ×6 (36)
R7: (5 sc, inc) ×6 (42)
R8: sc around (42)
R9: sc around (42)
R10: sc around (42)
R11: sc around (42)
R12: sc around (42)
R13: sc around (42)
R14: sc around (42)
R15: sc around (42)
R16: sc around (42)
Begin stuffing and shape the lower half wider than the upper torso.
R17: (5 sc, dec) ×6 (36)
R18: sc around (36)
R19: (4 sc, dec) ×6 (30)
R20: sc around (30)
R21: (3 sc, dec) ×6 (24)
R22: sc around (24)
R23: (2 sc, dec) ×6 (18)
R24: (sc, dec) ×6 (12)
R25: dec ×6 (6)
Finish stuffing firmly.
Fasten off and close.
Hind Legs — Make 2
Yarn: medium lavender.
R1: 6 sc in MR (6)
R2: inc ×6 (12)
R3: (sc, inc) ×6 (18)
R4: (2 sc, inc) ×6 (24)
R5: sc around (24)
R6: sc around (24)
R7: sc around (24)
R8: (2 sc, dec) ×6 (18)
R9: sc around (18)
R10: sc around (18)
R11: (sc, dec) ×6 (12)
R12: sc around (12)
Stuff the foot firmly and the upper section lightly. Flatten the final opening before sewing.
Fasten off with a 35 cm tail.
Tail
Yarn: medium lavender.
R1: 6 sc in MR (6)
R2: inc ×6 (12)
R3: (sc, inc) ×6 (18)
R4: sc around (18)
R5: sc around (18)
R6: (sc, dec) ×6 (12)
R7: sc around (12)
R8: sc around (12)
R9: sc around (12)
R10: sc around (12)
R11: (sc, dec) ×4 (8)
R12: sc around (8)
R13: sc around (8)
R14: sc around (8)
R15: (2 sc, dec) ×2 (6)
R16: sc around (6)
R17: sc around (6)
Stuff firmly at the base and lightly toward the tip.
Fasten off with a long sewing tail.
Pink Wing Membrane — Make 2
Yarn: bubblegum pink. Work flat.
Row 1: ch 31, starting in second ch from hook, 30 sc (30)
Row 2: ch 1, turn, dec, 26 sc, dec (28)
Row 3: ch 1, turn, 28 sc (28)
Row 4: ch 1, turn, dec, 24 sc, dec (26)
Row 5: ch 1, turn, 26 sc (26)
Row 6: ch 1, turn, dec, 22 sc, dec (24)
Row 7: ch 1, turn, 24 sc (24)
Row 8: ch 1, turn, dec, 20 sc, dec (22)
Row 9: ch 1, turn, 22 sc (22)
Row 10: ch 1, turn, dec, 18 sc, dec (20)
Row 11: ch 1, turn, 20 sc (20)
Row 12: ch 1, turn, dec, 16 sc, dec (18)
Row 13: ch 1, turn, 18 sc (18)
Row 14: ch 1, turn, dec, 14 sc, dec (16)
Row 15: ch 1, turn, 16 sc (16)
Row 16: ch 1, turn, dec, 12 sc, dec (14)
Row 17: ch 1, turn, 14 sc (14)
Row 18: ch 1, turn, dec, 10 sc, dec (12)
Row 19: ch 1, turn, 12 sc (12)
Row 20: ch 1, turn, dec, 8 sc, dec (10)
Row 21: ch 1, turn, 10 sc (10)
Row 22: ch 1, turn, dec, 6 sc, dec (8)
Row 23: ch 1, turn, 8 sc (8)
Row 24: ch 1, turn, dec, 4 sc, dec (6)
Row 25: ch 1, turn, 6 sc (6)
Row 26: ch 1, turn, dec, 2 sc, dec (4)
Fasten off.
The membrane forms a long tapered panel. The 30-stitch edge sits closest to the body.
Purple Wing Leading Edge — Make 2
Yarn: medium lavender.
R1: 6 sc in MR (6)
R2: sc around (6)
R3: sc around (6)
R4: sc around (6)
R5: sc around (6)
R6: sc around (6)
R7: sc around (6)
R8: sc around (6)
R9: sc around (6)
R10: sc around (6)
R11: sc around (6)
R12: sc around (6)
R13: sc around (6)
R14: sc around (6)
R15: sc around (6)
R16: sc around (6)
R17: sc around (6)
R18: sc around (6)
R19: sc around (6)
R20: sc around (6)
R21: sc around (6)
R22: sc around (6)
R23: sc around (6)
R24: sc around (6)
Stuff only the first two-thirds and leave the outer end flexible.
Fasten off with a long sewing tail.
Purple Wing Border
Yarn: medium lavender.
Join purple at the body-side corner of one pink membrane.
Work sc evenly along the complete upper tapered edge and around the pointed end.
Continue sc along the lower scalloped edge, placing one extra sc at each lower turning point so the border remains flat.
Fasten off with a long tail.
Repeat for the second wing.
Wing-Tip White Bumps — Make 2
Yarn: white.
R1: 6 sc in MR (6)
R2: inc ×6 (12)
R3: dec ×6 (6)
Stuff lightly.
Fasten off with a sewing tail.
White Toe Claws — Make 6
Yarn: white.
R1: 6 sc in MR (6)
R2: sc around (6)
Fasten off.
Do not stuff.
Pink Cheek Patches — Make 2
Yarn: bubblegum pink.
R1: 6 sc in MR (6)
R2: inc ×6 (12)
Join with sl st.
Fasten off with a sewing tail.
Nostrils
Yarn: black embroidery yarn.
Embroider one short nostril approximately 5–6 mm long on each side of the snout near its rounded tip.
Assembly
- Sew the long snout to the forward center of the head, keeping its upper edge approximately level with the lower third of the safety eyes.
- Pin the broad 24-stitch base of the crest to the rear-upper head and angle the point backward before sewing around the complete base.
- Attach the head to the top of the body with the eyes facing slightly downward rather than directly forward; test the sitting balance before tightening the seam.
- Sew the pink cheek patches below and slightly behind the eyes, then embroider the two nostrils at the front of the snout.
- Attach the hind legs low on the body with approximately 3–4 cm between their inner edges, keeping both feet level on the table.
- Sew three white claw bumps to the front of each foot, positioning the middle claw first and placing the two outer claws approximately 8–10 mm from it.
- Attach one purple leading-edge tube across the top edge of each pink wing membrane, then sew the membrane edge to the tube with relaxed stitches.
- Pin both completed wings high on the sides of the body; the upper roots should sit close behind the head while the lower membrane corners attach around the body midpoint.
- Sew the tail centrally to the back of the body between the lower wing attachments, then add one white bump at the upper tip of each wing.
- Weave all remaining tails into matching-color stitches, spread both wings evenly, and stand the plush on a level surface to correct head, foot, crest, and wing alignment.
The completed pterosaur should sit on both feet with the crest extending behind the head, the snout projecting forward, and both pink membranes opening symmetrically from the body.
7 Technical Tips
- Crest sag: Packing the final 8–10 cm with dense fiberfill makes the long crest drop backward. Keep the pointed third only lightly filled and concentrate support at the 24-stitch base.
- Head rotation: A head attached more than about 1.5 cm behind the body center can tilt under the crest weight. Pin the finished head and crest together before deciding the neck seam position.
- Wing membrane puckering: A purple border worked tighter than the pink fabric pulls the wing into a cup. Use a 5.5 mm hook for the border if the 30-stitch membrane edge shortens by more than 1 cm.
- Uneven wings: Attaching one wing root even two rounds higher than the other becomes obvious across a 50 cm wingspan. Count body rounds and mark both attachment lines before sewing.
- Foot rocking: Overstuffing one 24-stitch foot lifts the opposite leg from the table. Compress both finished feet side by side and match their depth before attachment.
- Eye distortion: Dense stuffing pushed directly behind an 18 mm safety eye can widen the stitch opening. Pack fiberfill around the eye posts first, then fill the center of the head.
- Loose claws: Small chenille claw pieces can rotate if attached with only one pass. Stitch each 6-stitch base twice around its perimeter and bury the tail at least 3 cm into the foot.
Shaping the Long Crest
The crest is the feature that separates this plush from a generic winged dinosaur. It needs a broad base, a smooth taper, and enough rigidity to remain visible behind the head without turning into a straight stuffed cone.
The first six rounds create the 24-stitch base. From that point, the circumference drops gradually through 18, 12, 8, and finally 6 stitches.
Do not fill the entire piece at one time. Add small amounts as the crest grows. Firm stuffing belongs close to the head because that section carries the rest of the structure. The pointed end needs very little fiberfill.
Before sewing, curve the crest slightly upward. The photograph shows a gentle rise from the skull rather than a crest that leaves the head horizontally.
Building the Elongated Snout
The snout must remain narrower than the skull but broad enough to avoid reading as a bird beak.
An 18-stitch maximum gives the front section enough volume for chenille yarn. The final decrease to 12 stitches narrows the attachment end, allowing the seam to disappear into the head.
Pin the snout before sewing. Viewed from above, it should run through the midpoint between the eyes.
Viewed from the side, its top surface should tilt slightly downward from the center of the head. A snout angled upward competes with the backward crest and changes the characteristic pterosaur profile.
Constructing Broad Pink Wings
The wings occupy more visual area than the torso. Their proportions therefore need to be planned before final assembly.
The pink membrane uses a long flat triangle, decreasing from 30 stitches to four. Purple edging then defines the perimeter and ties the membrane to the body color.
The separate six-stitch leading-edge tube gives the wing a thicker upper structure. This is particularly useful with chenille because a flat membrane by itself can fold under its own weight.
Do not densely stuff that tube. A rigid leading edge makes both wings project straight sideways and can pull the body backward. Moderate filling preserves shape while allowing a gentle downward curve.
Balancing the Wingspan
A large chenille pterodactyl plush can become unstable even when both hind feet are identical. The problem usually comes from wing weight rather than the legs.
Pin both wings at once before sewing either one permanently. Measure from the body center to each wingtip. The two measurements should differ by no more than about 1 cm.
Next, view the plush from above. The front edge of each wing should leave the body at approximately the same angle.
If the toy falls backward, move the wing roots slightly forward or remove stuffing from the outer leading edges. Do not compensate by overfilling the tail.
Choosing Chenille Yarn and Hook Size
Current plush pterodactyl patterns support the pairing of #6 super-bulky yarn with a 5 mm hook. That combination produces dense amigurumi fabric while keeping the stitches flexible enough for large wing membranes.
Make the first 42-stitch head section before committing to the full project.
Stretch the fabric gently over two fingers. If large gaps expose stuffing, move to a 4.5 mm hook. If the hook repeatedly catches inside the chenille core or the fabric becomes rigid, return to 5 mm.
The wings can tolerate slightly looser tension than the head because they are not stuffed.
Positioning the Hind Legs
The hind feet provide the sitting base and need to counter the mass of both wings.
Place them low on the torso and slightly forward of the body midpoint. That position moves the support under the head rather than under the tail.
The photograph uses noticeably oversized feet. Keeping the maximum circumference at 24 stitches gives enough contact area without making the legs dominate the body.
Before sewing, pin the legs and set the unfinished plush on a hard table. Both feet should touch the surface while the lower body sits just behind them.
Planning Yarn Quantity
Published worsted pterodactyl patterns use around 100–150 g of main yarn, but the photographed design uses super-bulky chenille and unusually broad wings.
For a more accurate personal estimate, weigh the completed head, snout, and crest before starting the body. Record that amount.
Next, weigh one completed wing. Multiply the membrane amount by two, then add roughly 15% for borders and sewing tails.
Main purple is used across nearly every stuffed component, so buying an extra skein from the same dye lot is preferable to trying to match the color after the body is complete.
Competition Gap
Current pterodactyl patterns occupy several distinct categories. Miniature cotton versions may measure only 7–13 cm, while larger worsted designs reach 27–38 cm. Plush chenille versions often simplify the anatomy into compact market-style toys.
The supplied image takes another approach. The crest is exceptionally long, the snout is pronounced, and the wings occupy almost the full width of the composition. Pink membranes contrast clearly against the purple framework.
That combination makes the pattern more useful for readers searching for a recognizable flying pterosaur rather than a generic round dinosaur with small attached wings.
Finishing Checks
Place the completed toy on a level table.
Both hind feet should carry weight simultaneously. If one foot floats, loosen that leg seam and rotate the leg before adding more stuffing.
Measure the wings from body center to tip. Correct differences greater than approximately 1 cm.
Look at the head from above. The snout, skull, and crest should share one central axis.
Finally, lift the wings gently and release them. They should return to a broad open position without folding sharply at the body seam.
Conclusion
Finish the head, snout, and crest before sewing either wing because those three pieces establish the balance of this pterodactyl amigurumi crochet pattern. Pin the hind legs next, test the sitting stance on a hard surface, and attach the broad pink membranes only after the body remains stable. Record the finished wingspan and crest length before making a second version so the proportions remain consistent. Save a side-profile photograph to Pinterest and share the open-wing view on Instagram with #PurplePterodactylPlush. Would you keep the wing membranes pink, or switch them to a second shade of purple?









