Introduction
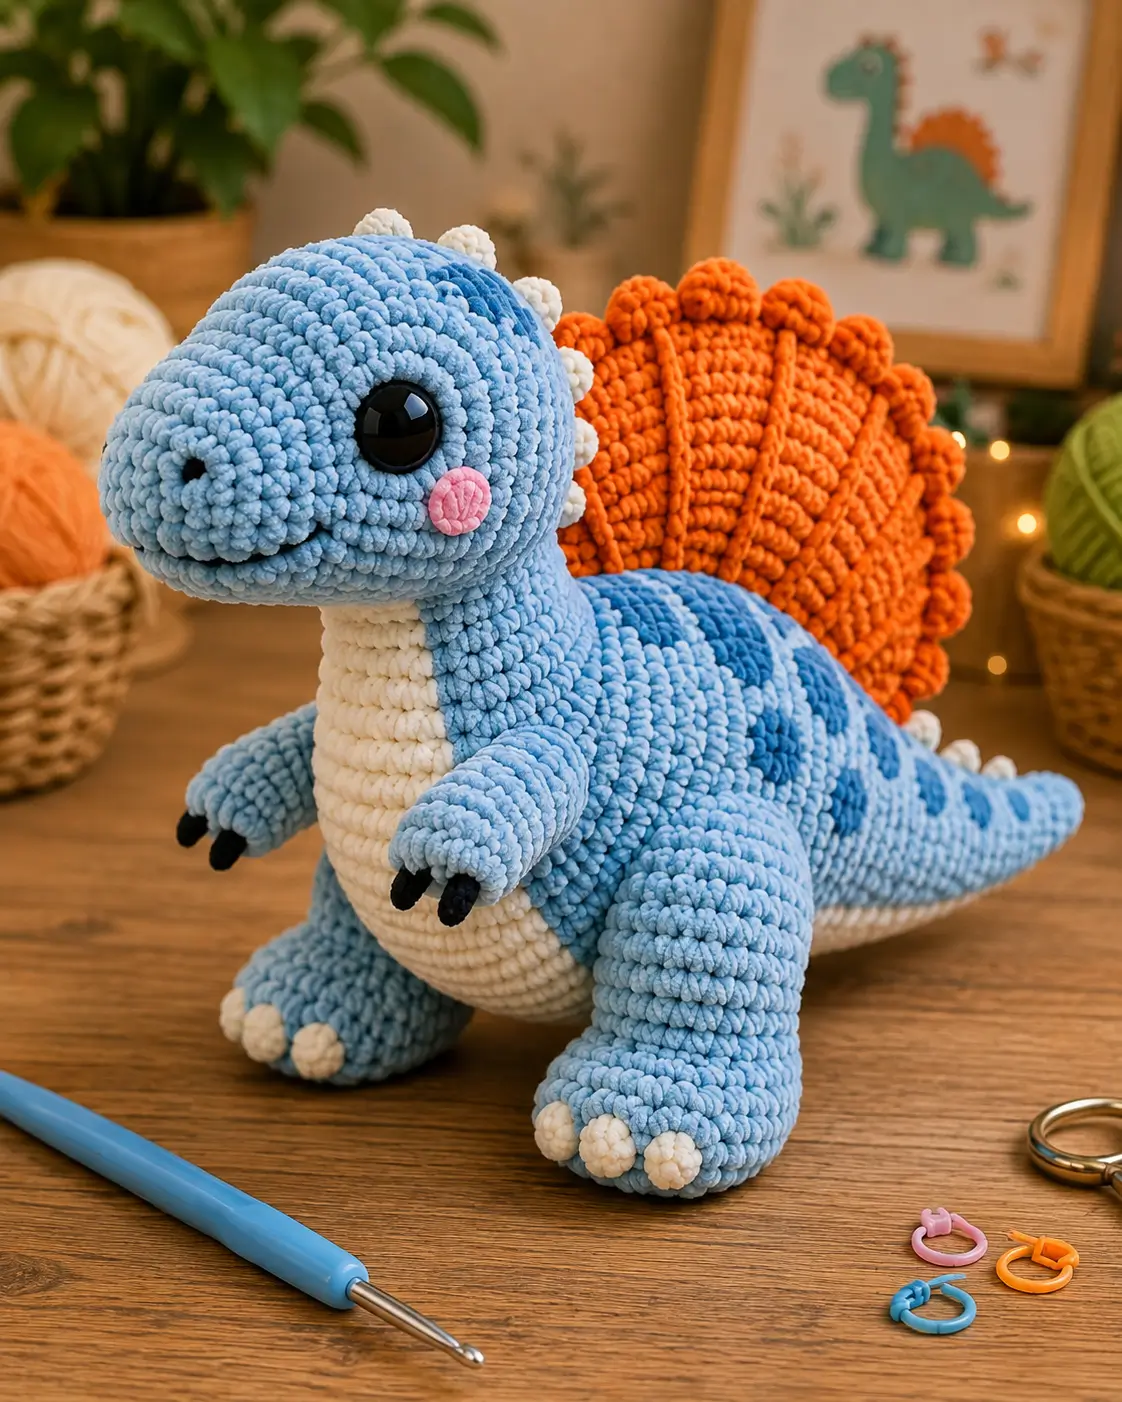
A Spinosaurus can carry a sail taller than its torso, and that is the first structural problem this pattern has to solve. This Spinosaurus amigurumi crochet pattern uses plush chenille yarn, a 4 mm hook, and approximately 15 mm safety eyes for a dinosaur about 30 cm tall. The intermediate construction combines a long muzzle, weighted body, tapered tail, cream belly, short arms, oversized feet, and a ribbed orange sail.
The Design: What Makes This Spinosaurus Different
The orange sail is built as a separate shaped panel rather than a row of individual spikes. That choice gives the crochet Spinosaurus plush the broad fan visible in the photo and spreads attachment tension across the back. Raised vertical surface lines divide the sail into ribbed sections, while small scallops finish the top edge. The second structural decision is the head-to-neck ratio. A long muzzle needs enough stuffing to hold its profile, but the neck must remain thick enough to counter the forward weight. Large hind legs create the third support point and allow the dinosaur to stand rather than tip toward its nose. A frequent mistake with a Spinosaurus dinosaur crochet pattern is making the tail too short. The tail is not decorative here; its length balances the head and large dorsal sail.
Project Info at a Glance
| Skill Level | Time | Finished Size | Hook | Best For |
|---|---|---|---|---|
| Intermediate | 9–13 hours | Approx. 30 cm tall × 45 cm long | 4.0 mm | Large dinosaur plush, display toy, nursery decor |
Published Spinosaurus amigurumi sizes range from about 10.5 cm to 45 cm depending on yarn and hook. This project sits between the common worsted-scale toys and the largest velvet versions.
Materials and Tools
Yarn
- Powder blue plush / chenille yarn — approximately 280–330 g — head, neck, body, tail, arms, and legs
- Orange plush / chenille yarn — approximately 70–90 g — dorsal sail
- Warm white / cream plush yarn — approximately 40–55 g — throat, belly, dorsal spikes, and toes
- Dark blue plush yarn — approximately 25–35 g — body markings
- Pink yarn — approximately 5 g — cheek patches
- Black yarn — approximately 5 g — claws, nostrils, and mouth details
Tools
- 4.0 mm crochet hook
- 15 mm safety eyes
- Polyester stuffing
- Yarn needle
- Locking stitch markers
- Sharp scissors
- Long doll-making needle
- Strong matching sewing yarn for sail attachment
Abbreviations
MR — magic ring
sc — single crochet
inc — increase
dec — invisible decrease
sl st — slip stitch
ch — chain
hdc — half double crochet
dc — double crochet
BLO — back loop only
FLO — front loop only
An invisible decrease is worked through the front loops of the next two stitches before completing one single crochet, reducing visible gaps in stuffed chenille fabric.
Pattern — Step by Step
Work all stuffed parts in a continuous spiral unless a section says otherwise. Stitch counts are original photo-matched construction based on standard six-stitch amigurumi shaping.
Head
Yarn: powder blue — standard amigurumi math.
R1: 6 sc in MR (6)
R2: inc × 6 (12)
R3: (sc, inc) × 6 (18)
R4: (2 sc, inc) × 6 (24)
R5: (3 sc, inc) × 6 (30)
R6: (4 sc, inc) × 6 (36)
R7–R13: sc around (36)
Insert the safety eyes between R9 and R10, approximately 9 stitches apart. The visible photo eye sits high on the side of the head rather than close to the muzzle.
R14: (4 sc, dec) × 6 (30)
R15: (3 sc, dec) × 6 (24)
Stuff firmly, concentrating extra filling behind the eyes and at the rear of the head.
R16: (2 sc, dec) × 6 (18)
R17: (sc, dec) × 6 (12)
R18: dec × 6 (6)
Fasten off. Leave a 25 cm tail.
Long Muzzle
Yarn: powder blue.
R1: 6 sc in MR (6)
R2: inc × 6 (12)
R3: (sc, inc) × 6 (18)
R4–R7: sc around (18)
R8: (2 sc, inc) × 6 (24)
R9–R11: sc around (24)
R12: (2 sc, dec) × 6 (18)
R13: sc around (18)
Stuff firmly but keep the opening flat enough to sew across the lower front half of the head.
Fasten off. Leave a 30 cm sewing tail.
Body
Yarn: powder blue.
R1: 6 sc in MR (6)
R2: inc × 6 (12)
R3: (sc, inc) × 6 (18)
R4: (2 sc, inc) × 6 (24)
R5: (3 sc, inc) × 6 (30)
R6: (4 sc, inc) × 6 (36)
R7: (5 sc, inc) × 6 (42)
R8–R17: sc around (42)
R18: (5 sc, dec) × 6 (36)
R19–R21: sc around (36)
R22: (4 sc, dec) × 6 (30)
R23–R24: sc around (30)
Stuff the lower body firmly. Keep the top slightly softer so the neck can be attached without creating a rigid ridge.
R25: (3 sc, dec) × 6 (24)
R26: (2 sc, dec) × 6 (18)
R27: (sc, dec) × 6 (12)
R28: dec × 6 (6)
Fasten off.
Neck
Yarn: powder blue.
R1: 6 sc in MR (6)
R2: inc × 6 (12)
R3: (sc, inc) × 6 (18)
R4: (2 sc, inc) × 6 (24)
R5–R12: sc around (24)
R13: (2 sc, dec) × 6 (18)
R14–R16: sc around (18)
Stuff very firmly at the lower half. This section supports the oversized head.
Fasten off. Leave a 35 cm sewing tail.
Front Arms — Make 2
Yarn: powder blue.
R1: 6 sc in MR (6)
R2: inc × 6 (12)
R3: (sc, inc) × 6 (18)
R4–R5: sc around (18)
R6: (sc, dec) × 6 (12)
R7–R12: sc around (12)
R13: (sc, dec) × 4 (8)
R14–R15: sc around (8)
Stuff the lower two-thirds lightly. Flatten the opening.
Fasten off. Leave a 25 cm tail.
Black Arm Claws — Make 6
Yarn: black.
R1: 6 sc in MR (6)
R2: sc around (6)
R3: dec × 3 (3)
Fasten off. Leave a 10 cm tail.
Sew three claws to each front hand, angling them slightly downward.
Back Legs — Make 2
Yarn: powder blue.
R1: 6 sc in MR (6)
R2: inc × 6 (12)
R3: (sc, inc) × 6 (18)
R4: (2 sc, inc) × 6 (24)
R5: (3 sc, inc) × 6 (30)
R6–R9: sc around (30)
R10: (3 sc, dec) × 6 (24)
R11–R14: sc around (24)
R15: (2 sc, dec) × 6 (18)
R16–R18: sc around (18)
Stuff firmly, especially the foot end. Flatten the upper opening.
Fasten off. Leave a 35 cm tail.
Cream Hind Toes — Make 6
Yarn: cream.
R1: 6 sc in MR (6)
R2: sc around (6)
R3: (sc, dec) × 2 (4)
Fasten off. Leave a 10 cm tail.
Sew three toes across the front edge of each hind foot.
Tail
Yarn: powder blue.
R1: 6 sc in MR (6)
R2: inc × 6 (12)
R3: (sc, inc) × 6 (18)
R4: (2 sc, inc) × 6 (24)
R5: (3 sc, inc) × 6 (30)
R6: (4 sc, inc) × 6 (36)
R7: (5 sc, inc) × 6 (42)
R8–R12: sc around (42)
R13: (5 sc, dec) × 6 (36)
R14–R17: sc around (36)
R18: (4 sc, dec) × 6 (30)
R19–R22: sc around (30)
R23: (3 sc, dec) × 6 (24)
R24–R27: sc around (24)
R28: (2 sc, dec) × 6 (18)
R29–R33: sc around (18)
R34: (sc, dec) × 6 (12)
R35–R40: sc around (12)
R41: dec × 6 (6)
R42–R46: sc around (6)
Stuff the first two-thirds firmly, then reduce stuffing gradually toward the point.
Fasten off. Leave a 40 cm tail.
Cream Belly Panel
Yarn: cream. Work flat in rows.
Ch 9.
Row 1: sc in second ch and across (8)
Row 2: inc, 6 sc, inc (10)
Row 3: inc, 8 sc, inc (12)
Rows 4–12: sc across (12)
Row 13: dec, 8 sc, dec (10)
Row 14: sc across (10)
Row 15: dec, 6 sc, dec (8)
Rows 16–21: sc across (8)
Fasten off. Leave a long sewing tail.
The panel should run from the lower throat through the center of the abdomen.
Orange Dorsal Sail
Yarn: orange. Work flat in rows.
Ch 27.
Row 1: sc across (26)
Row 2: inc, 24 sc, inc (28)
Row 3: inc, 26 sc, inc (30)
Row 4: 2 sc, hdc 4, dc 18, hdc 4, 2 sc (30)
Row 5: inc, 28 sc, inc (32)
Row 6: 3 sc, hdc 4, dc 18, hdc 4, 3 sc (32)
Row 7: sc across (32)
Row 8: dec, 28 sc, dec (30)
Row 9: dec, 26 sc, dec (28)
Row 10: dec, 24 sc, dec (26)
Row 11: dec, 22 sc, dec (24)
Row 12: dec, 20 sc, dec (22)
Row 13: dec, 18 sc, dec (20)
Row 14: dec, 16 sc, dec (18)
Row 15: dec, 14 sc, dec (16)
Row 16: dec, 12 sc, dec (14)
Row 17: dec, 10 sc, dec (12)
Row 18: dec, 8 sc, dec (10)
Do not fasten off.
Work sc evenly down one side, across the long lower edge, and up the opposite side.
Across the curved top edge work repeating groups of:
(sc, hdc, 3 dc in next st, hdc, sc)
This forms the rounded orange scallops visible along the crest.
Fasten off. Leave a 70 cm attachment tail.
Sail Ribs
Yarn: orange.
Cut six strands approximately 45 cm long.
Using surface slip stitch or chain embroidery, work six raised vertical lines from the lower sail edge toward the curved top.
Space the ribs approximately 2–2.5 cm apart.
Do not pull tightly; a tight rib will make the sail buckle.
Cream Dorsal Spikes — Make 6
Yarn: cream.
R1: 6 sc in MR (6)
R2: sc around (6)
R3: (sc, inc) × 3 (9)
R4: sc around (9)
R5: (2 sc, inc) × 3 (12)
Fasten off. Leave a 15 cm tail.
Make the two spikes nearest the head one round shorter if required by the final spacing.
Dark-Blue Body Spots
Yarn: dark blue. Make approximately 8–10 in mixed sizes.
Small spot:
R1: 6 sc in MR (6)
Fasten off.
Medium spot:
R1: 6 sc in MR (6)
R2: inc × 6 (12)
Fasten off.
Large spot:
R1: 6 sc in MR (6)
R2: inc × 6 (12)
R3: (sc, inc) × 6 (18)
Fasten off.
Flatten and sew the spots mostly along the upper body and tail.
Cheek Patches — Make 2
Yarn: pink.
R1: 6 sc in MR (6)
R2: inc × 6 (12)
Fasten off. Leave a 12 cm tail.
Sew one patch below and slightly behind each eye.
Nostrils — Make 2
Yarn: black.
Make one small horizontal embroidery stitch on each side of the upper muzzle approximately 1.5 cm behind the muzzle tip.
Assembly
- Sew the muzzle to the lower front of the stuffed head, keeping its center line aligned between the eyes.
- Attach the neck to the rear underside of the head with a wide circular seam and add stuffing through the opening before closing.
- Sew the neck to the upper front of the body, tilting the head slightly upward rather than allowing the muzzle to point toward the floor.
- Attach the cream belly panel from the throat down the center front of the body, keeping its edges symmetrical.
- Sew the two hind legs low on the body so all six cream toes contact the table when the dinosaur is placed upright.
- Attach both front arms high on the chest and angle the black claws slightly inward and downward.
- Sew the tail to the rear body with the widest tail rounds distributed across a broad attachment line; check balance before closing the seam.
- Pin the orange sail along the back from the rear neck toward the front half of the tail, then sew both lower edges securely without compressing the body.
- Attach the cream dorsal spikes in the exposed line from the head toward the front edge of the sail, then sew the dark-blue spots along the body and tail.
- Attach both pink cheek patches, embroider the nostrils and mouth line, weave every tail into the stuffed body, and reshape the sail ribs.
The completed Spinosaurus should stand on both hind feet and the lower body while the tail counterbalances the head and raised sail.
7 Technical Tips
- Sail collapse: A sail sewn only at two or three points will fold sideways. Stitch the full lower edge to the body at intervals no greater than approximately 8 mm.
- Head tipping: A lightly stuffed neck bends under the long muzzle. Fill the lower 6–8 cm of the neck firmly enough that it resists compression between two fingers.
- Eye misalignment: Plush yarn hides individual rounds and makes one-stitch errors difficult to see. Insert both eyes before locking the washers and measure the spacing across the muzzle center line.
- Leg instability: Hind feet attached too high leave the abdomen as the only support point. Pin each leg so its lowest three cream toes reach the same table plane before sewing.
- Invisible-decrease gaps: Pulling both loops of chenille stitches into a standard decrease creates visible holes. Work the decrease through front loops only and keep the hook movement short.
- Rib puckering: Tight surface stitches will distort the orange sail. Each decorative rib should remain approximately the same length as the flat sail beneath it rather than shortening the fabric.
- Tail imbalance: An under-stuffed tail cannot counter the heavy head and sail. Pack the first 12–15 cm firmly, then reduce stuffing progressively toward the last six-stitch section.
Why the Sail Needs a Separate Panel
The sail defines the silhouette more strongly than any other part of this dinosaur. Separate triangular spikes can suggest a generic dinosaur crest, but they do not reproduce the broad fan visible in the reference.
A single panel creates continuous height from the rear neck through the middle back. The shaped rows increase width near the front half and taper gradually toward the rear. Surface ribs then divide the fabric without cutting it into separate pieces.
The attachment line matters. Pin the sail while the dinosaur is standing. If the panel leans left or right before sewing, reposition it instead of correcting the lean with tighter stitches on one side.
Controlling the Head and Neck Balance
The photo uses an oversized head with a long rounded muzzle. That proportion pushes weight forward.
The neck therefore needs a wider attachment to the body than a typical small dinosaur plush. Sew through complete stitches rather than only surface fibers of the chenille yarn.
After attaching the head and neck, place the unfinished dinosaur upright before adding the sail. If the head drops, add stuffing to the neck seam while it is still accessible.
The hind legs and tail then create the remaining support points.
Working With Plush Chenille
Chenille hides stitch anatomy, so counting is more reliable than visual estimation.
Place a locking marker in the first stitch of every round. Move it immediately after completing that stitch. Missing one increase in an early 36- or 42-stitch section can twist an entire part.
The 4 mm hook is intentionally smaller than many package recommendations because amigurumi fabric needs to contain stuffing.
If the yarn begins shedding or snapping at the magic ring, make the ring from a matching smooth yarn and crochet the first plush round over it.
Placing the Dark-Blue Markings
The reference does not use evenly spaced stripes. Its darker marks are irregular patches concentrated on the upper body and tail.
Make several spot diameters rather than repeating one circle. Position larger spots on the torso and gradually reduce their size toward the tail tip.
Pin every patch before sewing. Avoid placing a spot directly beneath the sail seam because the extra layers make that section unnecessarily thick.
The markings should remain secondary to the orange sail.
Choosing the Safety-Eye Size
Published Spinosaurus patterns demonstrate how strongly eye size changes with scale. Current examples specify 8 mm, 12 mm, 12–15 mm, and 20 mm eyes.
For the photo-matched chenille version, approximately 15 mm gives the large glossy eye shown without occupying most of the face.
Test the eye before fastening the washer. The visible iris should sit above the muzzle line, not level with its center.
For a toy intended for a child who may remove small components, replace safety eyes with securely embroidered eyes.
Estimating Yarn More Accurately
A large published velvet Spinosaurus uses about 350 g of main-color yarn at 45 cm finished size. This smaller project should use less, but chenille consumption varies significantly by yarn diameter.
Weigh the completed head before making the remaining large parts. If the head uses 55 g of blue yarn, a practical working allowance for the full blue body is approximately five to six times that amount.
Keep at least 10% of the main blue yarn unused until assembly is complete. Repairs, seam reinforcement, and replacing a damaged chenille section can consume more yarn than expected.
Adjusting the Finished Size
Changing hook size alone changes both firmness and dimensions. For a meaningfully smaller Spinosaurus, use a thinner yarn with a hook sized for dense amigurumi fabric.
Published examples demonstrate the range: a free DK version measures only about 3 inches tall, worsted designs reach roughly 20 cm, and a velvet version reaches 45 cm.
Keep all parts in the same yarn weight. Making the orange sail in a significantly thicker yarn changes its weight and may pull the body sideways.
Finishing Checks
Set the completed dinosaur on a level table before weaving the final long attachment tails away.
Both hind feet should touch the surface. The lower body may provide a third contact point, but the dinosaur should not roll toward either side.
Look at the sail from the front and rear. Its top edge should remain approximately vertical rather than twisting around the body.
Count the visible cream dorsal spikes and compare their spacing. Check that the dark-blue markings continue onto the tail rather than stopping abruptly at the body seam.
Finish by lifting the cheek patches, smoothing the muzzle, and reshaping the sail scallops with the fingers.
Conclusion
Complete the head, neck, and body first, then test their balance before committing to the large dorsal sail. That sequence makes it easier to correct stuffing firmness and leg placement while the primary seams remain accessible. Keep the orange panel centered, taper the tail gradually, and distribute the dark-blue markings irregularly to preserve the reference proportions of this Spinosaurus amigurumi crochet pattern. Photograph the sail from the side for Pinterest and share the finished dinosaur on Instagram with #BlueSpinosaurusAmigurumi. Would you keep the sail bright orange or switch it to a darker rust color?









