Introduction
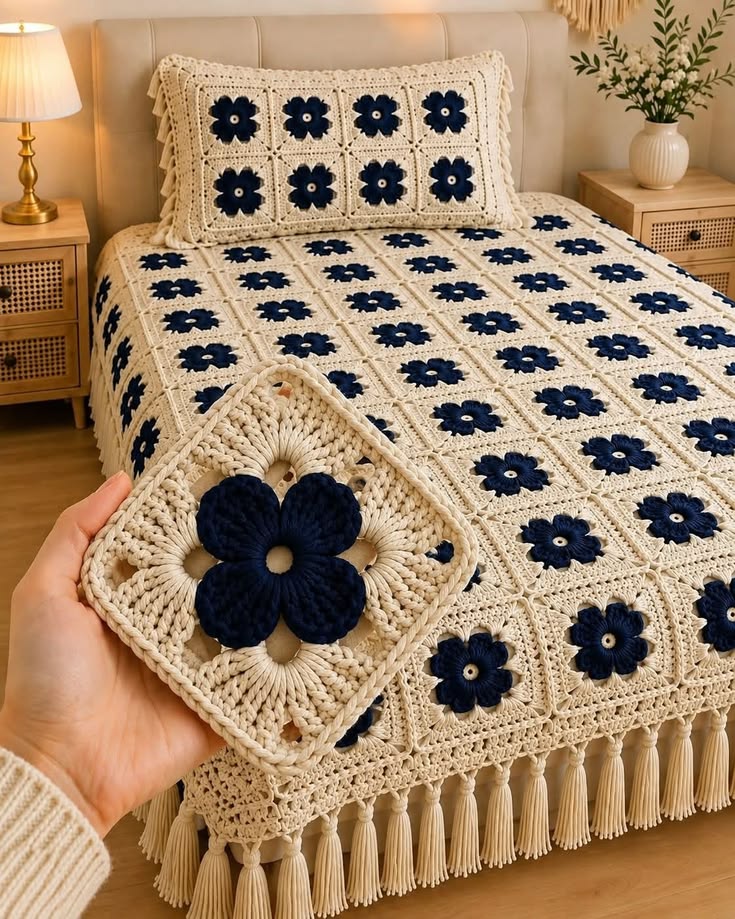
Five navy petals must occupy the center without swallowing the cream spokes that make this square look open. This navy flower granny square crochet bedspread uses DK yarn and a 4 mm hook to produce approximately 20 cm blocked motifs. The intermediate project combines oversized flower centers, cream openwork squares, flat seams, a deep lace border, tassels, and a matching eight-square pillow for a coordinated bed set.
The Design: What Makes This Navy Flower Square Different
The flower uses five broad petals rather than the six, eight, or twelve sections found in many floral blocks. That odd-numbered arrangement creates larger cream gaps between petals and keeps the center visually separate from the square structure. Most of each five petal granny square is cream. Radial stitch groups expand outward from behind the flower, then open corner spaces convert the circular center into a square. Navy stops at the petals; the background, joins, border, and tassels remain neutral. The finished navy flower granny square blanket therefore reads as a regular field of dark flowers rather than a multicolor patchwork. A common mistake is enlarging the navy flower by adding another petal round. That pushes the dark color into the cream corners and removes the negative space visible in the reference.
Project Info at a Glance
| Skill Level | Time | Finished Size | Hook | Best For |
|---|---|---|---|---|
| Intermediate | 80–105 hours | Approx. 175 × 210 cm before tassel length | 4.0 mm | Full bedspread, queen topper, matching pillow set |
The project targets a 20 cm blocked motif. Make one complete square, wash it, and verify the measurement before producing the full eighty-square field.
Materials and Tools
Yarn
- Warm cream / ivory — DK #3 — approximately 1,700–2,000 g — flower centers, square backgrounds, frames, seams, border, pillow, and tassels
- Deep navy blue — DK #3 — approximately 450–600 g — five-petal flower centers
A cotton-acrylic DK blend provides enough stitch definition for the open square while keeping a full bedspread lighter than pure cotton. Purchase the cream from one dye lot because it forms most of the finished surface.
Tools
- 4.0 mm crochet hook
- 4.5 mm hook for joining if the seams contract
- Yarn needle
- Sharp scissors
- Locking stitch markers
- Blocking mats
- Rust-resistant T-pins
- Measuring tape
- 20 cm blocking template
- 10–12 cm card or tassel maker
- Kitchen scale for yarn calculations
Abbreviations
MR — magic ring
sc — single crochet
hdc — half double crochet
dc — double crochet
tr — treble crochet
dtr — double treble crochet
sl st — slip stitch
ch — chain
sp — space
ch-sp — chain space
RS — right side
WS — wrong side
Invisible decreases are not used because the square is worked flat; shaping comes from petal anchor spaces, varying stitch heights, and four expanding corners.
Pattern — Step by Step
This is an original photo-matched construction using standard crochet flower and granny-square geometry. Work one test motif through the final round before starting the complete bedspread.
Cream Flower Center
Yarn: warm cream.
R1: 10 sc in MR (10)
Join with sl st to first sc.
Leave the center opening approximately 6–8 mm wide rather than pulling the ring fully closed.
Fasten off.
Navy Petal Anchor Round
Yarn: deep navy.
Join navy in any stitch.
R2: *ch 5, skip 1 st, sl st in next st* around.
(5 ch-5 loops)
The five loops must remain equal in length because each becomes one complete petal.
Navy Flower Petals — Make 5
Yarn: deep navy.
R3: in each ch-5 loop work:
(sc, hdc, 2 dc, 3 tr, 2 dc, hdc, sc)
Repeat in all five loops.
Join with sl st.
Fasten off.
Spread the five petals by hand. Each should form a broad rounded lobe with a defined valley between neighboring petals.
Cream Rear Anchor Round
Yarn: warm cream.
Turn the flower slightly and work behind the navy petals.
Join cream around one petal-base junction.
R4: *ch 7, sl st around the next petal-base junction* around.
(5 ch-7 loops)
Keep these loops entirely behind the navy flower.
Cream Radial Foundation
R5: in each ch-7 loop work:
(2 sc, 2 hdc, 3 dc, 2 hdc, 2 sc)
Repeat around.
Join.
The cream stitches should become visible between the five navy petals without covering their outer edges.
Expansion Round
R6: ch 3.
Work dc evenly around the cream foundation, placing 2 dc into selected spaces where the work needs additional circumference.
Finish with approximately 50 stitches around.
Join.
Lay the motif flat before starting the square conversion. The flower may rise slightly, but the cream foundation should not form a cup.
First Square-Conversion Round
Yarn: cream.
Place four stitch markers at equal quarter points around the circular foundation.
At each marked corner work:
(hdc, 2 dc, 2 tr, ch 3, 2 tr, 2 dc, hdc)
Work dc across each side between corners, spacing stitches evenly enough for the fabric to remain flat.
Join.
Four corners should now be clearly visible.
Open Corner Round
R8: ch 1, sc in same stitch.
Across each side work:
*ch 3, skip 2 sts, sc in next st*
At each corner ch-3 space work:
(sc, ch 5, sc)
Repeat around.
Join.
Cream Cluster Frame
R9: work 3 dc in every side ch-3 space.
At each corner ch-5 space work:
(3 dc, ch 2, 3 dc)
Join.
Second Openwork Round
R10: *ch 3, skip 2 sts, sc in next st* across each side.
At each corner work ch 5.
Join.
Final Cream Frame
R11: work 3 dc in each ch-3 space.
At every corner ch-5 space work:
(3 dc, ch 2, 3 dc)
Join.
Firming Round
R12: sc in every stitch around.
At each corner work:
(2 sc, ch 2, 2 sc)
Join and fasten off.
Block the motif to 20 × 20 cm.
Pin only the cream frame and corners. Shape the navy petals by hand after the square dries.
Bedspread Motif Count
Make approximately 80 complete granny squares.
Arrange them:
8 motifs across × 10 motifs long
At a finished motif size of 20 cm:
8 × 20 cm = 160 cm before the border.
10 × 20 cm = 200 cm before the border.
A border approximately 7–8 cm deep brings the main fabric close to 174–176 cm wide and 214–216 cm long.
Tassels increase the visible hanging length but should not be included when deciding whether the solid fabric fits the mattress.
Flat Joining Method
Yarn: warm cream.
Block all eighty squares before joining.
Place two motifs RS up with their corresponding edges touching.
Insert the hook through the outer loop of one stitch on the first square and the matching outer loop on the second.
Make a loose sl st through both loops.
Continue along the complete edge.
The seam should lie on the surface as a narrow cream line without making the squares overlap.
Make ten horizontal rows of eight motifs first.
Join those ten strips vertically.
At a four-square intersection, work through the corner spaces without adding several extra stitches in the same location.
Measure one joined row. Eight 20 cm motifs should remain close to 160 cm. If the strip loses more than 2 cm, remake the seams with a 4.5 mm hook.
Outer Border
Border Round 1 — Foundation
Yarn: warm cream.
Join at one blanket corner.
Sc evenly around the entire field.
Work 3 sc at each corner.
Count opposite sides before continuing.
Border Round 2 — Solid Frame
Ch 3.
Dc in every stitch around.
At each corner work:
(2 dc, ch 2, 2 dc)
Border Round 3 — Open Mesh
*ch 4, skip 2 sts, sc in next st*
Repeat around all four sides.
At each corner work ch 6.
Border Round 4 — Lace Fans
In every side ch-4 space work:
(sc, ch 2, 5 dc, ch 2, sc)
In each corner ch-6 space work:
(sc, ch 3, 7 dc, ch 3, sc)
Border Round 5 — Scalloped Finish
Across each five-dc fan work:
(sl st in first dc, sc in next dc, 5 dc in center dc, sc in next dc, sl st in final dc)
Work an expanded seven-dc scallop over each corner fan.
Fasten off.
Block the border before attaching any tassels.
Tassels
Yarn: warm cream.
Cut a piece of cardboard approximately 11 cm high.
Wrap cream yarn around the card 18 times for each tassel.
Slide a 30 cm strand beneath the upper wraps and knot securely.
Cut all loops along the opposite edge.
Wrap another strand around the tassel approximately 15 mm below the top knot.
Knot firmly and trim the lower ends to an even length of approximately 9–10 cm.
Make enough tassels to position one approximately every 8–10 cm along the drop edges.
The photographed arrangement concentrates tassels along the bedspread perimeter rather than placing them at only four corners.
Attaching the Tassels
Insert both top ties through a border space.
Keep the tassel knot behind the scalloped edge.
Tie securely on the WS.
Thread each tie into a yarn needle and bury it through approximately 5–6 cm of nearby border stitches.
Do not rely on a simple surface knot. Repeated movement along the bed edge can loosen it.
Matching Pillow Front
The photograph shows a rectangular pillow built from eight bedspread motifs.
Make 8 additional navy flower squares.
Arrange:
4 squares across × 2 squares high
Join them with the same cream flat slip-stitch method used for the bedspread.
If each square measures 20 cm, the joined motif panel will measure approximately 80 × 40 cm before edging.
For a smaller pillow, use motifs blocked to approximately 15–16 cm specifically for the cushion, or work a three-square-wide layout.
Pillow Border
R1: sc evenly around the joined pillow front.
At each corner work 3 sc.
R2: dc around, working (2 dc, ch 2, 2 dc) at each corner.
R3: *ch 3, skip 2 sts, sc in next st* around.
R4: work 5-dc scallops evenly around the complete perimeter.
Fasten off.
Pillow Back
Yarn: warm cream.
Make two rectangular panels for an envelope closure.
Ch to match the finished width of the pillow front.
Work rows of dc until each panel measures approximately two-thirds of the pillow-front height.
Make two.
Overlap the back panels by approximately 12–15 cm.
Place the flower front RS down and arrange both back panels on top.
Sc through the front and back layers around all four edges.
Turn RS out.
Assembly
- Complete all eighty bedspread motifs and eight pillow motifs, weaving in navy ends immediately after each flower is finished.
- Block every bedspread square to exactly 20 × 20 cm; correct any block differing by more than 5 mm before joining.
- Arrange the main motifs eight across and ten long, keeping the five-petal flowers facing the same orientation throughout the grid.
- Join each row with cream flat slip stitches, then connect the ten completed rows vertically.
- Measure both diagonals of the assembled field; correct seam tension if they differ by more than approximately 2 cm.
- Work the two solid border rounds first, then add the open mesh, lace fans, and scalloped finish.
- Block the complete border and verify that every corner lies flat before making the tassels.
- Attach cream tassels approximately 8–10 cm apart along the selected perimeter edges and bury all attachment ties on the WS.
- Join eight additional flower blocks in a 4 × 2 layout, add the pillow border, and attach the overlapping cream back panels.
- Raise each navy petal by hand, trim all tassels to equal length, weave the final cream tails into the WS, and place the completed set on the bed.
The finished set should show evenly spaced navy flowers suspended inside an uninterrupted cream lattice, with a consistent scalloped border and level tassel line.
7 Technical Tips
- Five-petal distortion: A single ch-5 anchor loop more than approximately 5 mm shorter than its neighbors will produce a visibly smaller petal. Compare all five loops before starting R3.
- Flower spreading: Navy petals extending beyond roughly one-third of a 20 cm block reduce the cream negative space. Keep the completed flower close to 7–8 cm across before beginning the cream expansion.
- Center puckering: Pulling the cream magic ring completely shut changes the small eyelet visible in the reference. Leave an approximately 6–8 mm center and secure the yarn tail around nearby stitches.
- Square cupping: If all four cream corners lift more than 10 mm from a flat table after the first square-conversion round, add circumference before continuing rather than expecting blocking to correct it.
- Join contraction: A tight seam can shorten an eight-square row. Change to a 4.5 mm joining hook when a nominal 160 cm strip measures below approximately 158 cm.
- Tassel mismatch: Different wrap counts create visibly unequal tassels along a straight bed edge. Use exactly 18 wraps around the same 11 cm template for every tassel.
- Border ruffling: Extra foundation stitches multiply through subsequent lace rounds. Count the two long sides and two short sides separately after Border Round 1 and keep opposite totals identical.
Why Five Petals Change the Square
A five-petal flower does not align naturally with four square corners. That mismatch is part of the design.
If the flower used four petals, each petal could point directly toward one corner and the motif would feel strongly geometric. Six or eight petals would create more regular symmetry with the surrounding square.
Five petals produce uneven-looking gaps when judged only against the corners, but the cream expansion round absorbs that difference before the square conversion begins. The result is botanical at the center and geometric at the edge.
Do not try to rotate every flower so one particular petal points toward the top corner. Consistency matters more than perfect petal-to-corner alignment.
Controlling the Navy-to-Cream Proportion
The dark flower is visually strong because it is surrounded by a large amount of light fabric.
Adding navy to the frame would create more color but weaken the isolated flower effect. The supplied design is more disciplined: navy appears, stops, then the cream field takes over.
Use the same navy dye lot throughout the project. Even small shifts between blue-black and warmer navy can become obvious when identical flowers repeat eighty times.
After completing the first flower, place it on a sheet of cream paper. If the navy mass looks wider than approximately 40% of the eventual square, reduce the outer-petal height before producing the remaining motifs.
Keeping the Cream Background Flat
The radial area between the flower and the square corners carries most of the shaping work.
Its first task is to expand away from five petal bases without pulling the flower inward. Its second is to create enough circumference for four evenly spaced corners.
Lay the motif down after every cream round. A slight wave can often be corrected in the next round by spacing stitches differently. A pronounced cup or ruffle should be corrected immediately.
Do not stretch individual squares aggressively to make them reach 20 cm. The target should be close before blocking.
Choosing Yarn for a Full Bedspread
DK yarn keeps the openwork visible while limiting the weight of approximately eighty motifs, multiple border rounds, and dozens of tassels.
Pure cotton gives the square excellent definition but produces a heavy finished bedspread. Acrylic weighs less and dries faster. Cotton-acrylic provides a useful compromise for the photographed structure.
Use the same fiber and yarn line for both colors. Mixing a dense cotton navy with a springy acrylic cream can make the flowers and backgrounds respond differently after washing.
Wash the first completed square using the same method planned for the finished bedspread. Record its size before and after drying.
Calculating Another Bed Size
Use the blocked square measurement as the basis for every calculation.
At 20 cm per motif:
- 6 squares = 120 cm
- 7 squares = 140 cm
- 8 squares = 160 cm
- 9 squares = 180 cm
- 10 squares = 200 cm
- 11 squares = 220 cm
Add approximately 14–16 cm to the overall width and length for a 7–8 cm border on each side.
Tassels extend beyond those measurements and should be treated as decoration rather than usable mattress coverage.
A smaller throw could use 6 × 8 motifs. A larger queen bedspread with a substantial side drop may require 9 × 11 motifs.
Estimating Yarn from One Square
Large granny-square projects are easier to budget after weighing one completed motif.
Suppose a blocked square uses:
- 20 g cream
- 6 g navy
Eighty squares would then require:
1,600 g cream before joining, border, pillow, and tassels.
480 g navy.
Add at least 15% cream for the seams and border before calculating the pillow.
Tassels can consume more yarn than their size suggests. Weigh one finished tassel and multiply that figure by the planned quantity before cutting the complete set.
Planning the Tassel Spacing
The tassels need to read as one regular line.
Measure the finished border edge after blocking. Divide that measurement by the desired 8–10 cm spacing, then adjust the final number so the first and last tassels sit the same distance from the corners.
Do not attach tassels before blocking the border. A border that grows several centimeters during washing will leave previously even tassels with inconsistent gaps.
Trim the tassels only after all of them are attached and the bedspread is hanging vertically.
Matching the Pillow to the Bedspread
The rectangular cushion works because it repeats the same grid rather than introducing a new floral motif.
Eight squares create the photographed 4 × 2 panel. The scalloped outer edge then distinguishes the pillow from the flat interior seams.
If full-size bedspread motifs make the pillow too large, reduce the cushion motifs deliberately rather than changing the bedspread gauge.
Keep navy petal proportions identical. The pillow should look like a cropped section of the blanket, not a separate pattern.
Constructing the Lace and Tassel Edge
The outer border changes the visual scale of the bedspread.
The internal joins are narrow and geometric. The perimeter becomes progressively more open before finishing with scallops and hanging yarn.
Begin with solid stitches so the joined square field remains stable. Add open mesh only after the foundation is square and its stitch counts have been checked.
The tassels belong outside the completed lace structure. Attaching them to an earlier round would pull the mesh downward and distort the scalloped edge.
Finishing Checks
Spread the bedspread on a flat surface before attaching the pillow or trimming tassels.
Check the grid first. All vertical and horizontal cream seams should run continuously without obvious offsets at four-square intersections.
Inspect every navy flower. Five separate petals should remain visible, and the small cream center should sit near the geometric center of each block.
Measure the outside edge in several places. The border depth should remain consistent to within approximately 5 mm after blocking.
Hang one side over the bed and trim the tassels only when gravity has pulled them into their natural position.
Conclusion
Complete and wash one motif before calculating the remaining seventy-nine because its blocked measurement determines the bedspread dimensions, joining length, border depth, and total yarn requirement. Keep navy confined to the five broad petals and use cream consistently through the background, seams, lace, and tassels so the navy flower granny square crochet bedspread retains its strong two-color structure. Assemble the full grid before beginning the border, then attach tassels only after blocking. Photograph the flower detail for Pinterest and share the complete set on Instagram with #NavyFlowerBedspread. Would you keep the flower center cream or make that small center navy as well?









