Introduction
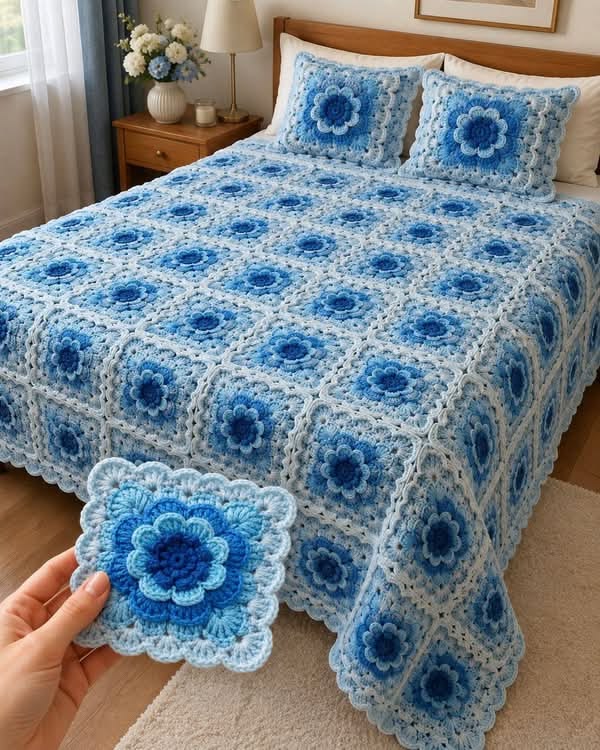
A blue flower loses its depth when every petal is worked in the same value, so this bedspread separates cobalt, medium blue, and ice blue into distinct raised layers. This blue 3D flower granny square crochet bedspread uses DK yarn and a 4.5 mm hook for approximately 20–22 cm motifs. The finished design combines dimensional flowers, pale-blue square fields, white openwork frames, flat joins, scalloped edging, and matching pillows.
The Design: What Makes This Blue Flower Bedspread Different
The color structure is as important as the stitch structure. A dark-blue center anchors each motif, medium-blue petals create the first raised ring, and lighter petals extend the flower outward before the pale-blue square background begins. White appears later, mainly in the openwork frame and joining grid. That sequence prevents the flower from blending into the square while keeping the entire blue flower granny square blanket within one controlled palette. The photographed motifs also show noticeable depth rather than a flat daisy surface. Two petal layers provide that relief, while the white frame visually separates one block from the next. A common construction error is adding the white round too early. If white touches the flower directly, the blue gradient loses continuity and the square looks divided into unrelated color bands.
Project Info at a Glance
| Skill Level | Time | Finished Size | Hook | Best For |
|---|---|---|---|---|
| Intermediate | 85–115 hours | Approx. 175 × 210 cm | 4.5 mm | Full bedspread, queen topper, coordinated pillow set |
Published blue flower blankets use much smaller 11 cm motifs with a 5 mm hook and worsted yarn. The supplied bedspread clearly uses larger blocks, so this project targets approximately 20–22 cm blocked per square.
Materials and Tools
Yarn
- Pale powder blue / ice blue — DK #3 — approximately 1,200–1,450 g — outer petals, square fields, and selected pillow rounds
- Warm white / ivory — DK #3 — approximately 850–1,050 g — openwork frames, seams, border, and pillow edging
- Medium blue — DK #3 — approximately 350–450 g — first raised petal layer and tonal transitions
- Cobalt / royal blue — DK #3 — approximately 220–300 g — flower centers and selected inner petals
- Optional sky blue — DK #3 — approximately 150–200 g — additional gradient variation
Tools
- 4.5 mm crochet hook
- 5.0 mm crochet hook for joining if required
- Yarn needle
- Sharp scissors
- Blocking mats
- Rust-resistant T-pins
- Locking stitch markers
- Measuring tape
- Kitchen scale
- 21 cm square blocking template
Abbreviations
MR — magic ring
sc — single crochet
hdc — half double crochet
dc — double crochet
tr — treble crochet
dtr — double treble crochet
sl st — slip stitch
ch — chain
sp — space
ch-sp — chain space
RS — right side
WS — wrong side
Invisible decreases are not required because the motif is built flat around a raised center; shape comes from rear anchor loops, graded stitch heights, and corner chain spaces.
Pattern — Step by Step
Work one test square through the final frame before beginning the full bedspread. The construction below is a photo-matched original using standard dimensional-flower and granny-square geometry.
Dark-Blue Flower Center
Yarn: cobalt / royal blue.
R1: 16 dc in MR (16)
Join with sl st to first dc.
Pull the ring closed firmly.
Fasten off.
Inner Petal Anchor Round
Yarn: medium blue.
Join medium blue in any stitch.
R2: *ch 3, skip 1 st, sl st in next st* around.
(8 ch-3 loops)
Keep all eight loops similar in height.
Inner Blue Petals — Make 8
Yarn: medium blue.
R3: in each ch-3 loop work:
(sc, hdc, 3 dc, hdc, sc)
Repeat around.
Join with sl st.
The inner petals should form a compact ring around the cobalt center.
Outer Petal Anchor Round
Work behind the R3 petals.
R4: *ch 5, sl st around the base between the next two inner petals* around.
(8 ch-5 loops)
Keep the loops fully behind the first petal layer.
Outer Ice-Blue Petals — Make 8
Yarn: pale powder blue.
Join pale blue into any ch-5 loop.
R5: in each loop work:
(sc, hdc, 2 dc, 3 tr, 2 dc, hdc, sc)
Repeat around.
Join and fasten off.
Lift the outer petals slightly away from the inner layer after completing the round.
Blue Transition Round
Yarn: sky blue or pale blue.
Join behind any outer petal.
R6: *ch 6, sl st around the base between the next two petals* around.
(8 ch-6 loops)
This round moves the working edge away from the dimensional flower before the square background begins.
Pale-Blue Background Foundation
Yarn: pale powder blue.
R7: in each ch-6 loop work:
(2 sc, 2 hdc, 3 dc, 2 hdc, 2 sc)
Repeat around.
Join.
The result should form a wide circular field behind the flower.
First Square-Conversion Round
Yarn: pale powder blue.
Mark four evenly spaced sections as corners.
At each corner section work:
(2 hdc, 2 dc, 2 tr, ch 3, 2 tr, 2 dc, 2 hdc)
Across each side section work sufficient dc and hdc stitches to keep the edge flat.
Join with sl st.
Place the square on a table and verify four clear corners before continuing.
Second Pale-Blue Square Round
R9: ch 3, dc in every stitch across each side.
At each corner ch-3 space work:
(2 dc, ch 2, 2 dc)
Repeat around.
Join.
First White Openwork Round
Yarn: warm white / ivory.
R10: ch 1, sc in same stitch, *ch 3, skip 2 sts, sc in next st* across each side.
At each corner work:
(sc, ch 4, sc)
Continue around.
Join.
White Cluster Frame
R11: work 3 dc in every ch-3 space.
At each corner ch-4 space work:
(3 dc, ch 2, 3 dc)
Join.
Second White Openwork Round
R12: *ch 3, skip 2 sts, sc in next st* around each side.
At each corner work ch 5.
Join.
Final Blue Edge Round
Yarn: very pale blue.
R13: work 3 dc in each ch-3 space.
At each corner ch-5 space work:
(3 dc, ch 2, 3 dc)
Join.
Firming Round
Yarn: white.
R14: sc in each stitch around.
At each corner work:
(2 sc, ch 2, 2 sc)
Join and fasten off.
Block to approximately 20–22 cm square.
Pin only through the pale-blue and white frame. Do not press the raised petals flat.
Bedspread Motif Count
For the photographed full-bed proportions, make approximately:
72 complete squares.
Arrange them:
8 squares across × 9 squares long
With a 21 cm blocked motif:
8 × 21 cm = 168 cm before border.
9 × 21 cm = 189 cm before border.
A border approximately 8–10 cm deep on every side produces a finished size close to 184 × 205 cm.
If the square blocks closer to 20 cm, the finished bedspread will be narrower. Measure the first six completed motifs before committing to all 72.
Blue Color Sequence
Use the same color hierarchy in every square to reproduce the photograph:
- Center: cobalt / royal blue
- Inner petals: medium blue
- Outer petals: pale ice blue
- Background: powder blue
- First frame: white
- Final accent: pale blue and white
Small changes in blue placement can be used from square to square, but retain the darkest value near the center.
That value progression creates a stronger visual center than alternating random blues.
Flat Joining Method
Yarn: warm white.
Block every square before joining.
Place two motifs RS up with corresponding edges touching.
Insert the hook through the outer loop of the first stitch on each square.
Sl st through both loops.
Repeat along the full edge.
Keep the seam loose enough that it does not shorten the blocked side.
If two joined 21 cm squares measure less than approximately 41.5 cm across, move from a 4.5 mm to a 5 mm hook for the seams.
Build nine horizontal rows of eight motifs first.
Join those nine rows vertically.
At each four-square intersection, pass through the shared corner spaces without stacking several extra slip stitches in one point.
Outer Border
Border Round 1 — White Foundation
Yarn: warm white.
Sc evenly around the complete joined field.
Work 3 sc into each blanket corner.
Count opposite sides and correct any stitch discrepancy now.
Border Round 2 — Pale-Blue Frame
Yarn: pale powder blue.
Ch 3 and dc around.
At each corner work:
(2 dc, ch 2, 2 dc)
Border Round 3 — White Open Mesh
Yarn: white.
*ch 4, skip 2 sts, sc in next st*
Repeat around.
At each corner work ch 6.
Border Round 4 — Blue Shell Foundation
Yarn: very pale blue.
In each ch-4 space work:
(sc, ch 2, 5 dc, ch 2, sc)
At each corner ch-6 space work:
(sc, ch 3, 7 dc, ch 3, sc)
Border Round 5 — White Scallops
Yarn: white.
Across each 5-dc shell work:
(sl st, sc, hdc, 3 dc in center dc, hdc, sc, sl st)
Repeat around.
Border Round 6 — Pale-Blue Picot Accent
Yarn: pale blue.
Sc around the scallop edge.
At the highest point of each scallop work:
(sc, ch 3, sl st in first ch, sc)
Fasten off.
Block the perimeter only. The flower centers should remain uncompressed.
Matching Pillow Front — Make 2
The pillows in the photograph repeat one enlarged floral square rather than several small bedspread blocks.
Work the main flower motif through R14.
Continue alternating pale-blue and white framing rounds until the panel measures approximately 45–48 cm.
Pillow Expansion Round 1
Yarn: pale blue.
Work dc across each side.
At every corner work:
(2 dc, ch 2, 2 dc)
Pillow Expansion Round 2
Yarn: white.
*ch 3, skip 2 sts, sc in next st* around.
Work ch 5 at corners.
Pillow Expansion Round 3
Yarn: pale blue.
Work 3 dc into every ch-3 space.
At corners work:
(3 dc, ch 2, 3 dc)
Pillow Scalloped Edge
Yarn: white.
Work 5-dc shells evenly around all four sides.
Use 7 dc in each corner shell.
Fasten off.
Pillow Back — Make 4 Panels
Two panels are required for each pillow.
Using pale blue or white, ch to match the blocked pillow-front width.
Work rows of dc until each back section measures approximately two-thirds of the pillow height.
Make two panels for each cushion.
Overlap the panels by 10–12 cm.
Place the pillow front RS down.
Position both back panels on top.
Sc through all layers around the perimeter.
Turn RS out and insert the cushion form.
Assembly
- Complete all 72 flower squares and weave in the dark-blue and medium-blue yarn tails before blocking.
- Block every motif to the same 20–22 cm measurement; any square differing from the target by more than 5 mm should be corrected before joining.
- Arrange eight squares across and nine squares long, keeping all flowers oriented in the same direction.
- Join each eight-square horizontal strip using loose white slip-stitch seams.
- Connect the nine completed strips vertically and keep every four-square junction flat.
- Measure both diagonals of the complete field; correct seam tension if they differ by more than approximately 2 cm.
- Work the first white and pale-blue foundation border rounds before starting any lace stitches.
- Add the white mesh, blue shells, scallops, and picot accent while checking all four corners after every completed round.
- Build two enlarged matching pillow fronts and attach overlapping back panels after blocking them to the same dimensions.
- Weave the remaining tails through matching-color WS stitches, raise every petal by hand, and reshape the scalloped edge before placing the set on the bed.
The finished bedspread should show a repeated dark-to-light blue flower gradient inside a pale-blue field, separated by crisp white openwork lines.
7 Technical Tips
- Petal flattening: Direct pressure over the flower removes the layered profile. Keep blocking pins at least 20 mm beyond the outer petal tips and pin the square frame only.
- Dark center disappearing: If the medium-blue inner petals cover more than roughly half of the cobalt center, the gradient becomes weak. Keep the dark center visibly exposed by approximately 2–3 cm across the middle.
- Outer-petal curling: Tight ch-5 anchor loops pull the ice-blue petals inward. Increase to ch 6 if the finished petal tips do not lie beyond the inner petal layer.
- Square cupping: If all four corners lift from the table after the first squaring round, the pale-blue background lacks circumference. Add one additional dc to each side group before repeating the next round.
- Join contraction: Tight white seams can reduce an eight-square strip by several centimeters. Move to a 5 mm joining hook if the finished strip loses more than about 2 cm from the calculated blocked length.
- Border ruffling: Excess foundation stitches become more obvious after six rounds. Count opposite sides after Border Round 1 and make their totals identical.
- Pillow edge warping: A shell border worked onto an unblocked pillow front can twist the corners. Block the panel to within 5 mm of its final dimension before adding the scallops.
Why the Blue Gradient Matters
The photograph does not depend on many unrelated colors. Instead, one hue moves from dark at the center to pale at the edges.
Cobalt draws the eye inward. Medium blue defines the first petal ring. Ice blue spreads outward, then the powder-blue field creates a quiet transition before the white frame begins.
That value sequence should stay consistent across the majority of squares.
If additional blue shades are introduced, place the darkest colors close to the center and the lightest colors near the frame. Reversing that hierarchy makes the flower look visually hollow.
Building the Raised Flower
The dimensional flower relies on two independent anchor rounds.
The first petal ring sits directly around the center. A second set of chain loops is then worked behind those petals, providing new attachment points for the larger outer layer.
Do not crochet the second layer into the top loops of the inner petals. Doing that merges both layers and removes most of the depth.
After R5, turn the motif sideways. You should see a clear stepped profile from center to inner petals to outer petals.
Keeping the Blue Background Flat
The raised flower should project; the surrounding blue field should not.
Place the motif on a table after R9. All four corners need to touch the surface without pressing them down.
If the field forms a bowl, add a little spacing in the transition round. If the edge waves, reduce excess stitches before the white openwork begins.
Blocking can refine a correct square. It cannot reliably repair major stitch-count imbalance across 72 motifs.
Why White Works as the Structural Color
White creates separation without adding another competing hue.
In the photograph, the join lines are easy to see because the surrounding squares remain blue. That contrast turns the modular construction into part of the design.
Using blue seams instead would visually merge adjacent backgrounds and reduce the grid effect.
Keep the white consistent across every square, join, and border. Slightly different whites can become obvious once 70 or more motifs sit next to one another.
Calculating a Different Bed Size
Base all calculations on the washed and blocked square measurement.
With a 21 cm motif:
- 6 squares = 126 cm
- 7 squares = 147 cm
- 8 squares = 168 cm
- 9 squares = 189 cm
- 10 squares = 210 cm
Add approximately 16–20 cm to both dimensions for an 8–10 cm border on all four sides.
An eight-square-wide bedspread therefore reaches roughly 184–188 cm after the border. Nine squares across would exceed 200 cm and provide a deeper side drop.
Measure the mattress itself rather than choosing solely by the commercial bed-size label.
Estimating Yarn from One Motif
Published blue flower blanket data shows how quickly yarn totals rise with square count: a 92 × 83 cm blanket already uses hundreds of grams of its primary blue yarn.
For this larger project, weigh one washed and blocked motif.
For example, if one square uses:
- 16 g pale blue
- 9 g white
- 5 g medium blue
- 3 g cobalt
Then 72 motifs would require approximately:
1,152 g pale blue before border.
648 g white before joins and border.
360 g medium blue.
216 g cobalt.
Add at least 20–25% to the white total because the seams and deep border use substantial yardage.
Planning the Matching Pillows
The pillows should repeat the bedspread’s color hierarchy but at a larger visual scale.
Use one central raised flower on each pillow rather than joining four bedspread motifs.
Expand only the blue background and white frame after the flower is complete. This keeps the flower large enough to remain the focal point from across the room.
Both pillow fronts should be blocked to the same size before the back panels are attached.
Constructing the Scalloped Border
The outer edge in the image is visibly softer than the internal square grid. Scallops create that change.
The first border rounds should remain solid enough to stabilize 72 joined motifs.
Open mesh follows. Shells then increase the depth, and the final picot detail breaks the edge into repeated rounded points.
Do not begin with scallops immediately after joining. A lace-only border attached to an uneven modular field is more likely to twist at the corners.
Finishing Checks
Lay the complete bedspread on a flat surface before final blocking.
Measure both diagonals. They should be close enough that no corner needs to be pulled several centimeters to form a rectangle.
Inspect the flower layers next. Every motif should show a dark center, eight inner petals, and eight larger outer petals.
Check all white seam intersections from the WS. No single four-square junction should feel substantially thicker than the neighboring ones.
Finish by lifting the petals and shaping the scallops after the bedspread is dry.
Conclusion
Complete one flower square first and wash it before calculating the full bedspread. Its blocked width controls motif count, seam length, yarn requirements, pillow proportions, and border depth for this blue 3D flower granny square crochet bedspread. Keep the darkest blue at each center, preserve the raised two-layer petals, and stabilize the complete field with white joins before working the lace edge. Photograph one close-up showing the layered flower and one full-bed view for Pinterest, then share the set on Instagram with #Blue3DFlowerBedspread. Would you keep all 72 flowers identical or alternate cobalt and medium-blue centers?









