Introduction
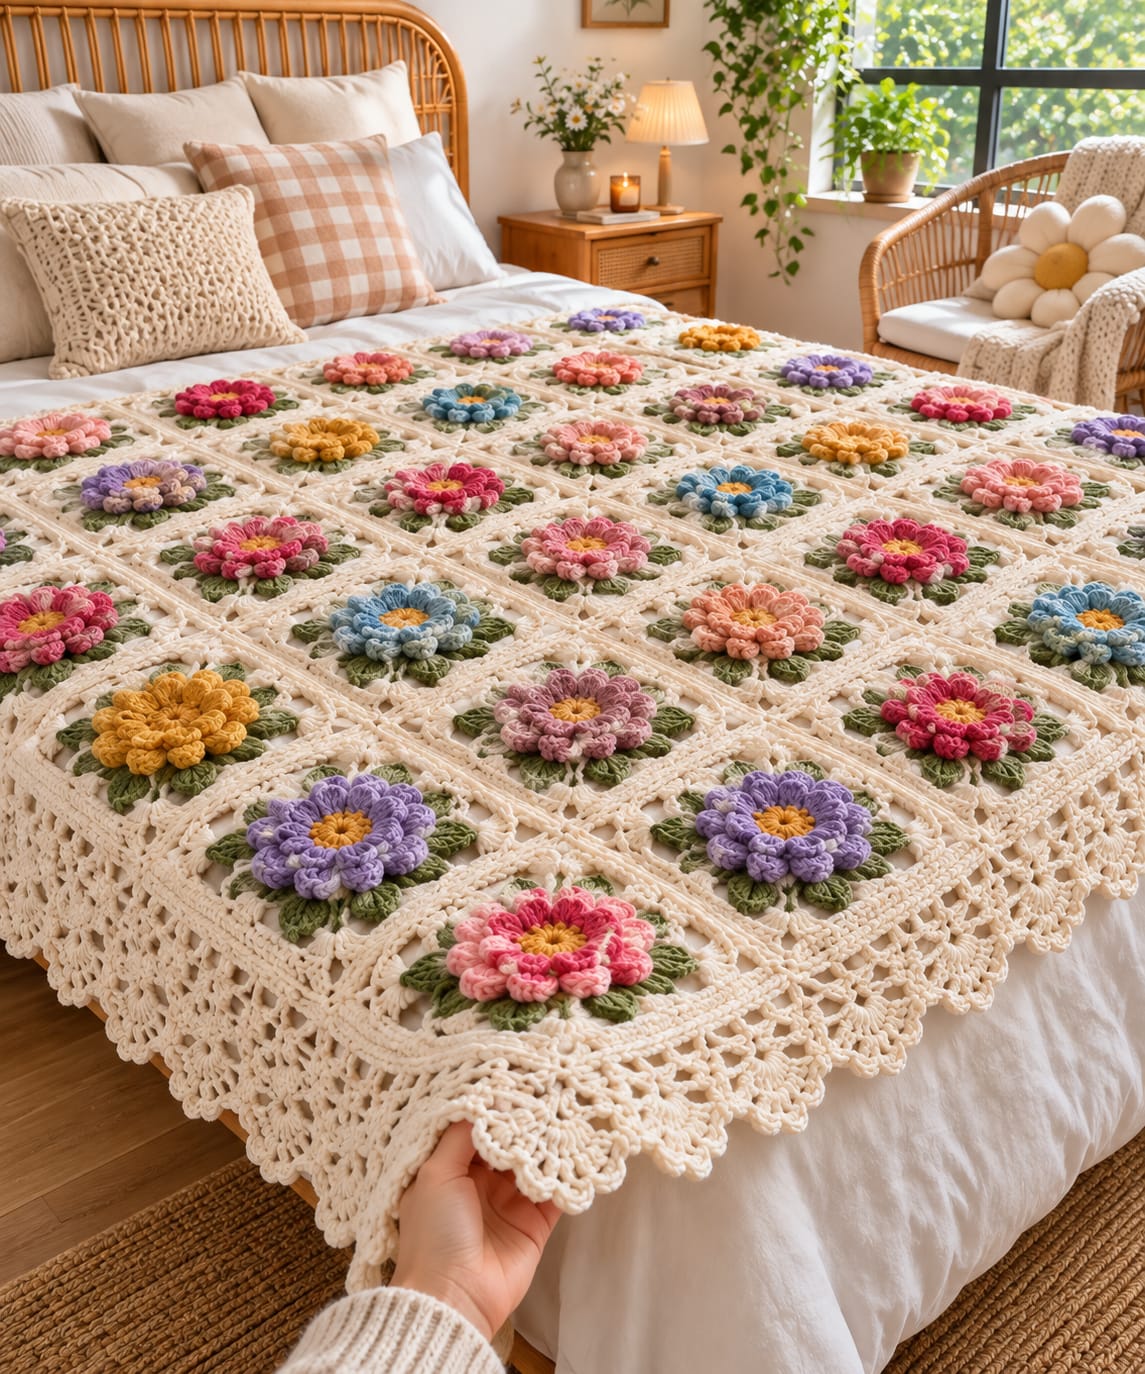
Sixteen raised petals can make one flower nearly as thick as the cream square beneath it, so the leaf ring has to stabilize the motif before the bedspread is joined. This 3D flower granny square crochet bedspread uses DK yarn and a 4.5 mm hook for approximately 21–22 cm blocks. Layered flowers, green leaves, cream openwork frames, flat seams, and a deep lace border reproduce the photographed construction.
The Design: What Makes This 3D Flower Bedspread Different
The flower is built above the square instead of being flattened into its background. Eight inner petals establish the first color ring, while eight larger outer petals overlap them and produce the raised profile visible across the bed. A separate green leaf round spreads the weight of that flower over a wider area before the cream squaring rounds begin. This matters structurally. Without the leaf layer, a raised flower granny square can pull inward around its center once dozens of motifs are joined. The cream frame performs a second job: it separates raspberry, lavender, blue, coral, rose, and mustard flowers so the multicolor flower crochet blanket remains ordered rather than fragmented. One common failure is blocking directly over the petals. Heavy pressure removes the depth that distinguishes this construction from an ordinary flat flower square.
Project Info at a Glance
| Skill Level | Time | Finished Size | Hook | Best For |
|---|---|---|---|---|
| Intermediate | 75–100 hours | Approx. 170 × 192 cm | 4.5 mm | Full bedspread, queen topper, large decorative blanket |
The finished dimensions assume 56 blocked motifs arranged seven squares across and eight squares long. Each motif should measure approximately 21–22 cm before joining. Border width adds roughly 8–10 cm to each side, depending on tension.
Materials and Tools
Yarn
- Warm cream / ivory — DK #3 — approximately 1,500–1,800 g — square backgrounds, seams, and complete outer border
- Sage / olive green — DK #3 — approximately 400–500 g — leaf rings
- Golden yellow — DK #3 — approximately 120–160 g — flower centers
- Raspberry / deep pink — DK #3 — approximately 120–160 g — flower petals
- Blush / coral pink — DK #3 — approximately 120–160 g — flower petals
- Lavender / purple — DK #3 — approximately 120–160 g — flower petals
- Dusty blue — DK #3 — approximately 100–140 g — flower petals
- Mustard / ochre — DK #3 — approximately 100–140 g — flower petals
The exact amount of each petal color depends on the final color map. Buy the cream and green yarn from single dye lots because those colors repeat through every motif.
Tools
- 4.5 mm crochet hook
- 5.0 mm crochet hook for joining if needed
- Yarn needle
- Sharp scissors
- Locking stitch markers
- Blocking mats
- Rust-resistant T-pins
- Measuring tape
- Kitchen scale for yarn calculations
- 21.5 cm square blocking template
Abbreviations
MR — magic ring
sc — single crochet
hdc — half double crochet
dc — double crochet
tr — treble crochet
dtr — double treble crochet
sl st — slip stitch
ch — chain
sp — space
ch-sp — chain space
BLO — back loop only
RS — right side
WS — wrong side
Invisible decreases are not needed in this flat motif; the three-dimensional shaping comes from front petal layers, rear anchor spaces, leaf stitches, and progressively taller corner stitches.
Pattern — Step by Step
This is a photo-matched original construction based on standard layered-flower and granny-square geometry. Work one complete test motif before beginning the full blanket.
Yellow Flower Center
Yarn: golden yellow.
R1: 16 dc in MR (16)
Join with sl st to the first dc.
Pull the center closed firmly.
Fasten off.
Inner Petal Anchor Round
Yarn: chosen flower color.
Join flower yarn in any stitch.
R2: *ch 3, skip 1 st, sl st in next st* around.
You should have 8 ch-3 loops.
These loops form the bases for the first eight petals.
Inner Petals — Make 8
Yarn: same flower color.
R3: in each ch-3 loop work:
(sc, hdc, 3 dc, hdc, sc)
Repeat around.
Join with sl st.
Do not fasten off if using the same color for both petal layers.
Outer Petal Anchor Round
Work behind the first petal layer.
R4: *ch 5, sl st around the base between the next two inner petals* around.
(8 ch-5 loops)
Keep these loops behind the completed petals rather than pulling them through to the front.
Outer Petals — Make 8
R5: in each ch-5 loop work:
(sc, hdc, 2 dc, 3 tr, 2 dc, hdc, sc)
Repeat around.
Join and fasten off.
Lift the outer petals slightly with the fingers rather than pressing them flat.
Green Leaf Anchor Round
Yarn: sage / olive green.
Join green behind one outer petal.
R6: *ch 6, sl st around the base between the next two outer petals* around.
(8 ch-6 loops)
The anchor round should lie behind the flower.
Green Leaves — Make 8
R7: in each ch-6 loop work:
(sc, hdc, 2 dc, tr, 2 dc, hdc, sc)
Repeat around.
Join with sl st.
Fasten off.
Each leaf should project between two flower petals. Rotate the motif before continuing and correct any leaf trapped beneath a petal.
Cream Foundation Round
Yarn: warm cream.
Join cream behind any leaf.
R8: *ch 5, sc around the base between leaves* around.
(8 ch-5 spaces)
These spaces shift the working edge away from the raised flower.
First Square-Conversion Round
Yarn: cream.
Mark four evenly spaced ch-5 loops as corners.
In each corner loop work:
(2 hdc, 2 dc, 2 tr, ch 3, 2 tr, 2 dc, 2 hdc)
In each non-corner loop work:
(2 hdc, 4 dc, 2 hdc)
Join with sl st.
Lay the motif on a flat surface. Four corners should now be clearly defined.
Second Cream Square Round
R10: ch 3, dc in each stitch across the side.
At each corner ch-3 space work:
(2 dc, ch 2, 2 dc)
Repeat around.
Join.
Openwork Cream Round
R11: ch 1, sc in same stitch, *ch 3, skip 2 sts, sc in next st* across each side.
At every corner work:
(sc, ch 4, sc)
Continue around.
Join.
Cream Frame Round
R12: work 3 dc in every ch-3 space.
At each ch-4 corner space work:
(3 dc, ch 2, 3 dc)
Join.
Final Firming Round
R13: sc in every stitch across each side.
At each corner work:
(2 sc, ch 2, 2 sc)
Join and fasten off.
Block the cream frame to approximately 21–22 cm square.
Do not pin through the dimensional flower.
Flower Color Plan
The supplied bedspread uses repeated colors but avoids obvious stripes. A controlled random layout works better than arranging every color in a strict sequence.
For 56 motifs, use approximately:
- 12 raspberry / deep pink flowers
- 12 blush / coral flowers
- 10 lavender / purple flowers
- 8 dusty-blue flowers
- 8 mustard flowers
- 6 mixed rose / mauve flowers
Every square uses the same yellow center, green leaf ring, and cream frame.
Lay the color plan out before joining. Avoid placing more than two motifs of the same petal color directly beside one another.
Bedspread Motif Count
Make 56 complete flower squares.
Arrange them:
7 squares across × 8 squares long
If each blocked motif measures 21.5 cm:
7 × 21.5 cm = approximately 150.5 cm before border.
8 × 21.5 cm = approximately 172 cm before border.
A border measuring approximately 9–10 cm deep on each side brings the finished bedspread close to 170 × 192 cm.
Measure your own blocked square before relying on these dimensions.
Flat Joining Method
Yarn: warm cream.
Block every motif first.
Place two squares RS up with their edges touching.
Insert the hook through the outer loop of the first corresponding stitch on both motifs.
Make a loose sl st.
Continue through matching outer loops across the entire edge.
Keep the seam flexible. If two 21.5 cm squares contract to less than approximately 42.5 cm after joining, move from the 4.5 mm hook to a 5 mm hook for seams.
Join seven-square rows first.
Make eight horizontal rows.
Join those eight rows vertically.
At each four-square intersection, pass through the existing corner spaces without adding an extra cluster.
Outer Border
Border Round 1 — Foundation
Yarn: cream.
Join yarn at one corner.
Sc evenly around the entire bedspread.
Work 3 sc in each corner.
Count opposite edges. Their stitch totals should match.
Border Round 2 — Solid Frame
Ch 3.
Dc in each stitch around.
At each corner work:
(2 dc, ch 2, 2 dc)
Border Round 3 — Open Mesh
*ch 4, skip 2 sts, sc in next st*
Repeat across each edge.
At each corner work ch 6.
Border Round 4 — First Lace Layer
In each ch-4 space work:
(sc, ch 3, 3 dc, ch 3, sc)
At each corner ch-6 space work:
(sc, ch 4, 5 dc, ch 4, sc)
Border Round 5 — Deep Shells
Work 7 dc into the center ch-space of each previous shell.
Sl st between adjacent shells.
At each corner work 9 dc in the corner shell.
Border Round 6 — Scalloped Finish
Across every 7-dc shell work:
(sl st in first dc, sc in next dc, hdc in next dc, 3 dc in center dc, hdc in next dc, sc in next dc, sl st in final dc)
Repeat around.
Fasten off.
Block the border separately from the flower field so the lace hangs downward without flattening the raised petals.
Assembly
- Complete all 56 flower motifs and weave in flower-color ends before adding them to the layout.
- Block every cream frame to 21–22 cm, correcting any motif that differs from the group average by more than 5 mm.
- Arrange seven squares across and eight squares long, distributing raspberry, coral, lavender, blue, mustard, and mauve flowers throughout the grid.
- Join each seven-square horizontal row with loose cream slip-stitch seams.
- Connect the eight completed rows vertically and keep every four-square intersection flat.
- Measure the joined field across both diagonals; a difference greater than approximately 2 cm should be corrected before the border begins.
- Work the first two solid cream border rounds and recount opposite edges after each round.
- Add the open mesh and lace rounds, keeping the corner chain spaces larger than the side spaces.
- Block only the cream square frames and lace edge, then lift and reshape every flower and green leaf by hand.
- Weave the remaining cream tails through the WS, place the bedspread flat, and correct any color cluster or petal caught beneath a neighboring motif.
The completed bedspread should show a continuous cream lattice with dimensional flowers rising independently from evenly spaced green leaf rings.
7 Technical Tips
- Petal collapse: Steam or heavy wet blocking directly over the flower can flatten both raised layers. Keep pins at least 2 cm away from the petal tips and block only the cream frame.
- Center cupping: If the 16-stitch yellow center curves into a bowl, the first petal anchor round is too tight. Increase each ch-3 loop to ch 4 before remaking the petals.
- Leaf hiding: Green leaves sewn or crocheted directly below petal centers disappear from the front. Position each leaf between two outer petals so at least 2–3 cm remains visible.
- Square twisting: A corner displaced by more than one repeat in the first cream squaring round creates diagonal strain. Mark all four corner loops before working any tall stitches.
- Join puckering: A tight slip-stitch seam shortens the field. If a joined seven-square row loses more than approximately 2 cm from its calculated length, remake the seam with a 5 mm hook.
- Border ruffling: Adding extra stitches around uneven square seams multiplies through six lace rounds. Count the foundation border and make opposite sides numerically equal.
- Color clustering: Three identical flowers touching at one square intersection create an unintended block of color. Lay out all 56 motifs before joining and limit direct same-color contact to two squares.
Why Two Petal Layers Matter
The photograph depends on depth. A single flat petal round would preserve the flower shape but remove the shadow line running through the center of each bloom.
The inner eight petals act as a compact crown around the yellow center. Larger outer petals begin behind them and extend farther into the leaf ring. That difference in radius creates the raised flower without requiring stuffing.
Work the rear ch-5 anchor loops loosely. If those loops pull tightly across the back of the inner petals, the outer layer will curl toward the center instead of spreading outward.
Building a Stable Green Leaf Ring
The leaf layer has both a visual and mechanical function.
Green separates brightly colored petals from the neutral cream field. At the same time, eight leaves spread the central flower over a wider circumference before the square conversion begins.
This reduces the abrupt transition from a thick dimensional center to flat background stitches.
After R7, place the motif face down. All eight leaf bases should form an approximately even circle. Correct a twisted anchor loop before starting the cream yarn because the error becomes harder to reach later.
Choosing Yarn for a Large Bedspread
DK yarn gives the photographed design enough petal definition without producing the extreme weight of a queen-size bedspread made entirely in bulky yarn.
Acrylic offers the lowest finished weight and usually requires less intensive blocking. Cotton gives sharper leaves and square corners but becomes considerably heavier across more than fifty motifs.
A cotton-acrylic blend is a useful middle option for a floral crochet bedspread. It retains stitch definition while reducing some of the weight associated with pure cotton.
Whatever fiber is selected, make one complete square and wash it before buying the remaining yarn. Measure the motif after drying rather than relying on its fresh-off-the-hook dimensions.
Controlling Flower Color Distribution
Random color placement still needs a plan.
Begin with the least common color, such as dusty blue, and place those motifs across the grid with two or three squares between most repeats. Add mustard next because its warm value is visually strong against cream.
Fill the remaining spaces with lavender, coral, rose, and raspberry.
Step back several meters from the layout before joining. At that distance, obvious diagonal lines and heavy color clusters are easier to identify.
The green and cream remain identical in every block, so only the petal color should change.
Calculating Another Bed Size
Base the calculation on your washed and blocked motif.
For a 21.5 cm square:
- 6 motifs = 129 cm
- 7 motifs = 150.5 cm
- 8 motifs = 172 cm
- 9 motifs = 193.5 cm
- 10 motifs = 215 cm
Add approximately 18–20 cm to both final dimensions for a 9–10 cm border on every side.
For a wider queen-size top, eight squares across may be preferable. A decorative full-bed topper may need only seven.
Measure the mattress and decide how much side drop is required before producing dozens of additional motifs.
Estimating Yarn from One Finished Square
Published chunky flower squares demonstrate how useful per-motif weighing can be: one current 25 cm pattern lists separate gram amounts for the center, petals, and background.
Apply the same method here.
Weigh one finished, blocked DK square and then weigh comparable remaining yarn if possible.
For example, if a motif consumes:
- 22 g cream
- 7 g flower color
- 6 g green
- 2 g yellow
Multiply those numbers by 56.
That produces approximately 1,232 g cream, 392 g flower colors, 336 g green, and 112 g yellow before seams and border.
Add at least 15–20% to the cream quantity because joins and the deep border consume substantially more background yarn.
Keeping the Cream Field Flat
The dimensional center should rise; the square itself should not.
After the first cream square-conversion round, place the motif on a table without stretching it. Four corners should touch the surface while the flower remains above them.
If the cream section cups upward, add a little height or spacing to the side groups. If the corners ripple outward, reduce excess stitches before continuing.
Do not assume blocking will correct structural ruffling across 56 squares. Small errors become large once the motifs are connected.
Constructing the Deep Lace Border
The border in the image is substantially deeper than a single shell round. That proportion is important because the dense flower field needs a lighter outer transition.
Begin with solid rounds. They stabilize the joined grid and provide predictable stitch counts.
The open mesh then removes visual weight before the shell rounds expand toward the edge. The final scallop should hang beyond the mattress rather than roll upward onto the blanket surface.
Check the corners after every border round. Four evenly expanding corners are more important than maintaining an exact side repeat when minor seam differences are present.
Finishing Checks
Lay the bedspread flat before final blocking.
Measure both diagonals. Their difference should remain small enough that the field still forms a rectangle without pulling one corner outward.
Inspect each flower next. Eight inner petals, eight outer petals, and eight visible green leaf sections should remain identifiable.
Run a hand along every joining seam from the WS. No seam should feel significantly tighter than its neighboring line.
Check the lace edge last. The shells should hang freely, while the cream foundation rounds remain flat against the outer row of squares.
Conclusion
Make one complete motif first, wash it, and record its blocked dimensions before calculating the full grid. That measurement determines square count, yarn consumption, border depth, and the final proportions of this 3D flower granny square crochet bedspread. Build all flowers before joining so the color arrangement can be viewed as one composition, then stabilize the cream field before adding the deep lace edge. Photograph a flower close-up and a full-bed view for Pinterest, and share the finished layout on Instagram with #3DFlowerGardenBedspread. Which flower color would you repeat most often: raspberry, lavender, dusty blue, or mustard?









