Introduction
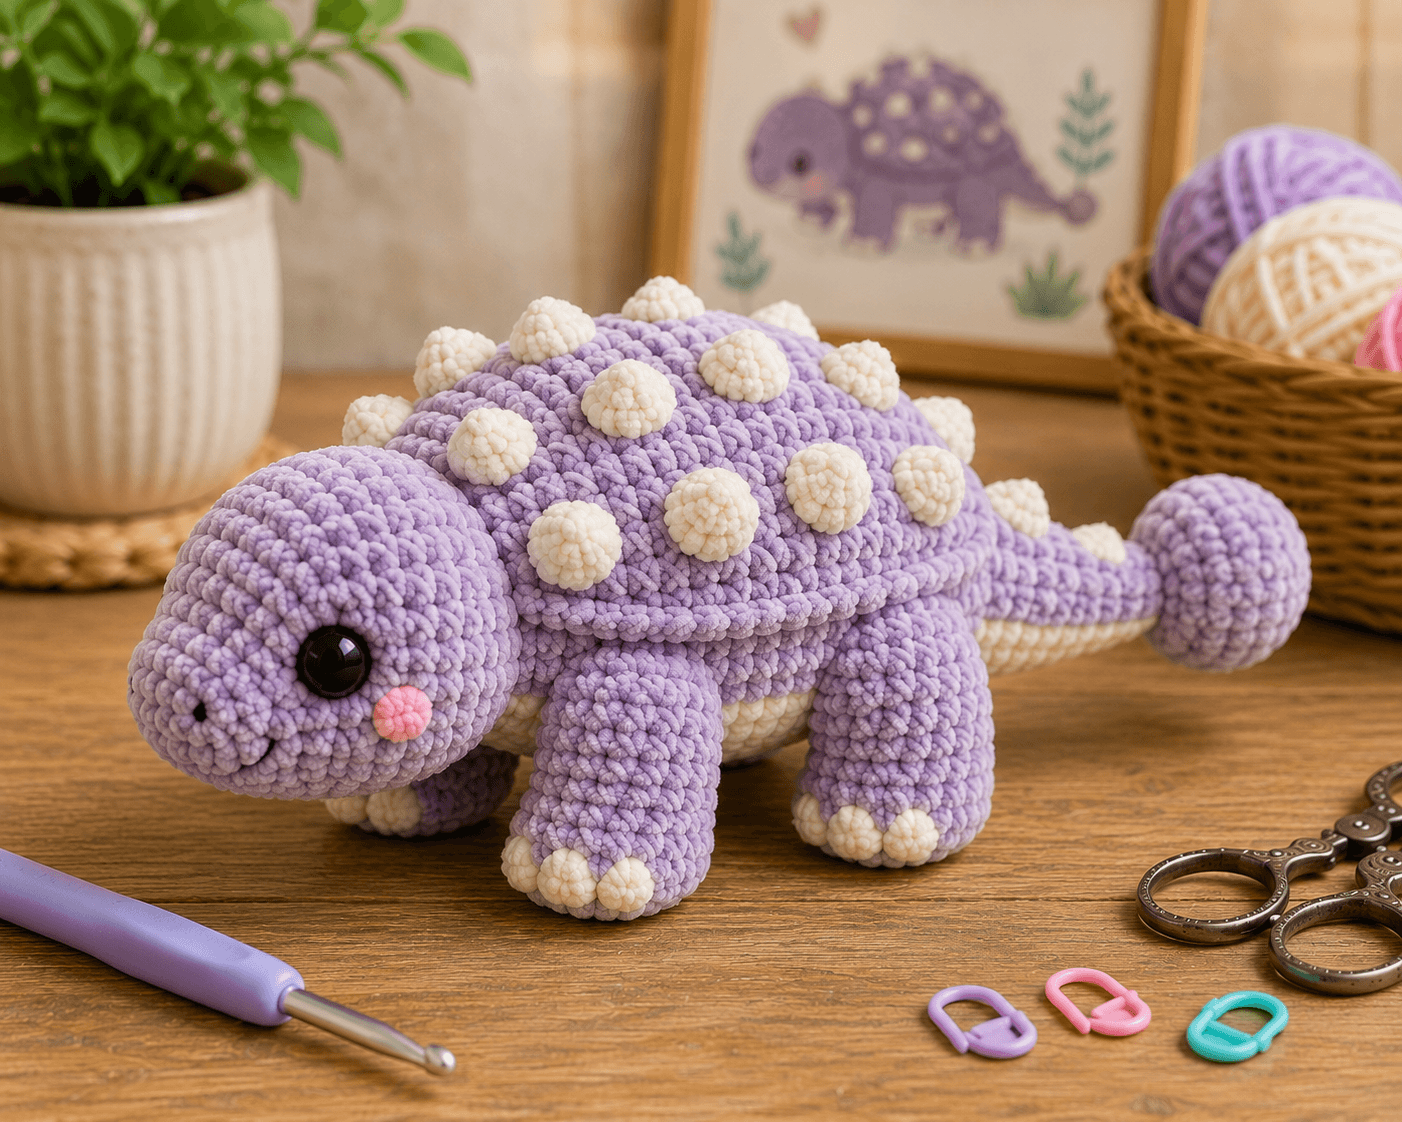
An ankylosaurus needs a tail club large enough to counterbalance a head that rides only a few centimeters above the ground. This ankylosaurus amigurumi crochet pattern uses chunky chenille yarn, a 5 mm hook and 16 mm safety eyes for a dinosaur approximately 38–45 cm long. A separate armor plate, cream osteoderms, four heavy legs and a bulbous tail club reproduce the proportions visible in the reference.
The Design: What Makes This Ankylosaurus Different
The dinosaur is constructed horizontally rather than as an upright character. A long oval body carries four short legs, allowing the belly to remain close to the ground while the head projects forward. The armored back is a separate lavender panel rather than bobble stitches worked directly into the torso. That choice makes it possible to place cream osteoderms in staggered rows and preserves the smooth chunky texture of the body. The crochet ankylosaurus plush also uses a long tail that narrows sharply before expanding into a large club. Cream toes and a light belly repeat the armor color without overpowering the purple body. A common maker error is attaching the legs too close to the center line. That reduces lateral stability and causes a long dinosaur to roll onto its side.
Project Information at a Glance
| Skill Level | Time | Finished Size | Hook | Best For |
|---|---|---|---|---|
| Intermediate | 8–11 hours | Approx. 38–45 cm long | 5.0 mm | Dinosaur collections, display plush and age-appropriate toys |
Published ankylosaurus patterns vary considerably in scale. PlanetJune lists an approximately 24 cm version worked in worsted yarn with a 3.5 mm hook, while a recent realistic design reaches about 58–60 cm. The photo sits between those two proportions and uses visibly thicker plush yarn.
Materials and Tools
Yarn
- Lavender chunky chenille — approximately 220–280 g — head, body, legs, tail, club and armor plate
- Cream chunky chenille — approximately 60–80 g — belly, armor knobs and toes
- Blush pink chunky or worsted yarn — approximately 5 g — cheeks
- Black yarn or embroidery thread — small amount — nostrils and optional mouth detail
Tools
- 5.0 mm crochet hook
- 16 mm safety eyes ×2
- Polyester fiberfill
- Large-eye yarn needle
- Long doll needle
- Stitch markers
- Sharp scissors
- Rust-resistant pins
For a toy intended for a child under three, replace plastic eye components with securely embroidered features.
Abbreviations
- MR — magic ring
- sc — single crochet
- inc — 2 sc in one stitch
- dec — single-crochet decrease
- sl st — slip stitch
- ch — chain
- hdc — half double crochet
- dc — double crochet
- BLO — back loop only
For an invisible decrease, insert the hook through the front loops of the next two stitches and complete them together as one single crochet.
Pattern — Step by Step
Work stuffed components in continuous spirals unless another method is stated. Move the stitch marker at the end of every round.
Body
Yarn: lavender — standard large amigurumi math.
R1: 6 sc in MR (6)
R2: inc ×6 (12)
R3: (sc, inc) ×6 (18)
R4: (2 sc, inc) ×6 (24)
R5: (3 sc, inc) ×6 (30)
R6: (4 sc, inc) ×6 (36)
R7: (5 sc, inc) ×6 (42)
R8: sc around (42)
R9: sc around (42)
R10: sc around (42)
R11: sc around (42)
R12: sc around (42)
R13: sc around (42)
R14: sc around (42)
R15: sc around (42)
R16: sc around (42)
Stuff progressively, keeping the body elongated rather than spherical.
R17: (5 sc, dec) ×6 (36)
R18: sc around (36)
R19: (4 sc, dec) ×6 (30)
R20: sc around (30)
R21: (3 sc, dec) ×6 (24)
R22: (2 sc, dec) ×6 (18)
R23: (sc, dec) ×6 (12)
R24: dec ×6 (6)
Fasten off and close.
Head
Yarn: lavender.
R1: 6 sc in MR (6)
R2: inc ×6 (12)
R3: (sc, inc) ×6 (18)
R4: (2 sc, inc) ×6 (24)
R5: (3 sc, inc) ×6 (30)
R6: (4 sc, inc) ×6 (36)
R7: sc around (36)
R8: sc around (36)
R9: sc around (36)
R10: sc around (36)
R11: sc around (36)
Insert 16 mm safety eyes between R8 and R9, approximately 8–9 visible stitches apart.
R12: sc around (36)
R13: (4 sc, dec) ×6 (30)
R14: (3 sc, dec) ×6 (24)
R15: (2 sc, dec) ×6 (18)
Stuff firmly, especially around the lower muzzle.
R16: (sc, dec) ×6 (12)
R17: dec ×6 (6)
Fasten off and close.
Cheeks — Make 2
Yarn: blush pink.
R1: 6 sc in MR (6)
R2: inc ×6 (12)
Fasten off with a 15 cm tail.
Flatten before sewing.
Front Legs — Make 2
Yarn: lavender.
R1: 6 sc in MR (6)
R2: inc ×6 (12)
R3: (sc, inc) ×6 (18)
R4: (2 sc, inc) ×6 (24)
R5: sc around (24)
R6: sc around (24)
R7: (2 sc, dec) ×6 (18)
R8: sc around (18)
R9: sc around (18)
R10: (sc, dec) ×6 (12)
R11: sc around (12)
R12: sc around (12)
Stuff firmly through the foot and moderately through the upper leg.
Flatten the top and work 6 sc through both layers.
Fasten off with a 30 cm sewing tail.
Back Legs — Make 2
Yarn: lavender.
R1: 6 sc in MR (6)
R2: inc ×6 (12)
R3: (sc, inc) ×6 (18)
R4: (2 sc, inc) ×6 (24)
R5: sc around (24)
R6: sc around (24)
R7: sc around (24)
R8: (2 sc, dec) ×6 (18)
R9: sc around (18)
R10: sc around (18)
R11: (sc, dec) ×6 (12)
R12: sc around (12)
R13: sc around (12)
Stuff firmly.
Flatten the attachment edge and work 6 sc through both layers.
Fasten off with a long sewing tail.
Cream Toe Bumps — Make 12
Yarn: cream.
R1: 6 sc in MR (6)
R2: sc around (6)
Fasten off.
Do not stuff.
Three toe bumps are attached across the front of each leg.
Cream Belly Patch
Yarn: cream.
R1: 6 sc in MR (6)
R2: inc ×6 (12)
R3: (sc, inc) ×6 (18)
R4: (2 sc, inc) ×6 (24)
R5: (3 sc, inc) ×6 (30)
R6: sc around (30)
Fasten off with a long sewing tail.
Stretch the circle into an oval while sewing it flat against the lower body.
Tail
Yarn: lavender.
R1: 6 sc in MR (6)
R2: inc ×6 (12)
R3: (sc, inc) ×6 (18)
R4: (2 sc, inc) ×6 (24)
R5: sc around (24)
R6: sc around (24)
R7: (2 sc, dec) ×6 (18)
R8: sc around (18)
R9: sc around (18)
R10: sc around (18)
R11: (sc, dec) ×6 (12)
R12: sc around (12)
R13: sc around (12)
R14: sc around (12)
R15: sc around (12)
R16: sc around (12)
Stuff firmly at the broad base and more lightly toward the narrow end.
Fasten off with a 35 cm sewing tail.
Tail Club
Yarn: lavender.
R1: 6 sc in MR (6)
R2: inc ×6 (12)
R3: (sc, inc) ×6 (18)
R4: (2 sc, inc) ×6 (24)
R5: (3 sc, inc) ×6 (30)
R6: sc around (30)
R7: sc around (30)
R8: sc around (30)
R9: (3 sc, dec) ×6 (24)
R10: (2 sc, dec) ×6 (18)
Stuff very firmly.
R11: (sc, dec) ×6 (12)
R12: dec ×6 (6)
Fasten off and close.
Sew the narrow tail end securely to one side of the club.
Cream Tail Underside
Yarn: cream.
Ch 18.
Starting in second chain from hook:
Row 1: 17 sc (17)
Row 2: ch 1, turn, 17 sc (17)
Row 3: ch 1, turn, dec, 13 sc, dec (15)
Row 4: ch 1, turn, 15 sc (15)
Row 5: ch 1, turn, dec, 11 sc, dec (13)
Fasten off.
Sew along the underside of the tail beginning near the body.
Armor Back Plate
Yarn: lavender. Work as an elongated oval.
Ch 24.
R1: starting in second ch, 22 sc, 3 sc in final ch; working along opposite side, 21 sc, inc in final ch (48)
R2: inc, 21 sc, inc ×3 across curved end, 21 sc, inc ×2 across opposite curve (54)
R3: sc around, placing 6 increases evenly across the two rounded ends (60)
R4: sc around (60)
R5: sc around (60)
Fasten off with a long tail.
The plate should cover most of the back from the rear of the head to the beginning of the tail.
Large Cream Armor Knobs — Make 10
Yarn: cream.
R1: 6 sc in MR (6)
R2: inc ×6 (12)
R3: sc around (12)
R4: dec ×6 (6)
Add a tiny amount of stuffing.
Fasten off with a sewing tail.
Small Cream Armor Knobs — Make 10–12
Yarn: cream.
R1: 6 sc in MR (6)
R2: sc around (6)
Add a small pinch of stuffing only if the chenille yarn collapses.
Fasten off.
Nostrils
Yarn: black.
Embroider two short vertical stitches near the front of the muzzle, approximately 2.5–3 cm apart.
Keep each nostril approximately 5–7 mm long.
Assembly
- Sew the head to the front of the body with its lower edge slightly below the body’s horizontal center line so the ankylosaurus maintains a low posture.
- Attach both front legs beneath the front third of the body, spacing them widely enough that each foot rests completely on the work surface.
- Sew the back legs beneath the rear third of the torso, matching the front-leg width rather than bringing them toward the belly center.
- Attach the cream belly patch to the lower body and position three cream toe bumps across the front of each of the four feet.
- Sew the tail to the rear of the body over a circular area approximately 5–6 cm wide, then connect the club firmly to the tapered tail end.
- Position the lavender armor plate over the top of the body so its front edge overlaps the rear of the head slightly and its narrow end points toward the tail.
- Sew the armor plate around its complete perimeter, adding several hidden anchoring stitches through its center so it cannot lift away from the stuffed body.
- Arrange the cream armor knobs in staggered rows, placing larger knobs near the upper center and smaller ones toward the outer edges and rear section.
- Sew both pink cheek circles below and slightly behind the eyes, then embroider the two black nostrils near the front of the muzzle.
- Place the dinosaur on a flat table, correct any leg or tail rotation, weave all remaining tails through internal stuffing, and reshape the armor knobs by hand.
The completed ankylosaurus should stand on all four feet with the belly low, the armored plate centered, and the club tail extending almost horizontally behind the body.
7 Technical Tips
- Body rolling: Legs attached closer than approximately 5–6 cm apart on a plush this size reduce lateral stability. Pin all four legs while the body rests on a flat surface before sewing.
- Tail sagging: A loosely stuffed 12-stitch tail section bends immediately in front of the club. Pack the final 5–7 cm more firmly than the middle section while keeping the seam flexible.
- Club rotation: Sewing the tail club with only one pass allows the heavy ball to twist. Work two complete sewing rounds through the 12-stitch tail end and several club stitches.
- Armor lifting: A plate attached only around its outer edge can dome away from the body by more than 2 cm. Add four to six hidden anchoring stitches through the middle of the plate.
- Knob crowding: Leave roughly 1.5–2 cm between neighboring cream osteoderms. Placing them edge-to-edge hides the lavender armor and turns separate knobs into one continuous textured surface.
- Eye mismatch: Sixteen-millimeter eyes amplify even a one-round placement error. Install both between R8 and R9 before locking either backing permanently.
- Chenille gaps: Stuffing visible between stitches indicates a hook that is too large or tension that is too loose. Test a 4.5 mm hook before altering any stitch counts.
Shaping the Low Ankylosaurus Body
An ankylosaurus does not need the upright torso used for many dinosaur amigurumi designs. The visual weight belongs close to the table surface. A 42-stitch body provides enough circumference for four thick legs while keeping the dinosaur elongated.
The plateau runs for several rounds because length matters as much as width. Too few plain rounds create a round-bodied dinosaur with little room for the armor plate.
Stuff the side walls before packing the center. That keeps the torso broad and prevents a hard central lump from forcing the back plate upward.
Building the Armored Back
Existing ankylosaurus patterns use several armor techniques. Club Crochet uses bobble and bean stitches, while ComplicatedKnots demonstrates waffle texture. Other patterns attach separate back plates and spikes. The photo uses another clear solution: a smooth plate covered by individual pale knobs. :contentReference[oaicite:15]{index=15}
The plate should remain relatively flat before assembly. It gains its curved profile only after being sewn across the stuffed torso.
Start with the largest cream bumps near the upper middle area. Reduce their size toward the plate edge to keep the silhouette rounded rather than uniformly spiky.
Constructing the Club Tail
The tail is one of the strongest identifying features of an ankylosaurus. PlanetJune describes the animal as having an armored back, side spikes and a club-like tail, while Nicole Chase’s pattern also uses a clubbed tip. :contentReference[oaicite:16]{index=16}
This version separates the tapered tail from the club. That produces a more abrupt change in diameter and makes the club visibly heavier than the shaft.
Stuff the club firmly enough that finger pressure does not leave a permanent indentation. The adjoining tail needs comparable support in its final few centimeters or the club will drag downward.
Choosing Chunky Chenille Yarn
Published ankylosaurus patterns frequently use DK, worsted or medium #4 yarn. Halime Özel lists DK cotton-acrylic and fingering cotton options, PlanetJune uses worsted yarn, and both versions of Archie use medium #4 worsted. :contentReference[oaicite:17]{index=17}
The reference image has a much thicker plush surface, so chunky chenille is a closer match. A 5 mm hook keeps the stitches dense while still allowing the fabric to bend over the broad body.
Chenille stitches can be difficult to see. Count by touch and keep a locking marker in the first stitch of every round.
Planning Yarn Quantity
Small DK versions can use as little as 25 g of main color, while Mini Archie lists 80 yards of main-color worsted yarn and the larger Archie uses 155 yards. :contentReference[oaicite:18]{index=18}
A chunky photo-matched version requires substantially more physical yarn because the body, armor plate, four legs and club are all oversized. Budget approximately 220–280 g of lavender and 60–80 g of cream.
Make the body and armor plate before cutting into a second lavender skein. Those pieces consume the largest share and give the most useful measurement for remaining yarn.
Placing the Four Legs
The legs need to support length rather than height. Front feet belong under the first third of the torso, while rear feet sit beneath the final third.
Attach them farther apart across the width than a sitting teddy-bear style amigurumi. The dinosaur should form a stable rectangle when viewed from above.
Nicole Chase’s large Archie instructions likewise specify exact leg and arm spacing against body rounds, demonstrating how strongly placement affects the final posture. :contentReference[oaicite:19]{index=19}
Adding Cream Toes
The photograph uses three clearly separated cream toes on each foot. Small circular bumps reproduce the raised chenille appearance more accurately than flat embroidery.
Attach the middle toe first. Position the two outer toes symmetrically around it, leaving a small section of lavender visible between them.
Do not overstuff the bumps. They should project from the foot without becoming six-stitch spheres.
Competition and Design Position
Current ankylosaurus patterns range from miniature low-sew versions to large realistic dinosaurs. Club Crochet uses specialized textured stitches, Mini Archie uses a separate plate with embroidered bumps, and a newly listed realistic design reaches approximately 58–60 cm with very little sewing. :contentReference[oaicite:20]{index=20}
This ankylosaurus amigurumi crochet pattern focuses instead on the exact visual structure in the photo: lavender chenille, a low wide body, a layered armor panel, individually crocheted cream knobs, pale belly details and an oversized rounded tail club.
Those separate pieces require more assembly, but they also make placement and color distribution easier to control.
Finishing Checks
Set the finished dinosaur on a level table and inspect all four feet. Every foot should contact the surface without forcing the body to tilt.
View the back from directly above. The armor panel should sit on the body center line and extend evenly toward both sides.
Check the cream knobs next. They should form staggered rows rather than a strict square grid, with visible lavender space between each bump.
Finish by viewing the tail from the side. The shaft should remain nearly horizontal before expanding into the rounded club instead of dropping sharply toward the table.
Conclusion
Crochet the 42-stitch body and armor plate first, then measure the combined torso length before making the tail. That dimension gives the best reference for keeping the club proportional when another chenille yarn is substituted. Pin all four legs while the dinosaur rests on a table, attach the armor only after the stance is stable, and add the cream knobs last. Save the finished ankylosaurus to Pinterest and share detailed armor photos on Instagram with #LavenderAnkylosaurus. For another version of this ankylosaurus amigurumi crochet pattern, would you keep the cream armor knobs or change them to a darker contrasting purple?
Sources
- PlanetJune / June Gilbank — Ankylosaurus: worsted yarn, 3.5 mm hook, 10 mm eyes and approximately 9.5 inches long.
- Nicole Chase — Archie the Ankylosaurus: medium #4 worsted yarn, 4 mm hook, 12 mm eyes, detailed body counts, separate plate, spikes and clubbed tail.
- Nicole Chase — Mini Archie: medium #4 worsted yarn, 4 mm hook, 9 mm eyes and published yarn yardages.
- Clairea Belle Makes / Handmade by Halime — 2024 free ankylosaurus using approximately 25 g DK yarn and bobble-style armor texture.
- Ravelry / Halime Özel — free Ankylosaurus pattern using DK cotton-acrylic or fingering cotton yarn.
- Club Crochet — miniature Ankylosaurus using bobble and bean stitches, 4 mm hook and 6 mm eyes.
- ComplicatedKnots — Ankylosaurus video tutorial covering head, body, tail, four feet, waffle-textured armor and assembly.
- Ravelry / Mevlinn Gusick — Aran ankylosaurus approximately 8.25 cm tall × 22.8 cm long with 90–120 yards listed.
- RealAmigurumiAndMore — large realistic Ankylosaurus using medium #4 yarn and a 4 mm hook, approximately 58–60 cm long.









