Introduction
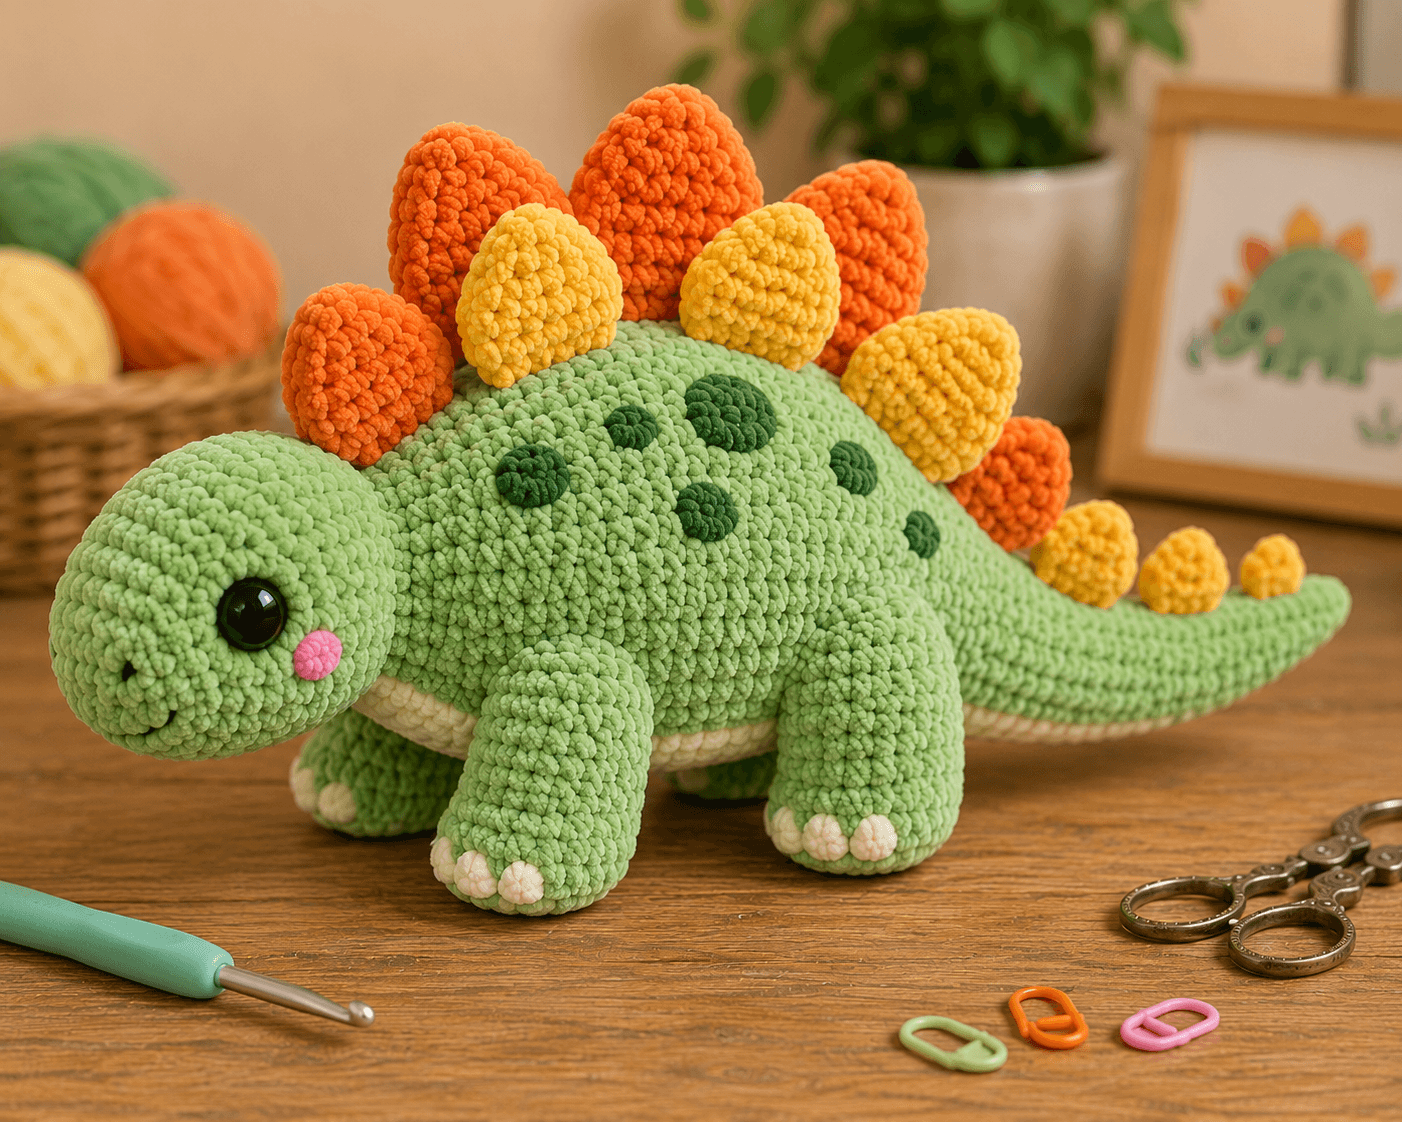
A stegosaurus can carry plates taller than its own neck, so shrinking every plate toward one uniform size destroys the silhouette. This stegosaurus amigurumi crochet pattern uses super-bulky chenille, a 5 mm hook and 16–18 mm safety eyes for a dinosaur approximately 42–48 cm long. Four low legs, a cream belly, spotted green body and graduated orange-and-yellow plates reproduce the photographed construction.
The Design: What Makes This Stegosaurus Different
The body sits almost horizontally, with the belly only a short distance above the ground, so all four legs need wide bases rather than narrow upright limbs. The dorsal plates are also deliberately unequal. Large orange pieces dominate the shoulder and center back, while yellow and orange plates reduce progressively toward the tail. That stepped scale identifies the animal immediately and gives the crochet stegosaurus plush a stronger profile than a row of identical spikes. A separate tapered tail continues the body line and curves slightly upward near the tip. Forest-green spots interrupt the pale green surface without becoming stripes, while cream toes and an underside strip add small high-contrast areas. One frequent construction error is sewing the plates too close together. Chenille compresses, and crowded plates quickly merge into one thick ridge.
Project Information at a Glance
| Skill Level | Time | Finished Size | Hook | Best For |
|---|---|---|---|---|
| Intermediate | 8–11 hours | Approx. 42–48 cm long | 5.0 mm | Large dinosaur plush, nursery display and collection pieces |
Published stegosaurus patterns vary sharply in scale. Compact worsted versions may measure only 12–23 cm long, while realistic Category 4 constructions can reach approximately 51 cm. The reference uses thick chenille and oversized components, so the project dimensions here target the larger end of that range.
Materials and Tools
Yarn
- Light spring green — Super Bulky #6 chenille — approximately 220–280 g — head, body, legs and tail
- Bright orange — Super Bulky #6 chenille — approximately 70–90 g — large and medium dorsal plates
- Golden yellow — Super Bulky #6 chenille — approximately 45–60 g — medium and small dorsal plates
- Cream / ivory — Super Bulky #6 chenille — approximately 35–50 g — underside and toes
- Forest green — Super Bulky or matching smooth yarn — approximately 15–25 g — body spots
- Pink — matching yarn — approximately 5 g — cheek patches
- Black embroidery yarn — small amount — nostril and mouth detail
Tools
- 5.0 mm crochet hook
- 16–18 mm safety eyes ×2
- Polyester fiberfill
- Large-eye yarn needle
- Long upholstery needle for body assembly
- Locking stitch markers
- Sharp scissors
- Rust-resistant pins
Use embroidered eyes instead of plastic safety eyes when making the dinosaur for a child under three.
Abbreviations
- MR — magic ring
- sc — single crochet
- inc — 2 sc in one stitch
- dec — decrease
- sl st — slip stitch
- ch — chain
- hdc — half double crochet
- BLO — back loop only
For an invisible decrease, insert the hook through the front loops of the next two stitches and complete both loops together as one single crochet.
Pattern — Step by Step
Work stuffed pieces in continuous spirals unless another method is stated. Place a stitch marker in the first stitch of every round.
Head
Yarn: light spring green — standard large amigurumi sphere.
R1: 6 sc in MR (6)
R2: inc ×6 (12)
R3: (sc, inc) ×6 (18)
R4: (2 sc, inc) ×6 (24)
R5: (3 sc, inc) ×6 (30)
R6: (4 sc, inc) ×6 (36)
R7: (5 sc, inc) ×6 (42)
R8: sc around (42)
R9: sc around (42)
R10: sc around (42)
R11: sc around (42)
R12: sc around (42)
R13: sc around (42)
Insert 16–18 mm safety eyes between R9 and R10, approximately 9–10 visible stitches apart. Position them toward the front half of the head rather than the side.
R14: (5 sc, dec) ×6 (36)
R15: (4 sc, dec) ×6 (30)
R16: (3 sc, dec) ×6 (24)
Stuff firmly, shaping the front into a broad blunt muzzle.
R17: (2 sc, dec) ×6 (18)
R18: (sc, dec) ×6 (12)
R19: dec ×6 (6)
Fasten off and close.
Body
Yarn: light spring green.
R1: 6 sc in MR (6)
R2: inc ×6 (12)
R3: (sc, inc) ×6 (18)
R4: (2 sc, inc) ×6 (24)
R5: (3 sc, inc) ×6 (30)
R6: (4 sc, inc) ×6 (36)
R7: (5 sc, inc) ×6 (42)
R8: sc around (42)
R9: sc around (42)
R10: sc around (42)
R11: sc around (42)
R12: sc around (42)
R13: sc around (42)
R14: sc around (42)
R15: sc around (42)
R16: sc around (42)
R17: sc around (42)
Stuff in small pieces and stretch the body lengthwise as you fill. The finished body should look oval rather than spherical.
R18: (5 sc, dec) ×6 (36)
R19: sc around (36)
R20: (4 sc, dec) ×6 (30)
R21: sc around (30)
R22: (3 sc, dec) ×6 (24)
R23: (2 sc, dec) ×6 (18)
R24: (sc, dec) ×6 (12)
R25: dec ×6 (6)
Fasten off and close.
Front Legs — Make 2
Yarn: light spring green.
R1: 6 sc in MR (6)
R2: inc ×6 (12)
R3: (sc, inc) ×6 (18)
R4: (2 sc, inc) ×6 (24)
R5: sc around (24)
R6: sc around (24)
R7: (2 sc, dec) ×6 (18)
R8: sc around (18)
R9: sc around (18)
R10: sc around (18)
R11: (sc, dec) ×6 (12)
R12: sc around (12)
Stuff firmly through the foot and moderately through the upper leg.
Flatten the opening.
Fasten off with a 35 cm sewing tail.
Back Legs — Make 2
Yarn: light spring green.
R1: 6 sc in MR (6)
R2: inc ×6 (12)
R3: (sc, inc) ×6 (18)
R4: (2 sc, inc) ×6 (24)
R5: (3 sc, inc) ×6 (30)
R6: sc around (30)
R7: sc around (30)
R8: (3 sc, dec) ×6 (24)
R9: sc around (24)
R10: (2 sc, dec) ×6 (18)
R11: sc around (18)
R12: (sc, dec) ×6 (12)
Stuff firmly, keeping extra fiberfill in the rounded foot.
Flatten the upper opening.
Fasten off with a 35 cm sewing tail.
Tail
Yarn: light spring green.
R1: 6 sc in MR (6)
R2: inc ×6 (12)
R3: (sc, inc) ×6 (18)
R4: (2 sc, inc) ×6 (24)
R5: sc around (24)
R6: sc around (24)
R7: (2 sc, dec) ×6 (18)
R8: sc around (18)
R9: sc around (18)
R10: sc around (18)
R11: (sc, dec) ×6 (12)
R12: sc around (12)
R13: sc around (12)
R14: sc around (12)
R15: sc around (12)
R16: sc around (12)
R17: (sc, dec) ×4 (8)
R18: sc around (8)
R19: sc around (8)
R20: sc around (8)
R21: sc around (8)
R22: sc around (8)
R23: dec ×4 (4)
Stuff the base firmly and reduce stuffing gradually toward the final 8–10 cm. Curve the lightly filled tip upward while shaping.
Fasten off with a long sewing tail.
Cream Belly Panel
Yarn: cream.
Ch 26.
Row 1: starting in second ch from hook, 25 sc (25)
Row 2: ch 1, turn, 25 sc (25)
Row 3: ch 1, turn, dec, 21 sc, dec (23)
Row 4: ch 1, turn, 23 sc (23)
Row 5: ch 1, turn, dec, 19 sc, dec (21)
Row 6: ch 1, turn, 21 sc (21)
Fasten off with a long sewing tail.
Pin the panel along the lower body from behind the front legs toward the tail base.
Cream Toe Bumps — Make 12
Yarn: cream.
R1: 6 sc in MR (6)
R2: sc around (6)
Fasten off.
Do not stuff.
Use three toe bumps on each of the four feet.
Pink Cheeks — Make 2
Yarn: pink.
R1: 6 sc in MR (6)
R2: inc ×6 (12)
Join with sl st and fasten off.
Forest-Green Body Spots — Make 8
Yarn: forest green.
For four small spots:
R1: 6 sc in MR (6)
Fasten off.
For four larger spots:
R1: 6 sc in MR (6)
R2: inc ×6 (12)
Fasten off.
Do not make every spot identical. The irregular distribution is part of the reference design.
Large Orange Back Plates — Make 4
Yarn: bright orange.
R1: 6 sc in MR (6)
R2: inc ×6 (12)
R3: (sc, inc) ×6 (18)
R4: sc around (18)
R5: sc around (18)
R6: (sc, dec) ×6 (12)
R7: sc around (12)
R8: dec ×6 (6)
Stuff lightly.
Flatten the bottom edge.
Fasten off with a 25 cm sewing tail.
Medium Yellow Plates — Make 3
Yarn: golden yellow.
R1: 6 sc in MR (6)
R2: inc ×6 (12)
R3: (sc, inc) ×6 (18)
R4: sc around (18)
R5: (sc, dec) ×6 (12)
R6: sc around (12)
R7: dec ×6 (6)
Stuff lightly and flatten the base.
Fasten off with a sewing tail.
Medium Orange Plates — Make 2
Repeat the Medium Yellow Plate pattern using orange yarn.
Small Yellow Tail Plates — Make 3
Yarn: golden yellow.
R1: 6 sc in MR (6)
R2: inc ×6 (12)
R3: sc around (12)
R4: (sc, dec) ×4 (8)
R5: dec ×4 (4)
Stuff very lightly.
Fasten off with a sewing tail.
Nostril
Yarn: dark green or black embroidery yarn.
Make one short horizontal stitch approximately 6–8 mm long near the front of each side of the muzzle.
Assembly
- Sew the head to the front of the body with the eye line approximately parallel to the tabletop and the muzzle projecting slightly downward.
- Attach the tail to the back of the body using two complete sewing passes around the 24-stitch base, then curve the lightly stuffed tip upward.
- Pin and sew the cream belly panel along the underside before adding the legs so its side edges remain hidden beneath them.
- Attach the front legs low on the shoulder area, spacing their bottom surfaces approximately the same distance apart as the head width.
- Sew the larger back legs to the rear half of the body and test the dinosaur on a flat surface before closing the final seam.
- Attach three cream toe bumps to each foot with approximately 5–8 mm between adjacent bump centers.
- Sew the pink cheek patches below and slightly behind the eyes, then embroider the short nostril stitches near the front of the muzzle.
- Arrange the large orange plates over the shoulder and middle back, then alternate yellow and orange medium plates toward the rear.
- Sew the three small yellow plates along the upper tail, maintaining progressively smaller spacing toward the tail tip.
- Attach the forest-green spots irregularly across both body sides, weave all tails through matching-color stitches, and hand-shape the legs, body, plates and tail.
The finished stegosaurus should stand on four broad feet with its belly low, its plates forming a decreasing ridge and its tail tapering upward behind the body.
7 Technical Tips
- Body rolling: A cylindrical body with evenly distributed stuffing can rotate onto its side. Compress the lower 2–3 cm slightly flatter before attaching the legs.
- Head droop: Chenille heads become heavy when overstuffed. Sew the neck connection through at least 6–7 cm of the head/body contact area rather than catching only the surface stitches.
- Plate collapse: An unstuffed 18-stitch plate folds sideways. Add only enough fiberfill to keep a 2–3 cm thickness while leaving the base flat for sewing.
- Plate crowding: Large plates spaced less than about 1 cm apart merge visually. Pin the entire ridge before sewing the first plate permanently.
- Leg instability: A back foot positioned more than roughly 3 cm above the body’s lowest point will not bear weight. Test all four legs on a flat board before tightening their seams.
- Tail sag: Firm stuffing all the way to the tail tip creates excessive weight. Reduce filling significantly over the final 8–10 cm and shape the tip upward by hand.
- Spot distortion: Pulling a 12-stitch spot too tightly makes a visible dent in chenille. Catch only the outer surface loops and stop tightening as soon as the applique lies flat.
Shaping the Low Stegosaurus Body
The photograph uses a long, low body rather than the nearly spherical trunk seen in many miniature dinosaur patterns. A 42-stitch maximum still follows standard large-amigurumi geometry, but the plateau is held for ten rounds and manipulated lengthwise during stuffing.
Do not pack the center as one dense ball. Place small pieces against the internal walls, then compress the lower surface slightly after every few handfuls.
The resulting body should be longer than it is tall. The four legs contribute most of the apparent height below the back ridge.
Building the Plate Gradient
Back plates are the main identification feature of a stegosaurus, and the photograph does not use one repeated size. Four large orange plates occupy the front and central spine. Yellow pieces then interrupt the orange row before the sequence reduces toward the tail.
Make all plates before sewing any of them. Lay the dinosaur on its side and arrange the complete color order along the spine.
The tallest plate should sit around the shoulder-to-mid-back region, not directly above the tail base.
Choosing Chenille Yarn and Hook Size
Published stegosaurus patterns cover everything from sport cotton to super-bulky chenille. A current Sweet Softies pattern specifically uses weight-6 chenille with a 5 mm hook, while thinner worsted designs use hooks around 2.75–4 mm.
A 5 mm hook works well for the plush density shown in the image. The stitches should remain tight enough that stuffing does not show when the body is bent.
If gaps appear around decreases, switch to a 4.5 mm hook for the head and body. Keep the 5 mm hook for the plates if tighter stitches make them difficult to stuff.
Placing the Four Legs
The stegosaurus body needs four points of contact because its long tail shifts weight backward. Front legs belong beneath the shoulder area, while the larger hind legs sit near the widest rear section.
Pin the legs with the dinosaur standing on a table. All four feet should touch without forcing one limb downward.
The broad 30-stitch rear feet provide more stability than the 24-stitch front feet and mirror the heavier hindquarters visible in the reference.
Adding the Cream Belly and Toes
The cream detail is limited to the underside and small toe bumps. It should not climb far up the sides of the body.
Attach the belly panel before the legs so the leg seams cover its raw side edges. The panel only needs to remain visible as a narrow strip from the front three-quarter angle.
Three individual cream bumps on each foot reproduce the raised toes more accurately than changing the entire last foot round to cream.
Positioning the Body Spots
Forest-green spots are irregular rather than arranged in rows. Mix six-stitch and twelve-stitch circles and leave noticeably different spaces between them.
Concentrate most spots across the upper side of the torso. Leave the head, legs and lower cream belly comparatively clear.
Pin every applique before sewing. A random pattern still needs visual balance when both sides are compared.
Planning Yarn Quantity
Yarn consumption varies significantly with scale and fiber. A published DK stegosaurus uses about 80 g of the main color plus 30 g contrast, while a realistic 51 cm worsted pattern calls for 250 yards of main-color yarn and another 70 yards for the plates.
Super-bulky chenille contains fewer meters per gram, so weigh the completed head and one leg before estimating the remaining green requirement.
The green body consumes most of the project yarn. Orange ranks second because the tallest plates are substantially stuffed, while yellow, cream and forest green are limited to smaller components.
Competition and Design Position
Current stegosaurus amigurumi competition includes no-sew miniatures, beginner patterns, medium chenille plush and highly realistic large dinosaurs. Sweet Softies offers 6-inch and 10-inch no-sew versions, while current realistic patterns reach approximately 51 cm.
This stegosaurus amigurumi crochet pattern sits closer to the large plush category but keeps the construction visually simple. The recognizable details come from body proportion, plate graduation, spots and low-set legs rather than anatomical complexity.
The alternating orange and yellow ridge also differentiates the design from common single-color plate patterns.
Finishing Checks
Place the dinosaur on a level table and check all four feet. The belly may sit low, but it should not carry the animal’s full weight.
View the spine directly from above. Plate bases should form one reasonably straight center line from shoulder to tail.
Inspect the tail next. It should continue the upper body line before curving upward rather than dropping immediately behind the hind legs.
Finally, compare the spots and cheeks from both sides. Exact symmetry is unnecessary for the spots, while eye and cheek height should remain closely matched.
Conclusion
Crochet the 42-stitch body and largest orange plate first, then compare their scale before producing the remaining ridge pieces. That relationship controls the silhouette of this stegosaurus amigurumi crochet pattern more than any single facial detail. Assemble the legs on a flat surface, add the plates from largest to smallest, and attach the irregular green spots last. Photograph both the side profile and an overhead view so the plate gradient is visible. Save the project to Pinterest and share it on Instagram with #RainbowPlateStegosaurus. For a second dinosaur, would you keep the orange-and-yellow plates or alternate purple and blue instead?
Sources
- Fortune Knot Designs — Stegosaurus Amigurumi Dinosaur Pattern, published July 2024.
- Sweet Softies — Rainbow Stegosaurus, October 2024, super-bulky chenille, 5 mm hook, 9 mm eyes, 6-inch and 10-inch sizes.
- Sweet Creek Patterns — free Stegosaurus Dinosaur Crochet Pattern, February 2024.
- DIY Fluffies / Ravelry — Brodie the Stegosaurus, September 2024, written and video pattern.
- RealAmigurumiAndMore — realistic 51 cm stegosaurus using Category 4 yarn and 3.75–4 mm hook.
- MevvSan — 22.8 cm long stegosaurus using worsted/Aran yarn, 2.75 mm hook and 9 mm eyes.
- Baby Crochet Designs — DK stegosaurus using 80 g main yarn, 30 g contrast, 2 mm hook and 10 mm eyes.
- Kress Krochet — 2024 intermediate stegosaurus tutorial using medium yarn, 4 mm hook and 12 mm safety eyes.
- Club Crochet — 2024 stegosaurus tutorial using worsted cotton, 4 mm hook and 6 mm eyes.









