Introduction
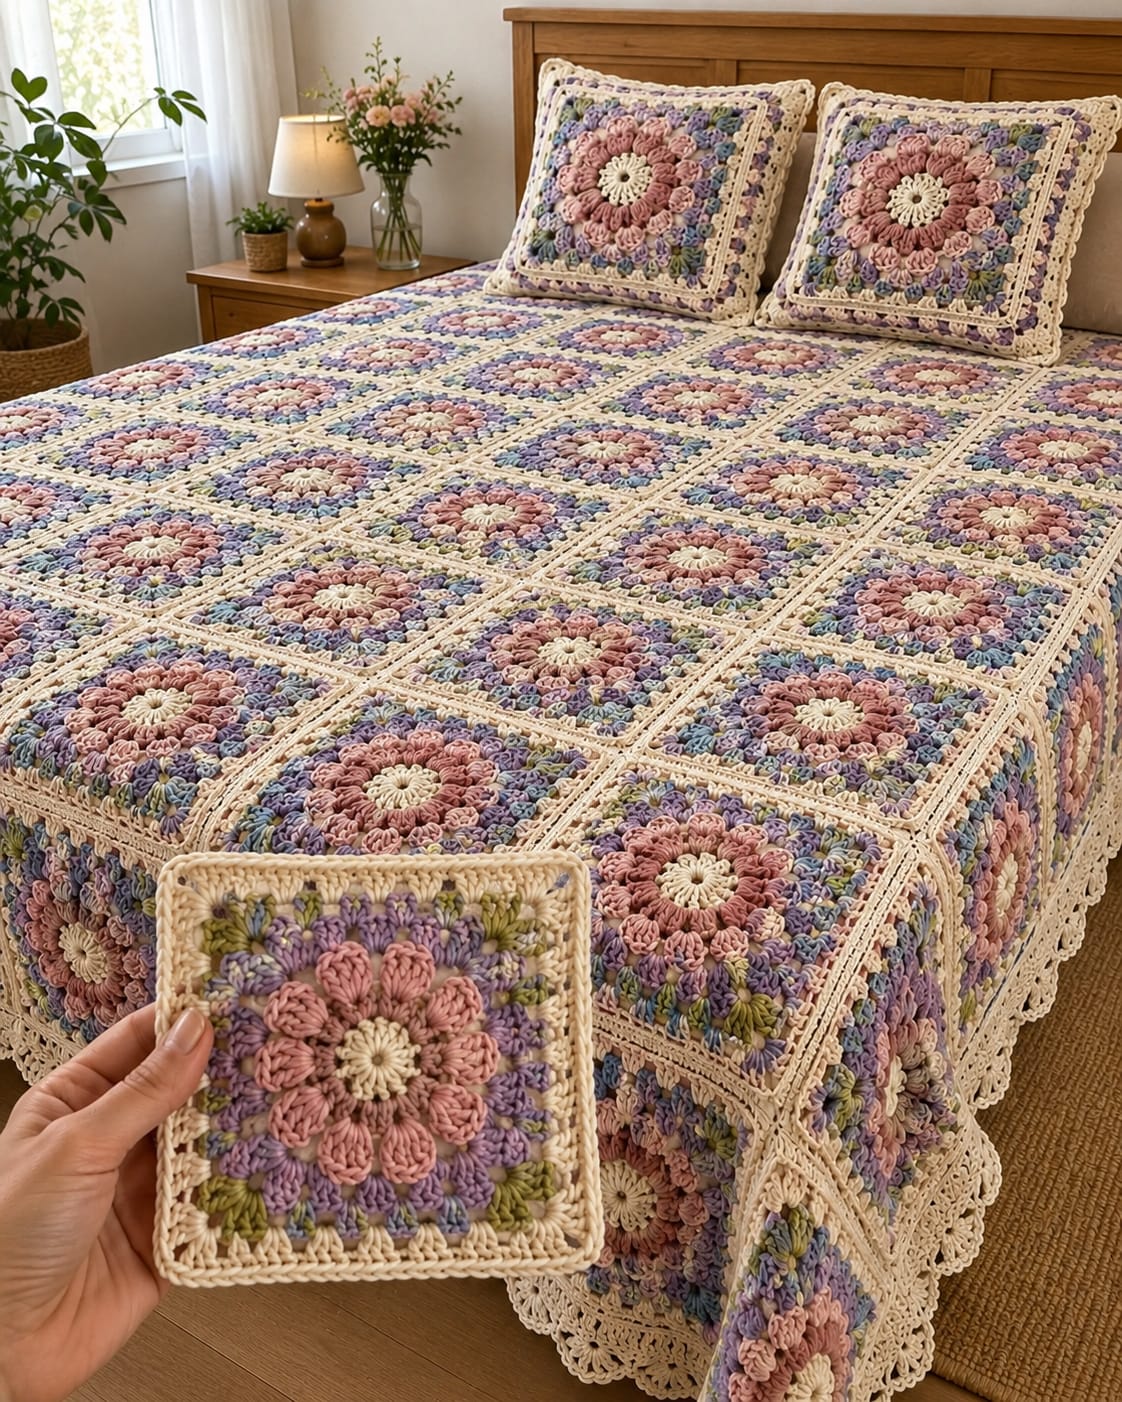
Twelve dusty-pink petals have to clear four square corners without flattening the lavender and green stitches behind them. This pastel floral granny square crochet pattern uses worsted or Aran yarn with a 4.5 mm hook for approximately 17–19 cm blocked motifs. Joined in a large grid, the squares form a floral bedspread with cream seams, a deep lace border and two coordinated pillow covers.
The Design: What Makes This Floral Bedspread Different
The main flower sits above the surface instead of being represented by flat color changes. Twelve dusty-rose petals surround a small ivory center, while lavender stitches form a second floral ring behind them. Muted green clusters read as leaves and small blue sections break up the purple background before the motif changes into cream. That construction gives the dimensional flower crochet square depth while preserving a defined square outline. Cream joining then connects the blocks without placing dark grid lines between the pastel flowers. The final bedspread adds a separate structural layer: several openwork cream rounds form a deep drop below the floral field. One frequent problem with this motif type is petal crowding. If the first raised ring is too tight, the center cups and the four cream corners cannot block to equal angles.
Project Information at a Glance
| Skill Level | Time | Finished Size | Hook | Best For |
|---|---|---|---|---|
| Intermediate | 70–95 hours | Approx. 165–185 × 205–225 cm | 4.5 mm | Full bedspreads, floral blankets and coordinated pillow covers |
The square size is a project specification based on the larger framed motifs visible in the reference. Crochet one complete block first, block it without excessive stretching, and calculate the final grid from its actual measurement.
Materials and Tools
Yarn
- Warm ivory / cream — worsted or Aran — approximately 1,900–2,300 g — flower centers, square frames, joining, border and pillows
- Dusty rose / blush pink — matching worsted or Aran — approximately 600–750 g — primary raised petals
- Soft lavender — matching yarn — approximately 400–550 g — secondary floral clusters
- Periwinkle / muted blue — matching yarn — approximately 250–350 g — accent clusters
- Sage / olive green — matching yarn — approximately 250–350 g — leaf clusters
Tools
- 4.5 mm crochet hook
- 5.0 mm hook for joining if the seam tension is tight
- Large-eye yarn needle
- Sharp scissors
- Locking stitch markers
- Blocking mats
- Rust-resistant T-pins
- Measuring tape
Abbreviations
- MR — magic ring
- ch — chain
- sl st — slip stitch
- sc — single crochet
- hdc — half double crochet
- dc — double crochet
- tr — treble crochet
- dc3tog — double crochet three together
- tr3tog — treble crochet three together
- sp — space
- ch-sp — chain space
- RS — right side
Invisible decreases are not needed in this flat pattern because the shaping comes from cluster height, chain spaces and corner placement.
Pattern — Step by Step
Work one test square before beginning the blanket. Block the motif to its natural finished dimensions and use that measurement for every remaining square.
Ivory Flower Center
Yarn: warm ivory.
R1: 12 dc in MR (12)
Pull the ring closed and join with sl st.
Fasten off.
The center should lie flat and measure approximately 3–4 cm across with the recommended yarn.
Dusty-Pink Primary Petals
Yarn: dusty rose.
Join pink in any stitch.
R2: *ch 3, tr3tog in same stitch, ch 3, sl st in next stitch*; repeat around (12 petals).
Join to the first petal base.
Fasten off.
Pull every petal toward the right side. Do not press them flat because the raised petal ring is the main structural feature of the square.
Lavender Rear Foundation
Yarn: soft lavender.
Turn the motif so the rear of the pink petal bases is accessible.
R3: *sc in the space between two petal bases, ch 3* around (12 ch-3 spaces).
Join.
Lavender Secondary Petal Clusters
R4: sl st into first ch-3 space, ch 2, 2 dc in same space; work 3 dc in each remaining ch-3 space around.
Join.
Fasten off.
The lavender round should remain visible between the dusty-pink petals rather than covering their edges.
Green Leaf Clusters
Yarn: sage or olive green.
Mark four equally spaced positions around the lavender round.
At each marked position work:
(sc, hdc, 2 dc, hdc, sc)
Fasten off after each leaf cluster or carry the yarn invisibly behind the motif if preferred.
Position the four leaves diagonally toward the future square corners.
Blue Accent Clusters
Yarn: periwinkle blue.
Join blue between two green positions.
Work small 3-dc clusters into the available lavender spaces, leaving the four green leaf sections unobstructed.
Continue evenly around.
Fasten off.
First Cream Squaring Round
Yarn: warm ivory.
Mark four positions directly beyond the green diagonal sections.
Join cream at one marked position.
R5: in corner work (3 tr, ch 2, 3 tr); across each side work a combination of 3 dc groups in the available spaces; repeat the corner group at all four marked positions.
Join.
Lay the motif flat before continuing. All four corner chain spaces should sit at approximately 90-degree intervals.
Second Cream Frame Round
R6: sl st into first corner; (ch 3, 2 dc, ch 2, 3 dc) in corner; *ch 1, 3 dc in each side space, ch 1, (3 dc, ch 2, 3 dc) in next corner* around.
Join.
Open Cream Frame Round
R7: ch 1, sc in corner, ch 3, sc in same corner; *ch 3, skip one cluster, sc in next space* across the side. In each corner work (sc, ch 3, sc).
Repeat around.
Join.
Outer Cream Square Round
R8: sl st into first ch-3 space; work 3 dc in each side ch-3 space. In each corner work (3 dc, ch 2, 3 dc).
Join.
Final Firming Round
R9: sc evenly in every stitch around. Work (2 sc, ch 2, 2 sc) in each corner.
Join and fasten off.
Block to approximately 17–19 cm square.
Make the Remaining Bedspread Squares
For the photographed scale, start by planning approximately eight motifs across and nine or ten motifs down.
At 18 cm per blocked square, an 8 × 10 field measures approximately 144 × 180 cm before joining and border.
The deep lace edge can add substantial width and length without requiring another complete row of flowers.
Production Method
Work all ivory centers first.
Complete every dusty-pink petal round next.
Add lavender, green and blue sections in color batches.
Finish with all cream square frames.
This method keeps yarn handling more controlled across a project containing several hundred color changes.
Blocking the Squares
Pin one finished square to the chosen measurement.
Measure its width, height and both diagonals.
The diagonal difference should remain below approximately 5 mm.
Use the same template for every remaining block.
Do not flatten the pink petals under blocking pins.
Cream Vertical Joins
Yarn: warm ivory.
Arrange two squares RS facing upward with adjacent edges aligned.
For a flat seam, work slip stitches through corresponding outer loops.
Keep the yarn relaxed.
Join all motifs into long vertical columns.
Cream Horizontal Joins
Arrange the completed columns on a flat surface.
Work across each horizontal junction with the same slip-stitch method.
At every four-square crossing, pass through the corner spaces once.
Avoid stacking extra stitches at the intersections.
Bedspread Border Foundation
Yarn: warm ivory.
Border R1: sc evenly around the entire joined field, working 3 sc in each corner.
Count opposite sides before proceeding.
Solid Border Round
Border R2: ch 3, dc in each stitch around. In each corner work (2 dc, ch 2, 2 dc).
Join.
Openwork Border Round 1
Border R3: *ch 4, skip 2 stitches, sc in next stitch* around.
At each corner use a ch-6 loop.
Openwork Border Round 2
Border R4: sl st into first ch-4 loop, ch 3, 3 dc in same loop; *ch 2, 4 dc in next loop* around.
At each corner work (4 dc, ch 3, 4 dc).
Openwork Border Round 3
Border R5: *sc in center of next dc group, ch 5, sc in next ch-2 space, ch 5* around.
Use ch 7 at the corners.
Shell Border Round
Border R6: work 7 dc in each ch-5 loop and sc in the following anchor point.
Work 9 dc in each corner loop.
Final Scalloped Border
Border R7: *sl st in first shell stitch, skip 2 stitches, 5 dc in next stitch, skip 2 stitches, sl st in last shell stitch* around.
Fasten off.
Block the lace edge independently from the flower field. Each scallop should remain open rather than folding behind the blanket.
Matching Pillow Flower Center
Work the ivory center, dusty-pink petals, lavender background, green leaf clusters and blue accents exactly as for the blanket motif.
Continue additional cream square rounds after R9 instead of fastening off permanently.
Pillow Expansion Rounds
Pillow R10: (3 dc, ch 2, 3 dc) in each corner; 3 dc in each side space.
Pillow R11: repeat, adding one additional side cluster.
Pillow R12: work an open ch-3 round between corners.
Pillow R13: work 3 dc into each ch-3 space.
Pillow R14: repeat granny-style framing to required size.
Continue until the front measures approximately 43–45 cm for an 18-inch cushion.
Lavender Pillow Accent Round
Yarn: lavender.
Work one round of sc around the pillow front.
Place (2 sc, ch 2, 2 sc) in each corner.
Fasten off.
Cream Pillow Lace Edge
Yarn: warm ivory.
Round 1: *ch 3, skip 2 stitches, sc in next* around.
Round 2: work 5 dc in each ch-3 loop, sl st between shells.
Fasten off.
Pillow Back Panels — Make 2 per Pillow
Yarn: warm ivory.
Ch to the finished width of the pillow front.
Work dc rows until each panel measures approximately two-thirds of the cushion height.
Make a second matching panel.
Overlap the inner edges by approximately 10–12 cm to form an envelope opening.
Pillow Assembly
Place the flower front RS outward.
Position the two cream back panels behind it with the overlap centered.
Join all layers with sc around the perimeter.
Keep the decorative lace edge free outside the structural seam.
Assembly
- Block every flower square to the same 17–19 cm dimensions while leaving the dusty-pink petal ring raised.
- Arrange the complete pastel layout on a flat surface and rotate any motif whose four green clusters do not point toward its corners.
- Join all vertical columns with relaxed cream slip stitches, moving to a 5 mm hook if a seam begins shortening the square edge.
- Connect the columns horizontally and keep each four-square intersection approximately the same thickness as an ordinary seam.
- Work the two solid cream perimeter rounds around the complete floral field before beginning the open lace.
- Add the chain-loop and grouped-double-crochet border rounds, checking every corner after each completed round.
- Finish the cream shell and scalloped edging, then block the border to an even drop around the mattress.
- Expand two matching flower motifs with extra cream frame rounds until they reach the required pillow dimensions.
- Attach cream envelope backs and keep the lavender and lace decorative edges outside the structural pillow seam.
- Spread the finished bedspread flat, align all flower-center rows, weave remaining tails into matching-color stitches and reshape each raised petal by hand.
The completed set should show repeating dusty-pink flowers surrounded by lavender, green and blue accents, with cream construction lines visually connecting the bedspread and pillows.
7 Technical Tips
- Petal collapse: If the dusty-pink tr3tog petals lie completely flat after R4, the rear lavender stitches are covering their bases. Pull all 12 petals toward the RS before beginning the cream frame.
- Center cupping: A center that rises more than approximately 8 mm indicates excessive tension around the first petal ring. Move up 0.5 mm for R2 rather than relying on blocking to flatten it.
- Uneven corners: A diagonal difference greater than 5 mm will show across an eight-square row. Mark all four squaring points before working the first cream corner.
- Join puckering: Tight slip stitches shorten motif edges. If two joined squares bow toward each other, use a hook 0.5 mm larger for the seam.
- Color crowding: Green and blue clusters should remain separated by visible lavender stitches. If either accent covers more than about one-quarter of a side, reduce that cluster by one dc.
- Border ruffling: Excess stitches in the first cream perimeter round multiply through seven border rounds. Opposite sides should carry matching stitch totals before lace construction begins.
- Scallop folding: A scallop narrower than approximately 3 cm can curl behind the bedspread. Pin each shell separately during final blocking and keep the border free from mattress weight until dry.
Controlling the Dimensional Petal Ring
The pink flower determines the entire motif. Its petals need enough height to remain visible after lavender, blue, green and cream stitches are added around them.
Twelve petals suit the photographed structure because they create a dense circular ring without producing the much finer appearance of a 16-petal daisy. Each petal uses grouped treble stitches to gain height while keeping the base narrow.
Do not steam the petals flat. Block only the square perimeter and use your fingers to align the flower after the frame has dried.
Turning the Flower into a Square
A circular floral center becomes square through four deliberately taller corner groups. Treble crochet at the corners reaches farther than the double-crochet side groups and creates the required diagonal expansion.
Mark the corners before beginning the cream round. A corner shifted by even one background space can rotate the complete flower within its frame.
After the first squaring round, place the motif on the table. Correct the corner locations immediately rather than carrying the error through three more cream rounds.
Managing Five Colors Across a Large Bedspread
This design contains considerably more yarn changes than a two-color granny square. Working the motifs assembly-line style keeps the process more measurable.
Make all centers first, then the pink petals, followed by lavender, green, blue and cream. Count the finished pieces after every color stage.
Weave tails after each two color rounds instead of leaving hundreds of ends until final assembly. Keep at least 8–10 cm of tail for secure weaving.
Choosing Yarn and Hook Size
Worsted or light Aran yarn gives the raised petals enough body without producing an excessively heavy bedspread. A 4.5 mm hook is a practical starting point for the photographed density.
If one blocked test motif measures less than 17 cm, add an extra cream frame round before changing the flower itself. Altering only the cream frame preserves the proportions of the pink and lavender sections.
If the square measures more than 19 cm and feels loose, reduce the hook to 4 mm rather than deleting a structural round.
Calculating the Bedspread Grid
An 18 cm motif multiplied across eight columns produces approximately 144 cm before the joining allowance and border. Ten rows produce approximately 180 cm before the lower lace drop.
The photographed border is wide enough to add substantial mattress coverage. That makes an 8 × 10 motif field a reasonable starting layout for a large bedspread, although the mattress measurement remains the controlling dimension.
Lay one row across the intended bed before completing all motifs. Increasing to nine columns is more efficient than discovering after assembly that the floral field is too narrow.
Keeping the Cream Joining Flat
The cream seams are part of the design but should not become the focal feature. Their job is to outline the square grid while remaining visually related to the cream borders.
A flat slip-stitch seam works well when corresponding edges carry identical counts. A flat-braid join can be substituted when a slightly more open junction is preferred.
Use relaxed tension. If the seam resembles a cord or ridge, change to a hook approximately 0.5 mm larger while keeping the motif hook unchanged.
Building the Deep Lace Border
The floral field is relatively dense, so the outer edge needs more open spaces to avoid adding excessive weight. Chain loops followed by shell groups create the transition from square motifs to the hanging border.
Work the solid foundation rounds first. They distribute the weight of the lace across the entire perimeter rather than placing it on individual square corners.
Place the bedspread on a flat surface after every two border rounds. Correct inward pulling before the final scallops are added.
Making the Matching Pillow Covers
The pillow fronts repeat the same flower but enlarge the cream area around it. That produces a clear connection with the bedspread without reducing the pillow to a grid of several tiny squares.
Keep the pink, lavender, green and blue flower dimensions unchanged. Add size only through cream framing rounds.
A narrow lavender round near the edge repeats one of the bedspread’s secondary colors. Cream lace outside that accent then links the pillow back to the blanket border.
Planning Yarn Quantity
Cream requires the largest allowance because it appears in every center, square frame, seam, lace border and pillow. Pink ranks second because all motifs use a complete raised petal ring.
Lavender occupies a substantial background round, while green and blue are smaller accents. Buying the full cream quantity from one dye lot avoids visible changes across the bedspread grid.
For a more exact calculation, weigh one fully finished and blocked square before joining. Record each color used for that motif, multiply by the final square count, then add separate allowances for joins, border and pillows.
Finishing Checks
Lay the completed floral field on a flat floor before starting the border. Each ivory center should align horizontally and vertically with the corresponding centers in neighboring squares.
Check all dusty-pink petals from a low angle. Every flower should retain a raised ring rather than merging into the lavender background.
Inspect the cream seams at the four-square intersections. Thick knots or stacked slip stitches will form visible bumps when the blanket lies on the bed.
Finish by checking the lace drop. Both side borders should hang to comparable depths, and the foot edge should form one level scalloped line.
Conclusion
Make one complete motif first and record its blocked width, petal diameter and cream-frame measurement before committing yarn to the full bedspread. Those three figures keep this pastel floral granny square crochet pattern consistent across a large grid. Assemble the entire flower field before beginning the cream lace so the border can be adjusted to the actual mattress dimensions. Repeat the same flower at larger scale for both pillow fronts. Save the finished layout to Pinterest and share close-up square photos on Instagram with #PastelGardenBedspread. For another colorway, would you keep the muted lavender background or replace it with a soft powder blue?
Sources
- Jo to the World Creations — Flower Granny Square Blanket, first published February 2024.
- Made by Gootie — Blossom Granny Square, October 2024, designed for worsted #4 yarn.
- Dada’s Place — Victorian Flower Granny Square Blanket with 13 cm motifs and joining instructions.
- StuckOnYouCrochet — Flora Blanket, floral granny-square blanket with customizable sizing.
- Crafting Happiness — Puff Flower Granny Square construction and raised petal technique.
- Make & Do Crew — flower granny-square tutorial showing petal construction and conversion from a round flower into a square.
- Modern Heirloom Flowers — Flat Braid Join-As-You-Go method for flower granny squares.
- Maisie and Ruth — Cozy Petals flower blanket with slip-stitch joining and multiple blanket sizes.









