Introduction
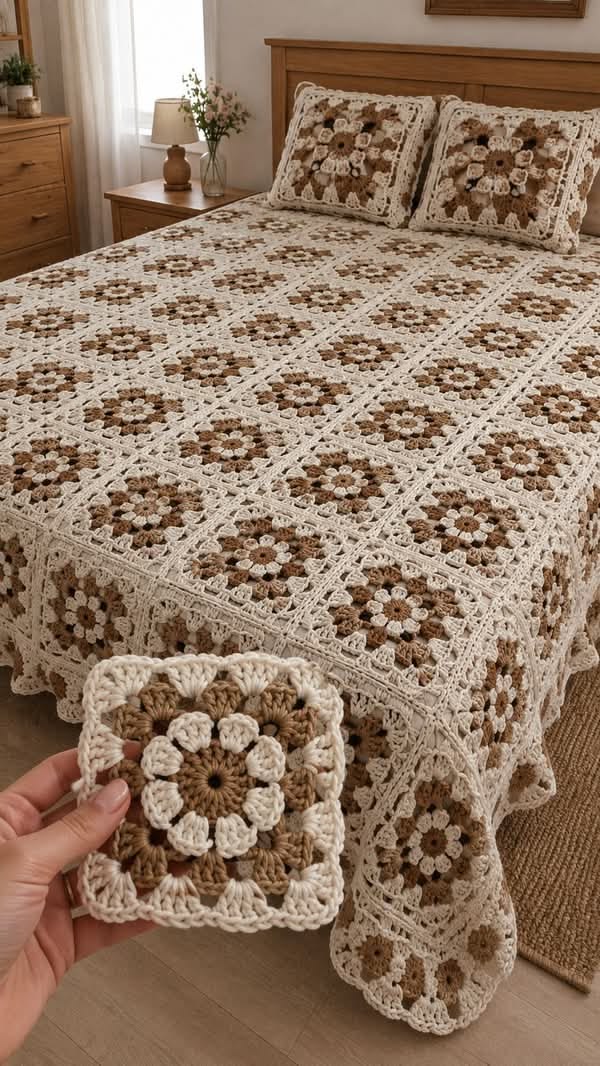
A neutral flower can disappear into an ivory bedspread unless the petal ring rises far enough above the square background. This neutral floral granny square crochet pattern uses worsted or Aran yarn with a 5 mm hook for approximately 17–19 cm blocked motifs. Brown centers, cream raised petals, tan transition rounds and an ivory lace border recreate the bedspread and matching pillow arrangement shown in the reference.
The Design: What Makes This Neutral Floral Bedspread Different
The flower is built as a raised center rather than a flat sequence of color changes. A compact brown disk anchors twelve cream petal clusters, while camel and taupe stitches create a second visual ring behind them. Several ivory rounds then convert the circular flower into a square and provide enough open space for the joining seams to disappear into the background. This neutral granny square blanket depends on texture more than contrast: cream petals must remain visibly higher than the surrounding tan stitches or the flower loses definition. The bedspread also uses a deep lace border that hangs below the motif field, while matching pillows repeat the flower at a larger scale. A common maker mistake is tightening the cream squaring rounds, which pulls the corners inward and makes large joined sections ripple after assembly.
Project Information at a Glance
| Skill Level | Time | Finished Size | Hook | Best For |
|---|---|---|---|---|
| Intermediate | 70–95 hours | Approx. 165–185 × 210–235 cm | 5.0 mm | Full bedspreads, neutral bedroom décor and matching cushions |
An 18 × 18 cm floral granny-square reference using Aran yarn provides a practical size benchmark. Current granny-square guides also show that larger blankets are easy to scale by changing the motif count rather than rewriting the square itself.
Materials and Tools
Yarn
- Warm ivory / cream — worsted or Aran — approximately 2,000–2,500 g — petals, square frames, joins, border and pillow fronts
- Camel / oatmeal — matching worsted or Aran — approximately 500–700 g — secondary flower rounds
- Medium brown — matching yarn — approximately 300–400 g — flower centers
- Taupe — matching yarn — approximately 250–350 g — optional transition clusters
Tools
- 5.0 mm crochet hook
- Large-eye yarn needle
- Sharp scissors
- Locking stitch markers
- Blocking mats
- Rust-resistant T-pins
- Measuring tape
Abbreviations
- MR — magic ring
- ch — chain
- sl st — slip stitch
- sc — single crochet
- hdc — half double crochet
- dc — double crochet
- tr — treble crochet
- dc3tog — double crochet three together
- sp — space
- ch-sp — chain space
Invisible decreases are not used because this motif is flat; all shaping comes from cluster placement, chain spaces and graduated stitch heights.
Pattern — Step by Step
Complete and block one test motif before making the full set. Use the same blocked measurement for every subsequent square.
Brown Flower Center
Yarn: medium brown.
R1: 12 dc in MR (12)
Join with sl st.
R2: 2 dc in each stitch around (24)
Join with sl st.
Fasten off.
The brown disk should remain flat and measure approximately 5–6 cm across.
Cream Raised Petals
Yarn: warm cream.
Join cream in any stitch of R2.
R3: *ch 3, work 3 tr together across the same stitch and next stitch, ch 3, sl st in next stitch*; repeat around to create 12 raised petal clusters.
Join with sl st.
Fasten off.
Pull each petal gently toward the front surface so the raised ring remains visible after the next color is added.
Camel Background Round
Yarn: camel.
Work behind the cream petal bases.
R4: *3 dc in space between two petals, ch 1* around.
Join.
The camel stitches should remain behind the cream petal ring.
Taupe Transition Round
Yarn: taupe or camel.
R5: sl st into first ch-1 space, ch 3, 2 dc in same space; *ch 1, 3 dc in next ch-1 space* around.
Join.
Fasten off.
First Cream Squaring Round
Yarn: warm ivory.
Identify four evenly spaced points around the circular motif.
R6: in each marked corner space work (3 dc, ch 2, 3 dc). Between corners, work 3 dc in each available space with ch 1 between groups.
Join.
Lay the work flat. All four corner ch-2 spaces should point toward a square outline.
Second Cream Frame Round
R7: sl st to first corner; (ch 3, 2 dc, ch 2, 3 dc) in corner. *Ch 1, 3 dc in each side space to next corner; in corner work (3 dc, ch 2, 3 dc)* around.
Join.
Openwork Cream Round
R8: ch 4, skip one side cluster, sc in next ch-1 space; *ch 4, sc in next side space* across. At each corner work (sc, ch 5, sc) in the ch-2 corner space.
Join.
Final Cream Square Round
R9: work 4 dc into each side ch-4 loop. In each corner ch-5 space work (4 dc, ch 2, 4 dc).
Join.
Fasten off.
Firming Round
R10: sc in every stitch around, working (2 sc, ch 2, 2 sc) in each corner.
Fasten off.
Block the motif to approximately 17–19 cm.
Make the Bedspread Squares
For a large bedspread comparable to the photograph, begin with approximately 80 squares arranged 8 across and 10 long.
The exact count depends on the blocked square measurement and mattress dimensions.
Make all brown centers first, then all cream petal rounds, followed by camel, taupe and ivory sections.
This production method reduces repeated yarn handling across a large project.
Blocking Every Motif
Pin each square to the same template.
Measure the width, height and both diagonals.
Keep square-to-square variation below approximately 5 mm.
Allow motifs to dry completely before removing pins.
Vertical Joining
Yarn: warm ivory.
Arrange two squares with matching edges together.
Use a loose flat slip-stitch join through corresponding outer loops.
Join all motifs into eight long columns.
Do not tighten the seam enough to shorten the square edge.
Horizontal Joining
Lay all columns flat.
Join them row by row using the same ivory slip-stitch method.
At each four-square crossing, pass through the corner spaces once rather than stacking multiple stitches in the intersection.
Bedspread Border Foundation
Yarn: warm ivory.
R1: sc evenly around the complete joined field, placing 3 sc in each corner.
Count opposite sides.
Adjust by no more than one or two stitches if necessary before continuing.
Border Round 2
R2: ch 3, dc in each stitch around; in corners work (2 dc, ch 2, 2 dc).
Join.
Openwork Border Round 3
R3: *ch 5, skip 2 stitches, sc in next stitch* around.
Use ch 7 at each corner.
Openwork Border Round 4
R4: sl st into first loop, ch 3, 4 dc in same loop; *ch 2, 5 dc in next loop* around.
In each corner work (5 dc, ch 3, 5 dc).
Openwork Border Round 5
R5: *sc in center dc of next 5-dc group, ch 5, sc in next ch-2 space, ch 5* around.
Use ch 7 around corners.
Decorative Shell Round
R6: in each ch-5 loop work 7 dc; sc in the next anchor point.
At each corner ch-7 loop work 9 dc.
Final Scalloped Edge
R7: *skip 2 dc, 5 dc in next dc, skip 2 dc, sl st in next anchor* around.
Fasten off.
Block the border so every scallop hangs independently rather than folding underneath the blanket.
Matching Pillow Flower
Work R1–R5 exactly as for the bedspread motif.
Continue additional cream square rounds until the panel reaches approximately 43–45 cm for an 18-inch cushion.
Because the flower remains the original size while the cream frame grows, it becomes visually centered within a broad neutral field.
Pillow Front Expansion
Round A: (3 dc, ch 2, 3 dc) in every corner; 3 dc in each side space.
Round B: repeat, adding one new 3-dc group along each side.
Rounds C–F: repeat until the panel reaches the required size.
Final Round: sc around with (2 sc, ch 2, 2 sc) in corners.
Pillow Back Panels — Make 2 per Pillow
Yarn: warm ivory.
Ch to the finished cushion width.
Work rows of dc until each panel measures approximately two-thirds of the cushion height.
Make two matching panels for each cushion.
Overlap the inner edges by approximately 10–12 cm.
Pillow Assembly
Place the floral front RS outward.
Position both back panels behind it.
Sc through both layers around the complete perimeter.
Work one decorative shell or picot round if a more pronounced pillow border is wanted.
Assembly
- Block every floral square to the same 17–19 cm measurement and reject any motif that differs by more than approximately 5 mm.
- Arrange the bedspread field before joining and distribute darker camel or taupe variations evenly if several neutral shades were used.
- Join all vertical columns with ivory yarn, keeping every seam flat rather than corded.
- Connect the columns horizontally and keep four-square intersections no thicker than the ordinary seam.
- Work the solid cream foundation rounds around the entire bedspread before beginning the lace section.
- Add the chain-loop and grouped-double-crochet border rounds while checking that all four corners remain flat.
- Complete the final scalloped border and block it to an even drop around the foot and sides.
- Make one enlarged floral square for each pillow front using extra cream frame rounds around the original motif.
- Attach overlapping cream back panels to each pillow front to form removable envelope-style covers.
- Lay the complete bedspread on the intended mattress, correct any twisted seam or scallop, then weave remaining yarn ends into matching-color sections.
The completed set should present a regular field of raised neutral flowers with a deeper ivory border and matching floral pillows at the head of the bed.
7 Technical Tips
- Center cupping: If the brown center lifts more than about 8 mm after R2, the increase round is too tight. Move up 0.5 mm for the center or loosen the working loops.
- Petal flattening: Cream clusters that sit level with the camel round disappear visually. Pull every petal forward before R6 and keep the background stitches behind the petal bases.
- Corner distortion: A corner angle narrower than roughly 90 degrees produces a diamond-shaped motif. Increase the corner chain from ch 2 to ch 3 if the square pulls inward after blocking.
- Square-size drift: A 5 mm difference repeated across eight squares can alter one row by 4 cm. Use one fixed blocking template for the entire project.
- Join puckering: Tight slip stitches shorten the joined edges. Use a hook 0.5 mm larger for seams if two attached squares curve toward one another.
- Border ruffling: One unnecessary stitch in every motif edge multiplies across the full perimeter. Count the foundation round before starting any chain-loop lace.
- Scallop collapse: Shells spaced closer than about 3 cm can overlap and fold. Block the completed border with each scallop pinned independently.
Controlling the Raised Flower Texture
The muted palette makes stitch height critical. Bright colors can separate adjoining rounds visually, but cream, camel and taupe need physical depth to prevent the motif from blending into one neutral disk.
The petal clusters therefore sit in front of the camel background round. When the square is viewed from an angle, each petal should cast a small shadow across the tan stitches behind it.
Do not press the flower completely flat during blocking. Pin the square frame and lightly arrange the petals by hand while leaving the raised ring free.
Building a Consistent Neutral Palette
The photograph uses several closely related earth tones rather than one brown. Medium brown works best at the flower center because it establishes the strongest contrast.
Camel or warm taupe should occupy the next round. Ivory belongs around the perimeter because using the lightest shade for frames and seams makes the motif grid appear continuous.
Keep all yarns within one warm or cool family. Combining a yellow-based cream with a blue-gray taupe can make the finished bedspread look mismatched even when every stitch is correct.
Choosing Yarn and Hook Size
Current worsted and Aran granny-square patterns frequently use hooks around 5–5.5 mm. An 18 cm floral granny-square blanket reference uses Aran yarn with a 5.5 mm hook, while other rustic worsted designs use the same general hook range. :contentReference[oaicite:13]{index=13}
A 5 mm hook creates a slightly firmer square for this bedspread. That additional density helps raised petals and decorative seams retain their definition.
Make one test square before committing to a yarn quantity. If it blocks below 17 cm, either add another ivory frame round or increase the hook rather than forcing the motif to stretch.
Calculating the Bedspread Size
At an 18 cm blocked motif size, eight squares across produce approximately 144 cm before joining and border. Ten motifs down create approximately 180 cm before the decorative drop.
A deep border can add another 12–20 cm around the outer field, bringing the finished dimensions much closer to the photographed full-bed scale.
Current granny-square sizing guides confirm that motif count should be selected from the intended final dimensions. For example, one 2026 guide estimates 48 eight-inch squares for a 50 × 60 inch throw, while larger bed sizes require substantially more motifs. :contentReference[oaicite:14]{index=14}
Planning Yarn Quantity
Ivory will account for most of the yarn because it appears in every square frame, every joining seam, the entire lace border and both pillow surrounds.
Current granny-square blanket examples demonstrate how quickly neutral background yarn accumulates: one worsted blanket project reports approximately 30 ounces of a neutral shade for its border/background component alone. :contentReference[oaicite:15]{index=15}
For a bedspread of this scale, buy all ivory yarn from one dye lot when possible. Measure the actual grams used by the first fully blocked motif before finalizing the total quantity.
Joining the Squares Without Heavy Seams
The photographed joins are pale and open enough to merge visually with the cream frame. A flat slip-stitch join reproduces that effect without introducing a bulky ridge.
Work the seam loosely and inspect it after every two or three motifs. The joined edge should remain the same length as the unjoined edge.
If a nearly invisible surface is preferred, mattress stitch can replace the crochet join. The important measurement is edge length, not the specific seam technique.
Constructing the Deep Lace Border
The bedspread’s border is deeper than a standard one- or two-round blanket edging. Chain loops create open sections before shell stitches establish the decorative lower line.
A broad border serves a structural purpose as well as a decorative one: it adds side and foot length without requiring another complete row of floral motifs.
Current border guides show that granny-square blankets can be sized through border construction as well as motif count, including adaptations from baby through king dimensions. :contentReference[oaicite:16]{index=16}
Making the Matching Pillow Covers
The pillows in the reference repeat the same flower but provide more cream space around it. That keeps the pillow design related to the bedspread without looking like a cropped section of the blanket.
Work the flower at normal scale, then continue square-frame rounds until the front panel reaches the cushion dimensions.
An envelope back makes the cover removable. Keep the back completely ivory so the flower remains the only focal motif.
Finishing Checks
Lay the joined motif field on a flat floor before beginning the border. All flower centers should form straight rows both horizontally and vertically.
Check the raised cream petals from across the room. If individual flowers disappear into the tan rounds, lift the petals by hand rather than flattening them during final blocking.
Inspect every four-square junction for bumps. A thick intersection will become more obvious after the bedspread is placed on a flat mattress.
Finish by checking the border drop on all visible sides. The scallops should hang at comparable depths and should not curl toward the underside.
Conclusion
Make and block one complete motif before calculating the bedspread field, then multiply the finished square measurement by the required row and column count. Record the brown-center diameter, raised-petal height and ivory-frame width so this neutral floral granny square crochet pattern stays consistent across a large set of motifs. Join the full field before adding the deep lace border, then repeat the flower in enlarged pillow fronts. Photograph one square close-up and the completed bedspread, save the project to Pinterest and share it on Instagram with #NeutralFlowerBedspread. For another version, would you keep the camel background or replace it with a cooler mushroom taupe?
Sources
- I Can Crochet That — 2026 granny-square pattern guide with blanket sizing examples and joining guidance.
- Annie Design Crochet — Aran daisy granny-square blanket with approximately 18 × 18 cm motifs and a 5.5 mm hook.
- Knitting with Chopsticks — granny-square blanket border sizing from baby through king dimensions.
- Crochet 365 Knit Too — worsted granny-square blanket using approximately 30 oz of neutral yarn for the background/border portion.
- Crochet Mind — current rustic granny-square references using worsted yarn and 5.5 mm hooks.
- Joanna’s Crochet — 2026 neutral daisy granny-square blanket with raised 3-dc petal clusters and beige background.
- Erica Arndt — granny-square pillow construction tutorial with lining and zipper options.









