Introduction
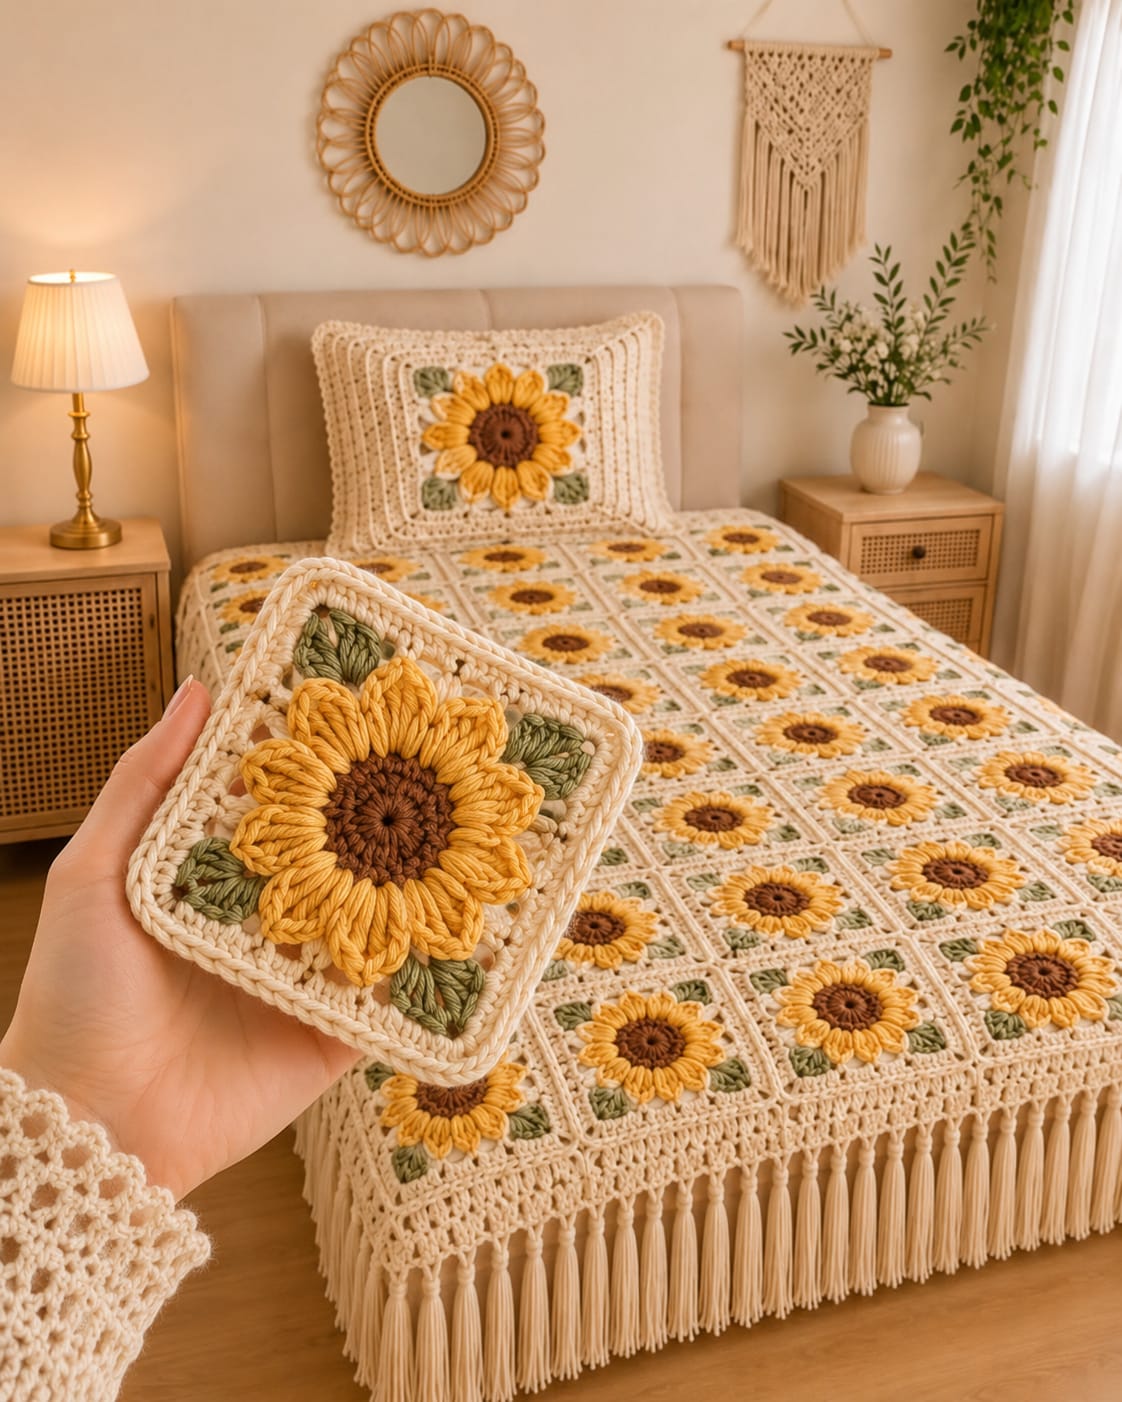
A sunflower needs enough space between its brown disk and four square corners or the yellow petals lose their round outline. This sunflower granny square crochet pattern uses worsted or Aran yarn with a 4.5 mm hook for approximately 15–17 cm blocked motifs. About 48 squares create the photographed bedspread, with cream framing, green leaf details, an openwork border, long tassels and a coordinated pillow.
The Design: What Makes This Sunflower Bedspread Different
The sunflower is raised above the cream background rather than worked as a flat color chart. A compact brown disk supports a ring of dimensional golden petals, while four olive-green leaf sections occupy the diagonal spaces between the flower and square corners. That construction keeps the floral granny square readable after dozens of motifs are joined. Cream is then used for both the frame and seams, so the grid remains quieter than the flowers. The crochet sunflower bedspread adds another structural layer through a wide openwork border and long tassels along the lower edge. A matching pillow enlarges the central sunflower instead of repeating several small motifs. One common failure occurs when the petal round is too tight: the brown center cups upward and the completed square refuses to block flat.
Project Information at a Glance
| Skill Level | Time | Finished Size | Hook | Best For |
|---|---|---|---|---|
| Intermediate | 55–75 hours | Approx. 145–165 × 195–215 cm before tassels | 4.5 mm | Bedspreads, floral afghans and coordinated bedroom crochet |
Materials and Tools
Yarn
- Warm cream / ivory — worsted or Aran cotton blend — approximately 1,700–2,100 g — square backgrounds, joins, border, tassels and pillow
- Golden sunflower yellow — matching worsted/Aran yarn — approximately 550–700 g — petals
- Chocolate brown — matching yarn — approximately 250–350 g — flower centers
- Muted olive or sage green — matching yarn — approximately 250–350 g — leaf details
Tools
- 4.5 mm crochet hook
- Large-eye yarn needle
- Sharp scissors
- Locking stitch markers
- Blocking mats
- Rust-resistant T-pins
- Measuring tape
- 15–18 cm cardboard template for cutting tassels
Abbreviations
- MR — magic ring
- ch — chain
- sl st — slip stitch
- sc — single crochet
- hdc — half double crochet
- dc — double crochet
- tr — treble crochet
- dc2tog — double crochet two together
- sp — space
- ch-sp — chain space
- RS — right side
Invisible decreases are not required in this flat motif; all shaping comes from stitch height, cluster placement and corner spaces.
Pattern — Step by Step
Work one test square before beginning production. Block it to 15–17 cm and use that measurement for every remaining motif.
Brown Sunflower Center
Yarn: chocolate brown.
R1: 12 dc in MR (12)
Join with sl st to the first dc.
R2: 2 dc in each stitch around (24)
Join and fasten off.
The center should lie flat. If R2 forms a cup, loosen the working tension before beginning the petal round.
Golden Sunflower Petals
Yarn: golden yellow.
Join yellow in any stitch.
R3: *ch 3, tr in same st, tr in next st, ch 3, sl st in second of those two stitches*; repeat around to form 12 paired petal sections.
Join with sl st.
Fasten off.
Use your fingers to pull each petal outward before adding the green foundation.
Green Rear Foundation
Yarn: muted olive green.
Work behind the petal round.
R4: *sc around the base between two petals, ch 3* around to create 12 rear chain spaces.
Join.
Green Leaf Corners
Mark four rear spaces at equal intervals.
Each marked section forms one leafy corner.
R5: in each marked space work (2 dc, 2 tr, ch 2, 2 tr, 2 dc). In each unmarked space work 3 hdc.
Join.
The four larger green sections should sit diagonally around the flower. Rotate the motif until they read as four leaves rather than one continuous green ring.
Cream Squaring Round
Yarn: warm cream.
Join cream in any green corner ch-2 space.
R6: (3 dc, ch 2, 3 dc) in corner; *ch 1, 3 dc in next space* across the side; repeat the corner group in each of the remaining three corner spaces.
Join with sl st.
Cream Expansion Round
R7: sl st into first corner; (ch 3, 2 dc, ch 2, 3 dc) in corner; *ch 1, 3 dc in every side ch-1 space, ch 1, (3 dc, ch 2, 3 dc) in next corner* around.
Join.
Second Cream Frame Round
R8: repeat R7, adding one 3-dc group in every available side ch-1 space and a (3 dc, ch 2, 3 dc) group in all four corners.
Join.
Final Firming Round
R9: ch 1, sc in every dc and ch-1 space around; work (2 sc, ch 2, 2 sc) in each corner.
Join and fasten off.
Block to approximately 15–17 cm square.
Make Approximately 48 Sunflower Squares
For the photographed bedspread, arrange approximately six squares across and eight squares down.
Make all brown centers first if production speed matters, followed by all yellow petal rounds, then green sections and cream frames.
Working by color reduces repeated yarn changes during a large blanket project.
Blocking the Squares
Pin one square to the chosen 15–17 cm measurement.
Measure both diagonals.
The difference should stay below approximately 5 mm.
Pin the remaining motifs to the same dimensions.
Allow every square to dry fully before joining.
Cream Vertical Joins
Yarn: cream.
Place two squares with matching edges together.
For a flat visible join, insert the hook through corresponding outer loops and work loose slip stitches from one corner to the next.
Join the squares into six long columns.
Cream Horizontal Joins
Lay all columns on a flat surface.
Work across each horizontal row using the same flat join.
At every four-square intersection, pass through the existing corner spaces without adding an extra cluster.
The intersection should remain approximately the same thickness as one ordinary seam.
Bedspread Border — Foundation Round
Yarn: cream.
R1: sc evenly around the complete blanket, working 3 sc in each corner.
Count opposite sides before continuing.
Bedspread Border — Double Crochet Round
R2: ch 3, dc in each stitch around; in each corner work (2 dc, ch 2, 2 dc).
Join.
Openwork Border Round 1
R3: ch 5, skip 2 stitches, sc in next; *ch 5, skip 2, sc in next* around.
At each corner, use one ch-7 loop.
Openwork Border Round 2
R4: sl st into first ch-5 loop, ch 3, 4 dc in same loop; *ch 2, 5 dc in next loop* around.
At each corner ch-7 loop work (5 dc, ch 3, 5 dc).
Openwork Border Round 3
R5: *sc in first dc group, ch 5, sc in next ch-2 space, ch 5* around.
Use ch 7 at corners if the fabric begins pulling inward.
Final Border Round
R6: work 5 dc in each ch-5 loop and 7 dc in each corner loop.
Fasten off.
Lay the border flat before adding tassels. Correct any ruffling or cupping now because fringe will not hide an uneven foundation.
Bedspread Tassels
Cut cream strands approximately 30–36 cm long.
For each tassel, group 8–10 strands.
Fold the bundle in half through a lower-border space and pull all cut ends through the loop.
Space tassels approximately 4–5 cm apart across the foot and visible side edges.
Trim to a finished length of approximately 14–17 cm.
Matching Pillow Center
Use the same brown center and yellow petal instructions as the bedspread square.
After the green leaf round, continue adding cream granny-style frame rounds until the panel reaches the required cushion size.
For an approximately 45 cm pillow, add cream rounds until the front panel measures about 43–44 cm before edging.
Pillow Cream Frame
Round A: (3 dc, ch 2, 3 dc) in every corner and 3 dc in each side space.
Rounds B–F: repeat the granny-frame construction, adding one side group per round.
Final Round: sc evenly around with (2 sc, ch 2, 2 sc) at corners.
Block the pillow front square.
Pillow Back — Make 2 Panels
Yarn: cream.
Ch to the finished pillow width.
Work rows of dc until each back panel measures approximately two-thirds of the pillow height.
Make two matching pieces.
Overlap them by about 10–12 cm to create an envelope opening.
Pillow Assembly
Place the sunflower front RS outward.
Position both cream back panels behind it with the overlap centered.
Work one round of sc through front and back layers around all four sides.
Add one decorative cream slip-stitch round if a firmer edge is wanted.
Assembly
- Block every sunflower square to the same 15–17 cm template and compare both diagonals before joining.
- Arrange approximately six motifs across and eight down, rotating any square whose green leaf positions do not match the surrounding layout.
- Join all vertical columns with cream yarn, keeping each seam flat and approximately 3–5 mm wide.
- Connect the columns horizontally and keep every four-square junction free from extra clusters or knots.
- Work the cream foundation and double-crochet border rounds around the complete bedspread.
- Add the three openwork border rounds and check the blanket on a flat surface before the final decorative edge.
- Attach evenly cut cream tassels every 4–5 cm along the lower edge and selected side edges.
- Expand one sunflower motif with additional cream rounds until it reaches the required pillow-front measurement.
- Attach the two overlapping cream back panels to form the removable pillow cover.
- Block the finished bedspread and pillow separately, trim all tassels to one length, and weave every remaining yarn tail into matching-color stitches.
The finished set should repeat one golden sunflower motif throughout the bedspread while the pillow uses the same flower at a larger visual scale.
7 Technical Tips
- Center cupping: A brown disk that rises more than about 1 cm after R2 usually indicates tight tension. Remake the round with a hook 0.5 mm larger rather than forcing it flat during blocking.
- Petal crowding: Twelve dimensional petals need visible separation at their tips. If neighboring petals overlap by more than about one-third of their width, loosen R3 or reduce the petal stitch height slightly.
- Leaf rotation: Green corner sections placed one space off-center make the entire sunflower look twisted. Mark four equally spaced rear loops before starting the leaf round.
- Square-size drift: A difference greater than 5 mm becomes obvious across a six-square row. Block every motif against the same template instead of measuring each one independently.
- Join ridging: Tight slip stitches create raised cream cords between motifs. Move up 0.5 mm in hook size for the joining pass if the bedspread begins puckering.
- Border ruffling: Extra stitches in the first perimeter round multiply through every openwork round. Opposite bedspread sides should have matching stitch totals before R2 begins.
- Uneven tassels: Hand-cut strands without a template can vary by several centimeters. Wrap yarn around a 15–18 cm cardboard gauge and cut along one edge for repeatable lengths.
Building the Dimensional Sunflower Center
The flower needs height without turning into a bulky rosette. A flat brown center is therefore paired with petals that rise away from the surface but remain open at their tips.
Published sunflower motifs use several valid constructions. Some work 16 cluster stitches, while others build eight large petals from a 24-stitch brown foundation. The photographed bedspread appears denser, so approximately 12 petal divisions better match the visible flower circumference.
Keep all petal bases close to the brown disk. Large gaps between the two colors expose the green foundation and break the circular sunflower outline.
Positioning the Four Green Leaves
The green sections perform two jobs. They introduce the leaf color, and they create visual transitions from a round flower to a square cream frame.
Place them at four equal diagonal points rather than directly above, below, left and right of the flower. That orientation leads naturally toward the corners.
After R5, set the motif on a flat surface and rotate it until the green sections sit at approximately 45, 135, 225 and 315 degrees around the sunflower.
Choosing Yarn and Hook Size
Current sunflower granny-square patterns cover several yarn systems. Published examples use 3.5 mm hooks with light yarn, 4–4.5 mm hooks with medium or Aran yarn, and 5.5 mm hooks for larger 15 cm motifs.
A 4.5 mm hook with worsted or light Aran cotton blend provides enough density for the raised petals while keeping the cream square flexible.
Make one complete test motif before buying yarn for the entire bedspread. The blocked size determines both the final square count and total yarn requirement.
Planning a 48-Square Bedspread
A layout of six motifs across and eight down uses 48 squares. At a blocked width of 16 cm per motif, the unbordered field is approximately 96 × 128 cm before seams, which may be too small for the photographed scale.
If each motif blocks closer to 20–22 cm after additional cream frame rounds, the same 6 × 8 layout reaches roughly 120–132 cm wide and 160–176 cm long before border.
For that reason, use the bed dimensions rather than the nominal square count as the final authority. Add one extra cream frame round to every square if the complete field would otherwise fall short.
Joining Without Competing with the Flowers
The supplied image uses cream joins that nearly disappear into the square backgrounds. That keeps attention on the brown, yellow and green motif rather than on the grid.
A flat slip-stitch join works well when the square edges have identical counts. Mattress stitching is another option when an almost invisible sewn seam is preferred.
Join complete columns before crossing them with horizontal seams. This reduces repeated handling of individual motifs and makes alignment easier to inspect.
Constructing the Openwork Border
The border is much more open than the square field. Chain loops and grouped double crochets reduce weight while creating enough lower-edge structure to support dozens of tassels.
Do not attach fringe directly to one row of single crochet. A wider openwork zone spreads the pulling force over several rounds.
The pictured border hangs below the floral field rather than curling under it. Block the lace section fully before measuring tassel length.
Making the Matching Sunflower Pillow
The pillow does not need dozens of miniature motifs to relate to the bedspread. One larger sunflower surrounded by repeated cream frame rounds creates the same color relationship at a different scale.
Keep the brown and yellow flower proportions close to those used in the blanket. Increase only the cream background until the front reaches pillow size.
An envelope back keeps the cover removable and avoids interrupting the cream perimeter with a visible zipper.
Estimating Yarn for the Full Set
The cream yarn carries most of the total yardage because it appears in every square frame, all joins, the broad border, the fringe and the pillow.
Golden yellow ranks second because every motif contains a full ring of dimensional petals. Brown and green remain lower-volume colors despite appearing in all 48 squares.
Weigh one blocked square and record the amount of each color separately. Multiply those figures by the final motif count, then add cream for seams, border, tassels and the pillow.
Finishing Checks
Spread the complete bedspread on a flat surface before cutting fringe. Every row of sunflower centers should form a straight visual line from one side to the other.
Inspect the green leaves next. A rotated leaf group is easier to notice across a finished grid than it was on an individual square.
Check the border corners for waves or inward pulling. Correct tension before tassels are attached.
Finish by hanging the lower edge freely and trimming the tassels. Their ends should form one level line rather than following minor variations in the crochet border.
Conclusion
Make one sunflower square, block it to the final measurement and calculate the complete bedspread dimensions before producing the remaining motifs. Record the brown-center diameter, petal width and cream-frame size so the sunflower granny square crochet pattern can be repeated consistently across every row. Join the floral field before adding the openwork border, then make the matching pillow from one enlarged motif. Photograph both a close-up square and the complete bedspread, save the project to Pinterest and share it on Instagram with #SunflowerGardenBedspread. For the next version, would you keep the leaves muted olive or switch them to a deeper forest green?
Sources
- Mavis & Flo — free Sunflower Granny Square tutorial, intermediate level, 5.5 mm hook and approximately 15 × 15 cm finished size.
- Moms and Crafters — free Sunflower Granny Square originally published in February 2024 and updated in 2026.
- Crafting Happiness — March 2024 Sunflower Granny Square using DK yarn, 4 mm hook and approximately 10 × 10 cm finished size.
- Easy Breezy Crochet — 12 × 12 cm sunflower square using #3 yarn and a 3.5 mm hook.
- Crochet Bits — three-dimensional sunflower square using worsted yarn and a 4 mm hook.
- Ravelry / Lisa Ferrel — 6-inch Aran sunflower square using a 5.5 mm hook and approximately 50–55 yards.
- Ravelry / Elyse Eades — 4-inch Aran sunflower square using a 4.5 mm hook and approximately 50–75 yards.
- Jo to the World Creations — sunflower granny-square blanket instructions covering motif assembly, flat slip-stitch joining and border construction.
- Hope Corner Farm — sunflower-square tutorial using clustered flower rounds and blocking guidance.









