Introduction
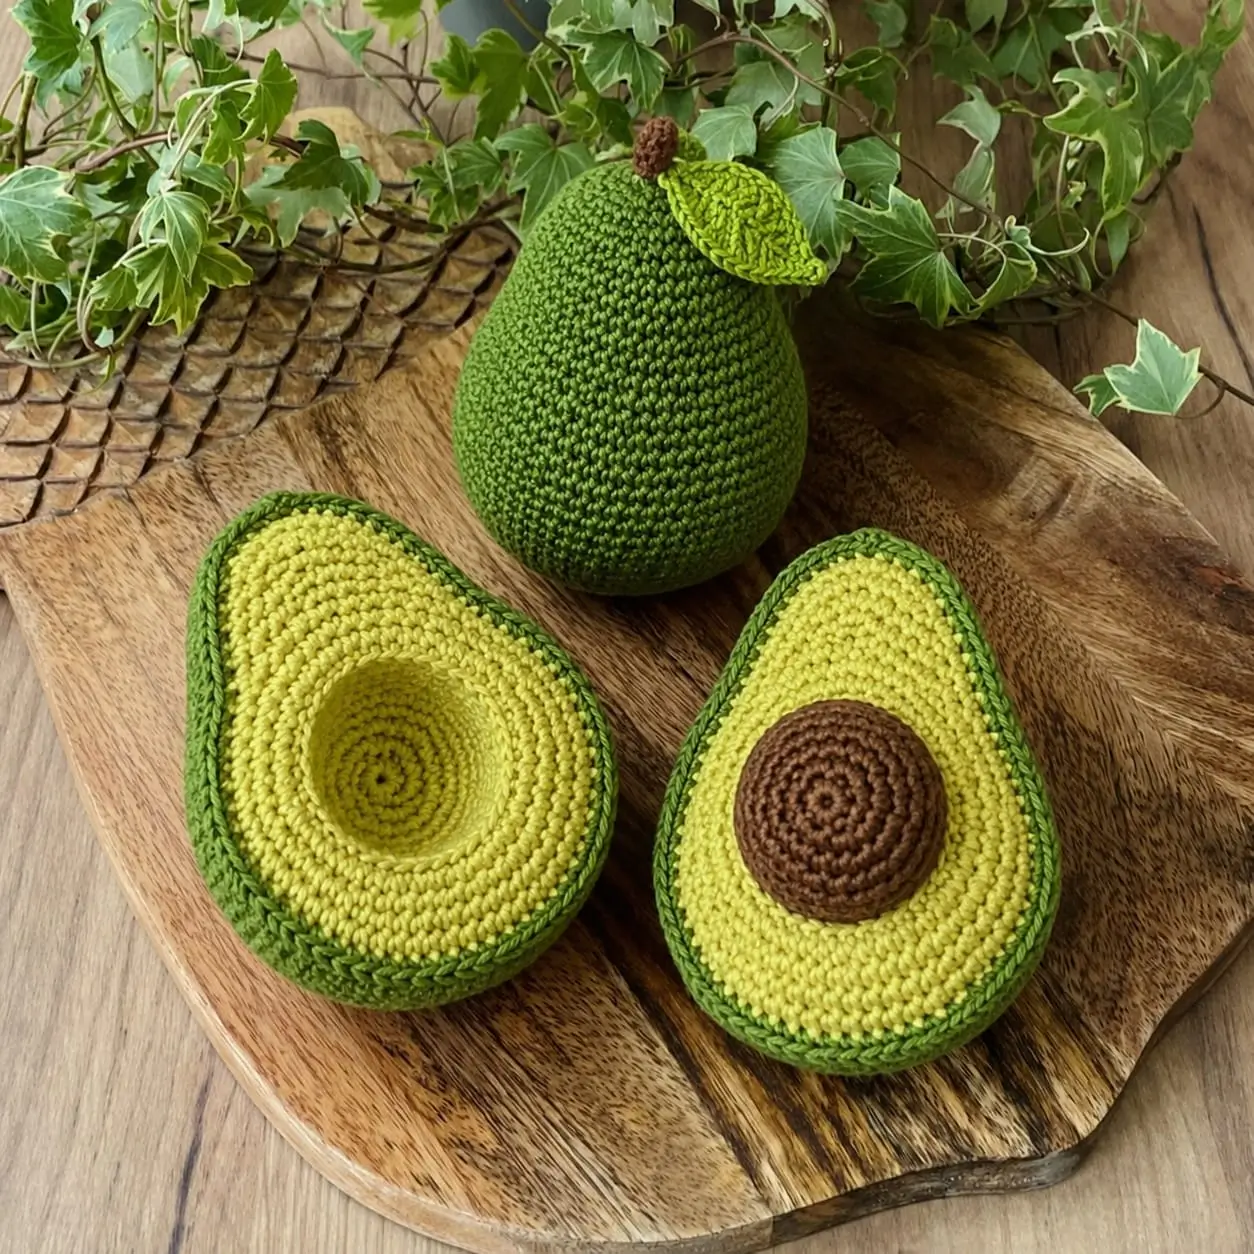
An avocado is not symmetrical from top to bottom: the narrow stem end has to taper much faster than the rounded base. This avocado amigurumi crochet pattern uses worsted yarn and a 3.25 mm hook to make a whole fruit plus two matching halves approximately life-size. Separate peel, flesh, pit and cavity details reproduce the cut-fruit structure and make the set practical for crochet food displays or pretend-play collections.
The Design: What Makes This Avocado Different
The whole fruit uses a rounded 36-stitch lower body followed by progressively narrower upper sections, creating the pear silhouette without relying on a sewn-on point. Both halves use the same basic pear outline so they register as one fruit when placed side by side. Their construction then separates: one half carries a raised brown pit, while the second uses an indented circular cavity. A narrow dark-green edging represents the peel and frames the yellow-green flesh without covering too much of it. The realistic crochet avocado also includes a small brown stem and one light-green leaf on the whole fruit. A common maker error is reducing the upper rounds too quickly. That produces a cone-shaped avocado instead of the broad shoulder and short taper visible in the reference.
Project Information at a Glance
| Skill Level | Time | Finished Size | Hook | Best For |
|---|---|---|---|---|
| Intermediate | 5–7 hours for the three-piece set | Whole fruit approx. 16–19 cm tall | 3.25 mm | Crochet food sets, kitchen displays and pretend play |
Published avocado amigurumi patterns cover a wide size range. Current examples include an 8.5 cm Etsy avocado, Drew Hill’s 13.5 cm Aran version and larger super-bulky constructions around 15 cm. The supplied fruit appears closer to natural avocado scale, so this project targets approximately 16–19 cm using worsted or light Aran yarn.
Materials and Tools
Yarn
- Deep avocado green — worsted/Aran cotton or cotton-acrylic blend — approximately 55–70 g — whole fruit, half backs and peel edging
- Yellow-green — matching yarn — approximately 35–45 g — cut flesh
- Medium brown — matching yarn — approximately 15–20 g — pit and stem
- Fresh lime green — matching yarn — approximately 5 g — leaf
Drew Hill’s 13.5 cm Aran avocado uses roughly 46–55 m of yarn, while a separate worsted pattern lists 69–91 m. The three-piece set here needs more material because it includes the whole fruit plus two halves.
Tools
- 3.25 mm crochet hook
- Polyester fiberfill
- Large-eye yarn needle
- Locking stitch markers
- Sharp scissors
- Rust-resistant pins for aligning halves
Abbreviations
- MR — magic ring
- sc — single crochet
- inc — 2 sc in one stitch
- dec — single-crochet decrease
- sl st — slip stitch
- ch — chain
- hdc — half double crochet
- dc — double crochet
- BLO — back loop only
Use front-loop invisible decreases on the whole fruit so the upper taper remains smooth and does not show horizontal gaps.
Pattern — Step by Step
Work the stuffed whole fruit in a continuous spiral unless stated otherwise. The cut halves combine rounds and short turning rows to create the pear-shaped top.
Whole Avocado
Yarn: deep avocado green — standard amigurumi math with a 36-stitch medium plateau.
R1: 6 sc in MR (6)
R2: inc ×6 (12)
R3: (sc, inc) ×6 (18)
R4: (2 sc, inc) ×6 (24)
R5: (3 sc, inc) ×6 (30)
R6: (4 sc, inc) ×6 (36)
R7: sc around (36)
R8: sc around (36)
R9: sc around (36)
R10: sc around (36)
R11: sc around (36)
R12: sc around (36)
The widest portion should sit low on the fruit. Begin tapering only after six plain rounds.
R13: (4 sc, dec) ×6 (30)
R14: sc around (30)
R15: sc around (30)
R16: (3 sc, dec) ×6 (24)
R17: sc around (24)
R18: sc around (24)
R19: (2 sc, dec) ×6 (18)
R20: sc around (18)
R21: sc around (18)
Stuff firmly through the rounded lower half. Add smaller pieces of fiberfill toward the top so the shoulder stays smooth.
R22: (sc, dec) ×6 (12)
R23: sc around (12)
R24: sc around (12)
R25: dec ×6 (6)
Fasten off and close the remaining six stitches.
Stem
Yarn: medium brown.
R1: 6 sc in MR (6)
R2: sc around (6)
R3: sc around (6)
R4: sc around (6)
Stuff with a very small amount of fiberfill.
Fasten off with a 15 cm sewing tail.
Leaf
Yarn: lime green.
Ch 9.
Starting in second ch from hook:
sl st, sc, hdc, dc, dc, hdc, sc, sl st.
Work along the opposite side of the foundation chain:
sl st, sc, hdc, dc, dc, hdc, sc, sl st.
Fasten off with a 20 cm sewing tail.
Block the leaf into a pointed oval approximately 5–6 cm long.
Cut Avocado Half Front — Make 2
Yarn: yellow-green.
R1: 6 sc in MR (6)
R2: inc ×6 (12)
R3: (sc, inc) ×6 (18)
R4: (2 sc, inc) ×6 (24)
R5: (3 sc, inc) ×6 (30)
R6: (4 sc, inc) ×6 (36)
R7: sc around (36)
Do not fasten off yet.
The next section forms the narrower top using turning rows over part of the circle.
Row 8: sc 12, turn (12)
Row 9: dec, 8 sc, dec, turn (10)
Row 10: dec, 6 sc, dec, turn (8)
Row 11: dec, 4 sc, dec, turn (6)
Row 12: dec, 2 sc, dec, turn (4)
Row 13: dec ×2 (2)
Fasten off.
The piece should now resemble a rounded lower circle with a short triangular pear top.
Dark-Green Half Back — Make 2
Yarn: deep avocado green.
Repeat the complete Cut Avocado Half Front instructions.
Do not add pit or cavity details to these back panels.
Raised Pit
Yarn: medium brown.
R1: 6 sc in MR (6)
R2: inc ×6 (12)
R3: (sc, inc) ×6 (18)
R4: (2 sc, inc) ×6 (24)
R5: sc around (24)
R6: sc around (24)
R7: (2 sc, dec) ×6 (18)
Add a shallow layer of stuffing.
Fasten off with a 30 cm sewing tail.
The pit should form a low dome rather than a complete sphere.
Pit Cavity Inner Ring
Yarn: yellow-green.
R1: 6 sc in MR (6)
R2: inc ×6 (12)
R3: (sc, inc) ×6 (18)
R4: (2 sc, inc) ×6 (24)
Fasten off.
This circle is used as the floor of the recessed cavity.
Pit Cavity Wall
Yarn: yellow-green.
Join around the 24-stitch cavity circle.
R5: BLO sc around (24)
R6: sc around (24)
R7: sc around (24)
Fasten off with a long tail.
Press the circle inward so the BLO fold creates a shallow bowl.
Dark-Green Peel Edging — Half with Pit
Place one yellow-green front against one dark-green back, wrong sides together.
Using deep avocado green, join through corresponding edge stitches.
Work sc evenly around the entire pear shape.
Add a small amount of stuffing before closing the final 5–6 cm.
The finished half should remain relatively flat, approximately 2.5–3.5 cm thick.
Fasten off.
Dark-Green Peel Edging — Cavity Half
Repeat the same joining process for the second yellow-green front and green back.
Add only enough stuffing to give the half a soft rounded profile.
Fasten off.
Attach the Raised Pit
Center the brown pit on the lower-middle section of the first yellow-green half.
The pit edge should sit approximately 2.5–3 cm from the dark-green peel at the bottom.
Sew around the complete 18-stitch opening.
Add or remove stuffing before the final stitches so the dome rises approximately 2.5–3 cm.
Install the Pit Cavity
Center the recessed yellow-green bowl on the second half.
Pin around its 24-stitch outer edge.
Sew the upper rim to the half while pressing the center inward.
The finished cavity should recess approximately 2–3 cm at its deepest point.
Assembly
- Shape the stuffed whole avocado so its widest point sits in the lower third and the upper taper remains short rather than conical.
- Sew the brown stem over the six-stitch closure at the top of the whole fruit, passing through the full stem base twice.
- Attach the lime-green leaf directly beside the stem and tack its lower 1–1.5 cm to the fruit so the tip remains free.
- Pair each yellow-green half front with a dark-green back and check that both pear outlines match before joining.
- Join the first half with dark-green sc edging, add shallow stuffing and close the final opening without creating a rounded pillow shape.
- Repeat the dark-green edging and shallow stuffing for the second half.
- Center and sew the brown pit to one half, keeping the pit approximately in the lower-middle third of the flesh.
- Center the yellow-green cavity bowl on the second half and sew around the rim while pressing the center inward.
- Place both halves side by side and correct any difference greater than approximately 5 mm in length or width by reshaping the stuffing and edging.
- Weave all tails through internal stitches, trim them, and hand-shape the peel border, pit dome, cavity and leaf.
The completed set should contain one smooth whole avocado and two matching cut halves, with one raised pit and one clearly recessed pit cavity.
7 Technical Tips
- Pear-shape failure: Starting decreases immediately after reaching 36 stitches creates a narrow cone. Hold the full 36-stitch circumference for six rounds before tapering.
- Flat-bottom distortion: Overstuffing the first six rounds creates a hard spherical base. Distribute fiberfill toward the side walls and keep the very bottom slightly softer.
- Half mismatch: A difference greater than 5 mm between the two pear fronts becomes obvious when they are displayed together. Stack and pin both fronts before joining either back.
- Peel-edge waviness: Adding extra sc around curves can create ruffles. Join corresponding stitches one-for-one wherever possible and place extra stitches only at the pointed top if necessary.
- Pit bulging: Stuffing the brown pit like a full ball makes it look detached from the flesh. Keep the dome height near 2.5–3 cm and flatten its sewing edge before attachment.
- Cavity collapse: A bowl shallower than about 2 cm reads as a flat applique. Use the BLO fold at R5 and press the center inward while sewing the rim.
- Leaf twisting: Sewing only the chain-end of the leaf allows it to rotate around the stem. Tack at least 1–1.5 cm of the leaf base against the avocado.
Shaping a Realistic Pear Profile
The whole avocado is not a sphere with a point added afterward. Its widest section must remain low, then transition through 30, 24 and 18 stitches before reaching the narrow stem end.
The six-round 36-stitch plateau produces the broad lower body. Two plain rounds at several smaller circumferences slow the taper enough to form shoulders rather than a straight cone.
Stuff in stages. The lower third needs enough firmness to stand upright, while the upper section should be packed with smaller pieces that can be manipulated after closing.
Making Matching Avocado Halves
Both halves should originate from the same front and back templates. That matters more than making either piece mathematically circular because the reference shows two halves that clearly belong to one fruit.
The construction expands to 36 stitches for the rounded bottom, then uses progressively shorter turning rows to form the neck and top.
A current crochet avocado keychain pattern uses a related strategy: it expands through 6, 12, 18, 24, 30 and 36 stitches before switching to turning rows for the upper point. That makes short-row shaping a practical choice for this type of fruit silhouette. :contentReference[oaicite:15]{index=15}
Building the Dark-Green Peel Rim
The dark-green outer edge should remain narrow. Its function is to show the skin thickness, not to cover the flesh.
Join front and back through corresponding stitches with one round of sc. A slightly firm tension creates the defined border visible around both halves.
If the edging curls toward the yellow-green face, use a hook 0.25–0.5 mm larger for the joining round rather than adding unnecessary stitches.
Constructing the Raised Pit
The pit begins as a 24-stitch circle and receives only two full-height rounds before tapering. That creates a low hemisphere.
The photo shows the pit extending prominently above the flesh, but it is not spherical. Flatten the open base before sewing so the perimeter contacts the avocado half evenly.
Place the pit slightly below the geometric center of the pear. Real avocado pits sit within the broader lower section rather than close to the pointed top.
Creating the Empty Pit Cavity
The opposite half requires different construction because a flat circle cannot convincingly represent an empty pit space.
Working R5 through BLO creates a sharp fold between the cavity floor and wall. Three 24-stitch wall rounds then provide enough depth to push the circle inward.
Sew the rim under mild tension while keeping the center depressed. The resulting bowl remains soft but visibly deeper than the surrounding flesh.
Choosing Yarn and Hook Size
Published avocado patterns use several yarn systems. Amigu World lists 2–3 mm hooks, a 2024 sport-weight tutorial recommends 3.5 mm, Codi Hudnall’s worsted version uses 3.25 mm, and Drew Hill’s Aran avocado uses a 5 mm hook. :contentReference[oaicite:16]{index=16}
A 3.25 mm hook with smooth worsted cotton or cotton-acrylic creates a dense surface while maintaining clear stitch definition. It also keeps the final scale close to a natural medium avocado.
If the fabric shows fiberfill when compressed, reduce the hook to 3 mm. If the piece becomes rigid and difficult to shape, increase to 3.5 mm.
Planning Yarn Quantity
Current avocado patterns confirm that the individual toy itself is not yarn-intensive. Drew Hill’s Aran design lists approximately 46–55 m, while Codi Hudnall’s worsted avocado lists about 69–91 m. :contentReference[oaicite:17]{index=17}
This project requires additional yarn because the photograph includes three separate objects. Budget approximately 55–70 g of dark green for the whole skin, two half backs and peel edges.
The yellow-green flesh uses less material because it appears only on the two flat halves. Brown is limited to the pit and stem, while the leaf needs only a few grams.
Competition and Design Position
Current avocado amigurumi competition includes many character designs with safety eyes, smiles, hearts and rounded plush forms. Ribblr’s Drewbies Zoo avocado even lists optional 12 mm safety eyes, while StringyDingDing’s 2024 design is a super-bulky heart-holding character. :contentReference[oaicite:18]{index=18}
This avocado amigurumi crochet pattern uses a different visual direction. There is no face, and the focus is on realistic produce anatomy: peel, flesh, pit, empty cavity, stem and leaf.
The whole-and-half presentation also makes the project useful for market-play sets, kitchen-themed displays and educational crochet food collections.
Finishing Checks
Set the whole avocado upright first. It should rest on the rounded base without leaning more than a few degrees to either side.
Compare both halves next. Their outer dark-green outlines should match closely, and their pointed ends should reach approximately the same height.
Inspect the pit from the side. The dome should rise clearly above the flesh without looking like a separate ball resting on top.
Finish with the cavity. Its center should remain recessed after handling; if it repeatedly pops outward, add several hidden anchoring stitches from the cavity floor through the back panel.
Conclusion
Crochet the whole fruit through its 36-stitch plateau first, then record its width before making the matching halves. That measurement gives the most useful scaling reference if the avocado amigurumi crochet pattern is later worked in another yarn. Shape both cut fronts together, add the pit and cavity only after their peel edges match, and photograph the completed three-piece set from above. Save the project to Pinterest and share it on Instagram with #RealisticCrochetAvocado. The next practical variation is color: would you make the flesh a brighter yellow-green, or keep the muted lime shade shown here?
Sources
- Ribblr — Drewbies Zoo Avocado Amigurumi: Aran-family yarns, 5 mm hook and optional 12 mm safety eyes. :contentReference[oaicite:19]{index=19}
- Amigurumi Cat — free Avocado Crochet Pattern published July 26, 2024. :contentReference[oaicite:20]{index=20}
- Amigurumi All Free Patterns — Anna Art Avocado published August 3, 2024. :contentReference[oaicite:21]{index=21}
- Ravelry / Drew Hill — Avocado Amigurumi measuring approximately 13.5 cm tall × 10 cm wide, using Aran yarn, a 5 mm hook and 46–55 m of yarn. :contentReference[oaicite:22]{index=22}
- Ravelry / Codi Hudnall — worsted Avocado Amigurumi using a 3.25 mm hook and approximately 69–91 m of yarn. :contentReference[oaicite:23]{index=23}
- Etsy / PinkyPinkyBlueAU — whole avocado and matching halves using cotton-blend yarn at 160 m/50 g with a 2.25 mm hook. :contentReference[oaicite:24]{index=24}
- Etsy / MagicCrochetByHelena — finished avocado size approximately 8.5 cm. :contentReference[oaicite:25]{index=25}
- Craftorator — avocado keychain construction expanding from 6 to 36 stitches before upper short-row shaping. :contentReference[oaicite:26]{index=26}
- AnDesign_Craft — January 2026 step-by-step avocado tutorial using 4-ply cotton and a 2.5 mm hook. :contentReference[oaicite:27]{index=27}









