Introduction
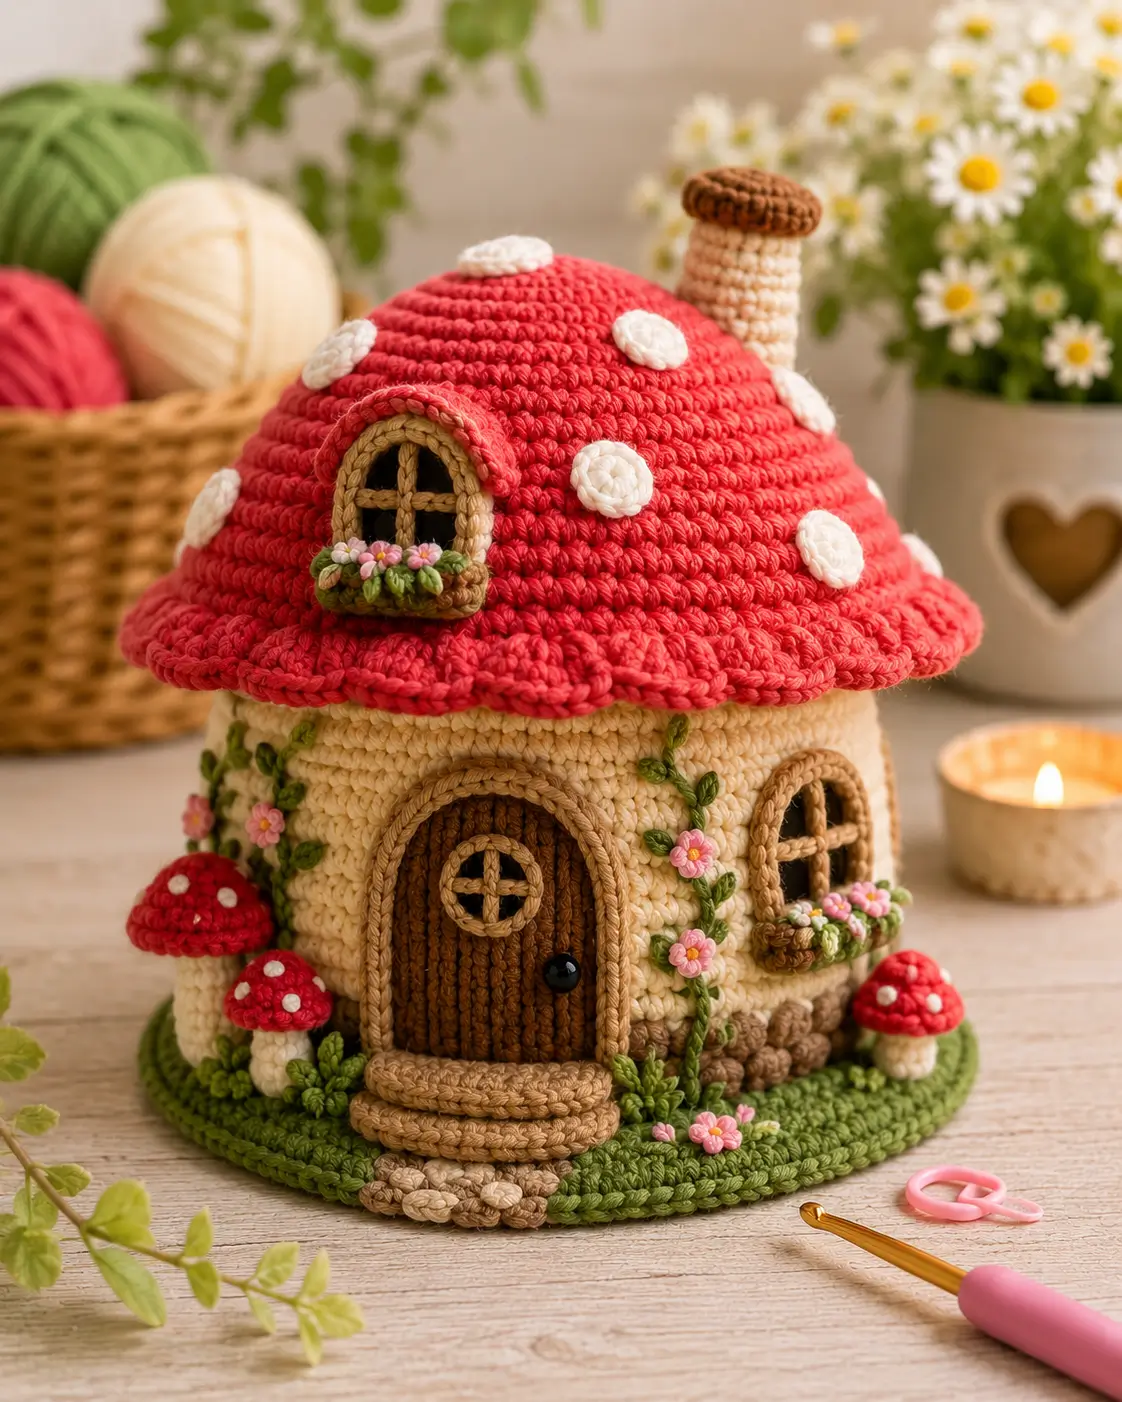
A mushroom roof can tolerate a soft dome; an arched window directly beneath it cannot tolerate a crooked wall. This crochet mushroom house pattern uses worsted or Aran cotton-blend yarn with a 3.75 mm hook to build a decorative cottage approximately 24–28 cm tall. The project combines a cream cylindrical house, red spotted roof, working architectural appliqués, flowers, vines, miniature mushrooms and a landscaped base.
The Design: What Makes This Mushroom House Different
The basic structure is deliberately simple so the surface details can remain precise. A 42-stitch cream cylinder forms the house, while a separately stuffed red dome creates the oversized toadstool roof. That separation allows the roof edge to project several centimeters beyond the wall like an eave. The front elevation uses a tall arched door, and two smaller windows repeat the same rounded architecture at different heights. Green vines climb across the otherwise plain cream wall, while pink flowers and tiny window boxes break up the vertical surface. The mushroom fairy house crochet design also extends beyond the building: stones, steps, grass and three small mushrooms create a complete base. One frequent failure is overstuffing the body. A wall that bulges outward makes the door and windows lift away from the surface instead of lying flat.
Project Information at a Glance
| Skill Level | Time | Finished Size | Hook | Best For |
|---|---|---|---|---|
| Intermediate | 9–12 hours | Approx. 24–28 cm tall | 3.75 mm | Cottagecore decor, fairy gardens and shelf displays |
Published mushroom houses cover a substantial size range. A detailed sport-weight pattern measures 27 cm high by 15 cm wide, an Aran design measures about 18 cm tall, and a DK house is approximately 15 cm. The larger photo-matched specification here allows enough surface area for the windows, vines, stones and entrance steps.
Materials and Tools
Yarn
- Warm cream — worsted/Aran cotton blend — approximately 100–125 g — house walls, mushroom stems and chimney
- Strawberry red — matching yarn — approximately 90–110 g — roof and small mushroom caps
- Olive green — approximately 55–70 g — grass base, vines and leaves
- Medium brown — approximately 25–35 g — front door, flower boxes and roof-window interior
- Tan — approximately 20–25 g — door/window trim and steps
- White — approximately 10–15 g — roof spots
- Pink — approximately 5–8 g — miniature flowers
- Black — small amount — door knob/window backing if desired
A published detailed sport-weight mushroom house specifies 250–300 m of yarn, while an Aran version uses a 3.75 mm hook. Those references provide a useful scale check, but weigh a finished test section before buying yarn for multiples.
Tools
- 3.75 mm crochet hook
- Polyester stuffing
- Yarn needle
- Scissors
- Locking stitch markers
- Long pins
- Optional plastic canvas or firm cardboard for the base
- Optional black 8–10 mm bead or safety eye for the door knob
Abbreviations
- MR — magic ring
- sc — single crochet
- inc — 2 sc in one stitch
- dec — decrease over two stitches
- sl st — slip stitch
- ch — chain
- hdc — half double crochet
- dc — double crochet
- BLO — back loop only
- FLO — front loop only
Use an invisible decrease through the front loops only whenever a stuffed round narrows so the exterior remains smooth.
Pattern — Step by Step
Work all three-dimensional pieces in continuous spirals unless a section is marked as flat. Place a marker in the first stitch of each round.
Grass Base
Yarn: olive green — standard circular amigurumi math.
R1: 6 sc in MR (6)
R2: inc ×6 (12)
R3: (sc, inc) ×6 (18)
R4: (2 sc, inc) ×6 (24)
R5: (3 sc, inc) ×6 (30)
R6: (4 sc, inc) ×6 (36)
R7: (5 sc, inc) ×6 (42)
R8: BLO sc around (42)
R9: sc around (42)
Fasten off with a 50 cm tail.
Insert a plastic-canvas circle if a rigid display base is wanted.
House Body
Yarn: warm cream.
R1: 6 sc in MR (6)
R2: inc ×6 (12)
R3: (sc, inc) ×6 (18)
R4: (2 sc, inc) ×6 (24)
R5: (3 sc, inc) ×6 (30)
R6: (4 sc, inc) ×6 (36)
R7: (5 sc, inc) ×6 (42)
R8: BLO sc around (42)
R9–R25: sc around (42)
R26: (5 sc, dec) ×6 (36)
R27–R29: sc around (36)
Stuff moderately. Keep the sides cylindrical rather than spherical.
Fasten off with a long tail.
Red Mushroom Roof
Yarn: strawberry red.
R1: 6 sc in MR (6)
R2: inc ×6 (12)
R3: (sc, inc) ×6 (18)
R4: (2 sc, inc) ×6 (24)
R5: (3 sc, inc) ×6 (30)
R6: (4 sc, inc) ×6 (36)
R7: (5 sc, inc) ×6 (42)
R8–R12: sc around (42)
R13: (5 sc, dec) ×6 (36)
R14: sc around (36)
R15: (4 sc, dec) ×6 (30)
Stuff the upper dome lightly.
For the projected lower edge:
R16: FLO inc around (60)
R17–R18: sc around (60)
Fasten off.
The roof should overhang the cream body by approximately 2–3 cm on all visible sides.
White Roof Spots — Make 9–11
Yarn: white. Make a mixture of two sizes.
Small:
R1: 6 sc in MR (6)
Fasten off.
Large:
R1: 6 sc in MR (6)
R2: inc ×6 (12)
Fasten off.
Sew the circles onto the stuffed red roof after final shaping so their spacing remains balanced.
Chimney
Start with cream.
R1: 6 sc in MR (6)
R2: inc ×6 (12)
R3–R8: sc around (12)
Change to brown.
R9: (sc, inc) ×6 (18)
R10–R11: sc around (18)
Fasten off with a 25 cm tail.
Stuff lightly and sew to the rear-right roof area.
Front Door
Yarn: medium brown. Work flat.
Ch 13.
Row 1: sc in second ch and across (12)
Rows 2–15: ch 1, turn, sc across (12)
Begin arch:
Row 16: dec, 8 sc, dec (10)
Row 17: dec, 6 sc, dec (8)
Row 18: dec, 4 sc, dec (6)
Row 19: dec, 2 sc, dec (4)
Fasten off.
Surface-crochet vertical brown lines if a plank effect is wanted.
Door Trim
Yarn: tan.
Join at one lower corner of the door.
Sc evenly up the side, around the arch and down the opposite side.
Do not edge the bottom.
Fasten off with a long sewing tail.
Round Door Window
Yarn: dark brown.
R1: 6 sc in MR (6)
R2: inc ×6 (12)
Change to tan.
R3: sc around (12)
Fasten off.
Embroider one vertical and one horizontal tan bar across the center.
Arched Windows — Make 2
Yarn: dark brown. Work flat.
Ch 9.
Row 1: sc in second ch and across (8)
Rows 2–7: ch 1, turn, sc across (8)
Row 8: dec, 4 sc, dec (6)
Row 9: dec, 2 sc, dec (4)
Fasten off.
Window Trim — Make 2
Yarn: tan.
Join at one lower window corner.
Sc along both straight sides and around the rounded top.
Fasten off.
Embroider or surface-crochet one vertical and one horizontal tan divider across each dark window.
Window Flower Boxes — Make 2
Yarn: brown.
Ch 11.
Row 1: sc in second ch and across (10)
Rows 2–3: ch 1, turn, sc across (10)
Fasten off with a sewing tail.
Curve the lower edge slightly while attaching below each window.
Mini Pink Flowers — Make 9–12
Yarn: pink with a cream or yellow center.
R1: 6 sc in MR (6)
In each stitch work:
(sl st, ch 2, hdc, ch 2, sl st)
Repeat around.
Fasten off.
Climbing Vines
Yarn: olive green.
Ch 25–40 depending on placement.
Sl st back through the full chain.
Make three or four vine cords.
Pin them in loose curves around the door and windows before sewing.
Small Vine Leaves — Make 12–16
Yarn: green.
Ch 5.
Starting in second ch:
sc, hdc, dc, 3 sc in final ch; work back along opposite side with dc, hdc, sc.
Fasten off.
Front Steps — Make 3
Yarn: tan.
Large step:
Ch 15. Work 3 rows sc.
Medium step:
Ch 12. Work 3 rows sc.
Small step:
Ch 9. Work 3 rows sc.
Fasten off each piece and lightly stuff or fold double before sewing.
Foundation Stones — Make 10–14
Use mixed tan and brown yarn.
R1: 6 sc in MR (6)
R2: inc ×6 (12)
Fasten off.
Fold or cup individual circles slightly while sewing them around the lower wall.
Large Side Mushroom
Stem: cream.
R1: 6 sc in MR (6)
R2: inc ×6 (12)
R3–R7: sc around (12)
Stuff lightly and fasten off.
Cap, red:
R1: 6 sc in MR (6)
R2: inc ×6 (12)
R3: (sc, inc) ×6 (18)
R4: sc around (18)
R5: (sc, dec) ×6 (12)
Stuff lightly. Attach to stem and add several small white embroidered spots.
Small Mushrooms — Make 2
Stem: cream.
R1: 6 sc in MR (6)
R2–R5: sc around (6)
Cap, red:
R1: 6 sc in MR (6)
R2: inc ×6 (12)
R3: sc around (12)
R4: dec ×6 (6)
Stuff minimally and assemble.
Assembly
- Sew the cream house body centrally to the green base and verify that the wall remains vertical when viewed from the front.
- Attach the brown arched door to the front wall, then sew its tan trim and circular divided window in place.
- Position the two arched windows at different heights, add their tan outlines and sew a brown flower box under each one.
- Arrange the green vine cords around the door and windows, then attach the miniature leaves and pink flowers along those curves.
- Sew the tan and brown foundation stones around the lower cream wall, leaving the front center clear for the entrance steps.
- Stack and attach the three steps from widest at the top to narrowest at the front edge of the grass base.
- Place the three small mushrooms around the outside of the cottage, keeping one taller mushroom on the right and two grouped on the left.
- Set the stuffed red roof over the house, center its overhang, and sew around the upper cream wall with hidden stitches.
- Attach the nine to eleven white roof spots and sew the chimney into the rear section of the red cap.
- Check the cottage on a flat surface, reshape the roof edge, straighten the steps and add any final flowers or leaves needed to balance the front elevation.
The completed house should sit level on the grass base with the red roof projecting evenly beyond the cream walls.
7 Technical Tips
- Wall bulging: Packing too much stuffing into the 42-stitch cylinder makes the door edges lift. Keep the wall diameter within about 1 cm of its unstuffed blocked measurement.
- Roof tilt: A roof attached more than one round higher on one side creates an obvious slope. Mark four quarter points on both the roof and house before sewing.
- Spot crowding: White circles placed closer than about 2 cm merge visually from a distance. Pin all roof spots before attaching any permanently.
- Window distortion: Pulling the tan edging too tightly bends the arched window into a cup. The trim should lie flat against the wall before sewing.
- Step collapse: Single-layer steps can curl under the weight of the cottage. Fold each rectangle double or insert a narrow piece of plastic canvas.
- Chimney leaning: A single ring of stitches allows the tube to rotate. Sew through at least 10–12 roof stitches around its base.
- Base warping: Dense wall and stone attachments can pull the green circle upward. Add a plastic-canvas insert approximately 5 mm smaller than the finished base diameter.
Shaping the Mushroom Roof
The roof needs two different profiles at once: a rounded crown and a comparatively flat projecting edge. The first seven rounds build the dome to 42 stitches, while later decreases pull the underside inward.
The final front-loop increase creates the red eave. That change matters because a roof with the same diameter from crown to lower edge resembles a cylinder rather than a toadstool cap.
Stuff only the upper portion. Packing fiberfill into the projecting edge makes it thick and rigid, while the supplied image shows a flatter rolled perimeter.
Building a Straight Cottage Body
The cream wall is deliberately simpler than the roof. After increasing to 42 stitches, most rounds remain unchanged so doors, windows and vines have a stable surface.
Keep stuffing even and moderate. Insert small pieces around the circumference instead of forcing one large wad into the center.
If the house is intended only for display, a cylinder of flexible plastic canvas placed inside the wall can help preserve the vertical profile.
Constructing the Door and Windows
The door and windows repeat the same arched geometry at different scales. Flat rectangles form their lower sections, then paired decreases create the curved tops.
Sew the dark panels down before adding tan edging. Attaching the trim first makes it harder to keep the outline symmetrical.
The door’s circular upper window and the crossbars in both side windows add enough contrast to remain visible against the brown interiors.
Placing the Flowers and Vines
Surface decoration should follow the architecture rather than cover it. Keep the strongest vine beside the door, then send lighter branches toward the window boxes.
The pink flowers work best in small groups of two or three. Sewing every blossom at the same distance produces a mechanical line instead of the irregular garden effect visible in the image.
Leave some cream wall exposed between leaves. The neutral background helps separate the red roof from the detailed lower section.
Choosing Yarn and Hook Size
Published mushroom houses use a wide material range. Alexandra Razinkova’s 27 cm house uses sport yarn with a 1.75 mm hook, while Elisa Sartori’s approximately 18 cm Aran house uses a 3.75 mm hook. A DK Ravelry house uses 4.5 mm, and a Ribblr super-bulky version uses 5 mm.
A 3.75 mm hook with worsted or Aran cotton blend gives the photograph’s firm architectural stitch texture without making the house extremely small.
If stuffing shows between stitches, move down 0.5 mm before altering the stitch counts.
Planning Yarn Quantity
One detailed published sport-weight Mushroom House lists approximately 250–300 m of yarn. The image here includes a larger roof, landscaped base and more appliqués, so total consumption will be higher.
Crochet and weigh the cream body first. It is the most reliable component for estimating scale because nearly every other piece is smaller.
Buy extra red yarn for the overhanging roof. The expanded lower edge uses considerably more yarn per round than the 42-stitch crown.
Creating the Miniature Mushrooms
The three satellite mushrooms keep the base from looking empty and repeat the red-and-white roof palette at a smaller scale.
Keep their stems short. A side mushroom more than roughly half the house-door height begins to compete with the cottage itself.
Attach the stems firmly to the grass base before adding the caps. This gives better access to the lowest joining stitches.
Finishing Checks
Set the cottage at eye level and examine the front door first. Its vertical centerline should align approximately with the center of the roof.
Check both windows next. Their lower flower boxes should sit level even though the windows themselves may be positioned at different heights.
View the roof from above and correct any large empty area between white spots.
Inspect the green base last. All three mushrooms, the steps and the cottage wall should contact the surface without lifting its outer edge.
Conclusion
Crochet the 42-stitch house body and red roof before making the architectural details, then test their proportions together. Record the wall height, roof diameter and door width so the crochet mushroom house pattern can be reproduced at the same scale. Pin the windows, vines and steps before sewing because small alignment errors become obvious on a cylindrical wall. Photograph the finished cottage from the front and from above, save it to Pinterest and share it on Instagram with #FlowerMushroomHouse. The next practical step is checking the roof overhang before adding its white spots. Would you keep the cap strawberry red or make a second cottage with a dusty-pink roof?
Sources
- Alexandra Razinkova / Ravelry — detailed sport-weight Mushroom House, 27 cm high × 15 cm wide, 1.75 mm hook and 250–300 m listed yardage.
- Elisa Sartori / Ravelry — beginner Mushroom House, approximately 18 cm tall, Aran yarn, 3.75 mm hook and 20 sc × 20 rows per 10 cm gauge.
- Jennine Schuster / Ravelry — free DK Mushroom House, approximately 15 cm tall with a 4.5 mm hook.
- HunniLoops / Ribblr — intermediate super-bulky Mushroom House using a 5 mm hook.
- Natalina Craft / Ravelry — free Mushroom Dollhouse published in 2025.
- Etsy — current mushroom-house crochet category with hundreds of competing cottage, fairy-house and toadstool patterns.









