Introduction
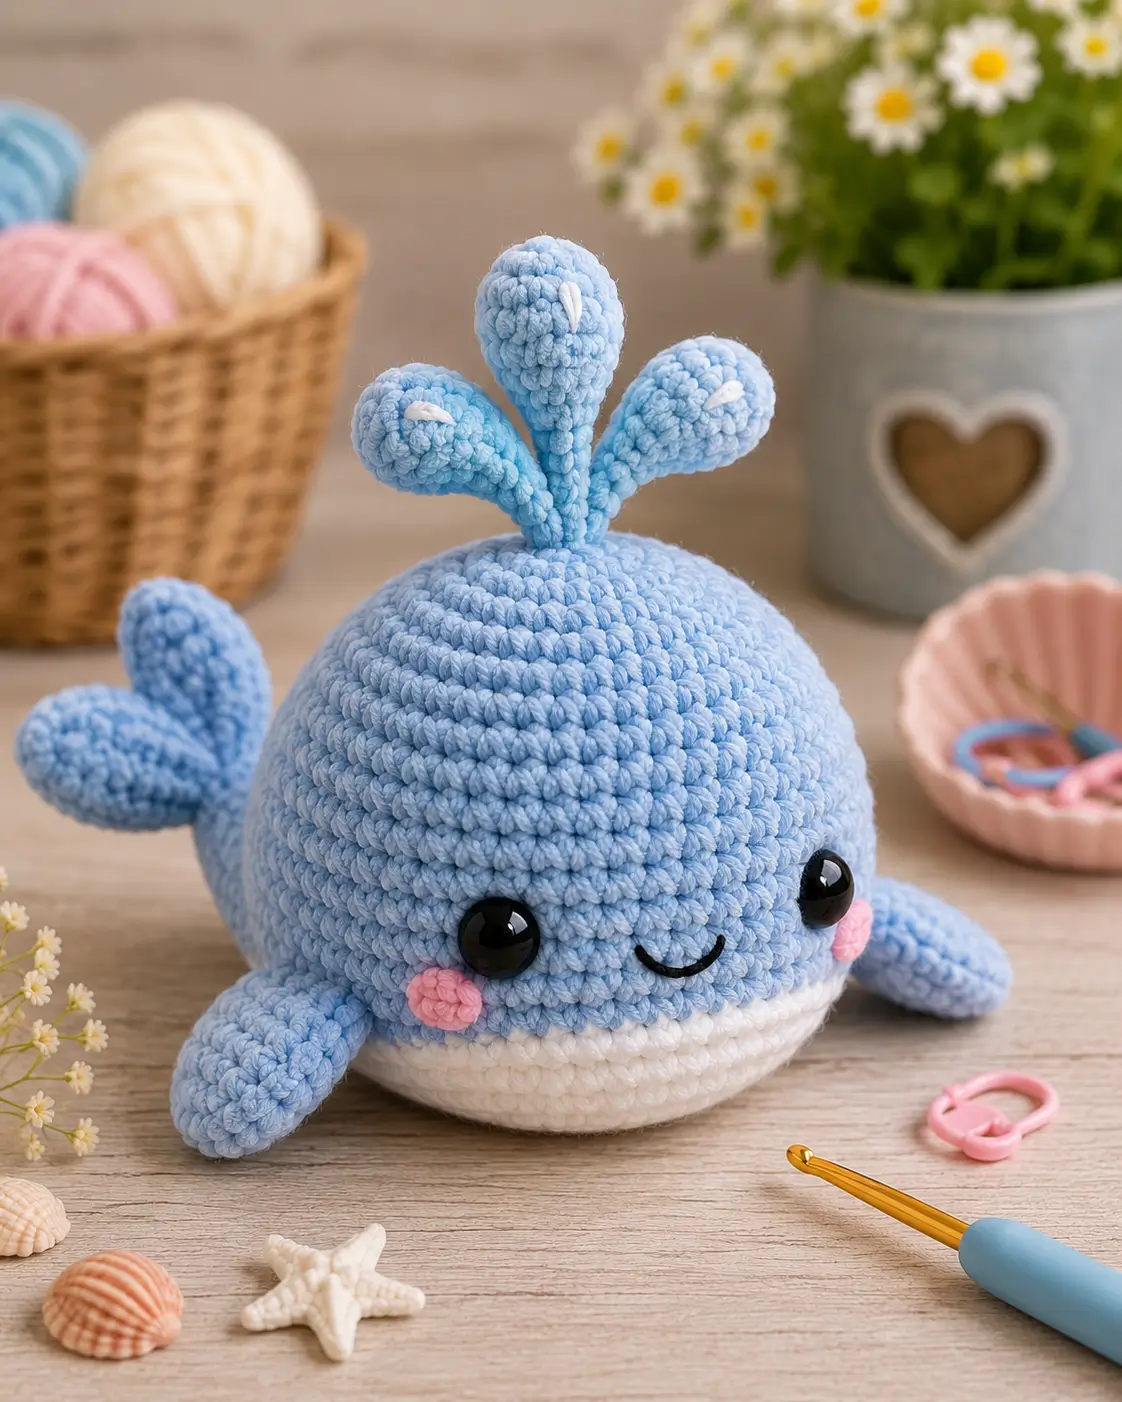
A whale’s belly line has to stay horizontal while forty-two body stitches curve into a nearly spherical head. This whale amigurumi crochet pattern uses worsted yarn, a 3.5 mm hook and 16 mm safety eyes for a finished whale approximately 22–26 cm long. The construction includes an integrated white belly, two fins, a split tail and a three-part water spout for a recognizable ocean-animal silhouette.
The Design: What Makes This Whale Different
The whale is built around one oversized body instead of a separate head and torso. That decision keeps the forehead broad and lets the face sit directly above the white belly line. A 42-stitch plateau provides the circumference required for large eyes and widely spaced cheeks without making the body excessively tall. The blue whale amigurumi also uses substantial side fins rather than tiny decorative flippers, which stabilizes the silhouette when the toy is placed on a table. At the rear, two independent flukes form the tail. The water spout is another structural feature: three crocheted droplets converge at the top center of the body instead of being embroidered flat. A common whale-making error is placing the tail on the body center rather than slightly above it, causing the finished animal to appear nose-down when viewed from the side.
Project Information at a Glance
| Skill Level | Time | Finished Size | Hook | Best For |
|---|---|---|---|---|
| Intermediate | 5–7 hours | Approx. 22–26 cm long | 3.5 mm | Ocean-themed decor, display toys and age-appropriate gifts |
Published whale patterns vary from tiny 4 cm cotton pieces to approximately 26 cm toys. A 15 cm Bailey Blue Whale uses worsted yarn, a 3.5 mm hook and 10 mm eyes, while larger patterns move into thicker yarn or larger hooks. This project keeps the smooth worsted texture but expands the body to a 42-stitch plateau for the fuller form visible in the photograph.
Materials and Tools
Yarn
- Powder blue — worsted/Aran cotton or cotton-acrylic blend — approximately 100–120 g — body, fins, tail and water spout
- White — matching worsted yarn — approximately 25–35 g — belly
- Blush pink — matching yarn — approximately 5 g — cheek patches
- Black embroidery thread or thin yarn — small amount — smile
- White embroidery yarn — scrap amount — spout highlights
Tools
- 3.5 mm crochet hook
- 16 mm black safety eyes ×2
- Polyester fiberfill
- Large-eye yarn needle
- Long embroidery needle
- Locking stitch marker
- Sharp scissors
If the finished whale is intended for a child under three, replace plastic safety eyes with securely embroidered eyes.
Abbreviations
- MR — magic ring
- sc — single crochet
- inc — 2 sc in one stitch
- dec — single-crochet decrease
- sl st — slip stitch
- ch — chain
- BLO — back loop only
- FO — fasten off
For an invisible decrease, work through the front loops of the following two stitches before completing one single crochet.
Pattern — Step by Step
Work stuffed pieces in continuous spirals unless another method is stated. Move a stitch marker at the end of every round.
Main Body and Head
Start with powder blue.
R1: 6 sc in MR (6)
R2: inc ×6 (12)
R3: (sc, inc) ×6 (18)
R4: (2 sc, inc) ×6 (24)
R5: (3 sc, inc) ×6 (30)
R6: (4 sc, inc) ×6 (36)
R7: (5 sc, inc) ×6 (42)
R8: sc around (42)
R9: sc around (42)
R10: sc around (42)
R11: sc around (42)
R12: sc around (42)
R13: sc around (42)
R14: sc around (42)
R15: sc around (42)
Install the 16 mm safety eyes between R11 and R12. Leave approximately 9–10 visible stitches between the posts. Attach both eyes only after checking their height from directly in front.
R16: sc around (42)
R17: sc around (42)
Begin the white belly color section. The change should sit on the lower third of the body rather than passing through the eye line.
White Belly Section
The belly is worked as partial white sections while the upper stitches remain blue.
R18: 13 sc blue, change to white, 16 sc white, change to blue, 13 sc blue (42)
R19: 11 sc blue, 20 sc white, 11 sc blue (42)
R20: 10 sc blue, 22 sc white, 10 sc blue (42)
R21: 10 sc blue, 22 sc white, 10 sc blue (42)
R22: 11 sc blue, 20 sc white, 11 sc blue (42)
Keep all color changes aligned on both sides. Carry unused yarn loosely across the inside or cut and rejoin if your carried strand begins shortening the fabric.
R23: 13 sc blue, 16 sc white, 13 sc blue (42)
Return completely to blue.
R24: (5 sc, dec) ×6 (36)
R25: sc around (36)
R26: (4 sc, dec) ×6 (30)
R27: sc around (30)
Stuff the front and lower body firmly. Keep the white belly smooth rather than packing a dense lump directly behind it.
R28: (3 sc, dec) ×6 (24)
R29: sc around (24)
R30: (2 sc, dec) ×6 (18)
Add the final stuffing.
R31: (sc, dec) ×6 (12)
R32: dec ×6 (6)
Fasten off and close the remaining six stitches.
Left Side Fin
Yarn: powder blue.
R1: 6 sc in MR (6)
R2: inc ×6 (12)
R3: (sc, inc) ×6 (18)
R4: sc around (18)
R5: sc around (18)
R6: (sc, dec) ×6 (12)
R7: sc around (12)
Do not stuff heavily. Add only enough fiberfill to round the outer end.
Flatten the opening and work 6 sc through both layers.
Fasten off. Leave a 30 cm sewing tail.
Right Side Fin
Repeat the left fin.
Before attaching either fin, compare their flattened lengths. A difference larger than approximately 5 mm will be visible from the front.
Left Tail Fluke
Yarn: powder blue.
R1: 6 sc in MR (6)
R2: inc ×6 (12)
R3: (sc, inc) ×6 (18)
R4: sc around (18)
R5: sc around (18)
R6: (sc, dec) ×6 (12)
R7: sc around (12)
Stuff only the outer rounded section.
Flatten and work 6 sc through both layers.
Fasten off with a 25 cm tail.
Right Tail Fluke
Repeat the left tail fluke.
Tail Center
Yarn: powder blue.
R1: 6 sc in MR (6)
R2: inc ×6 (12)
R3: sc around (12)
R4: sc around (12)
R5: sc around (12)
Stuff lightly.
Fasten off with a 30 cm tail.
Center Water Spout
Yarn: powder blue.
R1: 6 sc in MR (6)
R2: inc ×6 (12)
R3: (sc, inc) ×6 (18)
R4: sc around (18)
R5: (sc, dec) ×6 (12)
R6: dec ×6 (6)
R7: sc around (6)
R8: sc around (6)
R9: sc around (6)
R10: sc around (6)
R11: sc around (6)
Stuff the rounded upper section firmly but leave the last three narrow rounds only lightly filled.
Fasten off with a 25 cm sewing tail.
Side Water Spout — Make 2
Yarn: powder blue.
R1: 6 sc in MR (6)
R2: inc ×6 (12)
R3: sc around (12)
R4: sc around (12)
R5: dec ×6 (6)
R6: sc around (6)
R7: sc around (6)
R8: sc around (6)
R9: sc around (6)
Stuff the broad end lightly.
Fasten off with a 25 cm tail.
Spout Highlights — Make 3
White embroidery yarn.
On the broad face of each water droplet, embroider one short tapered vertical mark approximately 8–12 mm long.
Secure all white ends inside the droplet before attachment.
Cheek Patches — Make 2
Yarn: blush pink.
R1: 6 sc in MR (6)
R2: inc ×6 (12)
Join with sl st.
Fasten off with a 15 cm sewing tail.
Do not stuff.
Embroidered Smile
Black embroidery thread.
Mark a center point approximately one round below and midway between the eyes.
Embroider a shallow U-shaped smile approximately 3–3.5 cm wide.
Anchor the center one stitch below both ends to preserve the upward curve.
Assembly
- Position both cheek patches approximately one round below the eyes and 1–1.5 cm outside the ends of the planned smile.
- Embroider the black smile between the cheeks and compare both sides of the curve before hiding the thread ends.
- Pin the two side fins around the lower side quarters of the body so their outer tips touch the table when the whale rests naturally.
- Sew each fin along its complete six-stitch flattened base, adding a second pass if the piece rotates under light pressure.
- Join the two tail flukes to opposite sides of the short center-tail piece, angling them upward into a shallow V.
- Pin the completed tail to the rear body slightly above its horizontal midpoint and sew around the full tail-center circumference.
- Position the tall center water spout on the upper body directly above the facial center line.
- Attach one shorter spout on each side of the center piece, angling their rounded ends outward by approximately 30–40 degrees.
- Set the whale on a flat table and adjust the fins, tail and spout so no component causes the body to roll noticeably to one side.
- Weave all remaining tails through several internal stitches, trim them, and redistribute stuffing by hand where the body surface appears uneven.
The finished whale should rest on its broad white belly with both fins visible, the split tail raised behind the body and all three water droplets standing above the crown.
7 Technical Tips
- Belly-line drift: A color change moved by even two stitches creates a visibly slanted white underside. Mark both side transition points before beginning R18 and count the blue sections separately.
- Eye asymmetry: A one-round height difference is obvious with 16 mm safety eyes. Insert both posts between R11 and R12 before installing either washer.
- Body flattening: Packing one dense mass of stuffing behind the face produces a flat front. Add fiberfill in pieces roughly walnut-size and distribute them around the inner circumference.
- Fin rotation: Sewing through fewer than about 5 cm of flattened fin base lets the flipper turn downward. Catch every stitch across the six-stitch closure during attachment.
- Tail sagging: Heavy stuffing in both flukes can pull the tail downward. Fill only the rounded outer halves and keep the bases nearly flat.
- Spout collapse: An unstuffed 6-stitch stem folds where it meets the body. Add a narrow strand of fiberfill through the lowest 1–2 cm without making the stem rigid.
- Visible decrease holes: Normal two-stitch decreases can open gaps along the rear taper. Use front-loop invisible decreases from R24 through R32 and keep loose fiberfill away from the active round.
Controlling the 42-Stitch Whale Body
The body is the main structural challenge because it performs the work of both head and torso. Seven increase rounds create a 42-stitch circumference. That is larger than the 36-stitch plateau used in several compact whale tutorials, but the additional six stitches support the broad forehead and larger facial spacing visible in this version.
Eight nearly even rounds follow the final increase. They create enough height to keep the shape spherical rather than disk-like.
Do not begin decreasing immediately behind the eyes. The whale needs several rounds of full circumference so the fins and white belly can sit beneath a rounded side wall.
Making a Horizontal White Belly
The white underside is integrated into the main body instead of being sewn on as a separate oval. That keeps the transition line smooth and prevents a raised appliqué edge under the face.
Increase the number of white stitches from 16 to 22, hold that width briefly, then reduce it symmetrically. The resulting white section curves naturally around the lower body.
Count each blue section independently at every color-change round. If one side gains a stitch and the other loses one, the belly gradually rotates around the body.
Choosing Yarn, Hook and Finished Scale
Published whale patterns cover a broad range. Moon Loops Crochet lists a 4 × 2 cm whale using fine cotton, a 2.5 mm hook and 5 mm eyes. Bailey the Blue Whale measures about 15 cm long with worsted yarn, a 3.5 mm hook and 10 mm eyes. Larger current patterns reach roughly 26 cm.
The photographed whale sits near the larger end of that range, so a 3.5 mm hook with worsted cotton or cotton-acrylic yarn is a suitable starting specification.
If your 42-stitch test circumference feels stiff, move to a 4 mm hook. If stuffing shows through, move back to 3.25–3.5 mm rather than reducing the stuffing density.
Placing the Side Fins
The fins should project forward and downward. Positioning them too far toward the rear makes the whale resemble a fish with lateral fins rather than the rounded character in the photograph.
Pin both pieces before sewing either one. Compare the distance from each fin base to its corresponding eye.
The tips can touch the table lightly, but they should not carry enough weight to lift the white belly off the surface.
Building the Split Tail
The tail is formed from two flattened rounded pieces connected through a short center section. Separate flukes make it easier to control the V angle than one large figure-eight piece.
Keep the inner bases comparatively flat. The outer sections may contain light stuffing for dimension.
Mount the center section slightly above the body’s rear midpoint. The tail then reads as an upward-sweeping whale fluke instead of a pair of horizontal feet.
Constructing the Three-Part Water Spout
The spout is the strongest photo-specific feature. One central droplet stands taller than the two outer droplets, producing a three-way fountain shape.
All three pieces begin as small stuffed spheres or ovals, then narrow to six-stitch stems. The center component uses the largest 18-stitch rounded section.
Attach the middle spout first. The two shorter pieces can then be positioned relative to it rather than estimated independently.
Add the small white highlights before sewing the droplets to the body. Embroidery is much harder to control after the stems are fixed in place.
Planning Yarn Quantity
A small DK cotton whale documented on Ravelry uses approximately 26 g of blue yarn plus small accent quantities. The photo-matched whale is substantially larger and uses a heavier yarn, so budgeting 100–120 g of blue provides practical working room.
White consumption remains comparatively low because the color appears only across the lower body. Approximately 25–35 g is sufficient for this scale under ordinary worsted-yardage ranges.
Make the main body before cutting yarn for the appendages. Weigh the remaining blue skein afterward; the body represents most of the project consumption.
Competition and Design Position
Current whale-pattern competition includes very small no-sew whales, compact keychain forms and super-bulky blanket-yarn designs. Several patterns combine fins and tail directly with the body to reduce sewing.
This whale amigurumi crochet pattern takes a different approach. Larger separately worked fins create cleaner oval forms, while the assembled three-piece water spout gives the crown more dimension than a chain loop or embroidered splash.
The integrated white belly also distinguishes it from single-color whales. Powder blue, white and pink keep the palette close to the photographed version without adding complex stitches.
Finishing Checks
Set the whale on a level table before hiding the final yarn tails. The white belly should contact the surface evenly rather than rocking from front to rear.
Check the face next. Both eye centers should sit at the same height, the cheeks should remain below them, and the smile should occupy the midpoint between both pink circles.
Look from above. The fins should project at comparable angles and the center spout should line up with the midpoint of the face.
Inspect the tail from the rear. The two flukes should rise to similar heights and maintain a clear V-shaped gap between their upper edges.
Conclusion
Crochet the main body through the 42-stitch plateau before making the smaller components, then check the width against the intended 22–26 cm finished scale. Record body circumference, eye spacing and belly width so the same whale amigurumi crochet pattern can be reproduced with another yarn. After final assembly, photograph the whale from the front and rear to check fin and tail symmetry. Save the project to Pinterest and share it on Instagram with #BlueSpoutWhale. The next measurement to record is the distance between the water spout and eye line. Would you keep all three spout droplets blue, or add white tips to the next whale?
Sources
- Crafting Step by Step — 2026 beginner whale tutorial using super-bulky yarn, a 6.5 mm hook, 18 mm eyes and a 36-stitch body plateau.
- LoveCrafts / Loops and Love Crochet — Bailey the Blue Whale, approximately 15 cm long and 10 cm high with worsted yarn, 3.5 mm hook and 10 mm safety eyes.
- Ribblr / Moon Loops Crochet — 4 × 2 cm fine-cotton whale using a 2.5 mm hook and 5 mm safety eyes.
- Ravelry / Corinne Lloyd — DK cotton whale using approximately 26 g blue yarn, 5 g accent yarn, 6 mm eyes and a 2.5 mm hook.
- Ravelry / Samantha Yao — free whale amigurumi pattern with scalable yarn and hook options.
- Etsy / PlaymatePatterns — current larger whale pattern at approximately 26 cm using a 4 mm hook.
- JeanneChic — multiple free whale amigurumi patterns published in 2024.
- Little World of Whimsy — step-by-step no-sew whale tutorial using worsted yarn, 3.25 mm hook and 6 mm safety eyes.









