Introduction
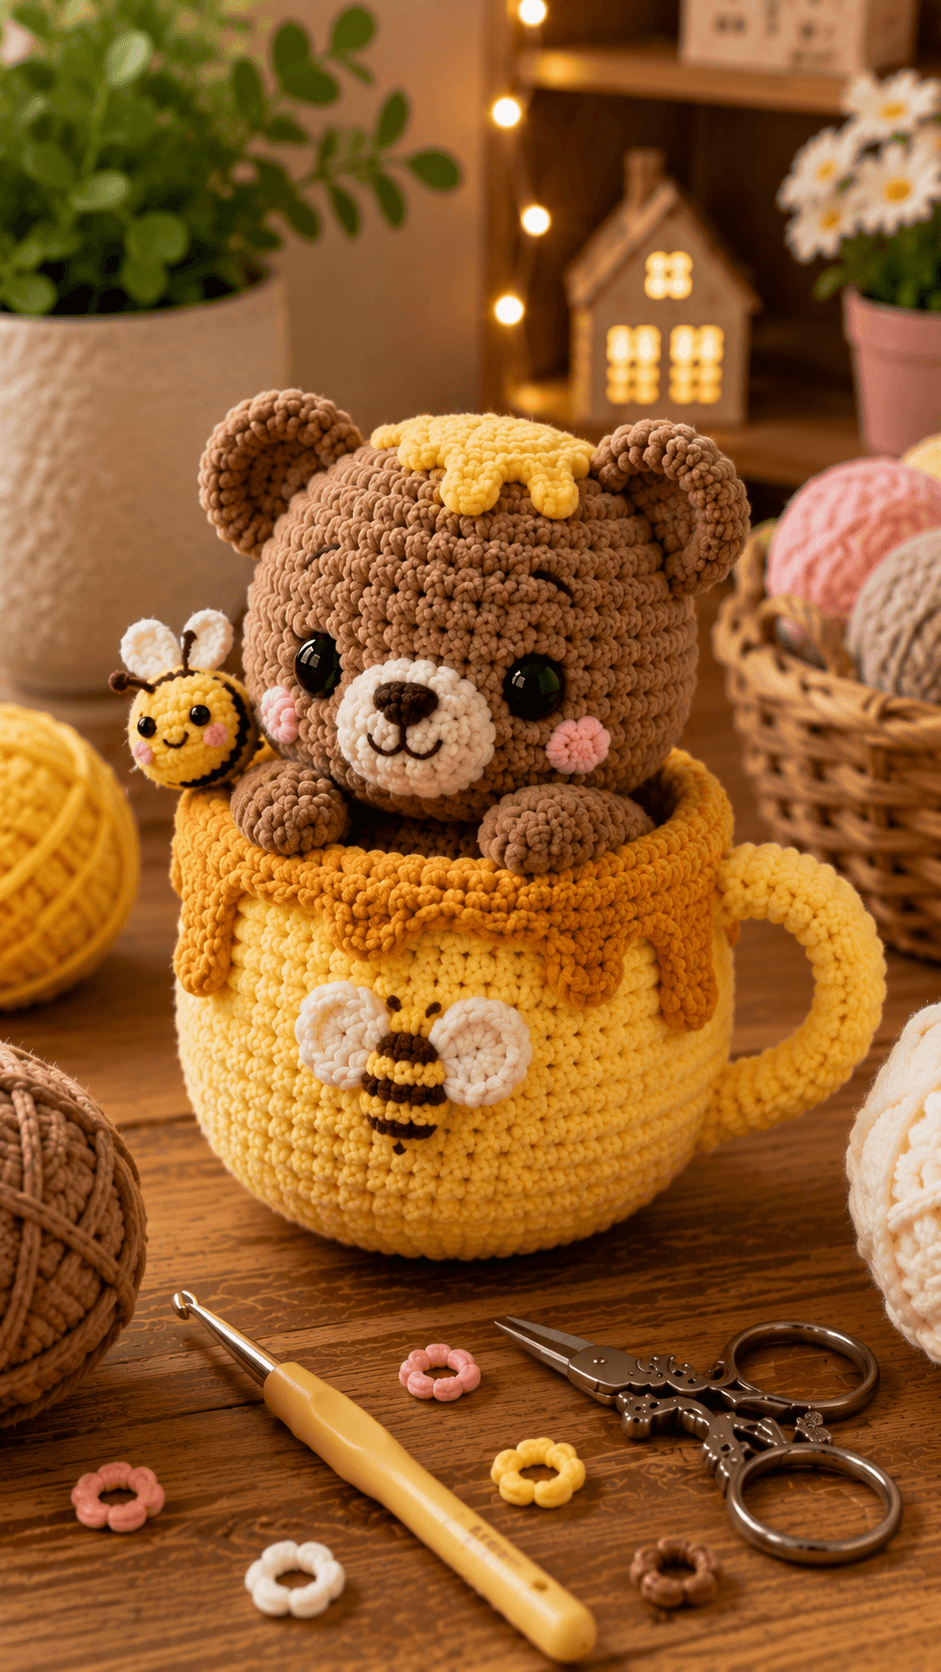
A bear sitting in a honey mug has to clear the rim with both paws while leaving enough face space for a projecting muzzle. This honey bear amigurumi crochet pattern uses chunky chenille, a 5 mm hook and 12 mm safety eyes. The finished display measures approximately 29–33 cm high and combines an intermediate teddy bear, structural mug, dripping honey trim and two bee details.
The Design: What Makes This Honey Bear Different
The bear uses a 36-stitch head rather than an oversized 42-stitch sphere because the ears, muzzle and cheeks already increase the visual width. Its body also reaches 36 stitches, creating enough structure to support the head while remaining mostly hidden inside the mug. Two forearms rest over the rim, which conceals the internal body-to-cup attachment. The muzzle is worked separately in cream so the dark-brown nose remains readable against the caramel face. A yellow honey patch is attached across the crown, while a darker golden drip layer folds over the mug edge. The crochet honey mug adds another structural requirement: its 60-stitch walls must resist collapsing around the bear. One common mistake is overstuffing the hidden body; a rigid torso pushes the paws outward and makes them look detached from the rim.
Project Information at a Glance
| Skill Level | Time | Finished Size | Hook | Best For |
|---|---|---|---|---|
| Intermediate | 14–18 hours | Approx. 29–33 cm complete display | 5.0 mm | Bee decor, nursery displays and handmade markets |
Materials and Tools
Yarn
- Caramel brown — bulky chenille — approximately 120–150 g — bear head, body, ears and paws
- Honey yellow — bulky chenille — approximately 130–160 g — mug and small bee
- Golden yellow — bulky chenille — approximately 40–50 g — honey drips and crown honey
- Cream — bulky or worsted yarn — approximately 35–45 g — bear muzzle and bee wings
- Dark brown — small amount — nose, bee stripes and antennae
- Black embroidery yarn — small amount — mouth and eyebrows
- Blush pink — small amount — bear cheeks and bee cheeks
Tools
- 5.0 mm crochet hook
- Two 12 mm black safety eyes for the bear
- Two 6 mm safety eyes for the small bee
- Polyester toy stuffing
- Large-eye yarn needle
- Locking stitch markers
- Dressmaking pins
- Scissors
- Optional flexible plastic canvas for mug reinforcement
Use a compact amigurumi tension throughout the stuffed parts. Work the mug slightly firmer than the bear because its walls support the complete upper assembly.
Abbreviations
- MR — magic ring
- sc — single crochet
- inc — two single crochet stitches in one stitch
- dec — decrease over two stitches
- sl st — slip stitch
- ch — chain
- hdc — half double crochet
- dc — double crochet
- BLO — back loop only
- FLO — front loop only
An invisible decrease is worked through the front loops of the following two stitches before completing both loops together as one single crochet.
Pattern — Step by Step
Work stuffed pieces in continuous spirals unless stated otherwise. Mark the first complete stitch of each round and check every bracketed count before continuing.
Bear Head
Yarn: caramel brown.
R1: 6 sc in MR (6)
R2: inc ×6 (12)
R3: (sc, inc) ×6 (18)
R4: (2 sc, inc) ×6 (24)
R5: (3 sc, inc) ×6 (30)
R6: (4 sc, inc) ×6 (36)
R7–R12: sc around (36)
R13: (4 sc, dec) ×6 (30)
Insert 12 mm safety eyes between R9 and R10, approximately seven visible stitches apart. Leave room between them for the cream muzzle.
R14: (3 sc, dec) ×6 (24)
R15: (2 sc, dec) ×6 (18)
R16: (sc, dec) ×6 (12)
R17: dec ×6 (6)
R18: sc around (6)
Stuff firmly after R13. Add small amounts around the eye washers before filling the crown.
Fasten off and close the remaining opening. Leave a 30 cm tail.
Bear Body
Yarn: caramel brown.
R1: 6 sc in MR (6)
R2: inc ×6 (12)
R3: (sc, inc) ×6 (18)
R4: (2 sc, inc) ×6 (24)
R5: (3 sc, inc) ×6 (30)
R6: (4 sc, inc) ×6 (36)
R7–R11: sc around (36)
R12: (4 sc, dec) ×6 (30)
R13: sc around (30)
R14: (3 sc, dec) ×6 (24)
R15: (2 sc, dec) ×6 (18)
R16: (sc, dec) ×6 (12)
R17: dec ×6 (6)
Stuff the lower half firmly and keep the upper section moderately filled. Most of the body remains inside the mug.
Fasten off and leave a 45 cm tail.
Bear Ears — Make Two
Yarn: caramel brown.
R1: 6 sc in MR (6)
R2: inc ×6 (12)
R3: (sc, inc) ×6 (18)
R4–R5: sc around (18)
Fasten off with a 30 cm sewing tail. Do not stuff.
Fold each circle slightly before sewing so the ear opening angles forward.
Cream Muzzle
Yarn: cream.
R1: 6 sc in MR (6)
R2: inc ×6 (12)
R3: (sc, inc) ×6 (18)
R4: sc around (18)
Fasten off with a 30 cm tail.
Add a small amount of stuffing only after three-quarters of the muzzle seam is attached.
Bear Nose
Yarn: dark brown.
R1: 6 sc in MR (6)
Fasten off with a 15 cm tail.
Flatten into a horizontal oval while sewing it to the upper center of the cream muzzle.
Bear Cheeks — Make Two
Yarn: blush pink.
R1: 6 sc in MR (6)
Fasten off with a 12 cm sewing tail.
Bear Arms — Make Two
Yarn: caramel brown.
R1: 6 sc in MR (6)
R2: inc ×6 (12)
R3: (sc, inc) ×6 (18)
R4–R6: sc around (18)
R7: (sc, dec) ×6 (12)
R8–R10: sc around (12)
R11: dec ×6 (6)
Stuff the paw section firmly. Leave the upper half lightly filled so it can bend over the mug rim.
Fasten off with a 30 cm sewing tail.
Honey Patch for Bear’s Head
Yarn: golden yellow.
Make three joined honey lobes.
Lobe 1:
R1: 6 sc in MR (6)
R2: inc ×6 (12)
R3: sc around (12)
Fasten off.
Lobe 2:
R1: 6 sc in MR (6)
R2: inc ×6 (12)
R3: sc around (12)
Fasten off.
Lobe 3:
R1: 6 sc in MR (6)
R2: inc ×6 (12)
R3: sc around (12)
Do not fasten off.
Flatten all three circles and overlap their edges into an irregular honey splash. Sew the overlapping sections together.
Add three short drips:
Drip A: ch 4, sl st back (3)
Drip B: ch 6, sl st back (5)
Drip C: ch 5, sl st back (4)
Fasten off with a long sewing tail.
Honey Mug Base and Wall
Yarn: honey yellow.
R1: 6 sc in MR (6)
R2: inc ×6 (12)
R3: (sc, inc) ×6 (18)
R4: (2 sc, inc) ×6 (24)
R5: (3 sc, inc) ×6 (30)
R6: (4 sc, inc) ×6 (36)
R7: (5 sc, inc) ×6 (42)
R8: (6 sc, inc) ×6 (48)
R9: (7 sc, inc) ×6 (54)
R10: (8 sc, inc) ×6 (60)
R11: BLO sc around (60)
R12–R22: sc around (60)
Place an optional plastic-canvas disk against the bottom after R11 if the chenille fabric compresses easily.
Do not fasten off.
Mug Rolled Rim
R23: FLO sc around (60)
R24: sc around (60)
Fasten off.
Fold R23–R24 slightly outward to form the thick rim visible around the bear.
Golden Honey Drip Border
Yarn: golden yellow.
Join to the mug directly beneath the top rim.
Work sc around, inserting eight drips at roughly equal intervals.
For short drips:
ch 4, starting in second ch work 3 sc, then return to the rim.
For medium drips:
ch 6, starting in second ch work 5 sc, then return to the rim.
For long drips:
ch 8, starting in second ch work 7 sc, then return to the rim.
Alternate short, medium and long drips irregularly so the border does not look mechanically repeated.
Mug Handle
Yarn: honey yellow.
Ch 36.
Row 1: starting in second ch from hook, sc across (35)
Row 2: ch 1, turn, sc across (35)
Row 3: ch 1, turn, sc across (35)
Fasten off with a 50 cm tail.
Fold the strip lengthwise and whipstitch the long edges together to create a thick cord.
Small Bee Body
Begin with honey yellow.
R1: 6 sc in MR (6)
R2: inc ×6 (12)
R3: (sc, inc) ×6 (18)
R4: sc around (18)
Change to dark brown.
R5: sc around (18)
Change to yellow.
R6: sc around (18)
Change to dark brown.
R7: sc around (18)
Change to yellow.
R8: sc around (18)
R9: (sc, dec) ×6 (12)
Insert 6 mm safety eyes between R3 and R4 before closing. Stuff lightly.
R10: dec ×6 (6)
Fasten off and close.
Small Bee Wings — Make Two
Yarn: cream.
R1: 6 sc in MR (6)
R2: inc ×6 (12)
Fasten off with a 15 cm tail. Flatten into an oval while attaching.
Small Bee Antennae — Make Two
Yarn: dark brown.
Ch 6.
Starting in second ch from hook, sl st back along the chain (5).
Fasten off.
Small Bee Cheeks — Make Two
Yarn: blush pink.
R1: 6 sc in MR (6)
Fasten off and flatten while sewing.
Bee Appliqué for Mug
Begin with yellow.
R1: 6 sc in MR (6)
R2: inc ×6 (12)
R3: (sc, inc) ×6 (18)
Flatten into an oval.
Embroider three horizontal dark-brown stripes across the lower half.
Bee Appliqué Wings — Make Two
Yarn: cream.
R1: 6 sc in MR (6)
R2: inc ×6 (12)
Fasten off.
Flatten each circle into an elongated oval and attach behind the bee body.
Bee Appliqué Antennae
Embroider two short dark-brown lines above the bee body.
Add one small knot at each tip if a raised antenna end is wanted.
Assembly
- Sew the two rounded ears to opposite sides of the bear head, spreading each attachment across approximately 4–5 cm.
- Attach the cream muzzle centrally below the eyes, add the dark-brown nose, then embroider the short vertical nose line and curved mouth.
- Sew the pink cheek patches outside the muzzle and add two short black eyebrow curves above the eyes.
- Attach the head to the body and sew the golden honey patch across the crown with its three drip ends pointing toward the forehead.
- Position both arms high on the body. Rotate the paws inward and slightly downward so they can rest naturally across the mug rim.
- Place the bear inside the completed mug. Raise it until the paws overlap the rim by approximately 2–3 cm, then sew the hidden body to the mug base at four structural points.
- Attach the golden honey-drip border beneath the rim and curve the handle into a large C shape before sewing its ends across two broad mug attachment zones.
- Assemble the small bee by attaching both cream wings, antennae and pink cheeks. Sew or tack the bee beside the bear’s left paw so it appears to hover near the rim.
- Assemble the flat bee appliqué and sew it centrally to the front of the mug, keeping the wing edges free enough to remain dimensional.
- Set the finished project on a level surface and check bear height, paw symmetry, mug stability, handle curve and bee alignment before weaving in every structural tail.
The completed display should show the bear rising above the honey-drip rim with both paws supported, one small bee beside the bear and a second bee centered on the mug front.
7 Technical Tips
- Mug collapse: A 60-stitch wall that compresses inward by more than about 1 cm will not support the bear cleanly. Tighten mug tension or add a flexible base insert before assembly.
- Paw separation: Arms mounted more than approximately 2–3 cm above the rim can appear to float. Pin the bear inside the mug before permanently sewing either arm.
- Ear rotation: An 18-stitch ear attached through fewer than four head stitches can turn sideways. Spread each seam across approximately 4–5 cm.
- Muzzle distortion: Overfilling the 18-stitch muzzle pushes it into a round ball. Use only enough stuffing to raise it about 1.5–2 cm from the face.
- Honey-drip curling: Tight return stitches can twist a long drip sideways. Work the chains and return single crochets at identical relaxed tension.
- Handle sag: A handle anchored at one stitch per end will rotate under its own weight. Spread each attachment over at least 4 cm of mug wall.
- Bee wing folding: Wings sewn through the full outer edge lie flat against the body. Anchor only the inner third of each wing and leave the remaining edge free.
Shaping the Bear Head
The head reaches a 36-stitch plateau, matching the medium-scale proportions of the photographed bear. That circumference leaves enough area for the 12 mm eyes and separate muzzle while keeping the ears visually dominant.
Six rounds at maximum width build the forehead and cheeks. The reductions then close the lower head without creating a pointed chin.
Stuff around the eye washers first. Firm side walls help the ears maintain their placement after the head is mounted above the mug.
Building the Cream Muzzle
The muzzle provides the strongest contrast on the face. Keep its 18-stitch circle shallow and oval rather than heavily padded.
Pin it below the eye line before adding the nose. The top edge should sit close enough to the eyes that the face reads as a teddy bear rather than a long-snouted animal.
Sew the nose only after the muzzle position is fixed. A short vertical black line and two compact mouth curves complete the face without covering the cream stitches.
Positioning the Bear Inside the Mug
The bear should be fully assembled before it is permanently mounted. Place temporary stuffing beneath the hidden body and move it upward until both paws can rest on the rolled rim.
Mark four contact points inside the cup. Stitching the torso at four positions prevents it from rotating when the head or ears are handled.
Most of the body remains concealed. The visible composition depends on head, paws and upper chest rather than on a complete seated leg structure.
Constructing the Honey Mug
The mug begins as a flat circle and turns vertically through a back-loop round. That creates a defined bottom instead of a rounded amigurumi sphere.
Eleven straight wall rounds produce the deep vessel shown in the image. A folded top edge increases the visual thickness and provides a stable surface for the bear’s paws.
If the chenille is especially soft, reinforce only the lower mug. Stiffening the full wall can make the project look rigid rather than crocheted.
Making the Dripping Honey Border
The honey layer should not repeat at equal lengths. Realistic dripping is created by mixing short, medium and long chain extensions around the rim.
Keep the top honey line relatively narrow. The yellow mug needs to remain visible beneath it.
Pin the entire drip border before sewing if it is worked separately. Check that the longest drip does not cover the front bee appliqué.
Making the Crown Honey Patch
The honey on the bear’s head is constructed from overlapping rounded lobes rather than one perfect circle. This irregular outline is important because a symmetrical disk can read as a hat.
Sew the central overlap first, then shape the three drips individually across the forehead.
Keep the honey clear of the ear seams. Attaching it over an ear base would make later reshaping difficult.
Building the Mug Handle
A single chain is too narrow for the photographed handle. Three rows of single crochet produce a broad strip that can be folded into a rounded cord.
Shape the handle before sewing the upper attachment. The opening should remain large enough to be recognizable from the front three-quarter view.
Secure the lower end first, then move the top until the curve is smooth and free from twisting.
Making the Small Bee
The bee uses an 18-stitch maximum because it needs to remain clearly subordinate to the bear. Alternating yellow and dark-brown rounds creates the striped abdomen without sewing separate bands.
The cream wings stay flat and unstuffed. Place them high on the bee body so they remain visible when the bee sits beside the bear.
The pink cheek patches repeat the bear’s cheek color and visually connect the accessory to the main character.
Making the Mug Bee Appliqué
The second bee should be flatter than the hovering bee. Its 18-stitch body is compressed into an oval and sewn directly to the mug.
Embroidered stripes avoid adding unnecessary bulk. The cream wings can project slightly beyond the yellow body to make the motif readable against the similarly colored mug.
Center the appliqué only after the handle is attached. That allows the bee to be aligned to the true front of the finished mug.
Working with Chunky Chenille
Keep a stitch marker through both loops of the first stitch. Plush fibers can hide round transitions, especially across the 36-stitch bear sections and 60-stitch mug wall.
If stuffing becomes visible, reduce the hook to 4.5 mm rather than altering stitch counts. The overall geometry depends on the written round totals.
Pull yarn tails gently. Chenille cores can shed when aggressively tightened through small openings.
Adjusting the Finished Size
The same stitch geometry can be used with thinner yarn for a smaller display. Worsted yarn with an approximately 3–3.5 mm hook will reduce both the bear and mug while maintaining their proportions.
For a larger project, use thicker blanket yarn and scale the hook accordingly rather than adding extra increase rounds to the bear alone.
Make the mug after the bear when changing yarn. The bear’s actual width determines whether the 60-stitch vessel still provides enough clearance around the body.
Planning Yarn Quantities
The mug consumes more yellow yarn than any individual bear component because it combines a broad 60-stitch base, tall walls and a thick handle.
Reserve the golden-yellow quantity for the drip trim and crown patch before using leftovers for optional bee details.
The brown bear uses less yarn than a complete freestanding plush of the same head size because the hidden lower body does not require separate hind legs.
Balancing the Finished Display
The handle adds weight to one side, while the hovering bee adds a smaller visual mass on the opposite side. The bear must remain centered over the mug base rather than centered relative to the handle.
Test the empty mug first. If it tilts after the handle is attached, correct the handle seam before mounting the bear.
Once the bear is inside, place the display on a hard surface and rotate it through several angles. The bottom should remain fully in contact with the table.
Finishing Checks
View the bear directly from the front and compare both ear heights. The muzzle must remain centered beneath the eyes and the pink cheeks should sit at similar levels.
Check the mug from the side. Its wall should remain upright, the handle should form a smooth curve and the honey drips should hang downward without twisting.
Inspect both bees last. The hovering bee should remain smaller than the bear’s paw, while the front appliqué should stay centered and fully visible beneath the honey border.
Conclusion
Measure the completed display from the mug base to the highest ear and record the mug diameter separately before storing your project notes. Those measurements make the design easier to reproduce when changing chenille brands. Photograph the finished piece from the front and three-quarter side to check ear symmetry, paw placement, honey drips and handle balance. Save this honey bear amigurumi crochet pattern to Pinterest and share the finished project on Instagram with #HoneyMugBear. Reshape the crown honey patch and both bee wings before taking the final photograph. Would you keep the mug bright honey yellow or make the next bear sit inside a cream mug with golden drips?
Sources
- All About Ami — No-Sew Baby Bear: current bear size and chenille construction reference.
- A Little Love Everyday — Amigurumi Plush Bear: bulky chenille, 5 mm hook and 12 mm safety-eye reference.
- Amigurum.com — Crochet Plush Bear: approximately 26 cm finished bear with 4 mm hook and 12 mm safety eyes.
- Amigurum.com — Bear With Bee: 2024 free pattern using Dolphin Baby yarn, 4 mm hook and approximately 21 cm finished size.
- My Amigurumi Farm — Coffee Cup Amigurumi: current mug construction and handle-position reference.
- Repeat Crafter Me — Crochet Coffee/Cocoa Mug: chain-and-return handle construction reference.
- Etsy — current Honey Bear and Honey Bee Bear pattern categories used for competition analysis.
- Ravelry — current classic, miniature and no-sew bear pattern listings used for scale comparison.









