Introduction
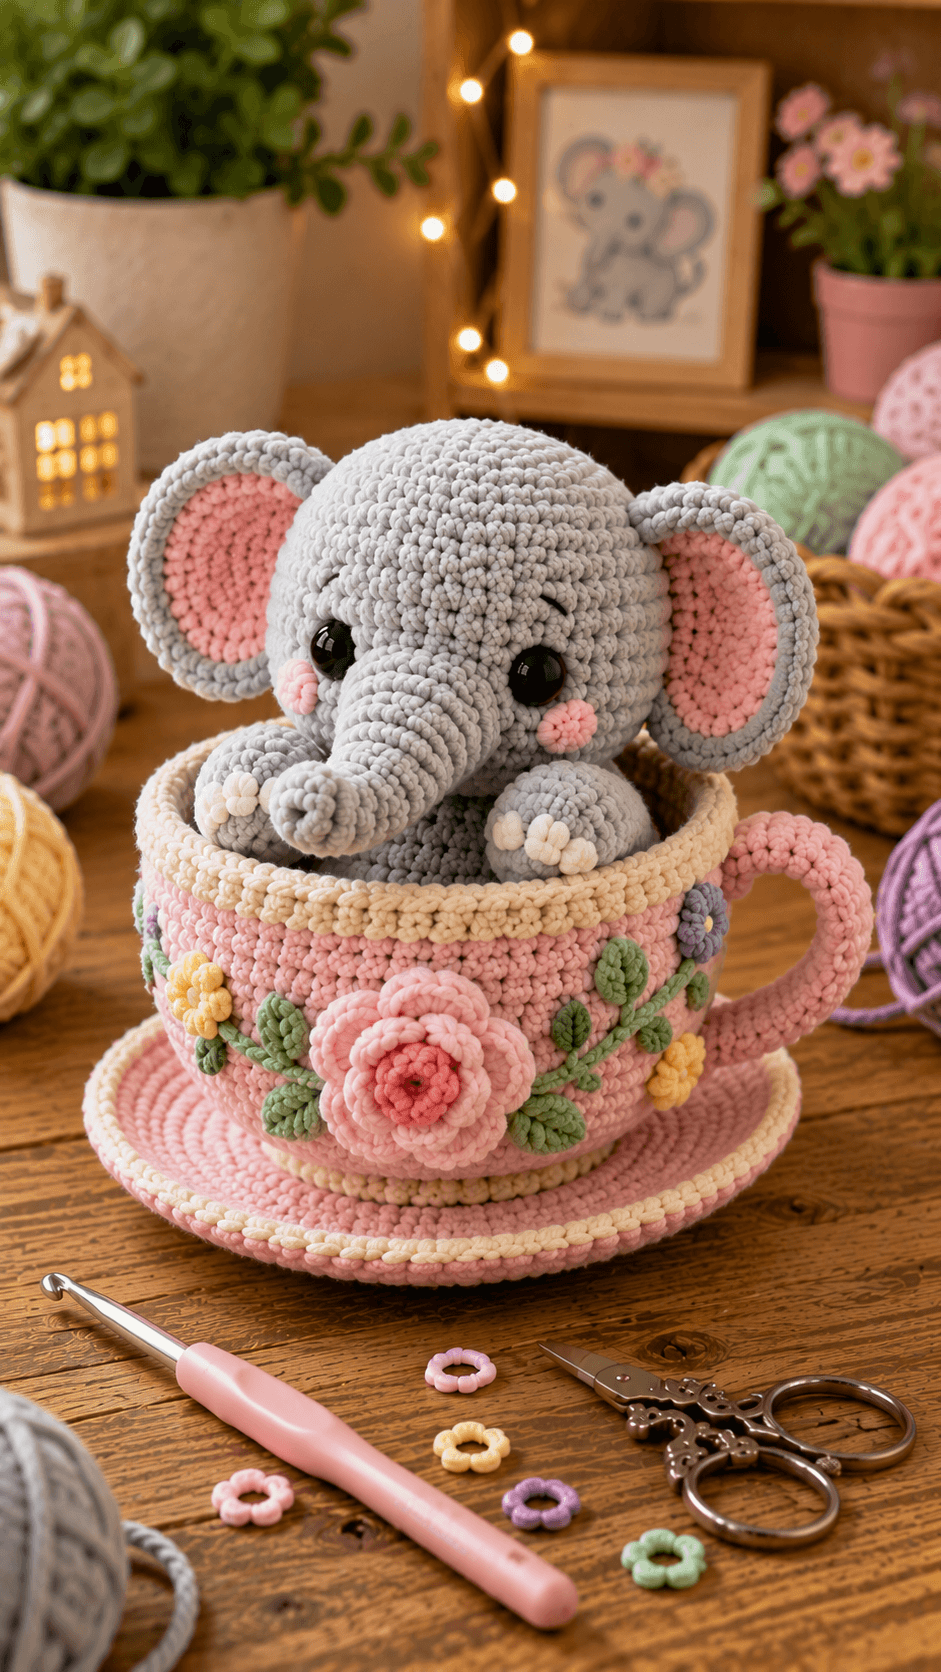
An elephant in a teacup has one structural problem before the trunk is even made: its ears must stay wider than the cup without making the entire display tip sideways. This elephant amigurumi crochet pattern uses chunky chenille, a 4.5 mm hook and 10–12 mm eyes. The finished floral display measures approximately 27–31 cm high and combines an intermediate elephant with a reinforced cup and saucer.
The Design: What Makes This Teacup Elephant Different
The elephant head expands to 42 stitches because the oversized ears and long trunk require a broad central face. A smaller 36-stitch body sits mostly below the teacup rim, so the visible head remains dominant. Each ear uses a gray outer panel and smaller pink inner panel; that two-layer construction keeps the pink surface recessed inside a defined gray border. The trunk starts narrow and gradually widens toward the face rather than hanging as a uniform tube. Two front paws rest across the cup opening, hiding part of the body seam and establishing depth. The floral teacup crochet section uses a 60-stitch wall, large curved handle and separate saucer. Raised roses, leaves and small flowers are sewn only after the cup holds its final shape. One common mistake is using a soft cup wall; the elephant’s head can pull an unsupported rim inward.
Project Information at a Glance
| Skill Level | Time | Finished Size | Hook | Best For |
|---|---|---|---|---|
| Intermediate | 15–19 hours | Approx. 27–31 cm high | 4.5 mm | Nursery display, floral decor and handmade markets |
Materials and Tools
Yarn
- Soft gray — chunky chenille — approximately 110–140 g — elephant head, body, trunk, ears and paws
- Dusty pink — chunky chenille — approximately 180–220 g — cup, saucer and handle
- Blush pink — matching yarn — approximately 20–25 g — inner ears, cheeks and large flower
- Cream — chunky or smooth bulky yarn — approximately 45–60 g — cup rim and saucer edging
- Sage green — bulky yarn — approximately 20–25 g — vines and leaves
- Yellow — yarn scrap — small flowers
- Lavender — yarn scrap — small flowers
- White — yarn scrap — elephant toenails
- Black embroidery yarn — small amount — eyebrows
Tools
- 4.5 mm crochet hook
- Two 10–12 mm black safety eyes
- Polyester toy stuffing
- Large-eye yarn needle
- Locking stitch markers
- Dressmaking pins
- Scissors
- Optional flexible plastic canvas for cup and saucer reinforcement
Use a compact amigurumi tension on the elephant and a slightly firmer tension on the cup. The cup has to resist the weight of the head, ears and paws instead of behaving like a soft basket.
Abbreviations
- MR — magic ring
- sc — single crochet
- inc — two single crochet stitches in one stitch
- dec — decrease over two stitches
- sl st — slip stitch
- ch — chain
- hdc — half double crochet
- dc — double crochet
- BLO — back loop only
- FLO — front loop only
An invisible decrease is made through the front loops of the following two stitches before those loops are completed together as one single crochet.
Pattern — Step by Step
Work stuffed pieces in continuous spirals unless a section states otherwise. Place a marker through the first complete stitch of every round and verify each bracketed total before moving on.
Elephant Head
Yarn: soft gray.
R1: 6 sc in MR (6)
R2: inc × 6 (12)
R3: (sc, inc) × 6 (18)
R4: (2 sc, inc) × 6 (24)
R5: (3 sc, inc) × 6 (30)
R6: (4 sc, inc) × 6 (36)
R7: (5 sc, inc) × 6 (42)
R8–R13: sc around (42)
R14: (5 sc, dec) × 6 (36)
Insert 10–12 mm safety eyes between R10 and R11. Position them approximately eight visible stitches apart, leaving enough central space for the trunk.
R15: (4 sc, dec) × 6 (30)
R16: (3 sc, dec) × 6 (24)
R17: (2 sc, dec) × 6 (18)
R18: (sc, dec) × 6 (12)
R19: dec × 6 (6)
Stuff firmly after R14. Add small pieces around the eye washers before filling the crown and lower face.
Fasten off and close the six-stitch opening.
Elephant Body
Yarn: soft gray.
R1: 6 sc in MR (6)
R2: inc × 6 (12)
R3: (sc, inc) × 6 (18)
R4: (2 sc, inc) × 6 (24)
R5: (3 sc, inc) × 6 (30)
R6: (4 sc, inc) × 6 (36)
R7–R12: sc around (36)
R13: (4 sc, dec) × 6 (30)
R14: sc around (30)
R15: (3 sc, dec) × 6 (24)
R16: (2 sc, dec) × 6 (18)
R17: (sc, dec) × 6 (12)
R18: dec × 6 (6)
Stuff the lower portion firmly. The body is mostly concealed, so prioritize structural support over a perfectly visible silhouette.
Fasten off and leave a 40 cm sewing tail.
Trunk
Yarn: soft gray. Work from the tip toward the face.
R1: 6 sc in MR (6)
R2–R5: sc around (6)
R6: (2 sc, inc) × 2 (8)
R7–R8: sc around (8)
R9: (3 sc, inc) × 2 (10)
R10–R11: sc around (10)
R12: (4 sc, inc) × 2 (12)
R13–R15: sc around (12)
Stuff the 12-stitch upper section moderately. Use progressively less filling toward the six-stitch tip so the trunk can curve downward and slightly upward at its end.
Fasten off and leave a 35 cm sewing tail.
Outer Ears — Make Two
Yarn: soft gray.
R1: 6 sc in MR (6)
R2: inc × 6 (12)
R3: (sc, inc) × 6 (18)
R4: (2 sc, inc) × 6 (24)
R5: (3 sc, inc) × 6 (30)
R6–R7: sc around (30)
Fasten off with a 40 cm tail. Do not stuff.
Inner Ear Panels — Make Two
Yarn: blush pink.
R1: 6 sc in MR (6)
R2: inc × 6 (12)
R3: (sc, inc) × 6 (18)
R4: (2 sc, inc) × 6 (24)
Fasten off with a 25 cm sewing tail.
Stretch each pink disk into a broad oval before pinning it inside the gray ear. Leave approximately one visible gray stitch around the pink panel.
Front Paws — Make Two
Yarn: soft gray.
R1: 6 sc in MR (6)
R2: inc × 6 (12)
R3: (sc, inc) × 6 (18)
R4–R6: sc around (18)
R7: (sc, dec) × 6 (12)
R8–R9: sc around (12)
R10: dec × 6 (6)
Stuff through R6 and keep the attachment end flexible.
Fasten off with a 30 cm tail.
White Toenails — Make Six
Yarn: white. Make three for each front paw.
Ch 2. Work 5 hdc into the second chain from hook. Sl st into the first hdc.
Fasten off with a 10 cm sewing tail.
Pink Cheeks — Make Two
Yarn: blush pink.
R1: 6 sc in MR (6)
Fasten off with a 12 cm tail. Stretch each circle horizontally while attaching it.
Eyebrows
Yarn: smooth black embroidery yarn.
Embroider one short curved line approximately 1–1.5 cm above each safety eye.
Keep the curves shallow and angle the outer ends slightly upward.
Teacup Base and Wall
Yarn: dusty pink.
R1: 6 sc in MR (6)
R2: inc × 6 (12)
R3: (sc, inc) × 6 (18)
R4: (2 sc, inc) × 6 (24)
R5: (3 sc, inc) × 6 (30)
R6: (4 sc, inc) × 6 (36)
R7: (5 sc, inc) × 6 (42)
R8: (6 sc, inc) × 6 (48)
R9: (7 sc, inc) × 6 (54)
R10: (8 sc, inc) × 6 (60)
R11: BLO sc around (60)
R12–R22: sc around (60)
If using flexible plastic canvas, cut a circle slightly smaller than the R10 base and place it inside before the wall becomes too tall to access comfortably.
Do not fasten off.
Cream Cup Rim
Change to cream.
R23: sc around (60)
R24: BLO sc around (60)
R25: sc around (60)
Fasten off.
Fold the final cream rounds outward slightly to create the thick rolled rim visible around the cup opening.
Teacup Handle
Yarn: dusty pink.
Ch 36.
Row 1: starting in second ch from hook, sc across (35)
Row 2: ch 1, turn, sc across (35)
Row 3: ch 1, turn, sc across (35)
Fasten off with a 50 cm tail.
Fold the strip lengthwise and sew its long edges together to form a thick cord. Curve it into a C shape before attaching it to the cup.
Saucer
Yarn: dusty pink. Work as a flat circle.
R1: 6 sc in MR (6)
R2: inc × 6 (12)
R3: (sc, inc) × 6 (18)
R4: (2 sc, inc) × 6 (24)
R5: (3 sc, inc) × 6 (30)
R6: (4 sc, inc) × 6 (36)
R7: (5 sc, inc) × 6 (42)
R8: (6 sc, inc) × 6 (48)
R9: (7 sc, inc) × 6 (54)
R10: (8 sc, inc) × 6 (60)
R11: (9 sc, inc) × 6 (66)
R12: sc around (66)
Change to cream.
R13: sc around (66)
Fasten off.
Block the saucer flat by hand. If the cup will be displayed permanently, a thin plastic-canvas circle can be placed beneath it before assembly.
Large Layered Rose
Yarn: pink.
Ch 31.
Starting in second chain from hook, work:
(sc, hdc, 3 dc, hdc) repeatedly across the chain to create a ruffled strip.
Fasten off with a 35 cm tail.
Roll the strip from one end into a spiral rose. Stitch through the lower edge several times to secure the layers.
Small Five-Petal Flowers — Make Four
Use yellow and lavender in mixed quantities.
R1: 5 sc in MR (5)
In each stitch work:
(sl st, ch 2, 2 hdc, ch 2, sl st)
Repeat five times. Fasten off with a 15 cm tail.
Green Leaves — Make Eight to Ten
Yarn: sage green.
Ch 7.
Starting in second chain from hook:
sl st, sc, hdc, dc, hdc, sc.
Work 3 sc into the final chain and repeat the sequence along the opposite side.
Fasten off with a 15 cm sewing tail.
Green Vine Cords — Make Two
Yarn: sage green.
Ch 25–32 depending on the section of cup to be covered.
Sl st loosely back along the full chain.
Fasten off with a 20 cm tail.
Optional Tiny Cup Dots — Make Four
Use leftover peach, lavender, yellow or green.
R1: 6 sc in MR (6)
Fasten off and leave a sewing tail.
Assembly
- Sew each pink inner-ear panel centrally onto a gray outer ear, leaving an even gray border. Attach the ears to opposite sides of the head across seams approximately 5–6 cm wide.
- Pin the trunk between and below the safety eyes. Sew the 12-stitch upper opening securely to the face, then curve the softer lower section downward and slightly forward.
- Attach both pink cheek patches outside the trunk and beneath the eyes. Add the embroidered eyebrows before the head is placed inside the teacup.
- Sew the head to the gray body, then attach the two front paws high on the torso. Add three white toenail bumps to the front edge of each paw.
- Place the assembled elephant inside the pink cup. Raise the body until both paws can rest above the cream rim while the lower torso remains fully concealed.
- Sew the elephant body to the cup base at four hidden structural points. Add one hidden attachment beneath each front paw if the display needs additional resistance to rotation.
- Attach the pink handle to one side of the cup. Spread the upper and lower joins across approximately 4–5 cm rather than fastening each end at one stitch.
- Centre the cup on the saucer and sew around a hidden circular contact line beneath the cup base. Keep the saucer edge completely free.
- Arrange the large pink rose on the front of the cup, then place vine cords, green leaves and smaller yellow/lavender flowers around it. Sew appliqués only to the cup wall, not through the elephant body.
- Place the finished display on a level surface and inspect ear symmetry, trunk angle, handle curve and saucer balance. Weave every structural tail through several stitch directions before trimming.
The completed elephant should rise clearly above the cup rim with both ears fully visible, the trunk centred between the paws and the pink floral cup sitting flat on its matching saucer.
7 Technical Tips
- Ear collapse: A 30-stitch ear joined through only three or four head stitches can fold forward. Spread each attachment seam across approximately 5–6 cm of the head.
- Trunk droop: Packing the entire six-stitch tip makes the trunk heavy. Leave the final 4–5 narrow rounds almost empty and concentrate filling near the 12-stitch face end.
- Cup wall folding: A soft 60-stitch wall can collapse under the elephant. Work the cup at firm tension and add a base insert if the wall can be compressed inward by more than about 1 cm.
- Elephant rotation: One body-to-cup seam acts like a pivot. Attach the hidden torso at four points around the cup base instead of relying on one central tack.
- Handle sag: A handle attached through fewer than roughly 4 cm at each end can twist downward. Spread both attachment zones broadly across the cup wall.
- Saucer cupping: Uneven tension across the 60- and 66-stitch rounds can make the saucer curl. Lay it flat after each final round and correct tension before attaching the cup.
- Flower distortion: Sewing through every rose petal flattens the layered spiral. Anchor the flower mainly through its centre and lower rolled edge, leaving the outer petal sections free.
Shaping the Elephant Head
The oversized head is central to this elephant amigurumi crochet pattern. Seven increase rounds bring the circumference to 42 stitches, giving enough width for the ears, trunk and broad eye spacing without pushing the features into one narrow area.
Six plain rounds at maximum width build the forehead and temples. The gradual reductions then create a nearly spherical head rather than a long oval.
Stuff around the safety-eye washers first. The ear attachment areas should also remain firm because each large ear adds lateral weight to the head.
Constructing the Curved Trunk
A constant-width tube tends to look cylindrical rather than elephant-like. This trunk begins at six stitches and expands progressively to twelve as it approaches the face.
Use stuffing to control the curvature instead of inserting wire. Keep the narrow tip soft and press the middle section gently into the required bend after attachment.
The upper seam belongs centrally below the eyes. Rotate the opening before sewing until the natural spiral of the crochet supports a downward curve.
Building the Oversized Ears
The photograph uses broad circular ears with a clearly recessed pink centre. Two separate layers reproduce that border more reliably than changing yarn colors inside one flat circle.
The gray outer ear reaches 30 stitches. The pink panel stops at 24, leaving enough difference for a visible gray outline after the two pieces are stretched into matching ovals.
Do not stuff either layer. A thick ear becomes heavy, projects too far from the head and increases the risk of the teacup display leaning sideways.
Positioning the Elephant Inside the Cup
Complete the elephant before fixing it into the teacup. Place temporary stuffing or folded fabric beneath the body and adjust its height until the composition matches the photograph.
The paws should overlap the cream rim slightly. Most of the torso remains hidden, while the head, ears and trunk stay completely unobstructed.
Mark four contact points inside the cup once the height looks correct. Those positions create a more stable internal mount than sewing only the bottom centre of the body.
Constructing the Teacup
The cup starts as a flat 60-stitch circle, then turns vertically through a back-loop round. That sharp transition establishes a flat bottom rather than a rounded amigurumi base.
Eleven straight wall rounds produce the deep cup silhouette. The cream final rounds create the contrasting lip visible in the image.
If your chenille is exceptionally soft, add an internal reinforcement layer. The insert should remain below the cream rim and should not press against the elephant.
Making the Curved Handle
The handle needs enough thickness to match the scale of the cup. A single crochet chain would look too thin beside a 60-stitch vessel.
Three rows create a broad strip that is folded and sewn into a cord. Shape this cord into a C before mounting it.
Attach the lower end first, then adjust the upper end until there is enough open space between the handle and cup wall for the shape to remain readable.
Constructing the Saucer
The saucer extends beyond the cup by one additional increase round, reaching 66 stitches. That creates the visible pink margin surrounding the base.
Only one plain pink round is required before the cream border. More vertical rounds would turn the saucer into another shallow bowl.
Centre the cup before sewing. Measure the visible saucer margin in four directions and move the cup until the spacing is comparable on the left, right, front and rear.
Making the Floral Cup Decoration
The floral appliqué should follow the curve of the cup rather than sit as one isolated badge. Start with the large pink rose near the front centre, then extend green vines toward both sides.
Add leaves before the smallest flowers. Their green shapes create a visual bridge between the large central rose and the yellow or lavender accent blossoms.
Keep most appliqué sewing inside the motif edges. Long exposed yarn bridges between leaves are more visible on dusty-pink chenille than on smooth cotton.
Shaping the Layered Rose
The rose begins as a ruffled strip rather than separate petals. Rolling that strip creates several concentric petal layers with one continuous piece of yarn.
Do not pull the centre into a hard spiral. Leave the outer two or three ruffles slightly loose so they can spread over the curved cup wall.
Before attaching the rose, pin it at four points and view the cup from the front. The flower should remain below the cream rim and clear of the handle.
Adding the White Toenails
The six white toe bumps provide contrast against the gray paws. Three small raised motifs work better than long embroidered lines in plush chenille.
Pin all three to one paw before sewing. Keep their centres on the same curved line and leave a small strip of gray between neighboring pieces.
Repeat the spacing on the second paw, then compare both while the elephant is already sitting in the cup.
Working with Chunky Chenille
Count stitches frequently because chenille can hide the top loops after several plain rounds. The 42-stitch head and 60-stitch cup are especially vulnerable to unnoticed skipped stitches.
Place the marker through both top loops of the first stitch. If the adjustable magic ring sheds when tightened, use two chains and work the starting six single crochets into the second chain.
Maintain firmer tension for the cup than for the ears. Structural pieces and flat decorative pieces do not require identical fabric flexibility.
Adjusting Finished Size
Keep the written stitch counts and change yarn thickness for predictable scaling. Worsted yarn with approximately a 3–3.5 mm hook will create a smaller elephant and teacup while preserving their proportions.
For a larger display, use thicker blanket yarn and a matching hook rather than adding more increase rounds to only the head. Every major component must scale together: elephant, cup, handle and saucer.
Make the cup before the saucer when changing yarn. Measure the finished cup base, then confirm that the written 66-stitch saucer still gives enough border around it.
Planning Yarn Quantities
The teacup and saucer consume more yarn than the visible elephant body because both are broad structural pieces. Reserve the full dusty-pink allocation before making decorative flowers.
The gray elephant also uses substantial yarn because of its 42-stitch head and two large ears. Make both ears before using leftover gray yarn for optional embellishments.
Small floral colors need far less yarn. Scraps are usually sufficient for individual yellow, lavender and green motifs, but the large pink rose requires a longer uninterrupted strand.
Balancing the Finished Display
The elephant’s ears create much of the lateral width, while the handle adds weight to one side of the cup. The saucer counters both by increasing the footprint beneath the display.
Test the assembled cup and elephant before sewing on the handle. If the elephant already leans, correct the internal body attachment first.
Add the handle afterward and rotate the complete display on a level table. The saucer should remain flat without one edge lifting from the surface.
Finishing Checks
View the elephant directly from the front. Both ears should reach similar heights, the trunk must sit between the eyes and the paws need comparable placement on the cream rim.
Check the cup from the side next. Its wall should remain nearly vertical, the handle should form a smooth open curve and the saucer must extend beyond the cup base.
Inspect the floral decoration last. The central rose should remain the largest motif, with green vines extending outward and smaller flowers filling gaps without covering the cup rim.
Conclusion
Measure the finished display from the saucer to the highest ear and record the cup diameter separately before storing your project notes. Those measurements are more useful than overall yarn weight when reproducing the design with another chenille brand. Photograph the elephant from the front and three-quarter side to check ear symmetry, trunk curve, handle shape and floral placement. Save this elephant amigurumi crochet pattern to Pinterest and share the finished project on Instagram with #FloralTeacupElephant. Reshape both ears and the rose before the final photograph. Would you keep the dusty-pink teacup or make the next elephant sit inside a lavender cup with cream flowers?
Sources
- Jess Huff — Esther the Elephant: 36 cm finished height, worsted yarn, 3.5 mm hook, 15 mm eyes and detailed yarn quantities.
- Zamiguz Handmade — current elephant pattern using worsted yarn, 2.75 mm hook and 12 mm safety eyes.
- Supergurumi — elephant construction reference with separately crocheted trunk and ears.
- Crochet Scout — elephant pattern comparison covering approximately 18–28 cm designs, multiple yarn weights and eye sizes.
- Ravelry — Elwis Elephant and additional elephant listings covering intermediate construction and 10 mm eye references.
- Etsy — current elephant crochet marketplace used to assess competition among standard plush, safari and low-sew elephant patterns.









