Introduction
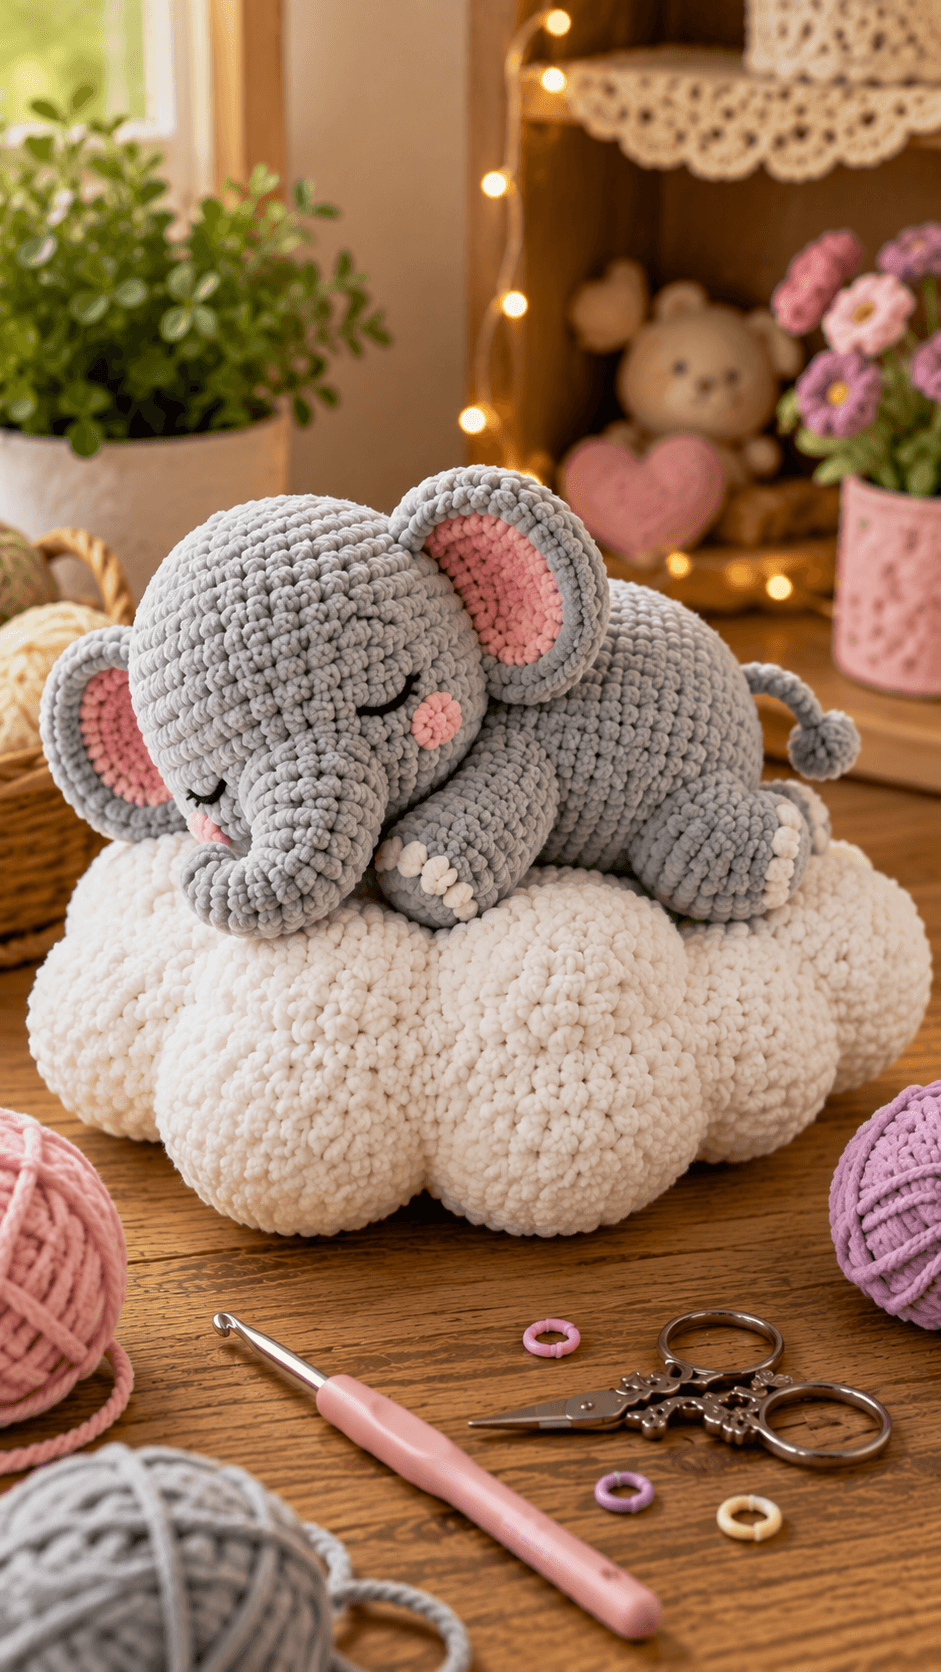
An elephant cannot look asleep if its trunk hangs rigidly away from the paws. This sleeping elephant amigurumi crochet pattern uses chunky chenille, a 4.5 mm hook and embroidered closed eyes for a reclining elephant approximately 25–29 cm long. Oversized ears, a curved trunk, four low limbs, a tufted tail and a dimensional white cloud create the intermediate construction.
The Design: What Makes This Sleeping Elephant Different
The 42-stitch head is intentionally larger than the 36-stitch torso because the photograph depends on a broad baby-elephant face and oversized ears. A tapered trunk projects from the lower face and bends inward toward the front paws instead of hanging vertically. The body is elongated and positioned stomach-down, so the rear legs sit behind the forelegs rather than below the torso. Each ear uses a gray outer panel and smaller pink inner panel, keeping the pink visible without replacing the gray border. Closed embroidered eyes control the sleeping expression. Underneath, a firm cloud core carries softer exterior puffs. This sleepy elephant crochet pattern therefore depends on assembly angle more than complex stitches. One common mistake is sewing the head directly above the body; it should tilt down toward the paws.
Project Information at a Glance
| Skill Level | Time | Finished Size | Hook | Best For |
|---|---|---|---|---|
| Intermediate | 12–16 hours | Elephant 25–29 cm long; cloud 29–34 cm wide | 4.5 mm elephant / 5 mm cloud | Nursery shelves, animal displays and plush collections |
Materials and Tools
Yarn
- Dove gray — chunky/plush chenille — approximately 140–180 g — head, body, trunk, ears, limbs and tail
- White — chunky/plush chenille — approximately 150–190 g — cloud and toe details
- Blush pink — matching chenille — approximately 20–30 g — inner ears and cheeks
- Black smooth embroidery yarn — small amount — closed eyes and lashes
Tools
- 4.5 mm crochet hook
- 5.0 mm crochet hook for the cloud
- Polyester toy stuffing
- Large-eye yarn needle
- Locking stitch markers
- Dressmaking pins
- Scissors
No safety eyes are used in the photographed version. Published open-eyed elephant patterns use hardware from about 8 mm through 15 mm, but replacing the embroidery with plastic eyes would materially change the sleeping face.
Abbreviations
- MR — magic ring
- sc — single crochet
- inc — two single crochet stitches in one stitch
- dec — decrease over two stitches
- sl st — slip stitch
- ch — chain
- hdc — half double crochet
- dc — double crochet
- BLO — back loop only
- FLO — front loop only
An invisible decrease is worked through the front loops of the following two stitches before completing both loops together as one single crochet.
Pattern — Step by Step
Work all stuffed pieces in continuous spiral rounds unless a section states otherwise. Mark the first complete stitch and verify the bracketed count after every round.
Head
Yarn: dove gray.
R1: 6 sc in MR (6)
R2: inc × 6 (12)
R3: (sc, inc) × 6 (18)
R4: (2 sc, inc) × 6 (24)
R5: (3 sc, inc) × 6 (30)
R6: (4 sc, inc) × 6 (36)
R7: (5 sc, inc) × 6 (42)
R8–R13: sc around (42)
R14: (5 sc, dec) × 6 (36)
R15: (4 sc, dec) × 6 (30)
R16: (3 sc, dec) × 6 (24)
Begin stuffing after R14. Keep the lower centre slightly softer where the trunk will attach.
R17: (2 sc, dec) × 6 (18)
R18: (sc, dec) × 6 (12)
R19: dec × 6 (6)
Fasten off. Pull the final six front loops closed and leave a 35 cm tail for shaping if required.
Body
Yarn: dove gray.
R1: 6 sc in MR (6)
R2: inc × 6 (12)
R3: (sc, inc) × 6 (18)
R4: (2 sc, inc) × 6 (24)
R5: (3 sc, inc) × 6 (30)
R6: (4 sc, inc) × 6 (36)
R7–R13: sc around (36)
R14: (4 sc, dec) × 6 (30)
R15–R16: sc around (30)
R17: (3 sc, dec) × 6 (24)
R18: (2 sc, dec) × 6 (18)
R19: (sc, dec) × 6 (12)
R20: dec × 6 (6)
Stuff the centre firmly and the final rear section slightly softer. Compress the torso into a horizontal oval before closing.
Fasten off and leave a 45 cm structural sewing tail.
Trunk
Yarn: dove gray. Work from the tip toward the face.
R1: 6 sc in MR (6)
R2–R6: sc around (6)
R7: inc × 6 (12)
R8–R10: sc around (12)
R11: (sc, inc) × 6 (18)
R12–R14: sc around (18)
Add a trace of stuffing to R7–R14. Leave R1–R6 almost empty so the tip can curl inward.
Fasten off and leave a 35 cm attachment tail.
Outer Ears — Make Two
Yarn: dove gray. Work flat in joined rounds.
R1: 6 sc in MR (6)
R2: inc × 6 (12)
R3: (sc, inc) × 6 (18)
R4: (2 sc, inc) × 6 (24)
R5: (3 sc, inc) × 6 (30)
Do not stuff. Fasten off with a 35 cm sewing tail.
Pink Inner Ears — Make Two
Yarn: blush pink.
R1: 6 sc in MR (6)
R2: inc × 6 (12)
R3: (sc, inc) × 6 (18)
R4: (2 sc, inc) × 6 (24)
Fasten off and leave a 25 cm tail.
Stretch each pink circle vertically while pinning so it becomes a soft oval inside the gray ear.
Front Legs — Make Two
Yarn: dove gray.
R1: 6 sc in MR (6)
R2: inc × 6 (12)
R3: (sc, inc) × 6 (18)
R4–R7: sc around (18)
R8: (sc, dec) × 6 (12)
R9–R11: sc around (12)
R12: dec × 6 (6)
Stuff the paw through R7. Keep the shoulder end flexible so the legs can lie forward across the cloud.
Fasten off with a 35 cm tail.
Back Legs — Make Two
Yarn: dove gray.
R1: 6 sc in MR (6)
R2: inc × 6 (12)
R3: (sc, inc) × 6 (18)
R4: (2 sc, inc) × 6 (24)
R5–R7: sc around (24)
R8: (2 sc, dec) × 6 (18)
R9: (sc, dec) × 6 (12)
R10–R11: sc around (12)
R12: dec × 6 (6)
Stuff to medium firmness and flatten the lower end into a broad oval foot.
Fasten off and leave a 35 cm tail.
White Toe Bumps — Make Twelve
Yarn: white. Three per foot.
Ch 2. Work 5 hdc into the second chain from the hook. Join with sl st to the first hdc.
Fasten off and leave a 10 cm tail on each piece.
Cheek Patches — Make Two
Yarn: blush pink.
R1: 6 sc in MR (6)
Fasten off with a 12 cm tail. Stretch each circle slightly sideways during attachment.
Closed Eyes and Lashes
Yarn: smooth black embroidery yarn.
Mark a shallow curve on each side of the face across approximately 2–2.5 cm.
Embroider each closed eye with two passes. Add two short lashes approximately 5–7 mm long at the outer end of each eye.
Tail
Yarn: dove gray.
R1: 6 sc in MR (6)
R2–R8: sc around (6)
Do not stuff. Fasten off, leaving a 30 cm tail.
Tail Tuft
Yarn: dove gray.
R1: 6 sc in MR (6)
R2: inc × 6 (12)
R3: dec × 6 (6)
Add a trace of stuffing. Fasten off and sew the tuft to the narrow tail tip.
Cloud Core
Yarn: white. Use 5 mm hook.
R1: 6 sc in MR (6)
R2: inc × 6 (12)
R3: (sc, inc) × 6 (18)
R4: (2 sc, inc) × 6 (24)
R5: (3 sc, inc) × 6 (30)
R6: (4 sc, inc) × 6 (36)
R7: (5 sc, inc) × 6 (42)
R8: (6 sc, inc) × 6 (48)
R9–R12: sc around (48)
R13: (6 sc, dec) × 6 (42)
R14: (5 sc, dec) × 6 (36)
R15: (4 sc, dec) × 6 (30)
R16: (3 sc, dec) × 6 (24)
R17: (2 sc, dec) × 6 (18)
R18: (sc, dec) × 6 (12)
R19: dec × 6 (6)
Stuff firmly and flatten the finished form into a broad oval before closing.
Fasten off and close.
Large Cloud Puffs — Make Five
Yarn: white.
R1: 6 sc in MR (6)
R2: inc × 6 (12)
R3: (sc, inc) × 6 (18)
R4: (2 sc, inc) × 6 (24)
R5–R7: sc around (24)
R8: (2 sc, dec) × 6 (18)
R9: (sc, dec) × 6 (12)
Stuff to medium firmness. Fasten off with a 30 cm sewing tail.
Medium Cloud Puffs — Make Three
Yarn: white.
R1: 6 sc in MR (6)
R2: inc × 6 (12)
R3: (sc, inc) × 6 (18)
R4–R6: sc around (18)
R7: (sc, dec) × 6 (12)
R8: dec × 6 (6)
Stuff lightly and leave a 25 cm attachment tail.
Assembly
- Sew each pink inner-ear panel onto a gray outer ear first, leaving an even gray border of approximately 1–1.5 cm around the visible edge.
- Attach the trunk to the lower front of the head. Curve its narrow tip inward and downward before tightening the final stitches.
- Mark and embroider both closed eyes, add the outer lashes, then sew the pink cheek patches below and outside the eye curves.
- Attach the two ears to the upper sides of the head across broad 5–6 cm seams. Angle the lower ear edges slightly backward rather than letting the circles face directly forward.
- Sew the head to the front of the body at approximately a 20–30 degree downward angle, then attach the front legs so both paws project beneath the trunk.
- Attach the two back legs farther along the body and sew three white toe bumps across every foot. Fix the narrow tail near the rear centre and let its tuft remain free.
- Arrange five large white cloud puffs around the structural core, sewing every puff both to the core and to at least one neighboring lobe.
- Place the three medium puffs into the largest upper gaps and leave a shallow central depression where the elephant will lie.
- Set the complete elephant stomach-down across the cloud. Attach the lower torso, one front-body contact point and the rear body with hidden structural stitches.
- Check head angle, trunk curve, ear position, limb spacing and cloud balance from the front and both sides, then weave all structural tails through several stitch directions.
The completed elephant should lie horizontally across the cloud with its muzzle and trunk close to the forward paws, the ears framing the head and the tufted tail visible behind the rear body.
7 Technical Tips
- Head sitting too high: A vertical head seam turns the reclining elephant into a seated toy. Rotate the head forward approximately 20–30 degrees before making the first permanent stitch.
- Trunk stiffness: Stuffing the 6-stitch tip makes it resist the inward curl. Leave the first six rounds almost empty and place filling mainly in the 12- and 18-stitch sections.
- Ear collapse: An ear sewn through only 2–3 head stitches can fold under its own weight. Spread the gray attachment across approximately 5–6 cm.
- Decrease gaps: Plush yarn can expose filling along the head and body shaping. Work every decrease through the front loops of the next two stitches.
- Eye mismatch: A difference of even 5 mm between the embroidered eye endpoints is visible on a plain gray face. Mark all four endpoints before stitching either eye.
- Cloud rotation: An exterior puff attached only to the centre can twist away from its neighbors. Join each large puff to the core and at least one adjacent lobe.
- Elephant rolling: One central body stitch acts as a pivot. Anchor the animal to the cloud at a minimum of three separated zones: chest/body, main torso and rear body.
Shaping the Sleeping Elephant Head
The 42-stitch head is intentionally larger than the torso. Published elephant amigurumi varies widely in proportion, but large-headed constructions are common when the ears and trunk need to remain individually readable.
Hold the maximum circumference through six rounds before reducing. That creates enough side area for the oversized ears and leaves space between the crown and eye embroidery.
Keep the lower centre slightly softer. A heavily packed face pushes the trunk outward when it is sewn on and makes the elephant look alert rather than resting.
Constructing the Curved Trunk
The trunk is the most character-specific part of this sleeping elephant amigurumi crochet pattern. Published elephant instructions commonly begin a trunk at six stitches and enlarge it toward the face; Supergurumi, for example, works a separate trunk from six to twelve stitches.
This larger chenille version continues to an 18-stitch attachment so the base does not look too narrow against the 42-stitch head.
Shape the curve during assembly rather than adding wire. Leave the tip nearly empty, bend it toward the opposite paw and tack one underside stitch to the lower trunk if the yarn repeatedly straightens.
Making the Oversized Ears
Each gray outer panel expands to 30 stitches while the pink centre stops at 24. That difference creates a visible gray border around the inner ear.
Pin the pink panel before sewing. Stretch it vertically rather than enlarging its crochet count; the photographed ears are slightly oval rather than circular.
When attaching the completed ear, sew only the inner edge to the head. The outer half should remain free so it can fall naturally beside the face.
Creating the Closed-Eye Expression
Safety eyes are not appropriate for matching the supplied photograph because the defining feature is a pair of embroidered sleeping curves. Published elephant patterns often specify plastic eyes, but those references are useful mainly for scale comparisons here.
Mark both inner and outer eye endpoints before threading the needle. The outer ends can sit fractionally lower than the inner ends.
Add lashes only after both main curves have been compared. Two short stitches are enough; long lashes pull too much attention away from the trunk and ears.
Building the Reclining Body
The torso reaches 36 stitches, one size tier below the head, and stays at that maximum through seven rounds. This gives the elephant enough length to extend behind the head without forming another large sphere.
Compress the stuffed body into a horizontal oval before closing it. Place it on the cloud during shaping so the lower surface begins to flatten naturally.
The rear third can remain slightly softer than the centre. That section needs to settle between the cloud puffs instead of sitting above them.
Positioning the Front Legs
The front legs are narrower than the rear pair because they sit close to the face. Their main visual role is to support the trunk and create the sleeping pose.
Attach both shoulder ends behind the head seam, then angle the paws forward. Leave roughly 2–3 cm between their rounded tips.
The trunk can rest between or just above them. A large gap between trunk and paws breaks the impression that the elephant has lowered its head to sleep.
Constructing the Rear Legs
The back legs reach 24 stitches so they remain visibly broader than the forelegs. Flatten the stuffed foot area before attachment.
Position the rear pair farther back along the torso and slightly outward. Most of their upper seams should disappear underneath the reclining body.
Test the silhouette from the side. The hind feet should remain readable without lifting the belly substantially above the cloud.
Adding the White Toe Details
Three white bumps on each foot reproduce the raised toenail details visible in the image. Twelve pieces are required for four feet.
Pin all three motifs before sewing a foot. Leave a narrow strip of gray between neighboring white bumps so they do not merge into one continuous line.
Use moderate sewing tension. Tight toe stitches create dents in plush chenille and distort the foot circumference.
Making the Tufted Tail
The tail consists of a narrow unstuffed tube and a small rounded tip. That structure produces the thin flexible line visible behind the elephant.
Do not stuff the six-stitch cord. The tuft needs only enough filling to hold its rounded shape.
Attach the tail near the rear centre and angle it slightly upward before letting the tuft fall naturally. Avoid fixing the tuft directly to the body.
Constructing the White Cloud
The cloud uses a structural core rather than relying on individual balls to hold the elephant. The core reaches 48 stitches and should receive firmer stuffing than the visible lobes.
Five large puffs establish the outside silhouette. Three medium puffs fill the deepest gaps without making the edge mathematically regular.
Leave a shallow depression through the upper centre. If every puff projects to the same height, the elephant balances on top instead of appearing to sink into the cloud.
Keeping the Cloud Stable
Set the stuffed core on a hard surface before attaching the first puff. Compress its underside until it contacts the table across a broad area.
Attach the front lobes first, then the two side sections and rear pieces. Check the footprint after every two or three puffs.
A cloud that rocks before the elephant is attached will become less stable after the extra weight is added. Correct the core and puff positions before final assembly.
Working with Plush Chenille
Published plush elephants demonstrate a useful hook range. One 17 cm elephant uses Himalaya Dolphin Baby with a 4 mm hook, while general super-bulky chenille guidance commonly uses about 5 mm.
The 4.5 mm hook specified here sits between those references and suits the dense rounded stitches visible in the photograph. Adjust by 0.5 mm if stuffing becomes visible.
Keep the marker through both top loops of the first stitch. Chenille fibers can disguise the actual stitch opening after several identical rounds.
Planning Yarn Quantities
Published worsted elephants can require around 121 g of a main body color, while other patterns specify roughly 182 metres of main yarn. A larger chenille reclining elephant with oversized ears requires a higher purchasing allowance.
Reserve the gray yarn for the head and both outer ears before finishing smaller pieces. Those three components consume a large percentage of the main color.
The cloud also uses substantial yarn because eight separate puffs are added around a stuffed core. Purchase the white yarn from one dye lot when possible.
Adjusting Finished Size
Keep the written stitch geometry and change yarn weight for the cleanest scaling. Worsted yarn with approximately a 3.5–4 mm hook will produce a smaller version while preserving the ear-to-head relationship.
For a larger sleeping elephant, move to thicker blanket yarn and an appropriate smaller-than-label amigurumi hook. Increase all parts through yarn thickness rather than enlarging only the head.
The cloud must change with the elephant. Its final width should remain several centimetres greater than the full reclining torso on every visible side.
Attaching the Elephant to the Cloud
Finish the animal and cloud independently. Move the elephant forward and backward until the head stays near the front lobes while the rear feet remain inside the cloud perimeter.
Pin the lower torso first. Add a second contact beneath the chest or front legs and a third near the rear body.
Keep visible limb surfaces free of attachment stitches. The supporting seams should disappear beneath the elephant rather than flatten the paws into the white puffs.
Competition and Design Gap
Current sleeping-elephant search results include standalone amigurumi, nursery-focused designs and compact sleeping toys. Dedicated sleeping-elephant PDFs are active on Etsy and Ribblr, while general elephant competition includes both low-sew and large traditional animals.
The supplied design adds a separate dimensional cloud to the reclining elephant. That shifts the project from one stuffed animal to a complete display piece.
The combination of embroidered closed eyes, oversized pink-lined ears, downward trunk and cloud support also creates stronger visual separation from upright open-eyed elephant patterns.
Finishing Checks
Place the completed cloud on a hard surface first. Several outer puffs should touch the table, and the base should not rock when pressed lightly at either side.
View the elephant directly from the front. Both embroidered eyes should have comparable curvature, the trunk must remain centred and the ears need similar visible pink areas.
Inspect the side profile last. The head should angle toward the paws, the body must remain almost horizontal, and the tail tuft should stay visible without extending beyond the cloud excessively.
Conclusion
Measure the elephant from the front of the trunk to the rear body and record the widest cloud diameter beside the yarn and hook sizes used. Those measurements matter more than standing height when reproducing this horizontal design. Photograph the finished project from a low side angle to check head tilt, trunk curve and cloud depth. Save this sleeping elephant amigurumi crochet pattern to Pinterest and share the completed piece on Instagram with #SleepyCloudElephant. Reshape both ears and the front cloud puffs before the final photograph. Would you keep the gray-and-pink elephant shown here or make the next sleeper in pale blue with cream inner ears?
Sources
- Amigurumi.com — Plushie Elephant: approximately 17 cm, Himalaya Dolphin Baby, 4 mm hook and 10 mm safety eyes.
- Loops and Love Crochet — Elephant Amigurumi: approximately 200 yd/182 m main yarn, 20 yd/18 m accent yarn, 3.5–4 mm hook and 12 mm eyes.
- Jess Huff — Esther the Elephant: 36 cm standing height, 121 g main gray yarn, 16 g pink yarn, 3.5 mm hook and 15 mm eyes.
- Supergurumi — Elephant Amigurumi: separate trunk worked from 6 to 12 stitches and separately crocheted ears.
- Ravelry — Esther the Elephant and Mini Love Elephant: current free elephant pattern listings.
- Etsy — current sleeping-elephant crochet-pattern marketplace showing active commercial competition.









