Introduction
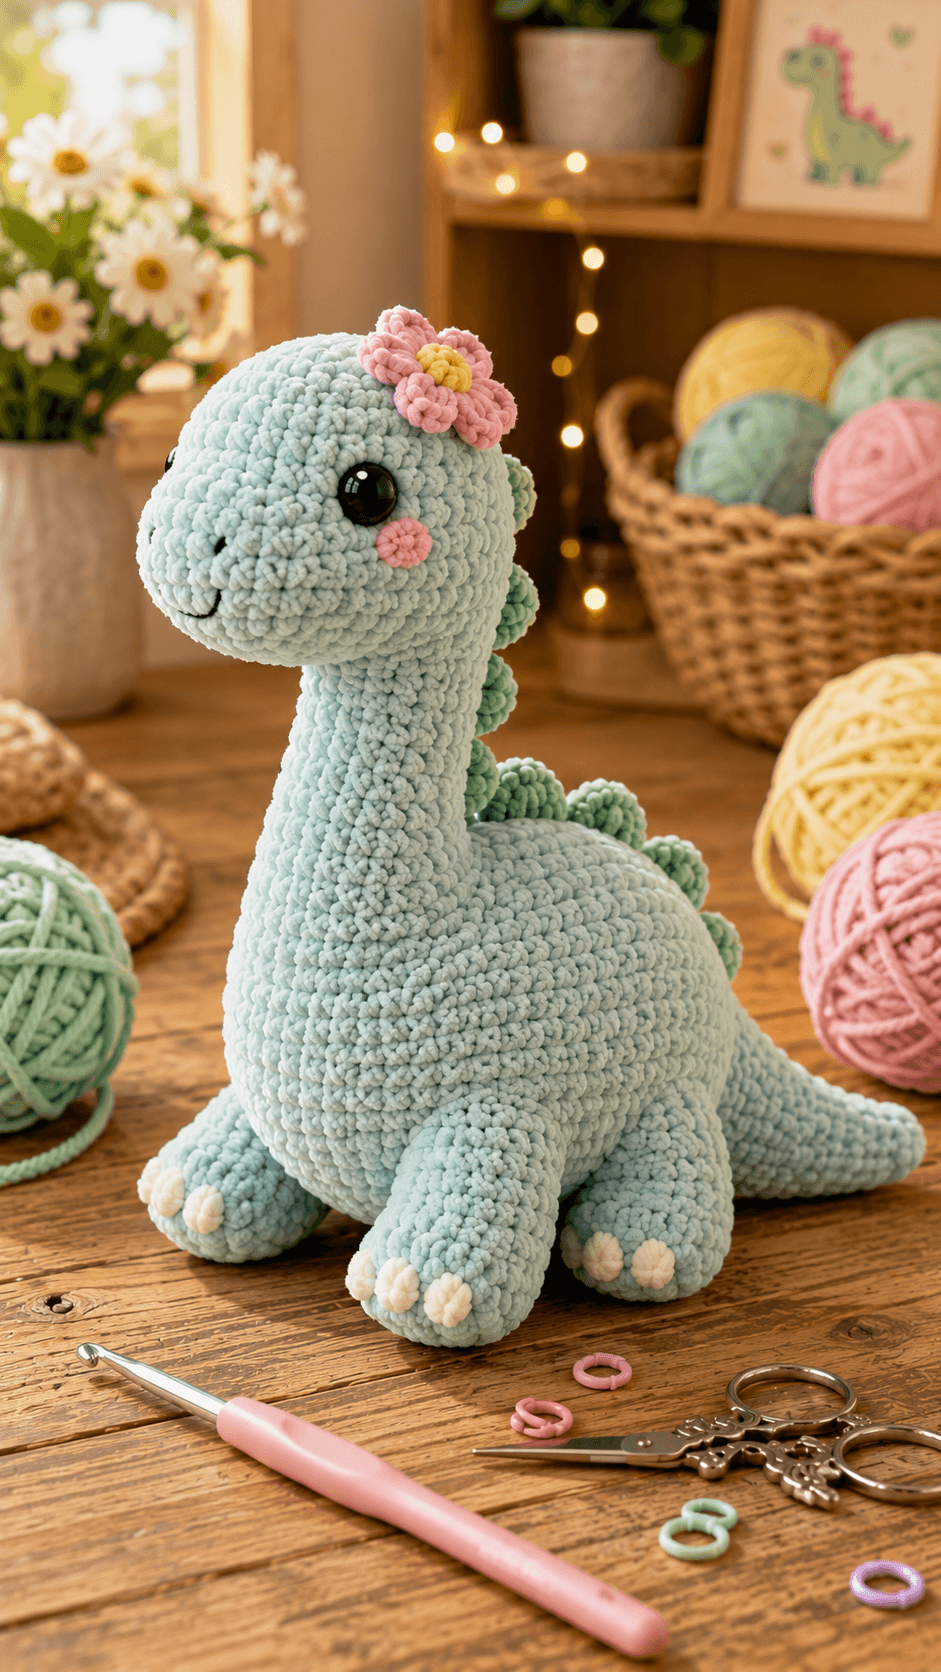
A long-neck dinosaur needs its neck to carry an oversized head without folding where it meets the shoulders. This long neck dinosaur amigurumi crochet pattern uses chunky chenille, a 4.5 mm hook and 10–12 mm safety eyes for a pastel sauropod approximately 31–35 cm tall. Four broad feet, a tapered tail, mint dorsal bumps and a pink crown flower complete the intermediate construction.
The Design: What Makes This Long Neck Dinosaur Different
The head expands to 42 stitches because the reference uses juvenile proportions: broad skull, small muzzle and large eyes. A narrower 18–24 stitch neck supports that head while creating the vertical sauropod profile. The torso returns to 42 stitches and stays broad enough to hold four substantial legs without appearing top-heavy. A long tapered tail provides visual balance behind the body. Seven mint dorsal bumps run from the rear head toward the tail, but they remain rounded and low rather than becoming Stegosaurus-style plates. The pastel dinosaur amigurumi also adds three white toes to every foot and a pink flower above one eye. A common mistake is under-stuffing the neck. If its centre compresses by several centimetres, the head rotates forward and the characteristic long-neck silhouette disappears.
Project Information at a Glance
| Skill Level | Time | Finished Size | Hook | Best For |
|---|---|---|---|---|
| Intermediate | 14–18 hours | 31–35 cm high; 34–40 cm long | 4.5 mm | Dinosaur collections, nursery shelves and plush markets |
Long-neck dinosaur patterns scale sharply with yarn choice. Current published examples include a 15 cm bulky chenille design, a 35 cm DK Brachiosaurus and worsted versions exceeding 40 cm from muzzle to tail. :contentReference[oaicite:17]{index=17}
Materials and Tools
Yarn
- Powder blue/pale aqua — chunky chenille — approximately 220–260 g — head, muzzle, neck, body, four legs and tail
- Mint green — matching chenille — approximately 35–50 g — seven dorsal bumps
- Blush pink — matching yarn — approximately 10–15 g — cheek and flower petals
- Yellow — yarn scrap — flower centre
- White — chunky or smooth plush yarn — approximately 15–20 g — twelve toe bumps
- Black embroidery yarn — small amount — nostrils and smile
Tools
- 4.5 mm crochet hook
- Two 10–12 mm black safety eyes
- Polyester toy stuffing
- Large-eye yarn needle
- Locking stitch markers
- Dressmaking pins
- Scissors
A current chunky chenille long-neck dinosaur uses a 4 mm hook and 10 mm safety eyes, while another 33 cm chenille Brachiosaurus uses 12 mm eyes. Those references make 10–12 mm a practical testing range for this larger plush head. :contentReference[oaicite:18]{index=18}
Abbreviations
- MR — magic ring
- sc — single crochet
- inc — two single crochet stitches in one stitch
- dec — decrease over two stitches
- sl st — slip stitch
- ch — chain
- hdc — half double crochet
- dc — double crochet
- BLO — back loop only
- FLO — front loop only
An invisible decrease is worked through the front loops of the next two stitches before completing the two loops together as one single crochet.
Pattern — Step by Step
Work all stuffed pieces in continuous spirals unless a section states otherwise. Mark the first stitch of each round and verify every bracketed total before moving to the following round.
Head
Yarn: powder blue — large 42-stitch head.
R1: 6 sc in MR (6)
R2: inc × 6 (12)
R3: (sc, inc) × 6 (18)
R4: (2 sc, inc) × 6 (24)
R5: (3 sc, inc) × 6 (30)
R6: (4 sc, inc) × 6 (36)
R7: (5 sc, inc) × 6 (42)
R8–R13: sc around (42)
R14: (5 sc, dec) × 6 (36)
Insert the safety eyes between R10 and R11, approximately seven visible stitches apart. Compare 10 mm and 12 mm before locking the washers.
R15: (4 sc, dec) × 6 (30)
R16: (3 sc, dec) × 6 (24)
R17: (2 sc, dec) × 6 (18)
R18: (sc, dec) × 6 (12)
R19: dec × 6 (6)
Stuff firmly from R14 onward. Pack the rear lower head especially well because it will sit over the narrow neck.
Fasten off. Leave a 35 cm attachment tail.
Rounded Muzzle
Yarn: powder blue. Work around both sides of a foundation chain.
Ch 8.
R1: starting in second ch from hook, 6 sc, 3 sc in final ch; continue along opposite side with 5 sc, inc in final ch (16)
R2: inc, 5 sc, inc ×3, 5 sc, inc ×2 (22)
R3: sc around (22)
R4: (9 sc, dec) ×2 (20)
Add a shallow layer of stuffing. Compress the attachment edge into a horizontal oval.
Fasten off and leave a 30 cm sewing tail.
Neck
Yarn: powder blue. Begin at the lower neck and work upward.
R1: 6 sc in MR (6)
R2: inc ×6 (12)
R3: (sc, inc) ×6 (18)
R4: (2 sc, inc) ×6 (24)
R5–R11: sc around (24)
R12: (2 sc, dec) ×6 (18)
R13–R24: sc around (18)
Stuff as you work. Pack R4–R16 firmly; use slightly less filling near the 18-stitch top so the head seam can compress cleanly.
Fasten off and leave a 45 cm sewing tail.
Body
Yarn: powder blue.
R1: 6 sc in MR (6)
R2: inc ×6 (12)
R3: (sc, inc) ×6 (18)
R4: (2 sc, inc) ×6 (24)
R5: (3 sc, inc) ×6 (30)
R6: (4 sc, inc) ×6 (36)
R7: (5 sc, inc) ×6 (42)
R8–R15: sc around (42)
R16: (5 sc, dec) ×6 (36)
R17: sc around (36)
R18: (4 sc, dec) ×6 (30)
R19: (3 sc, dec) ×6 (24)
R20: (2 sc, dec) ×6 (18)
R21: (sc, dec) ×6 (12)
R22: dec ×6 (6)
Stuff the lower half firmly enough to support four legs and the long neck. Keep the upper rear slightly softer where the neck seam will attach.
Fasten off and leave a 45 cm tail.
Front Legs — Make Two
Yarn: powder blue.
R1: 6 sc in MR (6)
R2: inc ×6 (12)
R3: (sc, inc) ×6 (18)
R4: (2 sc, inc) ×6 (24)
R5–R8: sc around (24)
R9: (2 sc, dec) ×6 (18)
R10–R13: sc around (18)
R14: (sc, dec) ×6 (12)
R15: dec ×6 (6)
Stuff the foot and lower leg firmly. Leave the upper 3–4 cm slightly softer.
Fasten off with a 35 cm tail.
Back Legs — Make Two
Yarn: powder blue.
R1: 6 sc in MR (6)
R2: inc ×6 (12)
R3: (sc, inc) ×6 (18)
R4: (2 sc, inc) ×6 (24)
R5–R9: sc around (24)
R10: (2 sc, dec) ×6 (18)
R11–R14: sc around (18)
R15: (sc, dec) ×6 (12)
R16: dec ×6 (6)
Stuff firmly and shape each foot into a broad oval. The rear pair may be approximately 1 cm fuller than the front pair.
Fasten off and leave a 35 cm sewing tail.
Tail
Yarn: powder blue. Work from the tail tip toward the body.
R1: 6 sc in MR (6)
R2–R6: sc around (6)
R7: inc ×6 (12)
R8–R12: sc around (12)
R13: (sc, inc) ×6 (18)
R14–R18: sc around (18)
Stuff the 18-stitch end firmly, then reduce the amount steadily toward the tip. Leave the final 4–5 rounds almost empty.
Fasten off and leave a 45 cm attachment tail.
Large Mint Dorsal Bumps — Make Three
Yarn: mint green.
R1: 6 sc in MR (6)
R2: inc ×6 (12)
R3: (sc, inc) ×6 (18)
R4–R5: sc around (18)
R6: (sc, dec) ×6 (12)
R7: dec ×6 (6)
Add only a trace of stuffing and flatten the base.
Fasten off with a 25 cm tail.
Medium Mint Dorsal Bumps — Make Two
R1: 6 sc in MR (6)
R2: inc ×6 (12)
R3–R5: sc around (12)
R6: dec ×6 (6)
Stuff lightly and leave a 20 cm tail.
Small Mint Dorsal Bumps — Make Two
R1: 6 sc in MR (6)
R2–R4: sc around (6)
Do not stuff firmly. Fasten off with a 20 cm tail.
White Toe Bumps — Make Twelve
Make three for each foot.
Ch 2. Work 5 hdc into the second chain from the hook. Slip stitch to the first hdc.
Fasten off with a 10 cm sewing tail.
Pink Cheek Patch — Make One
Yarn: blush pink.
R1: 6 sc in MR (6)
Fasten off and leave a 12 cm tail.
The reference angle clearly shows one cheek. A matching second cheek can be added to the opposite side if desired.
Pink Crown Flower
Yarn: blush pink.
R1: 5 sc in MR (5)
In each stitch work:
(sl st, ch 2, 2 dc, ch 2, sl st)
Repeat five times.
Fasten off and leave a 20 cm tail.
Flower Centre
Yarn: yellow.
R1: 6 sc in MR (6)
Fasten off with a 12 cm tail and sew to the centre of the pink flower.
Nostrils and Smile
Yarn: black embroidery yarn.
Embroider two short nostrils approximately 1–1.2 cm apart on the muzzle.
Add a shallow curved smile beneath them, approximately 2–2.5 cm wide.
Assembly
- Sew the muzzle to the lower front of the head first, then embroider the two nostrils and short curved mouth while access to the face remains unrestricted.
- Attach the pink cheek patch outside and below the visible eye. Add a matching patch on the opposite side only if you want bilateral facial symmetry.
- Sew the 18-stitch upper neck to the lower rear half of the head. Angle the head slightly forward and reinforce the join with a second seam approximately 4–5 cm wide.
- Attach the 24-stitch lower neck to the front upper body. Keep the neck nearly vertical but tilt it forward by roughly 5–10 degrees to match the reference.
- Pin all four legs before sewing. Place the front pair beside the chest and the rear pair farther back, then test the dinosaur on a level surface before closing any seam.
- Sew three white toe bumps across the front of every foot, leaving a small strip of blue fabric between adjacent toes.
- Attach the 18-stitch tail opening low on the rear body. Let the lightly stuffed end rest on the table instead of curving sharply upward.
- Arrange seven mint dorsal bumps from the back of the head down the neck, body and upper tail. Position larger pieces near the head and shoulder, then reduce the size toward the tail.
- Sew the pink flower above one eye. Stitch through the centre and inner petal bases while leaving the rounded outer petals free.
- Set the complete dinosaur on a hard surface, correct neck lean, foot height and tail rotation, then weave all structural tails through several stitch directions.
The finished dinosaur should stand on four broad feet with the neck held upright, the head slightly forward, the tail resting behind the body and seven mint dorsal bumps forming a continuous back line.
7 Technical Tips
- Neck buckling: A loosely filled 18-stitch neck can fold beneath the 42-stitch head. Pack the lower two-thirds until finger pressure compresses the cylinder by no more than about 5 mm.
- Head rotation: A neck-to-head seam narrower than approximately 4 cm creates a pivot. Make two passes across a 4–5 cm contact area and add one hidden rear anchor stitch.
- Uneven stance: One leg attached 5 mm higher than the opposite leg can lift a foot off the table. Pin all four legs simultaneously before permanently sewing any of them.
- Tail lift: Dense filling through the last five tail rounds makes the tip point upward. Leave those six-stitch rounds almost unstuffed.
- Decrease holes: Plush chenille can expose stuffing around the head and body reductions. Work each decrease through the front loops of the next two stitches.
- Dorsal-bump crowding: Bases attached directly against one another merge into a continuous ridge. Leave approximately one visible body stitch between most neighboring bumps.
- Toe distortion: Pulling the white toe tails too tightly creates dents across the feet. Sew each bump with enough tension to hold it flat but not enough to compress the 24-stitch foot.
Building a Neck That Supports the Head
The neck is the main structural problem in a long neck dinosaur amigurumi crochet pattern. Published sauropod designs use several solutions: separate head-and-neck sections, body-to-neck transitions and continuous one-piece builds. A free 2024 Little Longneck, for example, treats the head and neck as one component while the body and tail form another. :contentReference[oaicite:19]{index=19}
This version separates the 42-stitch head from a 24-to-18-stitch neck because the supplied image shows an especially large head. That construction gives you more control over the final angle.
Stuff the lower neck densely and the uppermost rounds slightly less firmly. The lower half supplies rigidity; the softer top allows the head seam to sit flush instead of forming a hard ridge.
Shaping the Oversized Head
The reference uses a baby-style sauropod rather than a realistic dinosaur skull. The head therefore expands to 42 stitches and remains broad through six plain rounds.
The muzzle is separate and comparatively shallow. Its job is to extend the face forward without converting the entire head into a long oval.
Install the eyes before the final decreases. Current long-neck patterns use eye sizes from about 6 mm in traditional worsted designs through 10–12 mm in larger chenille toys. :contentReference[oaicite:20]{index=20}
Constructing the Rounded Muzzle
Working around both sides of a foundation chain produces the wide horizontal snout visible in the image. A circular magic-ring muzzle would project too far forward and produce a bear-like face.
Add only a shallow layer of stuffing. Keep the outer edge soft enough to conform to the head when it is pinned.
Place the muzzle below the eye line and check it from the side. Its upper surface should project almost horizontally before curving into the mouth area.
Shaping the Sauropod Body
The torso reaches a 42-stitch plateau and remains there for eight rounds. That width is required because four 24-stitch legs need distinct attachment zones around the lower body.
Stuff the bottom firmly before reducing. A soft belly allows the torso to sink between the legs and shortens the apparent height of the dinosaur.
Keep the shoulder zone slightly compressible so the 24-stitch neck opening can be sewn over a broad contact area.
Positioning All Four Legs
Current long-neck dinosaur patterns consistently rely on four-legged support, reflecting the characteristic sauropod stance. The 2024 Little Longneck specifically constructs four separate legs before final assembly. :contentReference[oaicite:21]{index=21}
Place the front pair relatively close to the chest. The back legs need slightly more separation because they support the broader rear torso and counter the tail.
Do not rely on visual symmetry alone. Set the pinned toy on a hard surface and move each leg until all four feet contact the table.
Making the Long Tapered Tail
The tail grows from six to 18 stitches, giving the body end enough circumference for a strong seam while retaining a narrow flexible tip.
Gradual stuffing is critical. Pack the first 18-stitch section firmly, reduce pressure through the 12-stitch zone and leave the final narrow section almost empty.
Attach the tail low. A seam positioned too high makes the dinosaur look as if it has a tail emerging from the middle of its spine rather than continuing the torso line.
Adding the Rounded Dorsal Bumps
The photographed dinosaur has a row of small mint structures along its spine. They are considerably rounder and shorter than Stegosaurus plates, so the pattern treats them as padded bumps.
Place the largest pieces behind the head and upper neck. Medium pieces continue across the shoulder and upper body, while the smallest forms approach the tail.
Use only a trace of stuffing. Their silhouette should be visible without turning each bump into a separate ball.
Adding the White Toes
Three white raised stitches appear on each foot, for twelve toe bumps in total. Small separate motifs stay readable against thick chenille better than straight embroidered lines.
Pin all three across one foot before sewing. Maintain approximately equal spacing and keep the outer toes inside the blue foot outline.
Repeat the placement on all four legs before tightening the tails. The toe rows should sit at comparable heights when viewed from the front.
Constructing the Crown Flower
The small flower introduces the only strong pink element above the cheek. Five petals are sufficient because the blossom needs to remain secondary to the dinosaur’s face.
Sew the yellow centre onto the flower before attaching the complete motif to the head. Then pin it above one eye, slightly toward the side rather than directly on the crown centre.
Stitch through the flower centre and inner petal sections. Leaving the outer halves free gives the petals the raised shape visible in the reference.
Choosing Yarn and Hook Size
Long-neck dinosaur patterns currently span several yarn systems. A 15 cm no-sew design uses bulky chenille with a 4 mm hook, a 35 cm Brachiosaurus uses DK with a 3.5 mm hook and traditional worsted designs commonly use around 4 mm. :contentReference[oaicite:22]{index=22}
The supplied image has large rounded chenille stitches, so chunky plush yarn is the closest match. A 4.5 mm hook should create a dense enough fabric for stuffing while keeping the long neck flexible enough to shape.
If large gaps appear between stitches when the neck is stuffed, reduce the hook by 0.5 mm rather than altering the stitch counts.
Planning Yarn Quantity
A current 15 cm bulky chenille dinosaur uses one 100 g skein, while much larger long-neck designs consume 175–350 yards depending on yarn and construction. :contentReference[oaicite:23]{index=23}
This photo-matched design is substantially larger than the 15 cm market-style version and includes four large legs, a tall neck and a broad head. The 220–260 g main-color estimate therefore allows for the larger dimensions and sewing tails.
Buy the main aqua yarn from one dye lot. Color variation becomes obvious across the large head, long neck and torso.
Adjusting Finished Size
Keep the written stitch geometry and change yarn thickness for predictable scaling. DK yarn with a 3–3.5 mm hook will produce a substantially smaller long-neck dinosaur while preserving the head-to-neck relationship.
For a larger plush, switch to thicker blanket yarn and a matching hook. Current long-neck patterns demonstrate how the same basic form can move from about 23 cm to more than 50 cm depending on materials. :contentReference[oaicite:24]{index=24}
Avoid increasing only the head beyond 42 stitches. Additional head weight requires a wider neck and broader leg placement.
Keeping the Dinosaur Stable
The four feet, body and tail determine stability. The neck should not function as a counterweight; its job is only to carry the head vertically.
Place the rear legs slightly behind the body’s centre and the front legs underneath the chest. That produces a broad rectangular support area.
Test the stuffed dinosaur before adding the dorsal bumps and flower. If the figure already leans forward, correct the leg positions before increasing the weight above the shoulders.
Finishing Checks
Set the finished dinosaur on a hard, level table. All four feet should contact the surface, with the tail touching or nearly touching behind the body.
View the head from the front. The safety eyes should sit level, the muzzle needs to stay centred and the pink cheek should remain outside the mouth area.
Inspect the profile last. The neck should remain tall without an obvious bend, the head should angle only slightly forward and the seven mint dorsal bumps should decrease gradually toward the tail.
Conclusion
Measure the finished dinosaur from the tabletop to the crown and record the muzzle-to-tail length separately; both measurements matter when reproducing a long-neck plush. Photograph the project from the side before final trimming because that angle reveals neck compression, uneven legs and incorrect dorsal-bump spacing. Save this long neck dinosaur amigurumi crochet pattern to Pinterest and share the finished dinosaur on Instagram with #PastelLongNeckDino. Reshape the neck and all four feet before taking the final photograph. For another version, would you keep the mint dorsal bumps or change the entire back row to alternating pink, yellow and lavender?
Sources
- 5 Little Monsters — Little Longneck, free August 2024 pattern with separate head/neck, body/tail and four legs. :contentReference[oaicite:25]{index=25}
- Ravelry — Long Neck Dinosaur Amigurumi by Roxann Skvarj-Stetzer: multiple yarn-weight examples ranging from 9 to 22 inches and 300–350 yards for the listed construction. :contentReference[oaicite:26]{index=26}
- Crafty Intentions / Ravelry — Long Neck Dinosaur: 4 mm hook, worsted yarn, approximately 17–20 inches long and 6 mm eyes. :contentReference[oaicite:27]{index=27}
- Etsy — current no-sew long-neck dinosaur using bulky chenille, 4 mm hook, 10 mm eyes and about 100 g yarn for a 15 cm toy. :contentReference[oaicite:28]{index=28}
- Etsy — current chenille Brachiosaurus pattern measuring approximately 33 cm long × 23.5 cm high with a 4 mm hook and 12 mm eyes. :contentReference[oaicite:29]{index=29}
- Ravelry — Long Neck Brachiosaurus Plushy: 3.5 mm hook, DK yarn, approximately 35 cm nose-to-tail. :contentReference[oaicite:30]{index=30}









