Introduction
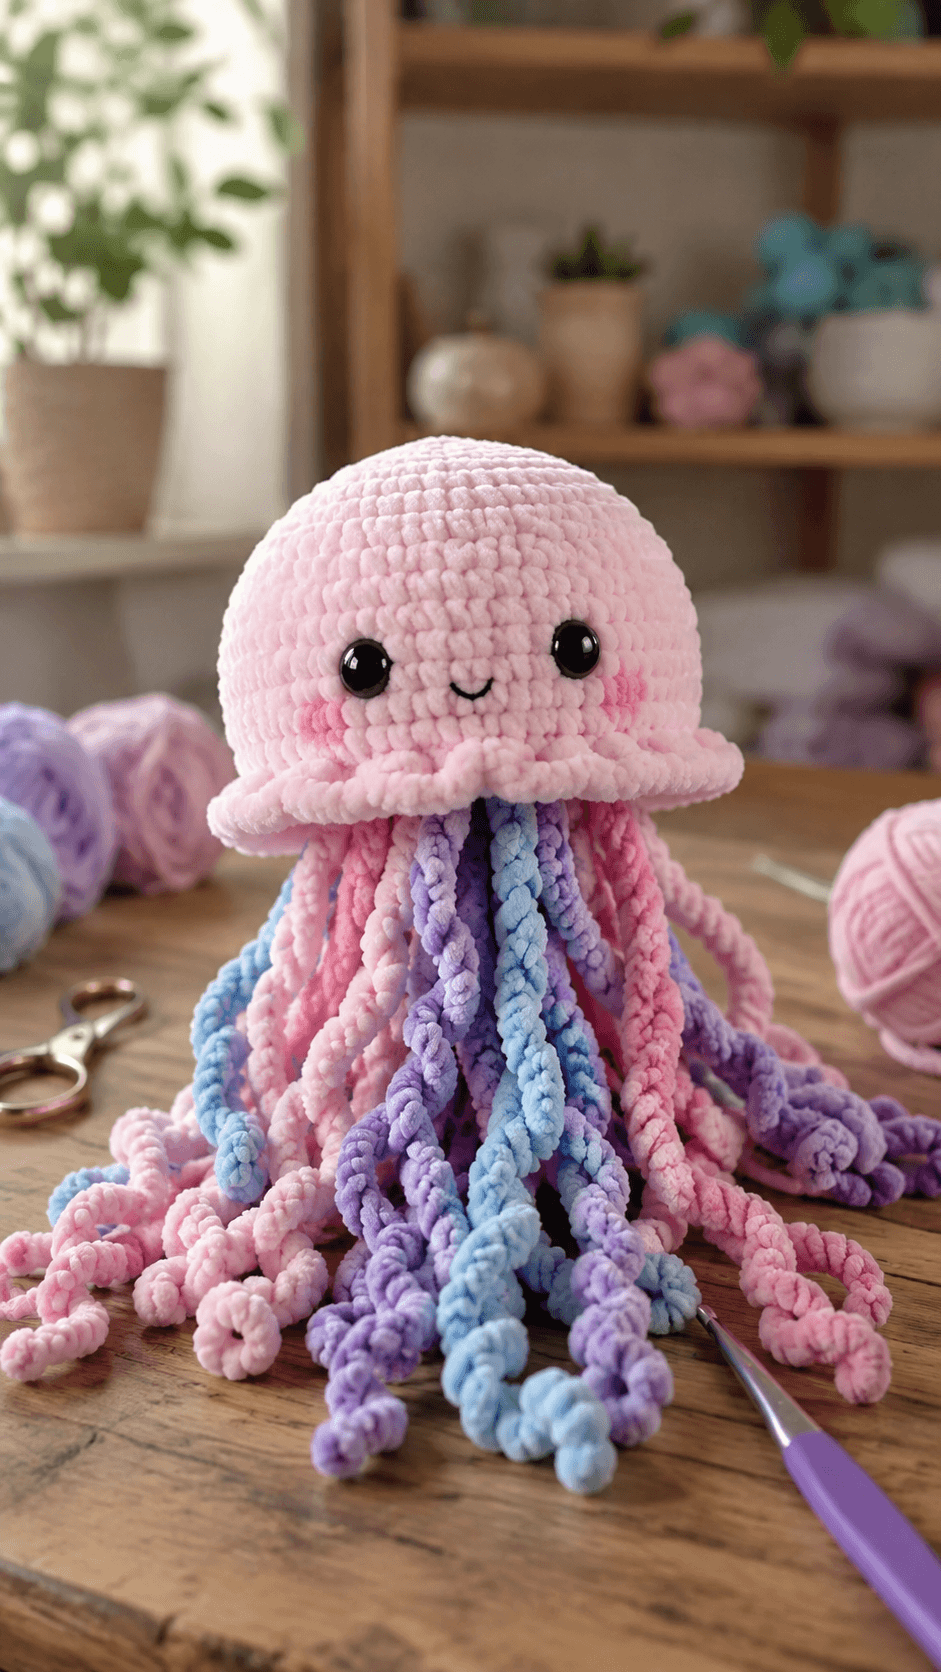
A jellyfish bell can be almost spherical at the crown, but its lower edge must flare before eighteen tentacles are added underneath. This jellyfish amigurumi crochet pattern uses chunky chenille, a 4.5 mm hook and 10 mm safety eyes to create a pastel plush approximately 32–38 cm long. A 42-stitch bell, scalloped rim, pink cheeks and three colors of spiral tentacles form the complete intermediate construction.
The Design: What Makes This Pastel Jellyfish Different
The bell reaches 42 stitches, one increase stage beyond the usual 36-stitch medium amigurumi sphere, because the wide lower edge has to carry a dense tentacle group without looking undersized. Seven shell sections form the skirt-like rim and visually separate the smooth stuffed bell from the moving strands below. The tentacles are deliberately mixed. Pink, lavender and powder blue appear in several lengths, and their increase rates vary so some form tight corkscrews while others fall in longer waves. This plush jellyfish crochet pattern also keeps the face unusually restrained: two black eyes, a small embroidered smile and short pink cheek marks leave most of the bell uninterrupted. A common jellyfish error is placing every tentacle around the outside edge. The centre underside also needs strands or the finished animal looks hollow when viewed from below.
Project Information at a Glance
| Skill Level | Time | Finished Size | Hook | Best For |
|---|---|---|---|---|
| Intermediate | 8–11 hours | Approx. 32–38 cm long | 4.5 mm | Large ocean plush and hanging display |
Published jellyfish sizes vary sharply because tentacle length contributes much more to the final measurement than bell height. Existing designs range from roughly 10–13 cm miniatures to approximately 38–46 cm long curly-tentacle versions. :contentReference[oaicite:19]{index=19}
Materials and Tools
Yarn
- Blush pink — chunky/plush chenille — approximately 110–140 g — bell, scalloped edge and pink tentacles
- Lavender — matching chunky chenille — approximately 45–60 g — spiral tentacles
- Powder blue — matching chunky chenille — approximately 40–55 g — spiral tentacles
- Deeper pink — matching chenille — approximately 35–45 g — secondary tentacles and cheeks
- Black smooth embroidery yarn — small amount — mouth
Tools
- 4.5 mm crochet hook
- Two 10 mm black safety eyes
- Polyester toy stuffing
- Large-eye yarn needle
- Locking stitch marker
- Extra removable markers for tentacle positions
- Scissors
A current plush jellyfish variation uses chunky yarn with a 4.5 mm hook and 10 mm eyes, making that combination a useful reference for this larger photo-matched construction. :contentReference[oaicite:20]{index=20}
Abbreviations
- MR — magic ring
- sc — single crochet
- inc — two single crochet stitches in one stitch
- dec — decrease over two stitches
- sl st — slip stitch
- ch — chain
- hdc — half double crochet
- dc — double crochet
- FLO — front loop only
- BLO — back loop only
An invisible decrease is worked through the front loops of the next two stitches before completing both loops together as one single crochet.
Pattern — Step by Step
Work the bell in continuous spiral rounds until the scalloped edge is reached. Mark the first stitch of every round and verify the number in brackets before moving to the next round.
Jellyfish Bell
Yarn: blush pink — six-stitch amigurumi expansion to a large 42-stitch plateau.
R1: 6 sc in MR (6)
R2: inc × 6 (12)
R3: (sc, inc) × 6 (18)
R4: (2 sc, inc) × 6 (24)
R5: (3 sc, inc) × 6 (30)
R6: (4 sc, inc) × 6 (36)
R7: (5 sc, inc) × 6 (42)
R8–R14: sc around (42)
R15: (5 sc, dec) × 6 (36)
Insert the 10 mm safety eyes between R11 and R12, approximately eight visible stitches apart. Check the face from directly ahead before fitting the washers.
R16: sc around (36)
Begin stuffing the crown. Keep the lower two rounds comparatively soft because the underside and scalloped edge need to remain flatter than the top.
Scalloped Bell Edge
Continue in blush pink. Work in the front loops of R16.
Across the 36 available front loops, distribute seven shell groups as evenly as possible:
*sl st in next st, skip 1 st, 5 dc in next st, skip 1 st, sl st in next st*
Repeat around, slightly adjusting the final spacing if required to finish cleanly at the round marker.
The photographed lower bell has a soft irregular ruffle rather than seven mathematically isolated points. Do not pull the slip stitches tightly.
Fasten off the scallop yarn and weave its tail into the bell wall.
Bell Underside
Return to the unused back loops of R16.
R17: sc around in the unworked back loops (36)
R18: (4 sc, dec) × 6 (30)
R19: (3 sc, dec) × 6 (24)
Add the remaining stuffing now. The bell should be firm through the crown but should compress slightly at the lower edge.
R20: (2 sc, dec) × 6 (18)
R21: (sc, dec) × 6 (12)
R22: dec × 6 (6)
Fasten off, leaving a 25 cm tail. Close the final six stitches through their front loops.
Pink Cheek Marks — Make Two
Yarn: deeper pink.
R1: 6 sc in MR (6)
Fasten off and leave a 12 cm sewing tail.
For the closest photo match, the cheek can also be embroidered as three or four short pink stitches rather than attached as a full circle.
Smile
Yarn: smooth black embroidery yarn.
Embroider a shallow U-shaped mouth between the eyes, approximately 1.5–2 cm wide. Keep the lowest point of the curve roughly one round below the eye centres.
Long Spiral Tentacles — Make Six
Make two pink, two lavender and two powder blue.
Ch 71.
Starting in the second chain from the hook:
2 hdc in each chain across.
The increases will force the strip into a tight spiral.
Fasten off and leave a 20 cm attachment tail.
Target relaxed length after curling: approximately 25–30 cm. Do not stretch the completed spiral when measuring.
Medium Spiral Tentacles — Make Six
Make two pink, two lavender and two powder blue.
Ch 56.
Starting in the second chain from the hook:
*hdc in next ch, 2 hdc in next ch*; repeat across.
Fasten off and leave a 20 cm tail.
This lower increase rate produces a looser curl than the long tentacles.
Short Spiral Tentacles — Make Six
Use mixed pink, lavender and blue.
Ch 41.
Starting in the second chain from the hook:
2 sc in each chain across.
Fasten off and leave a 15 cm attachment tail.
These pieces should remain shorter and springier so they fill the area immediately beneath the bell.
Optional Extra-Wavy Tentacle — Make Two
Use only if the underside still looks sparse after the first 18 pieces are pinned.
Ch 61.
Starting in the second chain:
*sc in next ch, 2 sc in next ch, 2 sc in next ch*; repeat across.
Fasten off and leave an attachment tail.
Tentacle Anchor Ring
Yarn: blush pink.
R1: 6 sc in MR (6)
R2: inc × 6 (12)
R3: (sc, inc) × 6 (18)
R4: (2 sc, inc) × 6 (24)
Fasten off and leave a 35 cm sewing tail.
This flat circle sits beneath the closed bell and hides the tentacle attachment knots. It also distributes the weight of the 18 strands across a wider area.
Attach Tentacles to the Anchor Ring
Divide the 24-stitch ring into three visual zones: outer, middle and centre.
Attach the six long tentacles around the outer two-thirds of the ring. Place the six medium spirals between those points.
Use the six short tentacles closer to the centre, filling the remaining open spaces.
Tie or stitch each attachment through at least two adjacent stitches of the ring. Keep all knots on the side that will face the bell.
Attach Anchor Ring to Bell
Centre the completed tentacle ring over the six-stitch closure at the bottom of the bell.
Sew around the full 24-stitch outer edge of the anchor circle. Pass several additional stitches through the centre of the ring and into the bell closure so the weight cannot pull the circle away from the body.
Assembly
- Finish stuffing and closing the 42-stitch bell before attaching any external facial or tentacle pieces; reshape the crown into a broad dome with the lower edge slightly flatter.
- Check both 10 mm safety eyes from the front, then embroider the shallow black smile centrally between them.
- Attach or embroider the two pink cheek marks below and outside the eyes, keeping both on approximately the same bell round.
- Sort all 18 tentacles by finished length and color before installation; separate the six long, six medium and six short pieces into three groups.
- Attach the long tentacles around the outer area of the 24-stitch anchor ring, spacing pink, blue and lavender so no color dominates one side.
- Add the medium spirals between the long pieces and place the short curls nearer the centre to fill the underside.
- Pin the loaded anchor ring to the bottom of the jellyfish and hold the toy upright; move any tentacle that sits directly behind another strand of the same color.
- Sew the anchor ring around its full outside edge and add several central reinforcement stitches through the ring and bell closure.
- Separate each spiral with the fingers, twisting any relaxed sections back in the direction established by the crochet increases.
- Place the jellyfish upright or suspend it temporarily to inspect the silhouette, then weave the remaining structural tails into the stuffed bell.
The finished jellyfish should show a broad pink dome, an uninterrupted scalloped edge and a dense multicolor tentacle curtain with no large empty section underneath.
7 Technical Tips
- Bell flattening: Excess stuffing in the final 3 cm of the body pushes the scalloped edge outward like a plate. Keep the lower R17–R22 section approximately 20–30% softer than the crown.
- Eye drift: A one-round difference between the two eye stems is easy to see on a smooth 42-stitch bell. Mark both 10 mm eye positions before locking either washer.
- Decrease gaps: Plush yarn can expose stuffing where standard decreases stretch. Work every R18–R22 reduction through the front loops of the following two stitches.
- Tentacle crowding: Three spirals sewn into one bell stitch create a heavy knot and pull the underside downward. Spread each primary attachment across at least two stitches of the 24-stitch anchor ring.
- Loose curls: A tentacle with only one stitch worked into each foundation chain will hang almost straight. Use at least an alternating increase rate of one HDC, then two HDC in the following chain for visible spiral formation.
- Color clumping: Three blue or lavender strands placed beside each other merge visually. Leave at least one differently colored tentacle between most matching long spirals.
- Anchor-ring sag: Sewing only around the ring perimeter can let its centre drop under 18 tentacles. Add at least four reinforcement stitches through the centre area and into the closed bell.
Shaping the Jellyfish Bell
The bell determines whether this jellyfish amigurumi crochet pattern reads as a jellyfish rather than an octopus with a spherical head. Published jellyfish patterns commonly use a rounded upper body followed by a distinct lower edge or underside construction. One free no-sew pattern expands as far as 42 stitches, while another current design uses a 36-stitch structural section with a separate shell edging. :contentReference[oaicite:21]{index=21}
Seven plain rounds at the 42-stitch maximum add enough vertical depth for the large face without turning the bell into a long cylinder. The first decrease round begins before the scalloped edge, which pulls the lower wall inward slightly.
Stuff from the crown downward. Keep the smooth top dense and rounded, then reduce pressure near the lower edge so the ruffle can retain its shape.
Building the Scalloped Lower Edge
The scallops are worked into the front loops before the underside closes. That leaves the back loops available for structural rounds and prevents the decorative edge from having to support the stuffing directly.
Each shell uses a group of double crochet stitches between low slip-stitch anchor points. The height difference makes the bell edge undulate without requiring separately sewn pieces.
The exact shell spacing can be adjusted by one stitch near the round marker. The goal is an evenly distributed ruffle, not a distorted final shell forced into too few loops.
Making the Curly Tentacles
Increase-driven chains are a standard method for jellyfish tentacles. Cuddly Stitches Craft, for example, works back along long chains with repeated HDC increases to form spirals. :contentReference[oaicite:22]{index=22}
The number of stitches placed into the return row controls curl density. Two half double crochets in every chain create the tightest spiral in this version. Alternating one and two produces a softer wave, while two single crochets in every chain give the short pieces a compact spring.
Make one sample in the chosen chenille before cutting yarn for all 18 pieces. Plush fibers and hook tension can change the relaxed length substantially.
Planning Tentacle Length
Published jellyfish illustrate how much the hanging strands affect final dimensions. One 1 Dog Woof design measures about 15–18 inches long with a roughly 5-inch head, and its designer specifically notes that curly-cue length can be adjusted. :contentReference[oaicite:23]{index=23}
This version uses three length classes so the lower silhouette does not end in one horizontal line. Six long tentacles establish the maximum drop, six medium pieces create the main volume and six shorter curls fill the area nearest the bell.
Measure each piece after it has curled naturally. Pulling a spiral straight gives a misleading measurement and can permanently loosen chenille.
Distributing the Pastel Colors
The reference uses pink as the structural color, with blue and lavender concentrated below the bell. Keep the bell entirely blush pink so the multicolor strands remain visually separate from the head.
Alternate the three tentacle colors around the outer ring. Strict pink-blue-purple repetition is not required, but avoid obvious blocks of one shade.
Use deeper pink for several inner curls. Those strands blend partially with the bell while still adding variation between the cooler blue and lavender sections.
Using an Anchor Ring
Many simpler jellyfish patterns work the tentacles directly into the underside or construct the project as one no-sew piece. Current no-sew jellyfish patterns are particularly prominent in search and marketplace results. :contentReference[oaicite:24]{index=24}
The photographed design carries far more strands than a small keychain jellyfish, so a separate anchor circle is useful. It spreads the load over 24 stitches and provides a flat layer that hides knots.
Attach the ring only after all tentacles have been positioned. Rearranging colors is much easier while the circle is still separate from the stuffed bell.
Working with Plush Chenille
A current plush adaptation of a jellyfish pattern uses Premier Parfait Chunky with a 4.5 mm hook and 10 mm eyes, which closely matches the scale choice for this project. :contentReference[oaicite:25]{index=25}
Place a stitch marker through the complete first stitch rather than catching only the fuzzy outer fibers. Chenille can make the top loops difficult to distinguish, particularly after several rounds at the same stitch count.
For tentacles, count the foundation chains before working back across them. Once the strip starts curling, finding a missed chain becomes substantially harder.
Controlling the Face Placement
The eyes sit above the vertical centre of the bell so the scalloped lower edge remains visually separate from the expression. Current jellyfish patterns place safety eyes on the upper-to-middle body rounds rather than immediately above the skirt. :contentReference[oaicite:26]{index=26}
Keep the mouth small. A broad smile extending nearly from eye to eye competes with the dense tentacle curtain and changes the restrained face visible in the image.
Place the cheek marks below the eyes and slightly farther apart. Their job is to add two small color accents, not to create another large circular feature on the pink bell.
Adjusting Finished Size
Jellyfish patterns scale particularly well through yarn substitution. Yarnhild explicitly notes that thicker yarn and a matching hook can change the finished size, while current patterns range from fine-yarn 10 cm examples to much larger hanging designs. :contentReference[oaicite:27]{index=27}
For a smaller version, retain the 42-stitch bell but use DK yarn and a 2.5–3 mm hook. Reduce tentacle foundation chains proportionally after testing one strand.
For a larger plush, move to thicker blanket yarn before adding another increase round. Expanding the bell to 48 stitches would also require more tentacles or wider spacing becomes noticeable underneath.
Safety and Display Use
Long spiral tentacles need special consideration if the finished piece is intended for a young child. One published jellyfish designer specifically warns that long curly cues can become a strangulation hazard and advises against allowing children to sleep with the toy. :contentReference[oaicite:28]{index=28}
For infant-room decor, treat this long-tentacle version as an out-of-reach decorative object rather than a crib toy. Embroidered eyes are also preferable when detachable plastic hardware is unsuitable for the recipient.
A shorter play version can be made by reducing the tentacle chains substantially and using embroidered facial features.
Finishing Checks
Hold the completed jellyfish at bell height and allow every tentacle to hang freely. No section of the underside should show a large empty wedge between neighboring strands.
View the bell directly from the front. Both eyes should remain level, the smile needs to sit on the centre line and the scalloped lower edge should remain visible beneath both cheeks.
Inspect the tentacles last. Long blue, lavender and pink strands should reach different levels, shorter spirals should fill the upper interior and no attachment knot should be visible below the 24-stitch anchor circle.
Conclusion
Measure the finished jellyfish from the crown to the lowest relaxed spiral, then record the bell diameter and longest foundation-chain count beside the yarn and hook used. Those measurements make a second jellyfish easier to reproduce because chenille tentacles can vary substantially even with identical stitch numbers. Photograph the project while the strands hang freely to check color distribution and underside density. Save this jellyfish amigurumi crochet pattern to Pinterest and share the finished plush on Instagram with #PastelSpiralJellyfish. Separate each curl before the final photograph rather than pulling it straight. For another version, would you keep the pink bell or change it to lavender with pink and blue tentacles?
Sources
- Stitch by Fay — No-Sew Crochet Jellyfish: chunky plush adaptation using a 4.5 mm hook and 10 mm safety eyes. :contentReference[oaicite:29]{index=29}
- Cuddly Stitches Craft — Free Crochet Jellyfish: 42-stitch bell construction and long increase-based curly tentacles. :contentReference[oaicite:30]{index=30}
- The Nicole Chase — Julie the Jellyfish, updated March 2026: 36-stitch structural section, 9 mm eyes, scalloped shell edge and spiral tentacle tutorial. :contentReference[oaicite:31]{index=31}
- 1 Dog Woof — Crochet Jellyfish: approximately 15–18 inch overall length, roughly 5-inch head and adjustable curly-cue lengths. :contentReference[oaicite:32]{index=32}
- Etsy — current Jellyfish Amigurumi marketplace showing strong no-sew, micro and plush-pattern competition. :contentReference[oaicite:33]{index=33}









