Introduction
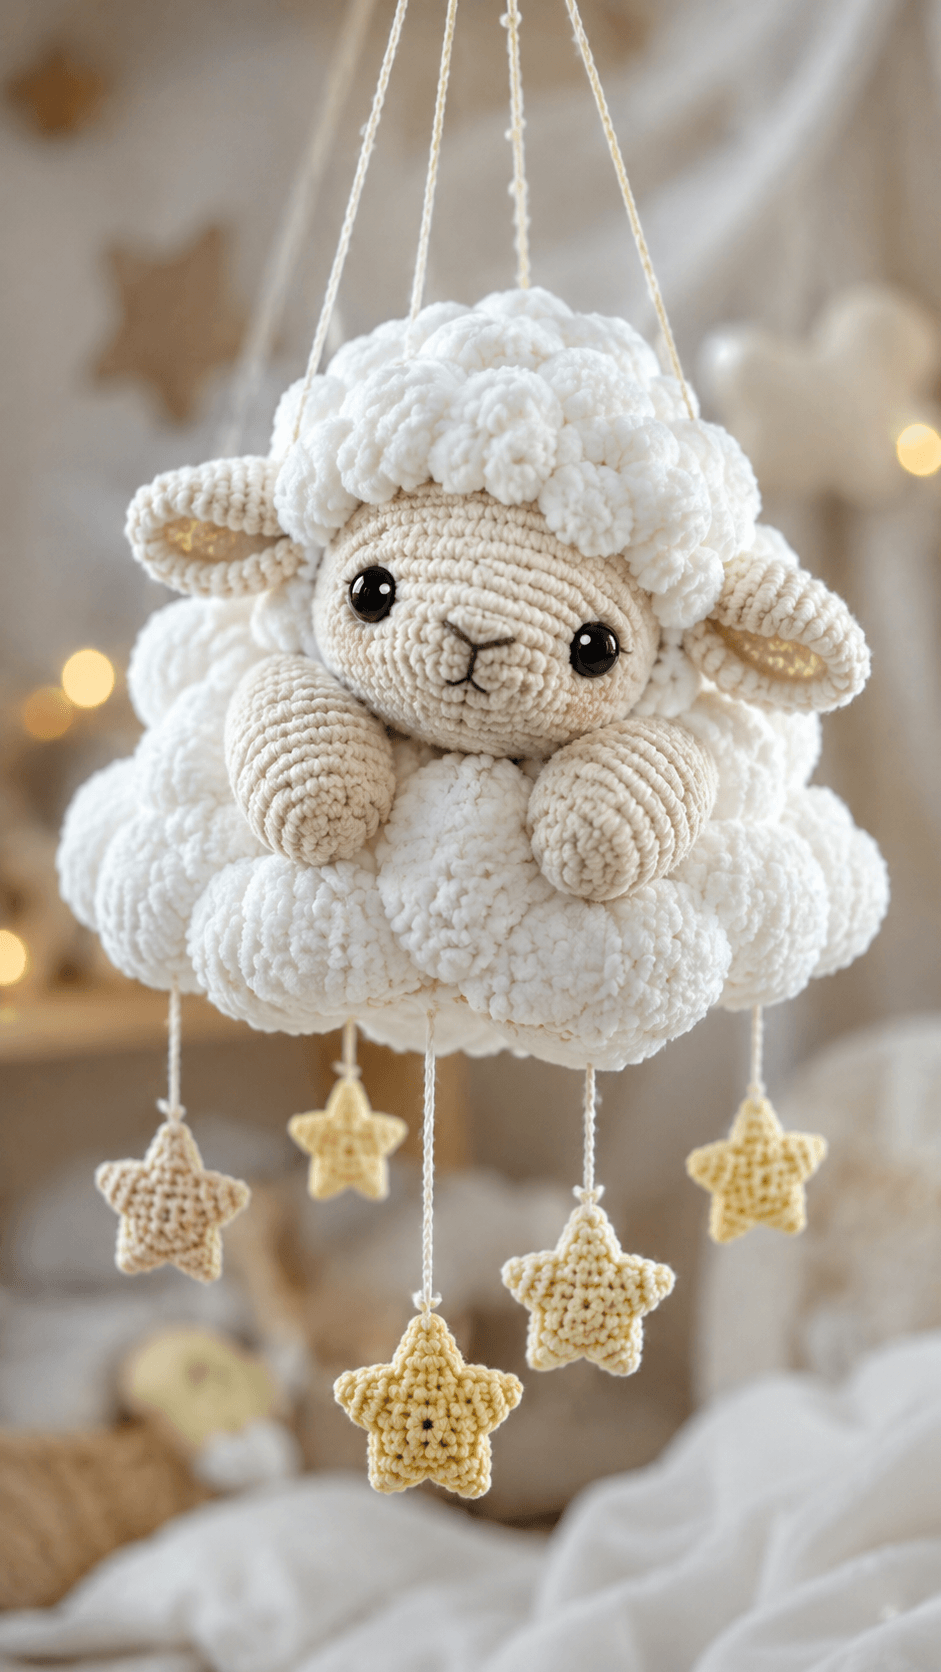
A lamb can disappear into its own fleece, but here the wool has to remain visually separate from the cloud underneath it. This sheep amigurumi crochet pattern uses a 5 mm hook, mixed smooth and textured yarn, and 12 mm eyes to create a lamb approximately 22–25 cm in scale. A stuffed cloud, five hanging stars and four suspension cords convert the character into a decorative hanging project.
The Design: What Makes This Cloud Lamb Different
The sheep uses three distinct textures. Smooth cream crochet defines the face, ears and front legs; clustered white stitches form the fleece cap; larger textured puffs create the cloud around the lower body. Keeping those surfaces separate prevents the lamb from becoming one undifferentiated white shape. The head reaches a 36-stitch plateau, while the body also reaches 36 stitches but remains largely concealed inside the cloud. Long horizontal ears extend beyond the fleece, giving this fluffy sheep amigurumi its recognizable silhouette. Five stars hang below at unequal lengths, so the lower edge remains open rather than forming a straight line. One common construction error is sewing the cloud puffs directly over the arms. Leave a clear front opening so both cream forelegs remain visible against the white fleece.
Project Information at a Glance
| Skill Level | Time | Finished Size | Hook | Best For |
|---|---|---|---|---|
| Intermediate | 12–16 hours | Sheep 22–25 cm; cloud 30–34 cm wide | 5 mm | Hanging nursery or wall decoration |
Published sheep patterns show substantial variation in scale. A free 2024 sheep measures about 23 cm, a plush Dolphin Baby sheep measures about 24 cm, and larger worsted versions exceed 30 cm. The dimensions here target the medium plush range visible in the reference. :contentReference[oaicite:19]{index=19}
Materials and Tools
Yarn
- Warm cream/beige — worsted or bulky smooth yarn — approximately 70–90 g — face, ears, arms and body core
- Pure white — bulky chenille or textured yarn — approximately 100–130 g — fleece and cloud
- Pale butter yellow — worsted/bulky yarn — approximately 25–35 g — hanging stars
- Light beige — worsted yarn — approximately 10–15 g — alternate star
- Black embroidery yarn — small amount — nose and mouth
Tools
- 5 mm crochet hook
- Two 12 mm black safety eyes
- Polyester stuffing
- Large-eye yarn needle
- Locking stitch marker
- Dressmaking pins
- Scissors
- Strong ceiling-safe hanging loop or fixture appropriate to the installation surface
Current bulky sheep guidance uses 5–6 mm hooks and 12 mm safety eyes, making that combination a useful scale reference for this construction. :contentReference[oaicite:20]{index=20}
Abbreviations
- MR — magic ring
- sc — single crochet
- inc — two single crochet stitches in one stitch
- dec — decrease over two stitches
- sl st — slip stitch
- ch — chain
- hdc — half double crochet
- dc — double crochet
- tr — treble crochet
- BO — 5-dc bobble
- BLO — back loop only
An invisible decrease is worked through the front loops of the next two stitches before those loops are completed together as one single crochet.
Pattern — Step by Step
Work in continuous spiral rounds unless a section specifies joined rounds or rows. Place a locking marker through the first complete stitch of each round and verify every bracketed count before continuing.
Head
Yarn: warm cream — original six-stitch sphere calculation.
R1: 6 sc in MR (6)
R2: inc × 6 (12)
R3: (sc, inc) × 6 (18)
R4: (2 sc, inc) × 6 (24)
R5: (3 sc, inc) × 6 (30)
R6: (4 sc, inc) × 6 (36)
R7–R11: sc around (36)
R12: (4 sc, dec) × 6 (30)
Insert the 12 mm eyes between R8 and R9, approximately seven visible stitches apart. Lock both washers before continuing.
R13: (3 sc, dec) × 6 (24)
R14: (2 sc, dec) × 6 (18)
R15: sc around (18)
R16: (sc, dec) × 6 (12)
R17: dec × 6 (6)
Stuff gradually after R12. Shape the forehead and muzzle area independently so the face stays oval rather than perfectly spherical.
Fasten off. Leave a 25 cm tail, pass it through the final six front loops and pull closed.
Muzzle
Yarn: warm cream.
R1: 6 sc in MR (6)
R2: inc × 6 (12)
R3: (sc, inc) × 6 (18)
R4–R5: sc around (18)
R6: (sc, dec) × 6 (12)
Add a shallow layer of stuffing and flatten the piece slightly from top to bottom.
Fasten off and leave a 30 cm sewing tail.
Ears — Make Two
Yarn: warm cream.
R1: 6 sc in MR (6)
R2: inc × 6 (12)
R3: (sc, inc) × 6 (18)
R4–R6: sc around (18)
R7: (sc, dec) × 6 (12)
R8–R9: sc around (12)
Do not stuff. Flatten each ear and pinch the attachment end so the outer half remains broad.
Fasten off and leave a 30 cm tail.
Body
Yarn: warm cream. Most of this piece will be hidden inside the cloud.
R1: 6 sc in MR (6)
R2: inc × 6 (12)
R3: (sc, inc) × 6 (18)
R4: (2 sc, inc) × 6 (24)
R5: (3 sc, inc) × 6 (30)
R6: (4 sc, inc) × 6 (36)
R7–R11: sc around (36)
R12: (4 sc, dec) × 6 (30)
R13: sc around (30)
R14: (3 sc, dec) × 6 (24)
R15: (2 sc, dec) × 6 (18)
Stuff firmly through R12. The lower body needs enough structure to support the head even though the cloud hides most of the torso.
R16: sc around (18)
R17: (sc, dec) × 6 (12)
R18: dec × 6 (6)
Fasten off and leave a 45 cm structural sewing tail.
Front Legs — Make Two
Yarn: warm cream.
R1: 6 sc in MR (6)
R2: inc × 6 (12)
R3: (sc, inc) × 6 (18)
R4–R6: sc around (18)
R7: (sc, dec) × 6 (12)
R8–R11: sc around (12)
R12: dec × 6 (6)
Stuff through R7. Leave the upper portion softer so each leg can rest naturally against the cloud.
Fasten off and leave a 30 cm tail.
Fleece Cap Foundation
Yarn: white textured yarn.
R1: 6 sc in MR (6)
R2: inc × 6 (12)
R3: (sc, inc) × 6 (18)
R4: (2 sc, inc) × 6 (24)
R5: (3 sc, inc) × 6 (30)
R6: (4 sc, inc) × 6 (36)
R7–R8: sc around (36)
Do not close the bottom. Fasten off and leave a 40 cm attachment tail.
Fleece Bobbles
Yarn: white. Work onto the completed fleece-cap surface.
Join yarn near R2. Work one 5-dc bobble into selected stitches, followed by 1 sc.
Texture repeat: BO, sc.
Continue in offset rows across the cap, spacing bobbles approximately one stitch apart. Concentrate larger clusters across the crown and front edge while leaving the lower side edge relatively flat for ear attachment.
Fasten off and hide the working tails beneath the cap.
Cloud Core
Yarn: white textured yarn.
R1: 6 sc in MR (6)
R2: inc × 6 (12)
R3: (sc, inc) × 6 (18)
R4: (2 sc, inc) × 6 (24)
R5: (3 sc, inc) × 6 (30)
R6: (4 sc, inc) × 6 (36)
R7: (5 sc, inc) × 6 (42)
R8–R11: sc around (42)
R12: (5 sc, dec) × 6 (36)
R13: (4 sc, dec) × 6 (30)
R14: (3 sc, dec) × 6 (24)
Stuff firmly enough to retain a flattened oval profile. Do not shape it into a sphere.
R15: (2 sc, dec) × 6 (18)
R16: (sc, dec) × 6 (12)
R17: dec × 6 (6)
Fasten off and close the opening.
Large Cloud Puffs — Make Six
Yarn: white textured yarn.
R1: 6 sc in MR (6)
R2: inc × 6 (12)
R3: (sc, inc) × 6 (18)
R4: (2 sc, inc) × 6 (24)
R5–R7: sc around (24)
R8: (2 sc, dec) × 6 (18)
R9: (sc, dec) × 6 (12)
Stuff to medium firmness. Fasten off and leave a 30 cm tail.
Medium Cloud Puffs — Make Six
Yarn: white textured yarn.
R1: 6 sc in MR (6)
R2: inc × 6 (12)
R3: (sc, inc) × 6 (18)
R4–R6: sc around (18)
R7: (sc, dec) × 6 (12)
R8: dec × 6 (6)
Stuff lightly and leave a 25 cm attachment tail.
Optional Small Cloud Puffs — Make Two
Add these only if open sections remain after assembly.
R1: 6 sc in MR (6)
R2: inc × 6 (12)
R3–R4: sc around (12)
R5: dec × 6 (6)
Stuff lightly and fasten off with a 20 cm tail.
Hanging Stars — Make Five
Make two pale yellow, two cream/yellow and one light beige.
R1: 10 sc in MR, join with sl st (10)
For each point:
ch 5; starting in second chain from hook work sl st, sc, hdc, dc; skip 1 base stitch and sl st into next base stitch.
Repeat five times to create five points.
Fasten off and leave a 20 cm tail.
For a thicker star, make two identical pieces and sew their edges together without stuffing, or add only a very thin layer of filling.
Star Suspension Cords — Make Five
Yarn: strong cream cotton or matching smooth yarn.
Make five cords with approximate finished lengths of:
- 15 cm
- 19 cm
- 23 cm
- 27 cm
- 31 cm
For each cord, make a foundation chain to the required length and slip stitch back along the entire chain for added strength.
Upper Suspension Cords — Make Four
Yarn: strong cream cotton rather than fuzzy chenille.
Make four equal cords approximately 35–45 cm long. Work each as a chain followed by slip stitches back across the foundation.
Join the four upper ends together in one reinforced hanging loop only after the cloud hangs level during testing.
Optional Cheek Patches — Make Two
No colored cheek patches are visible in the supplied photograph. Omit this section for the closest match.
R1: 6 sc in MR (6)
Fasten off with a 10 cm tail if using them.
Nose and Mouth
Yarn: smooth black embroidery yarn.
Embroider a small inverted Y at the centre of the muzzle. Keep the horizontal nose section approximately 1.5–2 cm wide, then extend one short vertical line downward and form two small mouth curves.
Assembly
- Attach the head to the body with the face tilted slightly forward. Sew around the neck twice and add one hidden rear anchor so the head does not rotate after hanging.
- Position the muzzle centrally below the eyes, add the final shallow stuffing and sew around its perimeter. Embroider the black nose and mouth after the muzzle is fixed.
- Place the fleece cap across the crown and upper back of the head. Sew its lower edge securely while keeping the bobbled outer surface free.
- Attach one flattened ear on each side beneath the fleece edge. Spread each ear base across approximately 6–8 head stitches so both pieces project horizontally.
- Sew the front legs to the upper body and angle both paws forward. Keep several centimetres between their lower ends so the white cloud remains visible through the centre.
- Seat the sheep body into the cloud core, then arrange the six large and six medium cloud puffs around it. Sew every puff to both the core and at least one neighboring puff.
- Attach the five star cords across the lower cloud at different positions. Sew one star to each cord and verify that the lowest two stars remain separated rather than overlapping.
- Attach the four upper suspension cords around the cloud at approximately quarter points. Pass each attachment through the cloud core rather than through a surface puff alone.
- Temporarily knot the four upper cords together and suspend the project over a clear surface. Adjust individual cord lengths until the sheep remains upright and the cloud sits approximately level.
- Secure the final upper loop, reinforce all suspension attachment points and weave structural tails through several stitch directions. Treat the finished piece as hanging decoration and keep every cord and soft component outside a child’s reach.
The completed mobile should hang with the sheep facing forward, both ears visible, the cloud wider than the head and all five stars suspended at different heights.
7 Technical Tips
- Head rotation: A 36-stitch head attached by one narrow neck seam can tilt after suspension. Add a second hidden anchor approximately 2 cm behind the main neck seam.
- Fleece-cap lift: Bobbles increase surface weight and can pull the cap away from the forehead. Tack its lower edge to the head every 1.5–2 cm rather than relying on four isolated stitches.
- Cloud collapse: Puffs attached only to neighboring puffs can sag downward. Every large puff should have at least one structural stitch passing into the 42-stitch cloud core.
- Decrease gaps: Standard decreases can expose stuffing through chenille. Work the head, body and cloud reductions through the front loops of the following two stitches.
- Eye-installation timing: A 12 mm washer becomes difficult to reach after the head opening falls below 24 stitches. Lock both eyes before completing Head R13.
- Star tangling: Five cords cut to identical lengths allow neighboring stars to collide. Use at least four centimetres of difference between most adjacent hanging lengths.
- Suspension imbalance: A one-centimetre difference between upper cords can visibly tilt a 30 cm cloud. Hang-test all four cords before permanently closing the top loop.
Building the Sheep Face
The face carries very little decoration, so proportion has to do most of the work in this sheep amigurumi crochet pattern. A 36-stitch head supplies enough width for the horizontal ears while keeping the muzzle relatively small.
Place the eyes before adding the muzzle. That order lets you centre the projecting cream piece between the black eyes rather than forcing the eye position around an already sewn muzzle.
The embroidered nose should remain narrow. A large black triangular nose would dominate the pale face and change the lamb-like proportions visible in the reference.
Making the Wool Cap
Textured sheep patterns commonly use bouclé, loop stitches, bobbles or curls to differentiate fleece from the smooth face. Current sheep resources specifically document bouclé and loop/curl approaches for this purpose. :contentReference[oaicite:21]{index=21}
The separate cap method is useful here because the face remains easy to crochet in smooth rounds. Only after the head shape is complete does the white wool layer cover the crown.
Offset successive bobble rows. Vertically stacked bobbles create visible columns, while staggered clusters produce a more irregular fleece line around the forehead.
Shaping the Cloud
The cloud is not one oversized sphere. A stuffed 42-stitch core provides the load-bearing structure, while twelve separate puffs create the lobed silhouette visible in the image.
Position the largest puffs across the lower front and outer sides. Medium pieces belong around the upper section and between the larger lobes. This distribution keeps the cloud broad without producing six identical round balls.
Do not depend on the surface puffs for hanging strength. Suspension yarn passes into the core because that component carries the combined weight of the sheep, stars and decorative fleece.
Positioning the Long Sheep Ears
Each ear reaches 18 stitches before narrowing to 12. That gives the outer end enough width to read as a lamb ear even when the fleece cap overlaps part of the attachment.
Keep the pieces unstuffed. A stuffed ear forms a cylinder and tends to point forward instead of extending outward beside the head.
Pin both ears before sewing either one. Their tips should finish at comparable heights even if the fleece creates slightly different visible base positions.
Constructing the Five Stars
The five-point star starts from a ten-stitch centre because two base stitches are allocated to each point. Graduated cord lengths create the scattered arrangement visible beneath the cloud.
Use smoother yarn for the stars than for the cloud when possible. Clear stitch definition keeps the points readable and prevents the star outline from becoming fuzzy.
A flat double-layer star weighs less than a heavily stuffed ornament. Lower weight also reduces strain on the cloud’s suspension system.
Planning the Hanging Balance
Four equal suspension points spread the load around the cloud rather than pulling from one central crochet stitch. Place those points roughly at quarter intervals around the structural core.
The sheep introduces more weight toward the front. Final cord lengths may therefore differ slightly even when the original four chains were made to matching measurements.
Test the project while hanging freely before hiding the suspension tails. Correct a tilted cloud by adjusting a cord, not by adding stuffing to one side.
Working with Mixed Yarn Textures
The image depends on a contrast between smooth facial crochet and thick white fleece. Using one yarn for every component removes much of that separation.
A smooth worsted or bulky yarn works well for the cream face because individual rounds remain visible. Chenille or another textured bulky yarn can then be reserved for cloud puffs and wool clusters.
If the textured yarn is significantly thicker, keep the 5 mm hook for the cloud but test a 4–4.5 mm hook on the face. The finished stitches should remain dense enough that stuffing cannot be seen between them.
Nursery Mobile Safety
This hanging sheep-and-cloud project should be treated as decoration rather than a graspable infant toy. The American Academy of Pediatrics advises that crib mobiles remain securely attached and high enough that a baby cannot reach them. :contentReference[oaicite:22]{index=22}
AAP guidance states that a mobile should be removed when a child can get up on hands and knees or at 5 months of age, whichever comes first. CPSC also identifies requirements and strangulation concerns for toys attached to cribs and playpens. :contentReference[oaicite:23]{index=23}
Keep the hanging stars, cords and sheep completely outside the sleep space and beyond reach. For permanent later use, reposition the piece as wall or ceiling decor where a child cannot pull any cord or component.
Adjusting Finished Size
Published sheep patterns demonstrate how strongly yarn affects scale: current examples range from roughly 10–12 cm mini sheep to 23–24 cm plush sheep and larger 34–35 cm versions. :contentReference[oaicite:24]{index=24}
For a smaller mobile, retain the written stitch counts and switch to lighter yarn. Reduce the stars and cloud puffs proportionally rather than removing sheep-head increase rounds.
For a larger hanging decoration, use thicker yarn instead of expanding the head beyond 36 stitches. Increasing only the sheep would require a larger cloud core and stronger suspension spacing.
Finishing Checks
Suspend the finished project for at least several minutes above an empty clear surface and inspect the four upper attachment points. None of the core stitches should distort or open under the hanging load.
View the sheep directly from the front. Both eyes should remain level, the muzzle must sit on the facial centre line and the ear tips should project beyond the fleece on both sides.
Check the stars last. All five need clear separation, and no lower cord should pass around another cord or cross beneath a neighboring star.
Conclusion
Measure the finished cloud from side to side and record the sheep height, longest star drop and four suspension lengths before the project is installed. Hang-test the completed piece again after the fleece and cloud puffs have settled, then correct any tilt at the upper cords rather than at the decorative stars. Save this sheep amigurumi crochet pattern to Pinterest and share the finished hanging project on Instagram with #CloudLambMobile. Keep every suspension cord beyond a child’s reach when displaying it. For another version, would you keep all five stars in cream and pale yellow or replace the centre star with a small crescent moon?
Sources
- Always Free Amigurumi — 2024 Sheep Amigurumi: approximately 23 cm finished-size reference. :contentReference[oaicite:25]{index=25}
- Amigurumi Corner — Fluffy Sheep Amigurumi: bulky yarn, 5–6 mm hook, 12 mm eye and 36-stitch-head reference. :contentReference[oaicite:26]{index=26}
- Jess Huff — Sage the Sheep: textured fleece construction, step-by-step crochet-along and larger worsted sheep scale. :contentReference[oaicite:27]{index=27}
- Airali Design — Bouclé Sheep: textured-yarn fleece construction reference. :contentReference[oaicite:28]{index=28}
- HealthyChildren.org / American Academy of Pediatrics — nursery mobile placement and removal guidance. :contentReference[oaicite:29]{index=29}
- U.S. Consumer Product Safety Commission — toy safety guidance for crib and playpen attachments. :contentReference[oaicite:30]{index=30}









