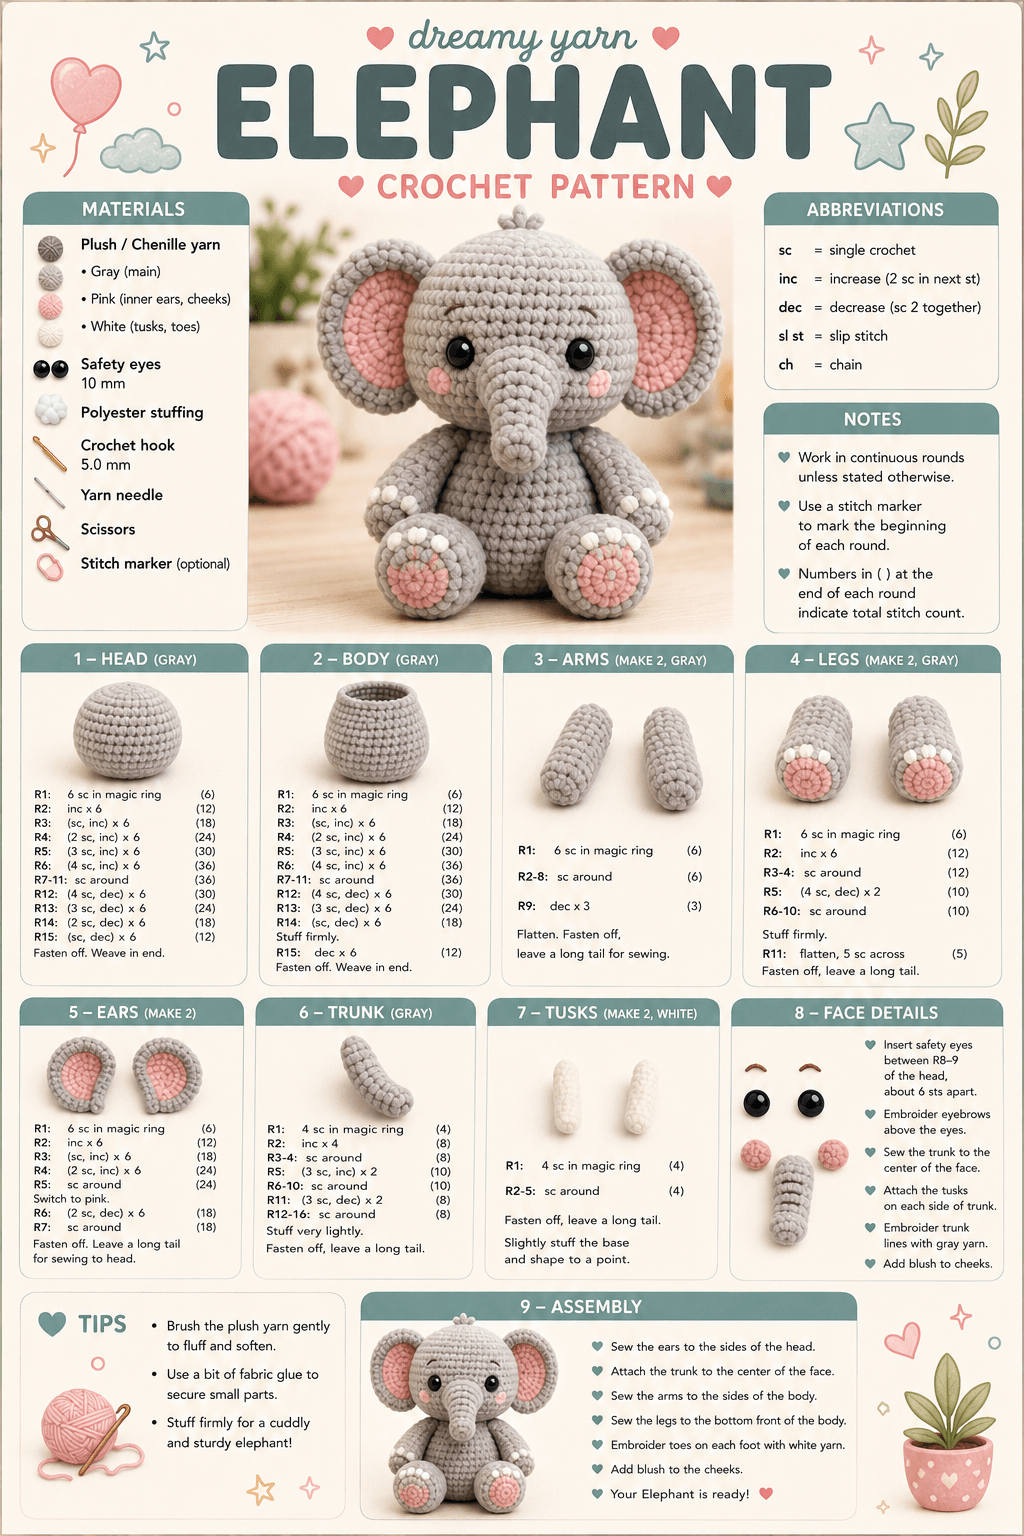
Introduction
An elephant’s trunk starts broad at the face and narrows before it curves, so a straight crocheted tube will not reproduce the defining profile. This elephant amigurumi crochet pattern uses heavy DK or light worsted yarn, a 3.5 mm hook and 10 mm safety eyes to make a seated elephant about 20 cm tall. Separate ear liners, foot pads and tusks add the required detail for an intermediate project.
The Design: What Makes This Baby Elephant Different
The head reaches a 42-stitch plateau to carry two broad ears without making the face disproportionately narrow. Each ear consists of a gray outer layer and a smaller pink insert, which creates the wide colored border visible in the reference elephant. The trunk is constructed separately because its taper and downward curve need more control than a tube worked directly from the face.
The body stops at 36 stitches. That smaller diameter matters: the head remains visually dominant while the seated legs widen the base enough to support it. Circular pink pads are added to the feet before the white toes, producing the layered sole seen in this baby elephant crochet pattern. A common mistake with an elephant amigurumi with trunk construction is overstuffing the final third of the trunk. Dense stuffing makes the narrow section rigid and prevents a controlled downward curve.
Project Info at a Glance
| Skill Level | Time | Finished Size | Hook | Best For |
|---|---|---|---|---|
| Intermediate | 8–10 hours | Approximately 20 cm seated | 3.5 mm | Animal collections, nursery display and supervised play |
Materials and Tools
Yarn
- Light warm gray — heavy DK or light worsted — approximately 100 g — a tightly spun cotton-acrylic yarn
- Dusty pink — matching weight — approximately 15–20 g — for inner ears, cheeks and foot pads
- Cream or white — matching weight — less than 10 g — for tusks and toes
- Dark brown or black — embroidery yarn — approximately 1 m if additional facial details are required
Tools
- 3.5 mm crochet hook
- Two 10 mm safety eyes
- Polyester stuffing
- Yarn needle
- Locking stitch marker
- Dressmaking pins
- Scissors
A comparable 20 cm baby-elephant pattern uses heavy DK yarn, a 3.5 mm hook and approximately 100 g of the main color. :contentReference[oaicite:15]{index=15} Safety eyes should be replaced with embroidery when the finished object is intended for a child under three.
Abbreviations
- MR — magic ring
- sc — single crochet
- inc — two single crochet stitches in one stitch
- dec — invisible single crochet decrease
- sl st — slip stitch
- ch — chain
- hdc — half double crochet
- dc — double crochet
- BLO — back loop only
- FLO — front loop only
An invisible decrease is formed by inserting the hook through the front loops of the next two stitches before finishing them together as one single crochet.
Pattern — Step by Step
Work three-dimensional pieces in a continuous spiral unless another method is stated. Put a marker in the first stitch of every round.
Head
Yarn: light warm gray — original 42-stitch construction based on standard six-stitch amigurumi shaping.
R1: 6 sc in MR (6)
R2: inc ×6 (12)
R3: (sc, inc) ×6 (18)
R4: (2 sc, inc) ×6 (24)
R5: (3 sc, inc) ×6 (30)
R6: (4 sc, inc) ×6 (36)
R7: (5 sc, inc) ×6 (42)
R8–R15: sc around (42)
Insert the 10 mm safety eyes between R11 and R12. Leave approximately seven visible stitches between their inner edges. Pin the trunk temporarily before fitting the washers so its top does not crowd the eyes.
R16: (5 sc, dec) ×6 (36)
R17: (4 sc, dec) ×6 (30)
R18: (3 sc, dec) ×6 (24)
R19: (2 sc, dec) ×6 (18)
Stuff the forehead and side walls firmly. Add smaller pieces behind each eye washer so the eye posts remain perpendicular to the surface.
R20: (sc, dec) ×6 (12)
R21: dec ×6 (6)
Fasten off. Close the opening and weave the tail through the head.
Outer Ears — Make 2
Yarn: light warm gray.
R1: 6 sc in MR (6)
R2: inc ×6 (12)
R3: (sc, inc) ×6 (18)
R4: (2 sc, inc) ×6 (24)
R5: (3 sc, inc) ×6 (30)
R6: (4 sc, inc) ×6 (36)
Do not stuff. Fasten off with a 30 cm sewing tail.
Fold approximately 1 cm of the lower edge inward when the ear is attached. This shallow pleat turns the flat circle into the cupped ear shape visible on the finished elephant.
Pink Inner Ears — Make 2
Yarn: dusty pink.
R1: 6 sc in MR (6)
R2: inc ×6 (12)
R3: (sc, inc) ×6 (18)
R4: (2 sc, inc) ×6 (24)
R5: (3 sc, inc) ×6 (30)
Fasten off, leaving a 25 cm tail. Pin one pink circle centrally to each gray ear.
Leave a gray margin approximately 5–7 mm wide around the pink section. Sew through the back loops of the pink panel where possible so the seam remains recessed.
Trunk
Yarn: light warm gray. Published elephant trunks commonly use narrow stuffed tubes that taper progressively; one current pattern decreases from 12 to 6 stitches across its length. :contentReference[oaicite:16]{index=16}
R1: 6 sc in MR (6)
R2: inc ×6 (12)
R3–R5: sc around (12)
R6: (4 sc, dec) ×2 (10)
R7–R9: sc around (10)
R10: (3 sc, dec) ×2 (8)
R11–R14: sc around (8)
R15: (2 sc, dec) ×2 (6)
R16–R18: sc around (6)
Stuff the first 6 cm lightly. Place almost no stuffing in the narrow final section so the trunk can bend downward.
Fasten off and leave a 30 cm sewing tail. Curve the final 2–3 cm upward very slightly after the main trunk bends down.
Tusks — Make 2
Yarn: cream or white.
R1: 6 sc in MR (6)
R2: sc around (6)
R3: (sc, dec) ×2 (4)
R4–R5: sc around (4)
Do not stuff. Fasten off and leave a 15 cm tail. Compress the final round between the fingers to form a narrow point.
Cheek Patches — Make 2
Yarn: dusty pink.
R1: 6 sc in MR (6)
R2: inc ×6 (12)
Fasten off with a 15 cm sewing tail. Flatten each patch and position it below the outside edge of the nearest eye.
Top Head Tuft
Yarn: light warm gray.
Join yarn to the crown of the completed head. Ch 5, sl st into the same insertion point; repeat twice more.
Fasten off. Draw both ends into the head and knot internally. Keep the three loops under approximately 15 mm high.
Body
Yarn: light warm gray — original medium 36-stitch construction.
R1: 6 sc in MR (6)
R2: inc ×6 (12)
R3: (sc, inc) ×6 (18)
R4: (2 sc, inc) ×6 (24)
R5: (3 sc, inc) ×6 (30)
R6: (4 sc, inc) ×6 (36)
R7–R13: sc around (36)
R14: (4 sc, dec) ×6 (30)
R15–R16: sc around (30)
R17: (3 sc, dec) ×6 (24)
R18: (2 sc, dec) ×6 (18)
Stuff the lower body firmly and the upper section to medium firmness. Keep the top surface level so the head does not tilt.
R19: (sc, dec) ×6 (12)
R20: dec ×6 (6)
Fasten off. Close the opening securely.
Arms / Front Legs — Make 2
Yarn: light warm gray.
R1: 6 sc in MR (6)
R2: inc ×6 (12)
R3–R5: sc around (12)
R6: (2 sc, dec) ×3 (9)
R7–R12: sc around (9)
Stuff the rounded hand and lower half only. Flatten the opening and crochet through both layers with 4 sc.
Fasten off, leaving a 25 cm tail.
Back Legs — Make 2
Yarn: light warm gray.
R1: 6 sc in MR (6)
R2: inc ×6 (12)
R3: (sc, inc) ×6 (18)
R4: (2 sc, inc) ×6 (24)
R5–R6: sc around (24)
R7: (2 sc, dec) ×6 (18)
R8: (sc, dec) ×6 (12)
R9–R12: sc around (12)
Stuff the foot firmly and the upper leg moderately.
Flatten the upper opening and crochet through both layers with 6 sc. Fasten off, leaving a 30 cm tail.
Pink Foot Pads — Make 2
Yarn: dusty pink.
R1: 6 sc in MR (6)
R2: inc ×6 (12)
R3: (sc, inc) ×6 (18)
Fasten off with a 20 cm tail. Sew one circle to the front surface of each back foot before attaching the legs to the body.
White Toes
Yarn: cream or white.
No separate stuffed part is required. Embroider four raised toe marks across the upper edge of each pink rear-foot pad using three horizontal satin stitches per toe.
Repeat three smaller toe marks at the tip of each front leg. Keep individual marks approximately 5 mm wide.
Assembly
- Place the head centrally on the body and sew around the neck twice, passing into firm body stitches rather than only surface loops.
- Pin the ears between approximately head R7 and R14, keeping their upper edges level and their widest points symmetrical.
- Center the trunk between the eyes with its upper edge beginning roughly one round below their lower edges, then sew around the 12-stitch base.
- Attach one tusk to each side of the trunk, keeping the tusk bases approximately 2 cm apart and at the same height.
- Sew the pink cheek patches below and slightly outside the eyes without overlapping the ear seam.
- Attach the arms to opposite sides of the body between approximately R14 and R17, with the flattened upper edges against the torso.
- Pin the rear legs across the lower front of the body, then place the elephant on a level surface before stitching them permanently.
- Rotate each foot until its pink pad faces forward and both sole circles appear at the same angle.
- Check that all eight rear toe marks and six front toe marks remain visible after the limbs are attached.
- Shape the trunk downward, level both ears and weave every structural tail through at least five internal stitches before cutting it.
The completed elephant should remain seated without support, with the trunk centred, both ears level and both pink foot pads facing forward.
7 Technical Tips
- Ear collapse: Large 36-stitch ears can fold backward if only the edge is attached. Sew a second hidden line approximately 8 mm inside the lower ear border to stabilize its angle.
- Trunk stiffness: Packing the final six-stitch section with dense stuffing prevents the required bend. Stop firm stuffing approximately 5 cm from the trunk tip and use only small fibres beyond that point.
- Eye-placement error: A one-round difference is obvious beside a vertical trunk. Insert both 10 mm posts between the same two rounds and count seven visible stitches between their inner edges.
- Decrease ridges: Standard decreases can produce horizontal bars across the lower head. Work front-loop invisible decreases from head R16 through R21.
- Foot rotation: A rear leg twisted by 10 degrees can turn the pink pad toward the floor. Pin both legs first and mark the top centre of each foot before sewing.
- Uneven tusks: A height difference greater than about 4 mm disrupts the symmetry around the trunk. Measure both bases from the centre of the nearest eye before making permanent stitches.
- Loose yarn tails: Large ears and legs place repeated load on their attachment threads. Weave each structural tail through five internal stitches, reverse direction and pass through at least three more.
Conclusion
Check the trunk before weaving the final assembly tails because its curve controls the centre line of the entire face. Place the elephant directly in front of you and compare the eye height, ear width, tusk spacing and orientation of both pink foot pads. Crochet one outer ear first as the next practical step and confirm that its diameter is proportional to the 42-stitch head before making the second. Save this elephant amigurumi crochet pattern to Pinterest and share the finished version on Instagram with #BabyElephantAmigurumi. On this elephant, would you keep the inner ears dusty pink or match them to the foot pads in another color?









