Introduction
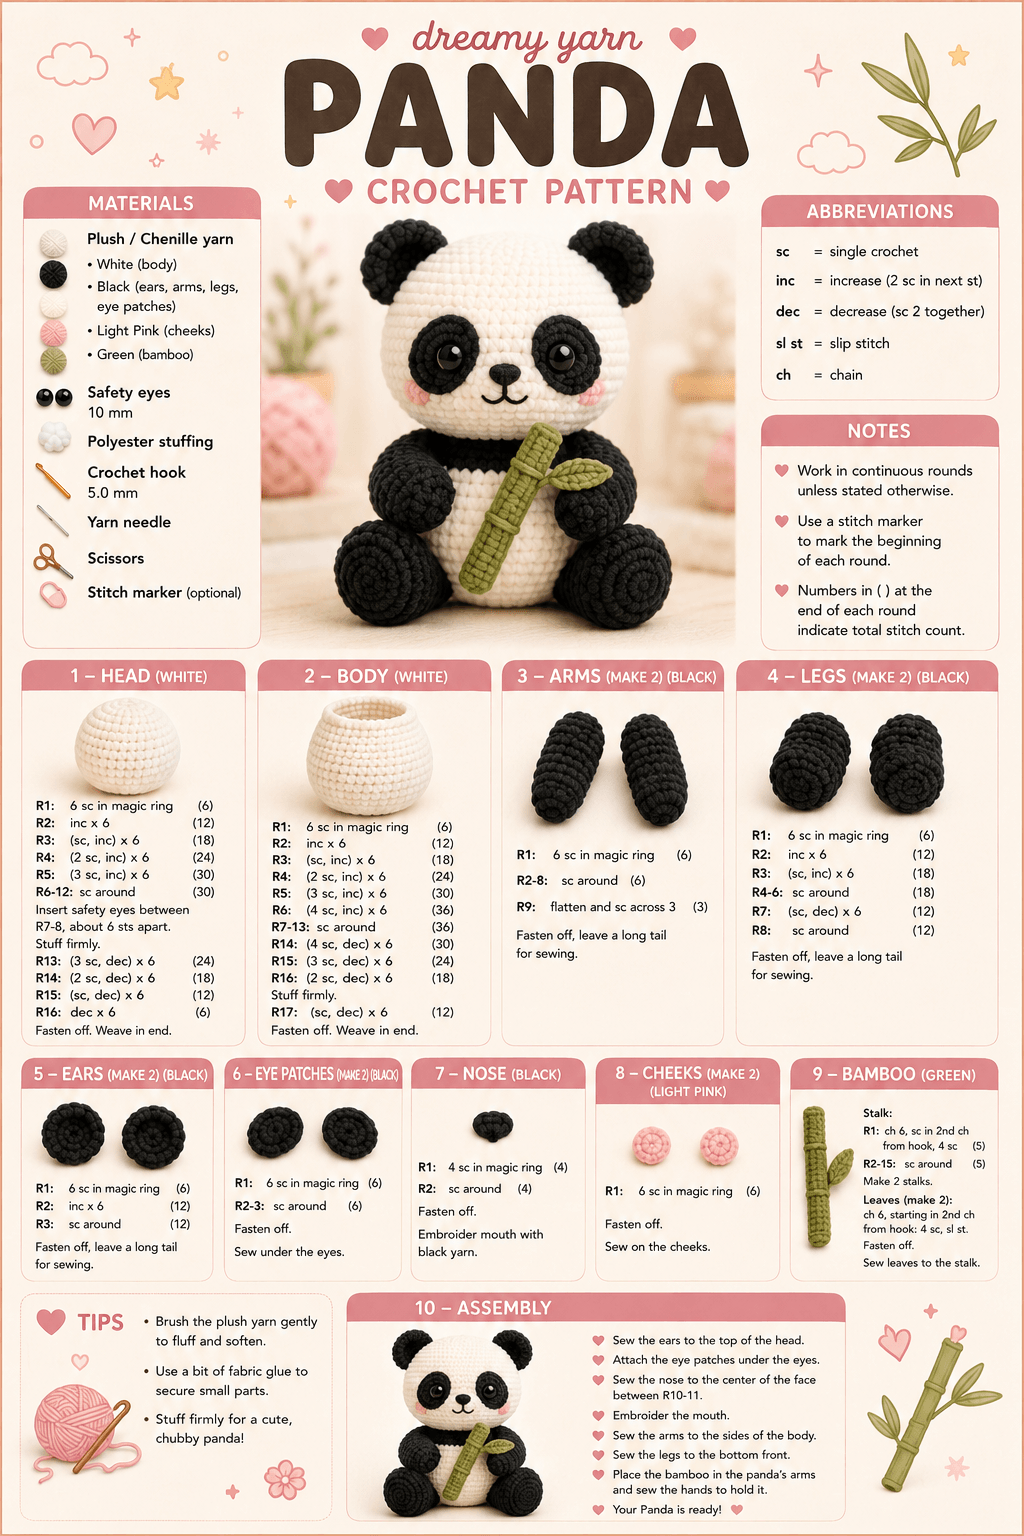
A panda’s black eye patches must frame the eyes without touching the ears or the face loses its characteristic three-part contrast. This panda amigurumi crochet pattern uses plush chenille, a 5 mm hook and 10 mm safety eyes to build a seated panda approximately 25–30 cm tall. Separate ears, limbs, cheek patches and a crocheted bamboo stalk complete the design. The construction suits makers comfortable with spiral rounds and sewn assembly.
The Design: What Makes This Bamboo Panda Different
The head and body both reach 36 stitches, but the head holds that circumference for more rounds so it stays larger and more spherical. Black eye patches are added as flat oval pieces rather than created with color changes, allowing their final angle to be adjusted around the safety eyes. The ears remain compact and sit high on the crown, while the broad black back legs establish a stable seated base. Short arms curve inward to hold the green bamboo across the white belly. That accessory is a central part of this chenille panda amigurumi rather than a loose decorative extra. One common panda-making error is placing the eye patches horizontally. Tilt each patch slightly toward the nose so the inner edge sits lower than the outer upper edge.
Project Information at a Glance
| Skill Level | Time | Finished Size | Hook | Best For |
|---|---|---|---|---|
| Intermediate | 8–11 hours | Approx. 25–30 cm seated | 5.0 mm | Large plush and panda display figure |
Materials and Tools
Yarn
- White — plush/chunky chenille — approximately 100–130 g — head, body and belly
- Black — matching chenille — approximately 80–100 g — ears, arms, legs, eye patches and nose
- Light pink — matching yarn scrap — cheek patches
- Sage or olive green — bulky yarn — approximately 10–15 g — bamboo and leaves
- Black smooth embroidery yarn — small amount — mouth
Tools
- 5.0 mm crochet hook
- Two 10 mm black safety eyes
- Polyester toy stuffing
- Large-eye yarn needle
- Locking stitch marker
- Dressmaking pins
- Scissors
The 5.0 mm hook and 10 mm eye diameter come directly from the supplied project graphic. Check the completed eye patches against the hardware before fitting the washers. Embroidered eyes can replace plastic components when detachable hardware is unsuitable for the intended recipient.
Abbreviations
- MR — magic ring
- sc — single crochet
- inc — two single crochet stitches in one stitch
- dec — decrease over two stitches
- sl st — slip stitch
- ch — chain
- hdc — half double crochet
- BLO — back loop only
- FLO — front loop only
An invisible decrease is worked through the front loops of the next two stitches before completing those loops together as one single crochet.
Pattern — Step by Step
Work in continuous spiral rounds unless a section specifies rows. Place a locking marker in the first complete stitch of every round and confirm the bracketed stitch count before continuing.
Head
Yarn: white — original six-stitch sphere calculation.
R1: 6 sc in MR (6)
R2: inc × 6 (12)
R3: (sc, inc) × 6 (18)
R4: (2 sc, inc) × 6 (24)
R5: (3 sc, inc) × 6 (30)
R6: (4 sc, inc) × 6 (36)
R7–R12: sc around (36)
R13: (4 sc, dec) × 6 (30)
Pin both completed black eye patches across the front. Pass each 10 mm safety-eye stem through its eye patch and then through the white head between R9 and R10. Leave approximately eight visible stitches between the eye stems. Lock the washers now.
R14: (3 sc, dec) × 6 (24)
R15: (2 sc, dec) × 6 (18)
R16: (sc, dec) × 6 (12)
R17: dec × 6 (6)
Stuff in small amounts beginning after R13. Distribute filling behind and around the eye hardware instead of pushing one dense piece directly behind both eyes.
Fasten off. Leave a 20 cm tail, thread it through the six remaining front loops and pull closed.
Body
Yarn: white.
R1: 6 sc in MR (6)
R2: inc × 6 (12)
R3: (sc, inc) × 6 (18)
R4: (2 sc, inc) × 6 (24)
R5: (3 sc, inc) × 6 (30)
R6: (4 sc, inc) × 6 (36)
R7–R12: sc around (36)
R13: (4 sc, dec) × 6 (30)
R14: sc around (30)
R15: (3 sc, dec) × 6 (24)
R16: (2 sc, dec) × 6 (18)
Stuff the lower body firmly enough to hold the seated shape. Keep the final neck section somewhat softer so it compresses beneath the head.
R17: (sc, dec) × 6 (12)
R18: dec × 6 (6)
Fasten off and leave a 45 cm tail for attaching the body to the head.
Arms — Make Two
Yarn: black.
R1: 6 sc in MR (6)
R2: inc × 6 (12)
R3: (sc, inc) × 6 (18)
R4–R5: sc around (18)
R6: (sc, dec) × 6 (12)
R7–R9: sc around (12)
R10: dec × 6 (6)
Stuff only the rounded hand section through R6. Keep the upper arm flexible so it can curve around the bamboo.
Fasten off and leave a 30 cm sewing tail.
Back Legs — Make Two
Yarn: black.
R1: 6 sc in MR (6)
R2: inc × 6 (12)
R3: (sc, inc) × 6 (18)
R4: (2 sc, inc) × 6 (24)
R5–R7: sc around (24)
R8: (2 sc, dec) × 6 (18)
R9: sc around (18)
R10: (sc, dec) × 6 (12)
R11: dec × 6 (6)
Stuff firmly through R7. Shape each completed leg into a broad oval with the largest surface facing forward.
Fasten off and leave a 35 cm sewing tail.
Ears — Make Two
Yarn: black.
R1: 6 sc in MR (6)
R2: inc × 6 (12)
R3: (sc, inc) × 6 (18)
R4: sc around (18)
Do not stuff. Flatten each circle and pinch the lower edge slightly before sewing.
Fasten off and leave a 25 cm attachment tail.
Eye Patches — Make Two
Yarn: black.
R1: 6 sc in MR (6)
R2: inc × 6 (12)
R3: (sc, inc) × 6 (18)
Slip stitch into the next stitch. Fasten off and leave a 30 cm sewing tail.
Stretch each circle into a narrow oval while pinning. Tilt the inner lower edge toward the nose position.
Nose
Yarn: black.
R1: 6 sc in MR (6)
R2: inc × 6 (12)
R3: sc around (12)
R4: (sc, dec) × 4 (8)
Add only a tiny pinch of stuffing. Flatten the piece into a short horizontal oval.
Fasten off and leave a 20 cm sewing tail.
Cheek Patches — Make Two
Yarn: light pink.
R1: 6 sc in MR (6)
R2: inc × 6 (12)
Slip stitch into the next stitch. Fasten off and leave a 15 cm tail. Pull each piece into a shallow horizontal oval during attachment.
Belly Patch
Yarn: white. This piece adds a subtle raised centre to the already white body.
R1: 6 sc in MR (6)
R2: inc × 6 (12)
R3: (sc, inc) × 6 (18)
R4: (2 sc, inc) × 6 (24)
Fasten off and leave a 30 cm sewing tail. Stretch the circle vertically while pinning it to the front of the body.
Bamboo Stalk
Yarn: sage or olive green.
R1: 6 sc in MR (6)
R2–R15: sc around (6)
Stuff only enough to keep the stalk from collapsing. A narrow strip of rolled scrap yarn can replace polyester filling inside such a small tube.
Fasten off and close the final opening.
Bamboo Nodes — Make Three
Yarn: sage green.
Ch 7. Fasten off.
Wrap each chain around the stalk at approximately equal intervals and sew its ends together. Tack the ring to the stalk at two points so it does not slide.
Bamboo Leaves — Make Two
Yarn: sage green.
Ch 7.
Starting in the second chain from the hook: sl st, sc, hdc, hdc, sc, sl st.
Work 3 sc into the final chain and continue along the opposite side: sl st, sc, hdc, hdc, sc, sl st.
Fasten off and leave a 15 cm tail. Fold the finished leaf lightly along its starting chain to create a centre ridge.
Mouth
Yarn: smooth black embroidery yarn.
Embroider one short vertical line beneath the nose, approximately 8–10 mm long. From its lower end, work two shallow curved stitches outward to create the small panda mouth.
Assembly
- Centre the head above the body and sew around the neck twice using the 45 cm body tail. Add one hidden rear anchor stitch to reduce forward rotation.
- Position both black eye patches before fixing their outer edges. Keep their inner edges angled downward toward the future nose while both 10 mm eyes remain level.
- Attach the black nose at the facial centre below the eye patches, then embroider the short vertical line and two curved mouth sections beneath it.
- Sew the pink cheek patches below and slightly outside the eye patches. Keep both cheeks on the same head round.
- Pin the black ears across the upper head. Sew each flattened base across approximately 6–8 head stitches while leaving the rounded outer edge free.
- Attach the white belly patch centrally across the lower torso. Sew around its edge with relaxed tension so the underlying body is not pulled inward.
- Sew the two black back legs across Body R4–R9. Test the panda on a hard surface before tightening either seam so both feet remain level.
- Attach both arms across Body R9–R14 and angle their rounded ends toward the centre. Leave enough space between them for the bamboo stalk.
- Sew the two leaves and three nodes to the bamboo. Place the stalk diagonally across the belly and tack it to each arm with hidden green or black stitches.
- Check the eye patches, ears, limbs and bamboo from the front and both sides, then weave every structural yarn tail through at least three stitch directions before trimming.
The completed panda should sit on the lower body and both back legs while the bamboo remains diagonally supported between the two black arms.
7 Technical Tips
- Eye-patch rotation: A circular patch sewn without pinning can shift until the eye looks sideways. Pin each 18-stitch patch at four points and angle its inner edge approximately one stitch lower than its outer edge.
- Head overstuffing: Packing the 36-stitch sphere too tightly pushes the safety eyes forward and opens the chenille stitches. Stop when firm finger pressure creates an indentation of roughly 5 mm.
- Visible decrease gaps: Conventional decreases can expose stuffing through plush yarn. Work every shaping decrease through the front loops of the following two stitches.
- Late eye installation: The washers become difficult to reach once the head opening falls below 24 stitches. Fit both 10 mm eyes before completing Head R14.
- Leg imbalance: A difference of approximately 5 mm between back-leg attachment heights makes the panda lean. Pin both legs at the same time and test the seated figure before sewing permanently.
- Bamboo rotation: One attachment point allows the stalk to swing away from the belly. Tack it at two arm contacts separated by approximately 4–6 cm.
- Ear collapse: A heavy chenille ear attached through only two or three stitches will fold downward. Spread each ear seam across at least 6–8 head stitches.
Getting the Panda Eye Patches Right
The black eye patches carry most of the facial identity in this panda amigurumi crochet pattern. Their shape should be oval rather than perfectly circular after attachment. Stretch each 18-stitch piece vertically and rotate its lower inner side toward the nose.
Install the safety eye through both layers before sewing the entire patch. This locks the centre position while the outer perimeter can still be adjusted. The black patch needs visible white head fabric between its outer edge and the nearby ear.
Pin both sides at once. Matching eye height is more important than making the black patches mathematically identical, because chenille pieces can stretch differently during sewing.
Shaping the Panda Head
The 36-stitch head remains at full circumference for six rounds. That plateau supplies enough vertical space for the eyes, cheeks and small muzzle without turning the head into a flattened disc.
Add stuffing in small pieces rather than one compact handful. Work around the safety-eye washers first and then fill the crown, sides and lower head. Uneven filling is easier to see after the eye patches are in position.
Before closing R17, view the head from above. Both sides should have comparable curvature and neither safety eye should project farther forward than the other.
Constructing the Black Panda Limbs
The back legs are larger than the arms because they establish the sitting silhouette. Each leg reaches 24 stitches, while the arms reach 18. That difference keeps the lower half broad without making the shoulders excessively heavy.
Stuff the arms only through their rounded ends. Flexible upper rounds allow the hands to turn inward and hold the bamboo. A completely filled arm tends to project straight ahead.
The hind legs should sit outside the lower body rather than directly underneath it. Rotate each broad oval forward until the panda rests steadily with both feet visible from a straight-on view.
Building the Bamboo Accessory
The bamboo is the defining accessory in this panda with bamboo crochet design. A narrow six-stitch tube creates enough thickness to remain visible against the white belly without becoming heavier than the arms can support.
Three separate chain rings create the segmented bamboo appearance. Space them irregularly rather than dividing the stalk into perfectly equal quarters. The leaves attach close to the upper half where they remain visible above the panda’s hand.
Keep the leaves relatively flat. Stuffed leaves add unnecessary weight and can rotate the stalk. A small fold along the starting chain provides enough structure to show the leaf centre.
Ear Placement
The ears belong high on the crown but not directly at the top centre. Leave a clear section of white yarn between the inner edges so the head remains visibly rounded.
Pin both ears before sewing either one. Their outer edges should project beyond the head profile while the lower portions overlap the upper side curve slightly.
Do not stuff the ears. Plush chenille already supplies enough thickness, and additional filling makes the pieces heavy enough to pull against the crown seam.
Working with Chenille Yarn
Chenille hides stitch boundaries more effectively than smooth cotton, particularly where black stitches absorb shadows. Use a locking marker through the entire first stitch instead of clipping a single surface strand.
Feel for both top loops before inserting the hook during decrease rounds. A missed black stitch can be difficult to see later and will change the final circumference of a limb or ear.
When a magic ring sheds or breaks during tightening, pass a smooth scrap strand through the starting loop and use the stronger strand to close the centre. Hide it inside the stuffed component.
Controlling Face Placement
The eye patches, eyes, nose and cheeks should be pinned as a group before the final sewing begins. A centred nose can still look crooked when the patches have different angles.
Place the cheek patches below the eyes and farther outward than the nose width. Their low horizontal shape adds color without changing the panda’s black-and-white facial structure.
Use smooth black yarn for the mouth. Thick chenille produces a line too broad for the compact facial space beneath the nose.
Adjusting Finished Size
The written counts are intended for a medium-large chenille panda using the 5 mm hook specified in the reference graphic. Changing the yarn brand may change the seated height because plush strands vary substantially in diameter.
For a smaller panda, retain the counts and use bulky yarn with a 4–4.5 mm hook. Recheck the eye diameter after the head reaches its 36-stitch plateau rather than automatically retaining 10 mm hardware.
For a larger figure, change to thicker chenille before adding another increase round. Expanding the head to 42 stitches would also require proportionally larger eye patches, ears and limbs.
Finishing Checks
Set the completed panda on a level surface before hiding the final structural tails. Both black back legs should contact the surface while the lower white body rests centrally between them.
View the face directly from the front. The safety eyes need to remain level, both black patches should have similar angles and the nose must sit on the vertical centre line.
Inspect the bamboo last. Both hands should visibly contact the stalk, and at least one green leaf should remain unobstructed from a straight-on viewing angle.
Conclusion
Measure the completed panda from the seated base to the highest point of the ears and record that figure beside the yarn, hook and eye size used. Photograph the face straight on next; that view exposes uneven eye-patch angles, asymmetric ears or a bamboo stalk that has rotated away from the hands. Save this panda amigurumi crochet pattern to Pinterest and share the finished project on Instagram with #BambooPandaPlush. Keep the bamboo diagonal across the white belly when setting the final pose. For another panda, would you keep the two-leaf bamboo shown here or add a third leaf near the upper node?
Sources
- Yarn + Chai — Amigurumi Panda: 12-inch bulky velvet/chenille panda, #5 yarn, 4 mm hook and 15 mm eyes.
- Ravelry — Panda Amigurumi by Odile Masson: 16 cm DK panda, 3.5 mm hook, 10 mm eyes and approximately 88 m yarn.
- Cuddly Stitches Craft — 2024 Low-Sew Panda: free step-by-step panda construction reference.
- Clover Needlecraft — Giant Panda: jumbo chenille panda measuring approximately 35.6 cm with published black and white yarn quantities.









