Introduction
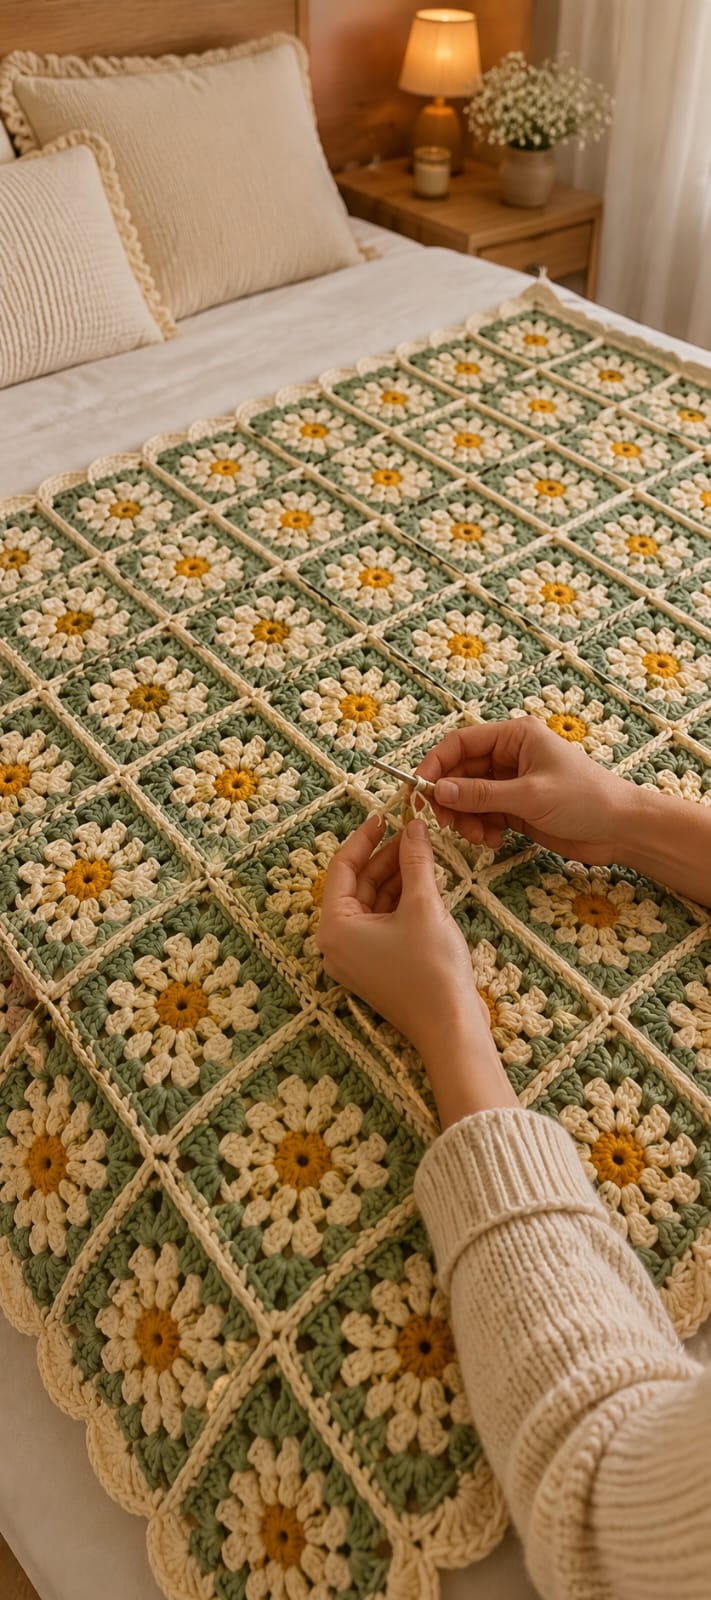
A daisy square fails visually when its flower center shifts even half a petal toward one corner, because a blanket repeats that error more than one hundred times. This daisy granny square blanket crochet pattern uses worsted yarn, a 5 mm hook and 108 floral blocks to produce an approximately 114 × 152 cm throw. Sage backgrounds, cream petals and raised cream joins create the pictured grid.
The Design: What Makes This Daisy Blanket Different
The flower is built first as a circular motif and squared only after all twelve cream petal positions have been established. That sequence keeps the mustard center round while allowing the sage background to form four controlled corners. Each block is designed to finish near 12.7 cm before joining, so a 9-by-12 layout produces the long rectangular proportions of the reference blanket. Cream joining stitches remain visible on the surface instead of disappearing into the sage background. They become part of the design: a pale grid separating every crochet flower granny square blanket motif. The final scalloped border repeats the cream joining color and breaks the rigid outer rectangle with a softer edge. One frequent construction error is joining squares before blocking them. A difference of only 5 mm per block can compound across nine columns and distort the finished throw.
Project Info at a Glance
| Skill Level | Time | Finished Size | Hook | Best For |
|---|---|---|---|---|
| Intermediate | 35–45 hours | Approx. 114 × 152 cm / 45 × 60 in | 5 mm | Bed-top throw, sofa blanket or floral display blanket |
Materials and Tools
Yarn
- Muted sage green — worsted / Aran weight — plan approximately 900–1,000 g for 108 square backgrounds, allowing extra for gauge variation.
- Warm cream — worsted / Aran weight — approximately 450–550 g for petals, raised joins and the outer border.
- Mustard yellow — worsted / Aran weight — approximately 80–100 g for all daisy centers.
Tools
- 5 mm crochet hook
- Locking stitch markers
- Tapestry needle
- Sharp scissors
- Blocking mats
- Rust-resistant blocking pins
- Measuring tape or rigid ruler
A current worsted daisy blanket specifies a 5 mm hook, while published Aran daisy squares can finish around 12.7 cm. Check the first completed block before producing the remaining 107 squares.
Abbreviations
- MR — magic ring
- ch — chain
- sl st — slip stitch
- sc — single crochet
- hdc — half double crochet
- dc — double crochet
- tr — treble crochet
- cl — cluster
- sp — space
- st / sts — stitch / stitches
- BLO — back loop only
When decreasing is needed for a correction round, an invisible decrease works through the front loops of the next two stitches before completing one single crochet through both loops.
Pattern — Step by Step
US crochet terminology is used throughout. Make one complete sample square, block it to 12.7 cm and confirm yarn consumption before beginning batch production.
Daisy Granny Square (Make 108)
Colors: mustard yellow, warm cream and muted sage green.
Round 1 — Daisy Center
Use mustard yellow.
R1: Make an MR. Ch 3; this counts as the first dc. Work 11 dc into the ring. Join with a sl st to the top of the beginning ch-3 (12 dc).
Pull the magic ring fully closed. The center must lie flat before the petal color is joined.
Fasten off mustard and secure the tail.
Round 2 — Twelve Petal Bases
Join warm cream in any dc from R1.
R2: Ch 3. In the same stitch work 2 unfinished dc, yarn over and pull through all loops to complete the first 3-dc cluster; ch 2. In each of the remaining 11 stitches work (3-dc cluster, ch 2). Join with a sl st to the top of the first cluster (12 clusters, 12 ch-2 spaces).
Do not tighten the ch-2 spaces. They provide the width needed for the fuller petal round.
Round 3 — Daisy Petals
Continue with warm cream.
R3: Sl st into the first ch-2 space. Ch 2, 3 dc, ch 2, sl st into the same space. In each remaining ch-2 space work (sl st, ch 2, 3 dc, ch 2, sl st).
Twelve petal groups are completed. Spread the petals with the fingers and check that none are trapped behind the neighboring group.
Fasten off cream. Leave no unsecured tails at the center before adding the background.
Round 4 — Squaring the Flower
Join muted sage in the valley between any two petals.
R4: Ch 3, 2 dc in the same valley, ch 1. Work 3 dc in each of the next two petal valleys, placing ch 1 between groups. In the fourth valley work (3 dc, ch 2, 3 dc) to form the first corner.
Continue around in this sequence: three side groups separated by ch 1, then (3 dc, ch 2, 3 dc) in the next corner valley. Repeat until four corners have been formed. Join with a sl st.
The flower now sits inside a recognizable square. Each corner must align between petals rather than through the center of a petal.
Round 5 — Sage Background
Continue with muted sage.
R5: Sl st to the first ch-1 space. Ch 3 and work 2 dc in the same space. Work 3 dc in every ch-1 side space. In each ch-2 corner work (3 dc, ch 2, 3 dc). Join with a sl st to the beginning ch-3.
Measure across the center after R5. The target blocked dimension is approximately 12.7 cm square.
Fasten off. Leave a 12–15 cm tail and weave it through at least three groups in alternating directions.
Production Plan for 108 Squares
Make the squares in batches rather than completing all color stages individually from start to finish. First crochet 108 mustard centers. Follow with all cream petal rounds, then finish the sage backgrounds. Batch construction reduces repeated yarn changes and makes differences in tension easier to identify before dozens of mismatched blocks have been produced.
Separate the finished squares into stacks of 12. Measure one square from each stack across both axes. Any block more than approximately 5 mm outside the target should be corrected or reworked before blocking.
Blocking the Squares
Pin each square to approximately 12.7 × 12.7 cm. Place the four corners first, then pin the midpoint of every side so the edges remain straight without stretching the daisy center.
Allow all blocks to return completely to room conditions before stacking them. Joining damp or stretched squares can produce an uneven final grid.
Blanket Layout
Arrange the 108 squares in 9 columns × 12 rows. Place every flower with the same side facing upward and orient each starting seam in the same direction.
The repeated orientation matters because a visible join forms a geometric grid over the complete blanket. Rotate any block whose petal or corner placement looks noticeably different before joining.
Horizontal Raised Joins
Use warm cream.
Place two squares side by side with right sides facing upward. Insert the hook through the corresponding outer loops of the first corner stitches and make a sl st.
Ch 1, then sc through the corresponding outer loops of both squares along the complete edge. Keep the cream joining yarn on the front surface.
The seam should remain visible but flat. Pulling the sc stitches tightly creates a raised ridge that shortens the row of squares.
Repeat until nine squares have been joined into one horizontal row. Make 12 complete rows.
Vertical Raised Joins
Continue with warm cream.
Align two completed nine-square rows. Starting at one outer corner, work sc through the corresponding outer loops along the full blanket width.
At every existing horizontal junction, ch 1 before crossing the intersection and continue into the next pair of squares.
Do not add extra single crochet stitches into the intersection itself. Excess stitches make the grid buckle where four squares meet.
Join all 12 rows until the complete 9 × 12 grid is assembled.
Outer Foundation Border
Use warm cream.
Join the yarn at any blanket corner.
Border R1: Sc evenly around the entire perimeter. Work 3 sc into each outer corner. Where one square meets the next, work one sc into the seam junction rather than skipping over it.
Count the stitches on opposite sides. The two long sides should match one another, as should the two short sides.
Second Border Round
Border R2: Ch 1, sc in each stitch around. At each corner work 3 sc into the center corner stitch from the previous round.
This plain round separates the structural edge from the decorative scallops.
Scalloped Border
Continue with warm cream.
Border R3: Sl st in first stitch, skip 1 stitch, work 5 dc in the next stitch, skip 1 stitch, sl st in the next stitch. Repeat around.
At each corner, adjust the spacing so one complete five-dc shell sits over or immediately beside the corner rather than splitting a shell across two sides.
If fewer than four stitches remain before a corner, redistribute the final two shells across the preceding 10–12 stitches instead of forcing an incomplete scallop.
Join with a sl st. Fasten off and weave the final tail through the cream border.
Optional Reinforcement at Grid Intersections
Use warm cream.
Inspect every four-square intersection from the reverse side. If a visible opening exceeds approximately 5 mm, thread the tapestry needle with cream yarn and make one diagonal stitch through the four adjacent corner loops.
Return diagonally in the opposite direction to form a small hidden X. Knot the yarn only on the reverse side and bury both tails inside the joining seam.
Assembly
- Complete all 108 daisy squares and weave in the mustard, cream and sage tails before blocking.
- Block every square to approximately 12.7 cm and reject any block more than about 5 mm outside the target measurement.
- Arrange the squares into nine columns and twelve rows with all flowers facing the same direction.
- Photograph or label the complete layout before moving individual squares to the joining area.
- Join each set of nine squares horizontally with warm cream so twelve separate strips are produced.
- Align the twelve strips and work the vertical cream joins while keeping all grid intersections centered.
- Lay the assembled blanket flat and correct any twisted square before beginning the perimeter edging.
- Work two structural cream border rounds, placing three single crochet stitches at each outer corner.
- Add the final five-double-crochet scalloped border and redistribute shells near corners whenever the stitch repeat does not divide evenly.
- Weave all remaining tails for at least 4–5 cm, inspect every grid intersection and block the complete blanket to its final rectangular dimensions.
The completed blanket should lie rectangular with straight cream grid lines, centered daisies and scallops that remain flat around all four corners.
7 Technical Tips
- Square-size drift: A difference of 5 mm seems minor until nine blocks are placed across one row. Measure one block from every batch of 12 and correct tension before continuing production.
- Off-center daisies: Starting a corner in the wrong petal valley rotates the entire sage square around its flower. Mark the first intended corner after R3 and place the remaining three corners exactly three petal valleys apart.
- Cupped flower centers: Twelve center stitches packed into an over-tight magic ring can make the yellow disc dome upward. Close the ring firmly only after checking that all 12 stitches can lie on one plane.
- Contracted joining seams: Tight cream single crochet joins shorten the rows and make the blanket ripple between grid lines. Hold each pair of squares flat while joining and compare the finished seam length with the 12.7 cm block edge.
- Bulging intersections: Adding extra stitches where four blocks meet creates a raised knot in every grid crossing. Use one chain to move across the junction and reinforce from the reverse side only when an opening exceeds about 5 mm.
- Wavy border: Too many perimeter stitches cause the cream edging to flare outward. Count opposite edges and remove excess stitches at square junctions before working the decorative shell round.
- Loose yarn tails: A tail woven only beneath one granny cluster can emerge during washing. Weave each joining and border tail for at least 4–5 cm, reverse direction beneath a neighboring cluster and trim only after the fabric relaxes.
Conclusion
Measure the complete grid before adding the scalloped edge because the border should finish the rectangle rather than compensate for uneven joining. The next practical step is to spread the blanket flat and compare both diagonals; a difference larger than about 2 cm usually indicates one section was joined under greater tension. Correct that area before final blocking. Share the finished daisy granny square blanket crochet pattern project on Pinterest with a vertical bed photograph, then post a close view of the cream grid and flower texture on Instagram using #SageDaisyGrannyBlanket. For this blanket specifically, would you keep every sage background identical or alternate two muted green shades across the grid?









