Introduction
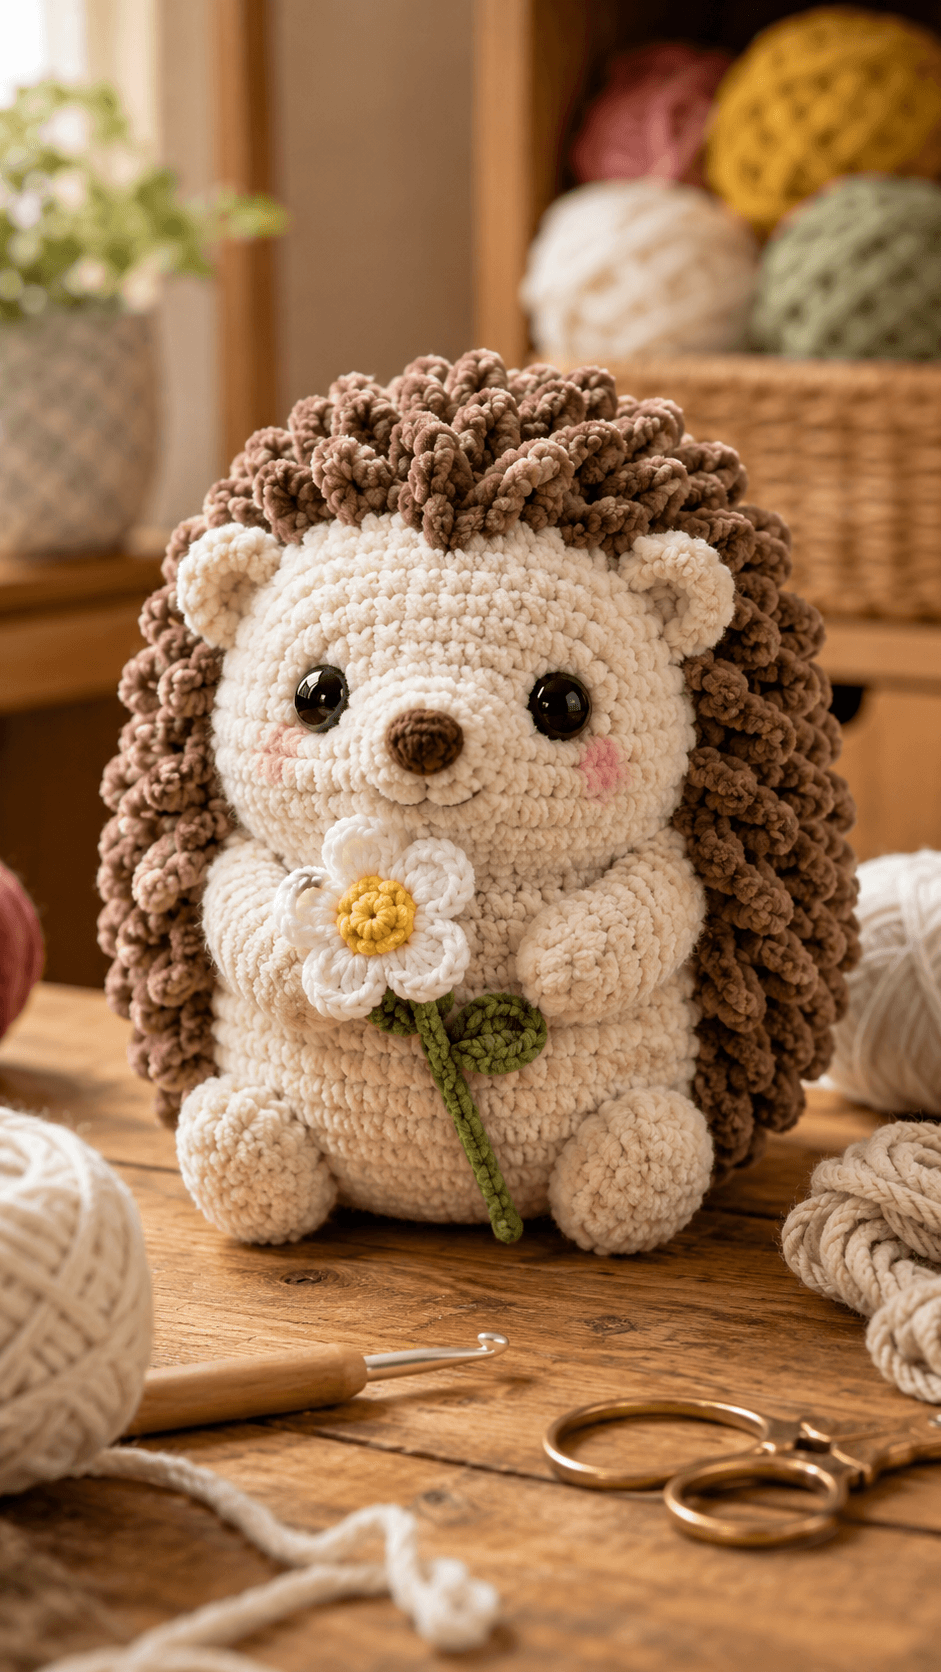
A hedgehog’s quills cannot cross onto its muzzle, so the brown spine line has to curve around both tiny ears before dropping behind the cheeks. This hedgehog amigurumi crochet pattern uses chunky yarn, a 4.5 mm hook and 12 mm safety eyes to make an approximately 20 cm seated figure. The intermediate build adds dense looped spines and a complete white daisy held between both paws.
The Design: What Makes This Daisy Hedgehog Different
The head reaches a 42-stitch plateau because the photographed hedgehog has a broad circular face rather than an elongated profile. A separate cream muzzle projects from the lower center and keeps the nose forward of the eye line, a critical proportion in a plush hedgehog amigurumi. The body also reaches 42 stitches but holds that width for longer, creating the heavy seated torso beneath the oversized head. Brown quills are worked over a separate cap rather than directly into the cream head. That gives you control over the facial border and spine density. One common mistake in a loop stitch hedgehog is bringing the texture too close to the eyes. Leave the cream forehead and cheeks exposed. The white flower adds another structural requirement because both short arms must angle inward without pulling the stem away from the body.
Project Info at a Glance
| Skill Level | Time | Finished Size | Hook | Best For |
|---|---|---|---|---|
| Intermediate | 9–12 hours | About 20 cm seated | 4.5 mm | Woodland displays, spring collections and plush photography |
Materials and Tools
Yarn
- Warm ivory — chunky chenille/plush yarn — approximately 100–120 g — used for the head, muzzle, body, ears and limbs.
- Taupe brown — matching chunky yarn — approximately 80–100 g — used for the spine cap, looped quills and nose.
- White — chunky or doubled DK yarn — approximately 10–15 g — used for the five flower petals.
- Golden yellow — chunky or doubled DK yarn — approximately 5 g — used for the daisy center.
- Olive green — chunky or doubled DK yarn — approximately 8–10 g — used for the flower stem and leaves.
- Blush pink — chunky yarn or embroidery yarn — approximately 3 g — used for the cheek patches.
- Dark brown or black — embroidery floss — under 1 g — used for the mouth.
Tools
- 4.5 mm crochet hook
- 12 mm safety eyes
- Polyester stuffing, approximately 70–90 g
- Yarn needle
- Embroidery needle
- Locking stitch markers
- Dressmaking pins
- Scissors
Replace plastic safety eyes with securely embroidered eyes when the completed hedgehog is intended for a child under three.
Abbreviations
- MR — magic ring
- sc — single crochet
- inc — two single crochet stitches in one stitch
- dec — invisible single crochet decrease
- sl st — slip stitch
- ch — chain
- hdc — half double crochet
- dc — double crochet
- BLO — back loop only
- FLO — front loop only
An invisible decrease is made through the front loops of the next two stitches before completing one single crochet through both loops.
Pattern — Step by Step
Work all stuffed components in a continuous spiral unless a joined round or row is specified. Mark the first stitch of each round and move the marker only after checking the completed stitch count.
Head
Yarn: warm ivory — Source: Standard amigurumi math.
R1: 6 sc in MR (6)
R2: inc ×6 (12)
R3: (sc, inc) ×6 (18)
R4: (2 sc, inc) ×6 (24)
R5: (3 sc, inc) ×6 (30)
R6: (4 sc, inc) ×6 (36)
R7: (5 sc, inc) ×6 (42)
R8–R13: sc around (42)
R14: (5 sc, dec) ×6 (36)
R15: (4 sc, dec) ×6 (30)
R16: (3 sc, dec) ×6 (24)
R17: (2 sc, dec) ×6 (18)
R18: (sc, dec) ×6 (12)
R19: dec ×6 (6)
Insert the 12 mm eyes between R10 and R11 with approximately nine visible stitches between the posts. Begin stuffing after R14 and place small pieces behind both washers before filling the middle.
Fasten off. Leave a 25 cm tail and close the remaining six front loops.
Body
Yarn: warm ivory — Source: Standard amigurumi math.
R1: 6 sc in MR (6)
R2: inc ×6 (12)
R3: (sc, inc) ×6 (18)
R4: (2 sc, inc) ×6 (24)
R5: (3 sc, inc) ×6 (30)
R6: (4 sc, inc) ×6 (36)
R7: (5 sc, inc) ×6 (42)
R8–R15: sc around (42)
R16: (5 sc, dec) ×6 (36)
R17–R18: sc around (36)
R19: (4 sc, dec) ×6 (30)
R20: sc around (30)
R21: (3 sc, dec) ×6 (24)
R22: (2 sc, dec) ×6 (18)
R23: (sc, dec) ×6 (12)
R24: dec ×6 (6)
Pack the lower two-thirds firmly enough to form the rounded seated base. Reduce the stuffing pressure above R20 so the head attachment area remains slightly compressible.
Fasten off. Leave a 35 cm sewing tail and close the final opening.
Muzzle
Yarn: warm ivory — Source: original projecting-muzzle shaping.
R1: 6 sc in MR (6)
R2: inc ×6 (12)
R3: (sc, inc) ×6 (18)
R4–R6: sc around (18)
R7: (sc, dec) ×6 (12)
Stuff the front half lightly and leave the 12-stitch attachment edge flexible. The finished piece should project about 2.5–3 cm from the face rather than forming a ball.
Fasten off. Leave a 25 cm sewing tail.
Nose
Yarn: taupe brown — Source: Standard small sphere math.
R1: 6 sc in MR (6)
R2: inc ×6 (12)
R3: sc around (12)
R4: dec ×6 (6)
Add only a pinch of stuffing. Shape the piece into a rounded oval with the fingers before attachment.
Fasten off. Leave a 15 cm sewing tail.
Arms / Front Legs (Make 2)
Yarn: warm ivory — Source: Standard small-limb math.
R1: 6 sc in MR (6)
R2: inc ×6 (12)
R3–R5: sc around (12)
R6: (sc, dec) ×4 (8)
R7–R10: sc around (8)
Stuff R1–R5 moderately. Keep the upper section soft so both paws can turn toward the flower stem.
Fasten off. Leave a 25 cm sewing tail.
Back Legs and Feet (Make 2)
Yarn: warm ivory — Source: Standard seated-foot shaping.
R1: 6 sc in MR (6)
R2: inc ×6 (12)
R3: (sc, inc) ×6 (18)
R4: (2 sc, inc) ×6 (24)
R5–R7: sc around (24)
R8: (2 sc, dec) ×6 (18)
R9: (sc, dec) ×6 (12)
R10–R11: sc around (12)
Stuff R1–R8 firmly, concentrating filling toward the toe. Leave the final two rounds softer so the foot can turn outward.
Fasten off. Leave a 30 cm sewing tail.
Ears (Make 2)
Yarn: warm ivory — Source: original compact ear shaping.
R1: 6 sc in MR (6)
R2: inc ×6 (12)
R3: (sc, inc) ×6 (18)
R4: sc around (18)
R5: (sc, dec) ×6 (12)
Do not stuff. Flatten each ear and fold the lower corners inward by approximately 5 mm to produce a shallow cup.
Fasten off. Leave a 20 cm tail on each ear.
Cheek Patches (Make 2)
Yarn: blush pink — Source: Standard flat-circle math.
R1: 6 sc in MR (6)
R2: inc ×6 (12)
Do not stuff. Flatten each circle before sewing it beside the muzzle.
Join with a sl st. Fasten off and leave a 15 cm tail.
Spine Cap
Yarn: taupe brown — Source: original shallow-cap construction.
R1: 6 sc in MR (6)
R2: inc ×6 (12)
R3: (sc, inc) ×6 (18)
R4: (2 sc, inc) ×6 (24)
R5: (3 sc, inc) ×6 (30)
R6: (4 sc, inc) ×6 (36)
R7: (5 sc, inc) ×6 (42)
R8–R12: sc around (42)
R13: (5 sc, dec) ×6 (36)
R14: sc around (36)
Do not stuff. Test the cap over the crown and back of the head. Its front edge should sit behind the ears and form a shallow arc approximately two rounds above the eyes.
Fasten off. Leave a 40 cm sewing tail.
Spine Loops
Yarn: taupe brown — loop texture based on established hedgehog quill techniques.
Attach taupe yarn near the lower edge of the spine cap. Work across the outer surface as follows: sl st in the next cap stitch, ch 7, sl st back into the same stitch, ch 6, sl st back into the same stitch, then sl st in the following cap stitch.
Repeat across the visible cap surface, alternating clusters of ch 5, ch 6 and ch 7 so the finished quills do not form rigid horizontal rows.
Cover roughly 75–85 percent of the cap stitches. Keep the front border less dense than the crown and back so the cream face remains sharply defined.
Fasten off. Pull the final yarn tail beneath the spine cap.
Daisy Center
Yarn: golden yellow — Source: Standard flat-circle math.
R1: 6 sc in MR (6)
R2: inc ×6 (12)
R3: (sc, inc) ×6 (18)
Keep the circle flat. This section should remain visible between all five white petals.
Join with a sl st. Fasten off and leave a 20 cm tail.
Daisy Petals (Make 5)
Yarn: white — Source: original rounded petal shaping.
R1: 6 sc in MR (6)
R2: inc ×6 (12)
R3–R5: sc around (12)
R6: dec ×6 (6)
Do not stuff heavily. Flatten each petal before attaching it behind the yellow center.
Fasten off. Leave an 18 cm sewing tail on every petal.
Flower Stem
Yarn: olive green — Source: original narrow-stem construction.
R1: 6 sc in MR (6)
R2–R15: sc around (6)
Do not fill with conventional stuffing. Feed the starting yarn tail down the inside of the tube to add a small amount of body without making the stem rigid.
Fasten off. Leave a 20 cm tail.
Flower Leaves (Make 2)
Yarn: olive green — Source: original flat-leaf shaping.
Row 1: ch 8
Row 2: starting in second ch from hook: sl st, sc, hdc, 2 dc, hdc, sc; work 2 sc in the final chain, then continue along the opposite side with sc, hdc, 2 dc, hdc, sc, sl st.
Pinch the foundation-chain line to create a shallow central vein. Curve one leaf toward the left and the second toward the right.
Fasten off. Leave a 15 cm sewing tail.
Mouth
Yarn: dark brown or black embroidery floss.
Bring the floss out directly beneath the brown nose. Work one vertical stitch approximately 7–8 mm long, then add one shallow curve to the left and another to the right to form the split smile.
Secure the floss behind the muzzle and bury both ends inside the stuffing.
Assembly
- Center the head over the upper body, pin at four quarter points and sew the attachment seam with small mattress stitches.
- Place the cream muzzle between and below the safety eyes, sew around its complete 12-stitch edge and attach the brown nose to the muzzle tip.
- Embroider the split mouth, then sew the two pink cheek patches beside the muzzle at equal heights.
- Attach the arms to the upper torso with their lower ends angled toward the center so both paws can contact the flower stem.
- Pin the two back feet low on the body, set the hedgehog on a level surface and compare their front edges before sewing permanently.
- Sew the ears near the crown around head R6–R8, leaving most of each rounded ear visible in front of the future spine border.
- Fit the completed brown spine cap over the crown and back, align its front edge behind both ears and sew the plain cap fabric securely to the head and upper body.
- Sew the five white petals around the yellow center, attach the flower head to the green stem and position the two leaves approximately one-third of the way down.
- Place the daisy between the paws, secure the stem to each inner paw with hidden green stitches and add one concealed attachment stitch at the lower belly.
- Weave every structural tail through at least 4 cm of dense crochet, reverse direction once and trim only after the yarn end retracts beneath the fabric.
The completed hedgehog should remain seated on the lower body and two feet while the daisy rests against the torso without pulling either arm forward.
7 Technical Tips
- Spine-border creep: Dense loops placed directly on the cap edge can visually move the brown area 10–15 mm toward the eyes. Leave the first border row sparse and start the longest seven-chain loops at least one stitch behind it.
- Flattened head: Packing a 42-stitch chenille head with one large mass of filling creates dents around the safety-eye washers. Add pieces smaller than approximately 3 cm and fill the cheeks before the center cavity.
- Visible decrease holes: Standard two-stitch decreases can expose pale stuffing through plush yarn. Work through the two front loops and match the decrease tension to the neighboring single crochet stitches.
- Incorrect eye timing: Installing the 12 mm washers after R15 leaves limited access inside the narrowing head. Fit both eyes after R13 and confirm about nine visible stitches between their posts before decreasing.
- Rigid quill rows: Making every loop the same length produces horizontal bands rather than irregular spines. Alternate five-, six- and seven-chain loops and offset the longest clusters from one textured line to the next.
- Uneven seated feet: Permanently sewing the first back foot before locating the second can raise one toe by 5–10 mm. Pin both pieces, stand the hedgehog on a hard surface and compare the lower edges first.
- Drooping flower: Attaching the daisy only to the outer paw loops leaves the long green stem unsupported. Pass a hidden fixing stitch through each inner paw and add one attachment point approximately 2 cm above the stem’s lower end.
Conclusion
Inspect the brown spine border before fixing the daisy because the flower draws attention to the exact center of the cream face and makes an uneven quill line easier to see. Next, place the hedgehog on a level surface and photograph the front, side and three-quarter views before trimming the structural tails. Those angles expose mismatched feet, a tilted muzzle or loops extending too far toward one eye. Share the finished hedgehog amigurumi crochet pattern project on Pinterest with a vertical image, then post the daisy detail on Instagram using #DaisyHedgehogAmigurumi. For this hedgehog specifically, would you keep the white five-petal daisy or change the flower to a yellow sunflower?









