Introduction
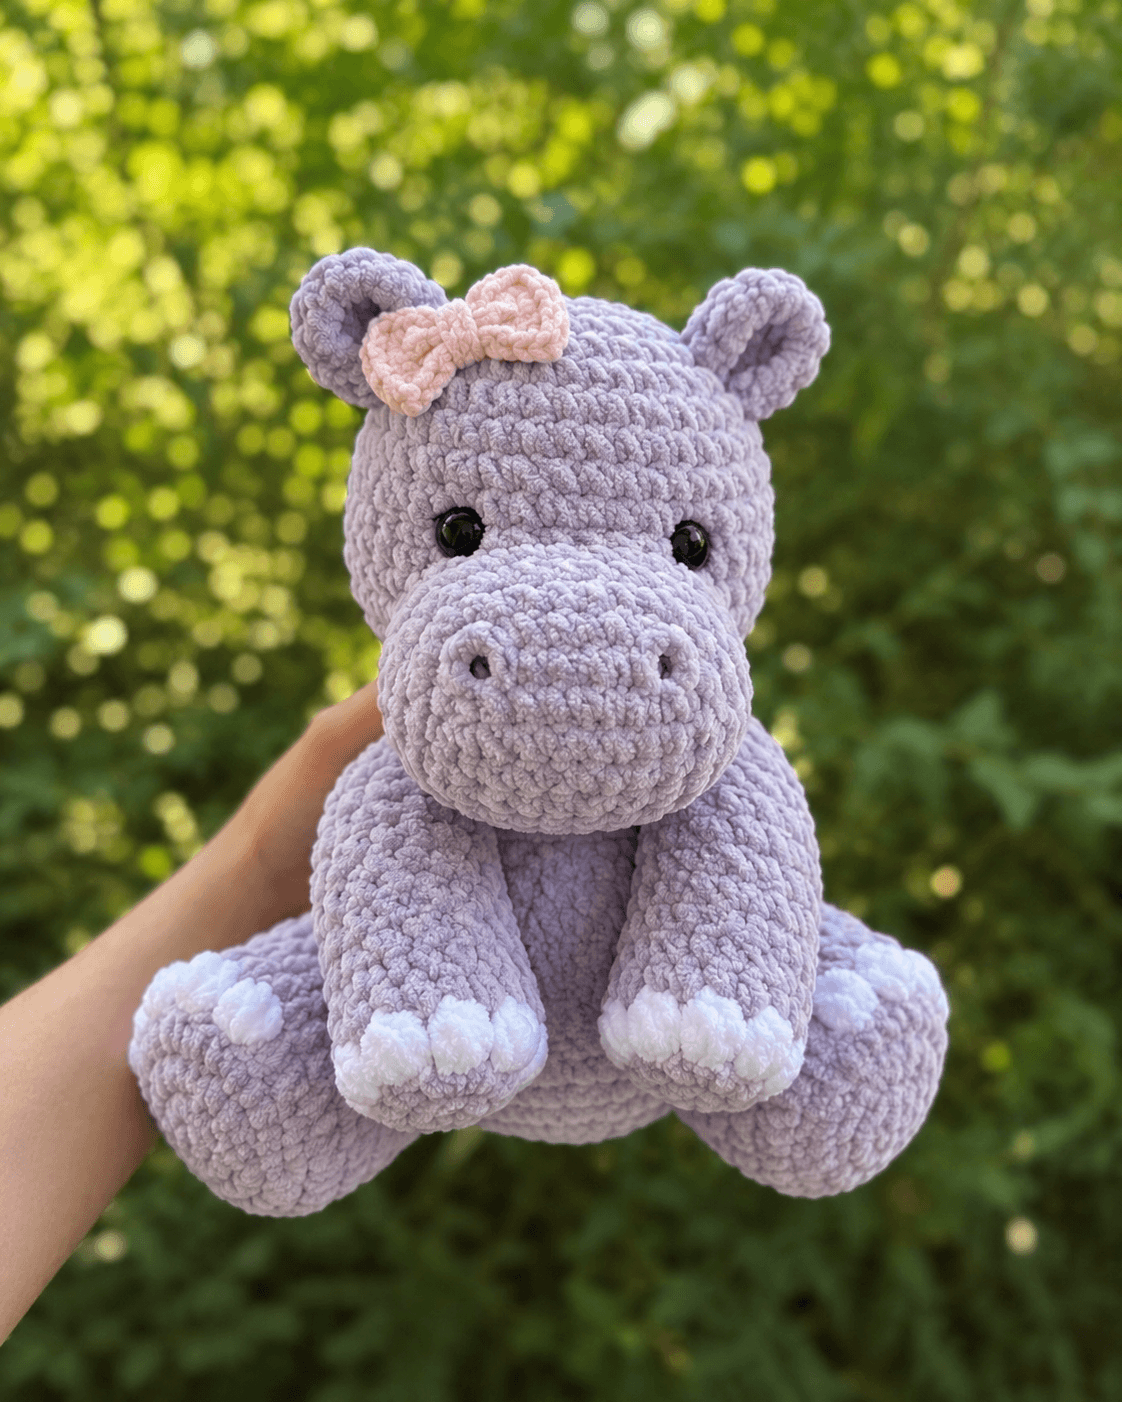
A hippopotamus needs a muzzle almost as wide as its cheeks; shrink that feature and the face starts reading as a bear. This hippo amigurumi crochet pattern uses super-bulky chenille, a 5 mm hook and a 42-stitch head to create a seated plush about 30 cm tall. The build includes a broad muzzle, small ears, long front legs, white toe details and a blush-pink bow. Intermediate assembly skills are required.
The Design: What Makes This Lavender Hippo Different
The head reaches a 42-stitch plateau because the photographed hippo depends on a wide forehead and enough surface area for a large projecting muzzle. Its body stops at 36 stitches, keeping the torso narrower so the hind legs remain clearly visible from the front. The ears stay deliberately small; oversized ears would shift the silhouette toward a mouse or bear. A separate 30-stitch muzzle provides the depth associated with a hippopotamus while leaving the safety eyes visible above it. The long front legs hang nearly vertically and finish with three white toe bumps rather than flat color changes. A common mistake in a plush hippo crochet pattern is overfilling the muzzle. Too much stuffing turns the horizontal snout into a round ball and hides the spacing between the nostrils.
Project Information at a Glance
| Skill Level | Time | Finished Size | Hook | Best For |
|---|---|---|---|---|
| Intermediate | 9–12 hours | Approximately 30 cm seated | 5 mm | Large plush display toy |
Published hippo sizes vary substantially. A 2024 YarnArt Jeans design finishes at 13–14 cm with a 2.25 mm hook, while Harriet the Hippo reaches approximately 14 inches, or 35.6 cm, using worsted-weight yarn and a 3.5 mm hook. This chenille build targets a midpoint near 30 cm because its bulky yarn creates greater physical size with fewer stitches.
Materials and Tools
Yarn
- Soft lavender — super-bulky chenille or velvet yarn — approximately 150–190 g — head, body, ears and limbs
- White — matching chenille — approximately 15–20 g — toe details
- Blush pink — matching chenille — approximately 10–15 g — bow
- Dark gray or black — small smooth-yarn scrap — nostrils if crocheted or embroidered
Tools
- 5 mm crochet hook
- Two 12–14 mm black safety eyes
- Polyester toy stuffing
- Large-eye yarn needle
- Locking stitch marker
- Dressmaking pins
- Scissors
The photographed eye diameter is estimated from the head proportions. Published smaller hippos use smaller eye sizes, including 8 mm eyes on a chunky baby hippo and 5 mm eyes on a 13–14 cm cotton-blend version.
Plastic safety eyes are detachable components. Use embroidered eyes instead when the finished toy is intended for a child who may pull or chew small parts.
Abbreviations
- MR — magic ring
- sc — single crochet
- inc — two single crochet stitches in one stitch
- dec — decrease over two stitches
- sl st — slip stitch
- ch — chain
- BLO — back loop only
- FLO — front loop only
An invisible decrease is worked through the front loops of the following two stitches before completing them together as one single crochet.
Pattern — Step by Step
Work in continuous spiral rounds unless a section specifies otherwise. Mark the first stitch of every round and check the number in brackets before continuing.
Head
Yarn: soft lavender — original six-stitch sphere calculation.
R1: 6 sc in MR (6)
R2: inc × 6 (12)
R3: (sc, inc) × 6 (18)
R4: (2 sc, inc) × 6 (24)
R5: (3 sc, inc) × 6 (30)
R6: (4 sc, inc) × 6 (36)
R7: (5 sc, inc) × 6 (42)
R8–R14: sc around (42)
R15: (5 sc, dec) × 6 (36)
R16: sc around (36)
R17: (4 sc, dec) × 6 (30)
Insert the safety-eye stems between R11 and R12 with approximately nine visible stitches between them. Lock the washers before reducing farther. Begin adding stuffing in small sections around the eye hardware.
R18: (3 sc, dec) × 6 (24)
R19: (2 sc, dec) × 6 (18)
R20: (sc, dec) × 6 (12)
R21: dec × 6 (6)
Fasten off. Leave a 20 cm tail, thread it through the front loops of the remaining six stitches and pull closed.
Body
Yarn: soft lavender.
R1: 6 sc in MR (6)
R2: inc × 6 (12)
R3: (sc, inc) × 6 (18)
R4: (2 sc, inc) × 6 (24)
R5: (3 sc, inc) × 6 (30)
R6: (4 sc, inc) × 6 (36)
R7–R12: sc around (36)
R13: (4 sc, dec) × 6 (30)
R14–R15: sc around (30)
R16: (3 sc, dec) × 6 (24)
R17: (2 sc, dec) × 6 (18)
Stuff the lower body to medium-firm density. Keep the top section slightly softer so it compresses cleanly beneath the head.
R18: (sc, dec) × 6 (12)
R19: dec × 6 (6)
Fasten off and leave a 45 cm sewing tail.
Broad Muzzle
Yarn: soft lavender.
R1: 6 sc in MR (6)
R2: inc × 6 (12)
R3: (sc, inc) × 6 (18)
R4: (2 sc, inc) × 6 (24)
R5: (3 sc, inc) × 6 (30)
R6–R8: sc around (30)
R9: (3 sc, dec) × 6 (24)
Add a shallow layer of stuffing. Flatten the piece from top to bottom so the finished muzzle remains substantially wider than it is tall.
Fasten off and leave a 40 cm sewing tail.
Nostrils — Make Two
Yarn: dark gray or black.
R1: 6 sc in MR (6)
Slip stitch into the first stitch and fasten off with a 12 cm tail. Shape each disc into a narrow vertical oval during attachment.
For the closest low-profile finish, replace the discs with two short dark embroidery stitches.
Ears — Make Two
Yarn: soft lavender.
R1: 6 sc in MR (6)
R2: inc × 6 (12)
R3: (sc, inc) × 6 (18)
R4: sc around (18)
Do not stuff. Fold each circle slightly inward so it forms a shallow cup.
Fasten off and leave a 25 cm sewing tail.
Front Legs — Make Two
Yarn: soft lavender.
R1: 6 sc in MR (6)
R2: inc × 6 (12)
R3: (sc, inc) × 6 (18)
R4–R6: sc around (18)
R7: (sc, dec) × 6 (12)
R8–R13: sc around (12)
R14: dec × 6 (6)
Stuff the lower half to medium density. Leave R9–R14 more flexible so the arm can hang naturally from the shoulder.
Fasten off and leave a 35 cm sewing tail.
White Front Toes — Make Six
Yarn: white.
R1: 6 sc in MR (6)
R2: sc around (6)
Fasten off with a 12 cm tail. Add only a tiny amount of stuffing or leave each toe unstuffed for a flatter bump.
Back Legs — Make Two
Yarn: soft lavender.
R1: 6 sc in MR (6)
R2: inc × 6 (12)
R3: (sc, inc) × 6 (18)
R4: (2 sc, inc) × 6 (24)
R5–R8: sc around (24)
R9: (2 sc, dec) × 6 (18)
R10: sc around (18)
R11: (sc, dec) × 6 (12)
R12: dec × 6 (6)
Stuff firmly through R8, then shape the piece as a broad forward-facing oval.
Fasten off and leave a 35 cm sewing tail.
White Back Toes — Make Six
Yarn: white.
R1: 6 sc in MR (6)
R2: sc around (6)
Fasten off and leave a 12 cm tail. The photograph shows the rear toe details partly hidden by the front legs, so keep these bumps low and closely spaced.
Pink Bow Loops — Make Two
Yarn: blush pink.
R1: 6 sc in MR (6)
R2: inc × 6 (12)
R3–R5: sc around (12)
R6: dec × 6 (6)
Add only a small amount of stuffing. Flatten each loop before closing the final opening.
Fasten off and leave a 25 cm tail.
Bow Centre
Yarn: blush pink.
R1: 6 sc in MR (6)
R2–R4: sc around (6)
Fasten off and leave a 25 cm tail. Flatten the tube and wrap it around the inner ends of both bow loops.
Optional Tail
Yarn: soft lavender. The tail is not visible from the supplied front view but may be added for a complete hippo.
R1: 6 sc in MR (6)
R2–R5: sc around (6)
Fasten off and leave a 20 cm sewing tail. Do not stuff.
Assembly
- Pin the head above the body with its centre line aligned to the torso. Sew around the neck twice using the long body tail.
- Position the broad muzzle across Head R11–R16, keeping its upper edge below the eye centres. Add the final stuffing before closing the last third of the seam.
- Attach or embroider the nostrils near the upper half of the muzzle. Keep approximately 3–4 cm between them on a 30 cm finished plush.
- Pin the ears across Head R4–R7. Their bases should sit near the crown while the cupped openings angle slightly forward.
- Sew the front legs to Body R10–R15. Keep both shoulders level and allow the lower halves to hang freely.
- Attach three white toe bumps across the front edge of each front foot, spacing them closely enough that no large lavender gap appears between them.
- Pin the back legs across Body R4–R9 with their widest faces directed forward. Test the seated balance before permanently tightening the seams.
- Attach three small white toe bumps to each rear foot where they remain visible around the front-leg overlap.
- Assemble the blush-pink bow and place it near the hippo’s upper-left forehead between the ear and crown. Sew through the centre first, then anchor both loops separately.
- Add the optional tail to the rear body, check all parts from front and side views, then weave every structural yarn tail through at least three stitch directions.
The completed hippo should sit on the lower body and both back legs while the long front legs hang symmetrically in front of the torso.
7 Technical Tips
- Muzzle overstuffing: Packing the 30-stitch snout firmly turns it into a sphere. Stop when the flattened muzzle measures roughly half as deep as it is wide.
- Hidden stitch marker: Chenille fibers can bury the first stitch and shift the entire reduction sequence. Count all 42 stitches at Head R8, R11 and R14 before moving the marker.
- Visible decrease holes: Standard decreases can expose stuffing through plush yarn. Work every head and body reduction through the two front loops and keep the working loop tight.
- Late eye installation: Large safety-eye washers become difficult to reach after the opening drops below 24 stitches. Fit both eyes before completing Head R18.
- Uneven arm length: A one-round difference is obvious because both arms hang side by side. Count all 14 rounds on each front leg before fastening off.
- Back-leg imbalance: A 5 mm difference in attachment height can make the seated body tilt. Pin both legs simultaneously and test the figure on a hard surface before sewing.
- Bow rotation: A centre-only attachment allows heavy chenille loops to tip forward. Add one hidden anchor stitch beneath each loop approximately 2 cm from the middle band.
Getting the Hippo Muzzle Right
The muzzle is the main anatomical marker in this hippo amigurumi crochet pattern. Its 30-stitch circumference is deliberately large compared with the 42-stitch head, but only a shallow amount of stuffing is used. Width matters more than projection.
Pin the piece before sewing and inspect it directly from the front. Both ends should extend beyond the inner edges of the safety eyes. If the muzzle is narrower than the eye spacing, stretch it sideways while pinning rather than adding more stuffing.
The nostrils belong above the horizontal centre of the muzzle. Placing them low makes the snout look like a nose patch rather than the broad upper surface of a hippopotamus muzzle.
Ear Size and Position
Hippo ears are relatively small compared with the head, which is why each piece stops at an 18-stitch circumference. Enlarging them to 24 or 30 stitches would make the upper silhouette resemble the oversized ears common in cow or mouse amigurumi.
Fold each ear slightly before sewing so the centre remains concave. The open side should face forward enough to remain visible in a straight-on photograph.
Position the ear bases several centimetres apart. The pink bow occupies the gap beside one ear but should not push the ear outward from its natural crown position.
Long Front Legs and White Toes
The front legs reach farther down the body than those in many compact hippo patterns. Six plain 12-stitch rounds after the first reduction create enough length for the arms to hang over the belly.
Keep the upper section lightly filled. Firm stuffing makes the arms project straight toward the viewer instead of dropping vertically. The lower rounded section can carry more fiberfill because it supports the white toe bumps.
Sew the three white pieces side by side rather than stacking them around the circumference. That creates the row of rounded toe tips visible at the bottom of each front foot.
Shaping the Back Legs
The back legs reach a 24-stitch plateau, making them noticeably broader than the front pair. That width forms the seated base and reproduces the large hind feet in the reference image.
Attach the legs only after the head and front legs are in place. Their angle needs to compensate for the weight of those upper pieces. Rotate each foot outward slightly until the plush sits without support.
Do not pull the leg seams excessively tight. Strong tension can indent the body and move the legs too close together, reducing the wide seated stance.
Working with Chenille Yarn
Current hippo patterns span everything from YarnArt Jeans miniatures to chunky no-sew toys. A chunky Ribblr baby hippo uses a 4.5 mm hook, while Harriet the Hippo reaches 14 inches using worsted yarn and a 3.5 mm hook. :contentReference[oaicite:16]{index=16} The 5 mm hook specified here is a photo-matched choice for the thicker chenille construction.
Chenille can shed when a magic ring is pulled hard. Run a strand of smooth scrap yarn through the initial loop if the chenille core feels weak, then tighten using the smooth strand.
Count stitches by feeling for the two top loops rather than relying on surface texture. Dense plush fibers can make adjacent stitches appear merged, particularly during decrease rounds.
Pink Bow Construction
The bow sits off-centre near the hippo’s left-side ear and creates the only strong color contrast against the lavender body. Two 12-stitch loops give it enough volume to remain visible without becoming wider than the head.
Use very little stuffing inside the loops. Each piece should compress easily between finger and thumb. Round, firmly filled loops will look more like pompons than folded bow sections.
Position the bow after both ears are attached. Its inner edge can overlap the base of one ear slightly, but neither loop should cover the safety eye when the head is viewed from the front.
Adjusting Finished Size
Published hippo patterns demonstrate how strongly yarn and hook choices affect scale. A 2024 cotton-blend hippo measures 13–14 cm with a 2.25 mm hook, while Harriet the Hippo measures approximately 35.6 cm in worsted yarn. :contentReference[oaicite:17]{index=17}
For a smaller plush, keep these stitch totals and switch to bulky yarn with a 4–4.5 mm hook. Recheck eye diameter after the head reaches its full 42-stitch circumference.
For a larger hippo, use thicker chenille rather than expanding the head to 48 stitches. Another increase round changes the head-to-body proportion as well as the finished scale.
Finishing Checks
Place the assembled hippo on a flat surface before hiding the final sewing tails. Both rear legs should carry equal weight while the lower body contacts the surface between them.
View the face directly from the front. The muzzle should remain horizontal, both nostrils should sit at the same height, and neither safety eye should be partly hidden by the upper muzzle edge.
Inspect the front legs last. Their white toe rows should finish at approximately the same height, and neither arm should rotate enough to turn the toes toward the body.
Conclusion
Measure the completed hippo from the seated base to the highest point of the head and record that figure beside the yarn, hook and eye size used. Photograph the face straight on as the next technical check; that angle exposes a narrow muzzle, unequal nostrils or front legs hanging at different heights. Save this hippo amigurumi crochet pattern to Pinterest and share the finished plush on Instagram with #PinkBowHippo. Keep the white toe bumps aligned across each foot before hiding the final tails. For another version, would you keep the blush-pink bow or match it to the lavender body with a contrasting white centre?
Sources
- Jess Huff — Harriet the Hippo: 14-inch finished size, worsted-weight yarn and 3.5 mm hook.
- Amigurumi All Free Patterns — September 2024 Hippo: 13–14 cm, YarnArt Jeans, 2.25 mm hook and 5 mm safety eyes.
- Ribblr — No-Sew Baby Hippo: chunky yarn, 4.5 mm hook and 8 mm eyes.
- Loops and Love Crochet — Hippo Amigurumi: documented head/body shaping and stuffing guidance.









