Introduction
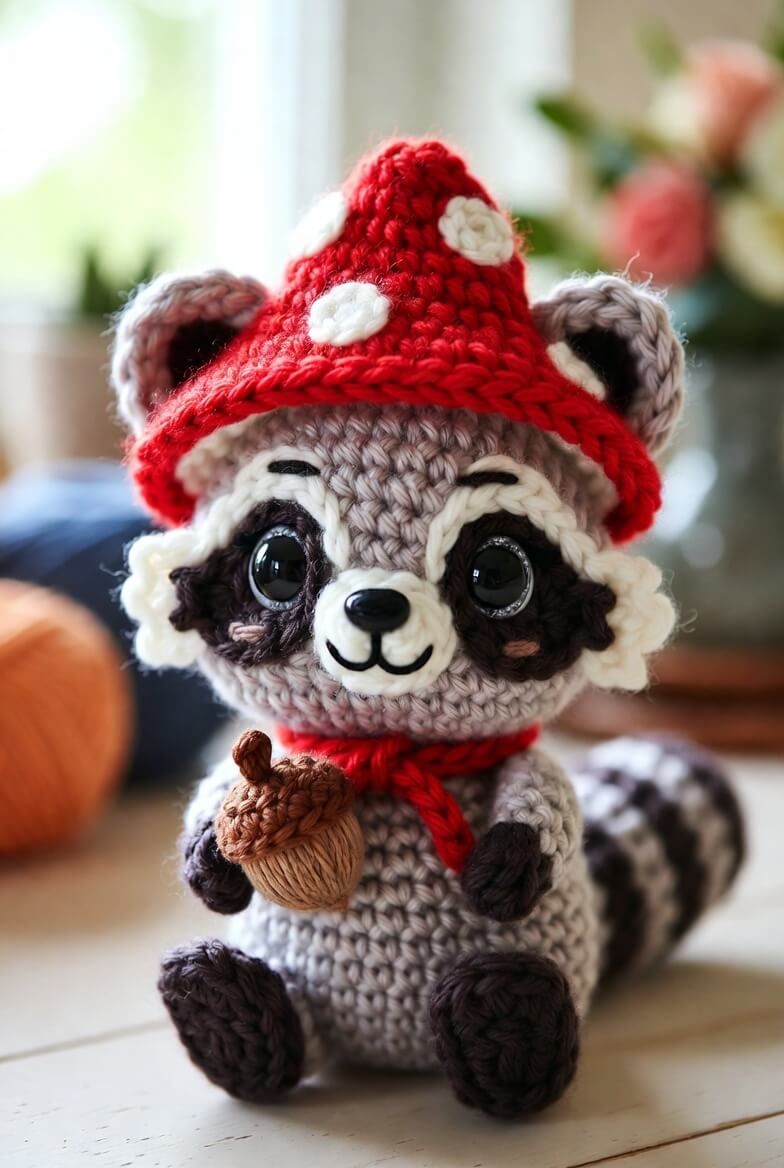
A raccoon’s dark mask must remain visible beneath a mushroom brim, or the face loses its defining division. This mushroom raccoon amigurumi crochet pattern uses worsted yarn, a 3.5 mm hook and separately fitted accessories to make a sitting figure approximately 22 cm tall. The intermediate project includes a striped tail, scalloped hat lining and removable acorn. Broad feet create a stable shelf display without wire.
The Design: What Makes This Mushroom Raccoon Different
The head expands to a 42-stitch plateau, leaving enough surface area for 15 mm eyes, separate dark masks, cream brows and a raised muzzle. Its mushroom cap is wider than the crown but shallow through the center, so the brim frames the eyes instead of compressing the ears. Rounded back legs support a sitting pose, while the striped tail rests against the table behind one hip. That third contact point offsets the weight of the cap and acorn. This crochet raccoon with mushroom hat also uses layered cheek markings rather than embroidered color blocks. The method preserves clear edges on a curved head. A common error in a woodland raccoon crochet pattern is placing the mask pieces too low. Their upper edges should cross the eye line; masks positioned entirely beneath the eyes resemble cheek patches rather than raccoon markings.
Project Info at a Glance
| Skill Level | Time | Finished Size | Hook | Best For |
|---|---|---|---|---|
| Intermediate | 11–14 hours | Approximately 22 cm | 3.5 mm | Woodland displays, autumn collections and market stock |
Measure from the lowest back-leg round to the point of the mushroom cap. Yarn diameter, eye size and the amount of filling beneath the brim will alter the finished height.
Materials and Tools
Yarn
- Warm gray — worsted or aran weight — approximately 85 g — used for the head, body, arms, legs and tail stripes
- Dark brown — worsted weight — approximately 30 g — used for masks, paws, feet and tail stripes
- Cream — worsted weight — approximately 35 g — used for muzzle, brows, cheeks, ears and mushroom gills
- Mushroom red — worsted or aran weight — approximately 45 g — used for the cap and scarf
- Chestnut brown — worsted weight — approximately 18 g — used for the acorn
- Pink — DK or embroidery yarn — approximately 3 g — used for cheek details
- Black — embroidery yarn — approximately 2 g — used for the mouth, eyebrows and eye definition
Tools
- 3.5 mm crochet hook
- 15 mm safety eyes
- 14 mm safety nose, or black yarn for an embroidered nose
- Polyester stuffing, approximately 70–85 g
- Yarn needle
- Locking stitch markers
- Dressmaking pins
- Scissors
- Ruler
Abbreviations
- MR — magic ring
- sc — single crochet
- inc — two single crochet stitches in one stitch
- dec — invisible decrease over two stitches
- sl st — slip stitch
- ch — chain
- hdc — half double crochet
- dc — double crochet
- BLO — back loop only
- FLO — front loop only
An invisible decrease is worked through the front loops of the next two stitches before completing one single crochet through both loops.
Pattern — Step by Step
Work three-dimensional pieces in continuous spirals unless joined rounds or rows are stated. Place a locking marker in the first completed stitch of each round.
Head
Yarn: warm gray — standard six-stitch amigurumi shaping.
R1: 6 sc in MR (6)
R2: inc ×6 (12)
R3: (sc, inc) ×6 (18)
R4: (2 sc, inc) ×6 (24)
R5: (3 sc, inc) ×6 (30)
R6: (4 sc, inc) ×6 (36)
R7: (5 sc, inc) ×6 (42)
R8–R15: sc around (42)
R16: (5 sc, dec) ×6 (36)
R17: sc around (36)
R18: (4 sc, dec) ×6 (30)
R19: sc around (30)
R20: (3 sc, dec) ×6 (24)
R21: (2 sc, dec) ×6 (18)
R22: (sc, dec) ×6 (12)
R23: dec ×6 (6)
R24: draw the yarn through the front loops and close (6)
Insert the eyes between R12 and R13 with eight visible stitches between the posts. The eye-mask pieces must be positioned before the washers are attached. Stuff after R19, adding small sections around both eye backs.
Fasten off. Leave a 30 cm tail.
Body
Yarn: warm gray — standard six-stitch amigurumi shaping.
R1: 6 sc in MR (6)
R2: inc ×6 (12)
R3: (sc, inc) ×6 (18)
R4: (2 sc, inc) ×6 (24)
R5: (3 sc, inc) ×6 (30)
R6: (4 sc, inc) ×6 (36)
R7–R15: sc around (36)
R16: (4 sc, dec) ×6 (30)
R17–R19: sc around (30)
R20: (3 sc, dec) ×6 (24)
R21–R22: sc around (24)
R23: (2 sc, dec) ×6 (18)
R24: sc around (18)
Pack the lower third firmly. Reduce the stuffing pressure near the final opening so the neck edge stays flat beneath the head.
Fasten off. Leave a 35 cm sewing tail.
Arms (Make 2)
Yarn: dark brown and warm gray — standard amigurumi math.
R1: with dark brown, 6 sc in MR (6)
R2: inc ×6 (12)
R3–R4: sc around (12)
R5: change to warm gray, sc around (12)
R6: (2 sc, dec) ×3 (9)
R7–R12: sc around (9)
R13: (sc, dec) ×3 (6)
Stuff through R6 only. Leave the upper half flexible enough for one arm to curve around the acorn.
Flatten the opening and crochet 3 sc through both layers. Fasten off, leaving a 25 cm tail.
Back Legs (Make 2)
Yarn: dark brown and warm gray — broad sitting-foot construction.
R1: with dark brown, 6 sc in MR (6)
R2: inc ×6 (12)
R3: (sc, inc) ×6 (18)
R4–R6: sc around (18)
R7: change to warm gray, sc around (18)
R8: (sc, dec) ×6 (12)
R9–R12: sc around (12)
R13: dec ×6 (6)
Fill the dark foot firmly. Use less stuffing above R8 so the upper leg can lie against the lower body.
Fasten off. Leave a 30 cm tail.
Outer Ears (Make 2)
Yarn: warm gray — rounded cup construction.
R1: 6 sc in MR (6)
R2: inc ×6 (12)
R3: (sc, inc) ×6 (18)
R4–R5: sc around (18)
R6: (4 sc, dec) ×3 (15)
R7: sc around (15)
Do not stuff. Fold the lower edge inward by approximately 5 mm to form a rounded ear cup.
Flatten the base and work 7 sc through both layers. Fasten off, leaving a 25 cm tail.
Inner Ears (Make 2)
Yarn: cream — flat semicircle construction.
R1: 6 sc in MR (6)
R2: inc ×6 (12)
R3: (sc, inc) ×6 (18)
Fold each circle in half and sew it inside an outer ear, leaving a 4 mm gray border.
Fasten off. Leave a 20 cm tail.
Dark Eye Masks (Make 2)
Yarn: dark brown — flat oval construction.
R1: 6 sc in MR (6)
R2: inc ×6 (12)
R3: (sc, inc) ×6 (18)
Stretch each circle into a 4 cm by 3 cm oval. Push the safety-eye post through the outer half of the piece before inserting it through the head.
Join with a sl st. Fasten off, leaving a 20 cm sewing tail.
Cream Brow Markings (Make 2)
Yarn: cream — curved appliqués worked in rows.
Row 1: ch 11, sc in second ch from hook, 2 hdc, 4 dc, 2 hdc, sc (10)
Row 2: ch 1, turn, sl st, 2 sc, 4 hdc, 2 sc, sl st (10)
Curve each strip over the upper edge of an eye mask. The inner tip should finish one stitch from the vertical facial center.
Fasten off. Leave a 20 cm tail.
Cream Cheek Tufts (Make 2)
Yarn: cream — scalloped flat pieces.
R1: 6 sc in MR (6)
R2: inc ×6 (12)
R3: repeat (sl st, 3 dc in next stitch) ×6 (24 worked stitches)
Flatten the piece and place three scallops along the outer face edge. Tuck the inner edge beneath the muzzle.
Fasten off. Leave a 20 cm tail.
Muzzle
Yarn: cream — shallow oval construction.
R1: 6 sc in MR (6)
R2: inc ×6 (12)
R3: (sc, inc) ×6 (18)
R4: (2 sc, inc) ×6 (24)
R5: sc around (24)
R6: (2 sc, dec) ×6 (18)
Add a small amount of filling. Attach the safety nose through the upper center before sewing the muzzle to the head.
Fasten off. Leave a 30 cm tail.
Pink Cheek Patches (Make 2)
Yarn: pink — flat-circle construction.
R1: 6 sc in MR (6)
R2: inc ×6 (12)
Stretch each piece into a horizontal oval and place it partly over the cream cheek tuft.
Join with a sl st. Fasten off, leaving a 15 cm tail.
Mouth and Eyebrows
Work one 12 mm black line below the nose, then add two curved mouth branches measuring approximately 8 mm each. Place one short black eyebrow above the outer third of each cream brow marking.
Striped Tail
Yarn: warm gray and dark brown — tapered striped tube.
R1: with dark brown, 6 sc in MR (6)
R2: inc ×6 (12)
R3: (sc, inc) ×6 (18)
R4–R6: sc around (18)
R7–R9: change to warm gray, sc around (18)
R10–R12: change to dark brown, sc around (18)
R13–R15: change to warm gray, sc around (18)
R16: change to dark brown, (4 sc, dec) ×3 (15)
R17–R19: sc around (15)
R20–R21: change to warm gray, sc around (15)
R22: change to dark brown, (3 sc, dec) ×3 (12)
R23–R24: sc around (12)
R25: (2 sc, dec) ×3 (9)
Stuff the first 12 rounds firmly and the remaining section lightly. Curve the tail while filling it so the outer end rests beside the body.
Fasten off. Leave a 35 cm tail.
Mushroom Cap
Yarn: mushroom red — shallow dome with a projecting brim.
R1: 6 sc in MR (6)
R2: inc ×6 (12)
R3: (sc, inc) ×6 (18)
R4: (2 sc, inc) ×6 (24)
R5: (3 sc, inc) ×6 (30)
R6: (4 sc, inc) ×6 (36)
R7: (5 sc, inc) ×6 (42)
R8–R10: sc around (42)
R11: (6 sc, inc) ×6 (48)
R12–R14: sc around (48)
R15: FLO inc ×48 (96)
R16: sc around (96)
Do not fill the brim. Add a thin layer of stuffing beneath the central dome only, stopping approximately 4 cm from the outer edge.
Join with a sl st. Fasten off, leaving a 40 cm tail.
Mushroom Gill Layer
Yarn: cream — shallow scalloped disc.
R1: 6 sc in MR (6)
R2: inc ×6 (12)
R3: (sc, inc) ×6 (18)
R4: (2 sc, inc) ×6 (24)
R5: (3 sc, inc) ×6 (30)
R6: (4 sc, inc) ×6 (36)
R7: (5 sc, inc) ×6 (42)
R8: (6 sc, inc) ×6 (48)
R9: repeat (sl st, 3 dc in next stitch) ×24 (96 worked stitches)
Place the scalloped edge approximately 1 cm inside the red brim. Leave two side gaps for the ear bases.
Fasten off. Leave a 35 cm tail.
Mushroom Spots (Make 7)
Yarn: cream — flat circles in two sizes.
Small spots, make 4: R1: 6 sc in MR (6).
Large spots, make 3: R1: 6 sc in MR (6); R2: inc ×6 (12).
Distribute the spots across the upper cap without placing one directly on the crown center.
Join each spot with a sl st. Fasten off, leaving a 12 cm tail.
Red Scarf
Yarn: mushroom red — ribbed rows.
Row 1: ch 6, sc in second ch from hook and across (5)
Row 2–Row 42: ch 1, turn, BLO sc across (5)
Border: ch 1, work sc evenly around all four edges, placing 3 sc in each corner
The finished scarf should measure approximately 3.5 cm wide and 35 cm long. Add two short ties when a fixed knot is required.
Fasten off. Weave in both tails.
Acorn Body
Yarn: chestnut brown — tapered oval construction.
R1: 6 sc in MR (6)
R2: inc ×6 (12)
R3: (sc, inc) ×6 (18)
R4–R8: sc around (18)
R9: (sc, dec) ×6 (12)
R10: sc around (12)
R11: dec ×6 (6)
R12: sc around (6)
R13: close through the front loops (6)
Stuff firmly after R9. Shape the lower end into a rounded point before closing.
Fasten off. Weave the tail through the body.
Acorn Cap
Yarn: dark brown — textured shallow cup.
R1: 6 sc in MR (6)
R2: inc ×6 (12)
R3: (sc, inc) ×6 (18)
R4: BLO sc around (18)
R5: repeat (sl st, hdc in next stitch) ×9 (18)
Place the cap over the wide end of the acorn body. Sew through the back-loop ridge formed in R4.
Fasten off. Leave a 20 cm tail.
Acorn Stem
Yarn: dark brown — narrow cord.
Ch 7. Beginning in the second chain from the hook, sl st in each chain across (6).
Fold the cord slightly and attach it to the center of the acorn cap.
Fasten off. Leave a 12 cm tail.
Assembly
- Pin the head centrally over the body’s 18-stitch opening. Sew twice around the neck, adding a final layer of filling before closing the last 2 cm.
- Position the eye masks so their upper edges cross the safety-eye line. Sew around each oval without pulling the outer corners inward.
- Attach the cream brows, cheek tufts and pink cheek patches. Center the muzzle over the inner cheek edges, then complete the mouth embroidery.
- Pin the ears between head R5 and R9 with approximately eight crown stitches between their inner bases. Compare both cup angles before sewing.
- Attach the arms at body R18. Turn the right paw inward so it can rest against the acorn body.
- Sew the back legs across body R3 to R10. Place the figure on a hard surface and level both feet before securing the second leg.
- Attach the striped tail between body R7 and R13. Rest its outer curve beside the right leg without lifting the opposite foot.
- Sew the cream gill layer beneath the mushroom cap, then attach the seven spots. Pin the completed hat behind both ear roots.
- Wrap the red scarf once around the neck and cross the ends at the front. Tack the rear center to the body so the scarf cannot rotate.
- Place the acorn between the paws and stitch it to the inner right paw at two points. Bury every remaining yarn tail through at least 5 cm of stuffed fabric.
The completed raccoon should sit on both back legs with the striped tail touching the work surface behind one side.
7 Technical Tips
- Rotated facial mask: Moving one mask by two stitches changes the visible width of the cream muzzle. Mark a vertical facial center from the midpoint between the eyes to head R18 before pinning either oval.
- Soft neck failure: A neck compressed by more than 6 mm lets the mushroom cap tilt the head backward. Add small pieces of filling around the outer neck wall before completing the head seam.
- Visible decrease gaps: Conventional decreases can expose stuffing along the gray head and body. Work through front loops only and change to a 3.25 mm hook when a gap exceeds 2 mm.
- Late eye installation: Fifteen-millimetre washers are difficult to fit after the head opening falls below 24 stitches. Attach the eyes through the mask pieces before beginning head R20.
- Collapsed mushroom brim: Stuffing placed within 4 cm of the outer edge makes the brim rigid and uneven. Keep the red brim empty and support only the central dome with a thin filling layer.
- Uneven sitting legs: A difference of 4 mm between the lowest foot rounds makes the raccoon lean. Pin both legs, place the body on a level table and compare their magic-ring centers before sewing.
- Loose acorn grip: A single attachment point allows the acorn to rotate away from the paw. Sew once through the cap edge and once through the lower body, keeping the two stitches approximately 15 mm apart.
Conclusion
Check the eye masks before fixing the mushroom hat. Their dark upper edges must remain visible below the cream gills, while each cream brow should clear the brim by at least one head round. Crochet the first back leg next and record its stuffed height from the magic ring to the flattened attachment edge; use that measurement when shaping the second. Save this mushroom raccoon amigurumi crochet pattern to a Pinterest woodland-project board, then share the finished figure on Instagram using #MushroomRaccoonPattern. Add the yarn weight, hook size and final sitting height to the caption. Did you rest the striped tail beside the acorn paw, or curve it behind the opposite leg?









