Introduction
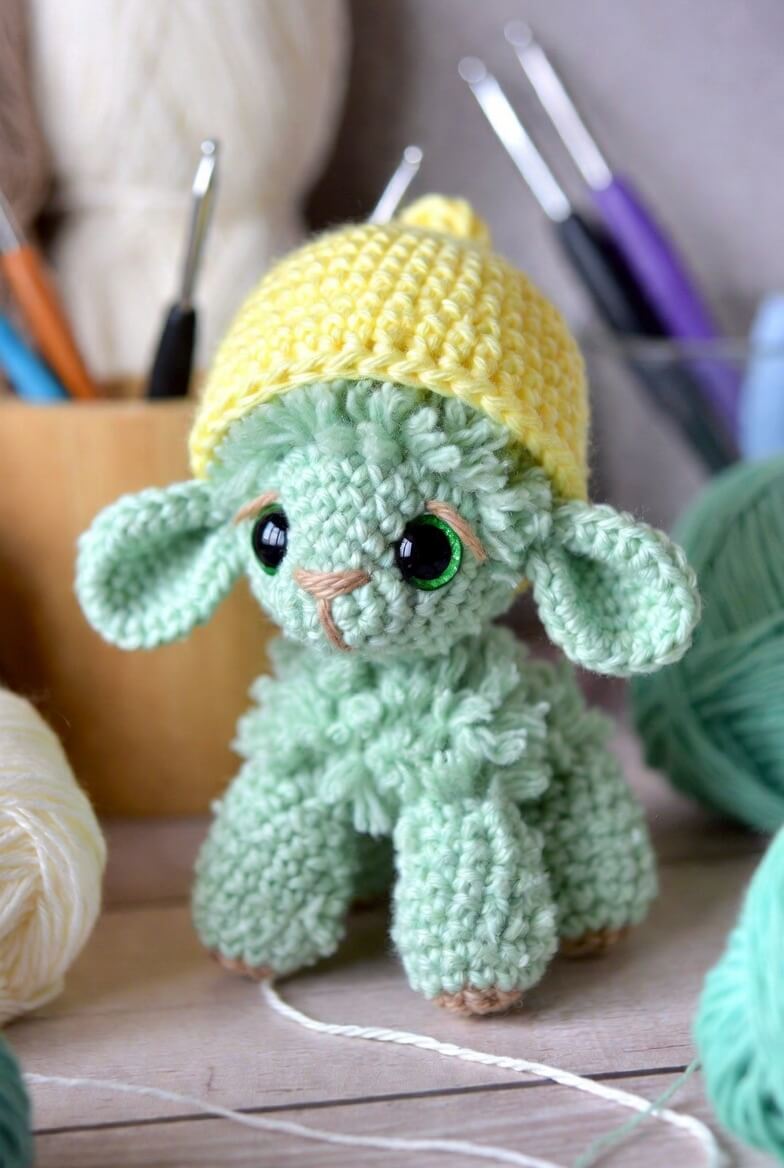
A lamb’s fleece changes direction where the forehead meets the muzzle, and copying that break is what keeps this figure from reading as a curly-haired rabbit. This bonnet lamb amigurumi crochet pattern uses worsted yarn, a 3.5 mm hook and controlled loop stitches to make an 18 cm figure. The project is intermediate level. Its four broad feet create a stable shelf toy without wire or an internal frame.
The Design: What Makes This Bonnet Lamb Different
The face is worked as a smooth 36-stitch sphere, while the wool is added as separate loop-stitch sections across the crown, chest and body sides. Dividing those textures keeps the muzzle visible and prevents fleece loops from distorting the eye placement. Low ear roots create the horizontal droop seen in a young lamb; sewing them above the eye line would make the head resemble a goat. The body uses four individually stuffed legs rather than a seated base, so each hoof must meet the same level. A fitted yellow cap turns this crochet lamb with bonnet into a distinct character without covering the ear joins. The most common error in a loop stitch sheep pattern is cutting the loops before assembly. Loose cut ends can pull through while the bonnet and ears are being sewn.
Project Info at a Glance
| Skill Level | Time | Finished Size | Hook | Best For |
|---|---|---|---|---|
| Intermediate | 9–12 hours | Approximately 18 cm | 3.5 mm | Nursery displays, spring collections and farm-animal sets |
The finished height, worsted-to-bulky yarn range and 3.5 mm hook are based on documented lamb patterns of comparable scale. Gauge remains more important than brand because the fabric must conceal the filling.
Materials and Tools
Yarn
- Mint green — worsted or aran weight — 100 to 110 g — Paintbox Yarns Simply Aran, Yarn and Colors Epic or a similar smooth yarn
- Lemon yellow — worsted weight — 30 g — used for the bonnet
- Peach-beige — DK or worsted weight — 5 g — used for the nose, mouth and hoof tips
- Bright green — embroidery yarn — 2 g — used around the eyes
- Black — embroidery yarn — 1 g — used for eye definition
Tools
- 3.5 mm crochet hook
- 12 mm safety eyes
- Polyester stuffing, approximately 55 to 70 g
- Yarn needle
- Locking stitch markers
- Dressmaking pins
- Scissors
- 15 mm card strip for forming even fleece loops
Abbreviations
- MR — magic ring
- sc — single crochet
- inc — two single crochet stitches in one stitch
- dec — invisible decrease over two stitches
- sl st — slip stitch
- ch — chain
- hdc — half double crochet
- BLO — back loop only
- FLO — front loop only
- lp-sc — loop single crochet
Work an invisible decrease through the front loops of the next two stitches, then complete one single crochet through both loops.
Pattern — Step by Step
Work in a continuous spiral unless a joined round or row is stated. Move the stitch marker after completing the first stitch of every round.
Head
Yarn: mint green — standard six-stitch amigurumi shaping.
R1: 6 sc in MR (6)
R2: inc ×6 (12)
R3: (sc, inc) ×6 (18)
R4: (2 sc, inc) ×6 (24)
R5: (3 sc, inc) ×6 (30)
R6: (4 sc, inc) ×6 (36)
R7–R14: sc around (36)
R15: (4 sc, dec) ×6 (30)
R16: sc around (30)
R17: (3 sc, dec) ×6 (24)
R18: sc around (24)
R19: (2 sc, dec) ×6 (18)
R20: (sc, dec) ×6 (12)
R21: dec ×6 (6)
R22: draw the yarn through the front loops and close (6)
Insert the safety eyes between R11 and R12 with seven visible stitches between the posts. Stuff firmly after R18, pressing small pieces around both eye washers.
Fasten off. Leave a 25 cm tail.
Body
Yarn: mint green — standard six-stitch amigurumi shaping.
R1: 6 sc in MR (6)
R2: inc ×6 (12)
R3: (sc, inc) ×6 (18)
R4: (2 sc, inc) ×6 (24)
R5: (3 sc, inc) ×6 (30)
R6: (4 sc, inc) ×6 (36)
R7–R14: sc around (36)
R15: (4 sc, dec) ×6 (30)
R16–R18: sc around (30)
R19: (3 sc, dec) ×6 (24)
R20–R21: sc around (24)
R22: (2 sc, dec) ×6 (18)
R23: sc around (18)
Pack the lower half firmly. Use less filling in the upper 2 cm so the head can sit evenly on the neck opening.
Fasten off. Leave a 30 cm sewing tail.
Front Legs (Make 2)
Yarn: peach-beige and mint green — standard amigurumi math.
R1: with peach-beige, 6 sc in MR (6)
R2: inc ×6 (12)
R3: sc around (12)
R4: change to mint green, sc around (12)
R5–R9: sc around (12)
R10: (2 sc, dec) ×3 (9)
R11–R13: sc around (9)
R14: (sc, dec) ×3 (6)
Stuff firmly through R9. Keep the final three rounds lightly filled so the upper leg can lie against the chest.
Fasten off. Leave a 25 cm tail.
Back Legs (Make 2)
Yarn: peach-beige and mint green — standard amigurumi math.
R1: with peach-beige, 6 sc in MR (6)
R2: inc ×6 (12)
R3: (sc, inc) ×6 (18)
R4: change to mint green, sc around (18)
R5–R7: sc around (18)
R8: (sc, dec) ×6 (12)
R9–R11: sc around (12)
R12: dec ×6 (6)
Pack the hoof and lower leg firmly. Reduce the filling above R8 so the leg does not push away from the body.
Fasten off. Leave a 25 cm tail.
Ears (Make 2)
Yarn: mint green — flattened oval construction.
R1: 6 sc in MR (6)
R2: inc ×6 (12)
R3: (sc, inc) ×6 (18)
R4–R6: sc around (18)
R7: (4 sc, dec) ×3 (15)
R8: sc around (15)
R9: (3 sc, dec) ×3 (12)
R10: sc around (12)
Do not stuff. Flatten the ear and fold the lower corners toward each other by approximately 5 mm to form the drooping root.
Crochet 6 sc through both layers. Fasten off, leaving a 25 cm tail.
Muzzle
Yarn: mint green — shallow oval construction.
R1: 6 sc in MR (6)
R2: inc ×6 (12)
R3: (sc, inc) ×6 (18)
R4: sc around (18)
R5: (sc, dec) ×6 (12)
Add a small amount of stuffing. Embroider a horizontal peach-beige nose across three stitches, then work one vertical line and two short lower branches.
Fasten off. Leave a 25 cm tail.
Forehead Fleece Panel
Yarn: mint green — loop-stitch surface panel.
R1: 6 sc in MR (6)
R2: lp-sc inc ×6 (12)
R3: (lp-sc, lp-sc inc) ×6 (18)
R4: (2 lp-sc, lp-sc inc) ×6 (24)
R5: lp-sc around (24)
R6: lp-sc around (24)
R7: (2 lp-sc, lp-sc dec) ×6 (18)
Form every loop around a 15 mm card strip. Leave the loops uncut until the panel has been attached.
Fasten off. Leave a 30 cm sewing tail.
Chest Fleece Panel
Yarn: mint green — loop-stitch oval.
R1: 6 sc in MR (6)
R2: lp-sc inc ×6 (12)
R3: (lp-sc, lp-sc inc) ×6 (18)
R4: (2 lp-sc, lp-sc inc) ×6 (24)
R5–R7: lp-sc around (24)
R8: (2 lp-sc, lp-sc dec) ×6 (18)
Keep the loops at 12 to 15 mm. A longer loop will conceal the upper front legs.
Fasten off. Leave a 30 cm tail.
Side Fleece Patches (Make 2)
Yarn: mint green — flat loop-stitch circles.
R1: 6 sc in MR (6)
R2: lp-sc inc ×6 (12)
R3: (lp-sc, lp-sc inc) ×6 (18)
R4: (2 lp-sc, lp-sc inc) ×6 (24)
R5: lp-sc around (24)
Do not stuff. Keep all loops on the same visible side of the work.
Fasten off. Leave a 25 cm tail.
Tail
Yarn: mint green — small loop-stitch sphere.
R1: 6 sc in MR (6)
R2: lp-sc inc ×6 (12)
R3: lp-sc around (12)
R4: lp-sc around (12)
R5: lp-sc dec ×6 (6)
Add a compact pinch of stuffing before completing R5.
Fasten off. Leave a 20 cm tail.
Yellow Bonnet
Yarn: lemon yellow — fitted dome with an open face edge.
R1: 6 sc in MR (6)
R2: inc ×6 (12)
R3: (sc, inc) ×6 (18)
R4: (2 sc, inc) ×6 (24)
R5: (3 sc, inc) ×6 (30)
R6: (4 sc, inc) ×6 (36)
R7–R12: sc around (36)
R13: sc in next 29 stitches, ch 1, turn (29)
R14: sc across, ch 1, turn (29)
R15: dec, sc in next 25 stitches, dec, ch 1, turn (27)
R16: sc across (27)
Rounds 13–16 leave a seven-stitch opening at the lower back. Test the bonnet on the head before fastening off; its front edge should sit directly behind the forehead fleece.
Fasten off. Leave a 30 cm tail.
Bonnet Top Nub
Yarn: lemon yellow — small stuffed detail.
R1: 6 sc in MR (6)
R2: inc ×6 (12)
R3: sc around (12)
R4: dec ×6 (6)
Add a small pinch of stuffing before closing.
Fasten off. Leave a 15 cm tail.
Embroidered Eye Rings
Thread bright green yarn through the head and work a close ring of surface stitches around the outer lower half of each safety eye. Keep the green stitches within 2 mm of the plastic edge. Add two short black stitches at the outside corner if stronger eye definition is required.
Assembly
- Pin the head centrally over the body’s 18-stitch opening. Sew around the neck twice, adding a small amount of stuffing before closing the final 2 cm.
- Place the muzzle between head R12 and R17. Its top edge should sit one round below the eye posts.
- Complete the green embroidered eye rings before attaching the fleece. Check that both rings expose the same amount of black plastic.
- Pin the ears between head R8 and R11, with approximately 20 stitches separating their inner roots across the forehead. Angle both ear tips slightly downward.
- Center the forehead fleece over head R3 to R10. Sew beneath the outer loops so the joining stitches remain hidden.
- Attach the body to the four legs, placing the front legs beneath the chest and the wider back legs near the rear third. Test all four hooves against a flat surface.
- Sew the chest fleece from the neck seam to body R12. Keep its lower edge above the front hoof line.
- Position one side fleece patch on each flank, then attach the tail at the center back between body R8 and R11.
- Fit the yellow bonnet behind the fleece and ears. Sew only around its upper rear edge so the face opening remains flexible, then attach the top nub.
- Cut selected fleece loops and trim any strand longer than 18 mm. Bury each remaining yarn tail through at least 5 cm of stuffed fabric.
The completed lamb should stand on all four hoof surfaces without pressure from the maker’s hand.
7 Technical Tips
- Uneven fleece loops: Freehand loops can vary by more than 5 mm and produce bald channels between rounds. Wrap each loop around the same 15 mm card strip before completing the single crochet.
- Twisted loop stitches: A loop pulled to the wrong side leaves a smooth patch in the fleece. Check the working face after every six stitches and move any loop before beginning the next round.
- Loose eye washers: A washer installed after heavy stuffing may not lock against the eye post. Fit both 12 mm eyes before the head opening decreases below 24 stitches.
- Asymmetrical ears: A root positioned one round higher changes the entire head silhouette. Mark both attachment lines with pins between R8 and R11 before sewing either ear.
- Bonnet creep: Sewing the lower edge completely closed can pull the cap over the eyes. Leave the seven-stitch back opening flexible and attach only the upper rear edge.
- Unstable feet: A vertical difference of 4 mm between two hoof bases will make the lamb rock. Pin all four legs, place the body on a hard table and adjust each seam before knotting the yarn.
- Visible decrease gaps: Standard decreases can open holes beside the muzzle and neck. Work through front loops only and change to a 3.25 mm hook when a gap exceeds 2 mm.
Conclusion
Measure the forehead fleece before permanently attaching the bonnet. The panel should occupy roughly two-thirds of the space between the ear roots while leaving the smooth muzzle fully exposed. Crochet one front leg next and use it as the physical gauge for the other three limbs; matching stitch counts alone does not correct a tension change. Save this bonnet lamb amigurumi crochet pattern to Pinterest with a close photograph of the loop texture, then share the completed lamb on Instagram using #BonnetLambPattern. Include the hook size, yarn weight and final loop length in the caption. Did you keep the fleece loops closed, or cut selected loops to create a shaggier forehead?









