Introduction
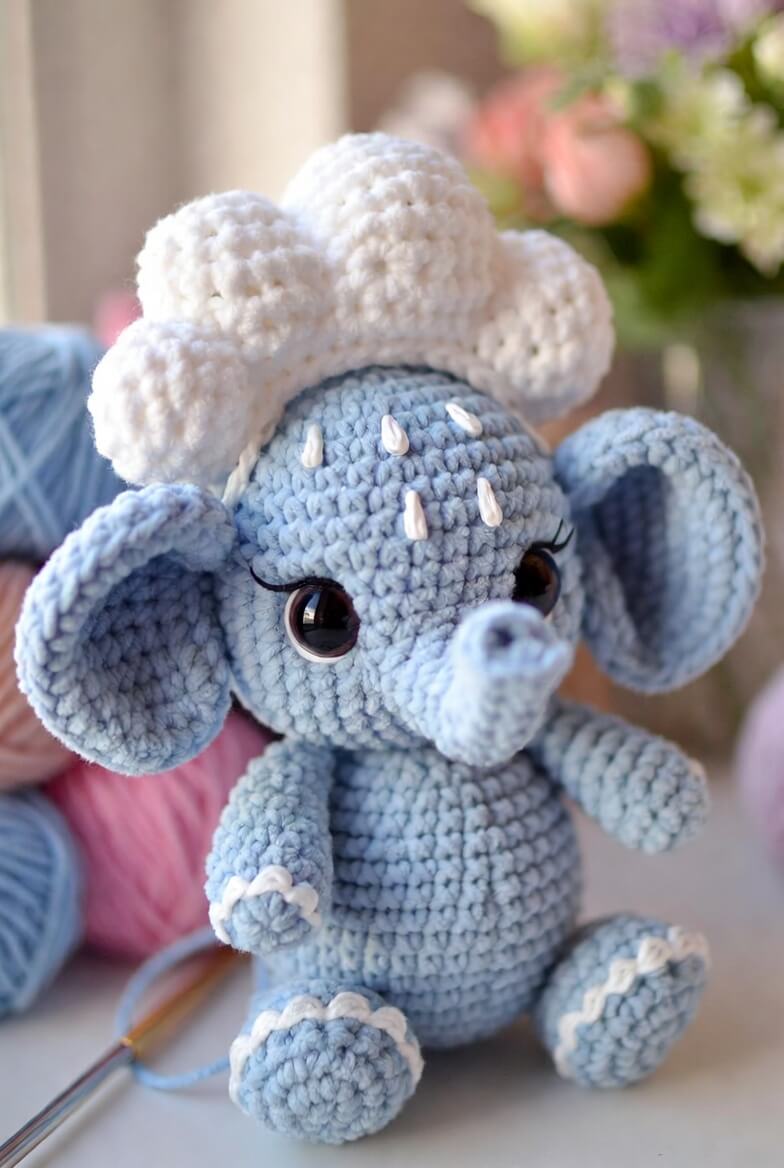
An elephant cannot hide its ears beneath a cloud, so both shapes must remain readable from the front. This elephant amigurumi crochet pattern uses heavy DK or compact worsted chenille, a 3.5 mm hook and 16 mm safety eyes to produce a sitting toy about 20 cm tall. The project suits an intermediate maker and creates a stable nursery display with a removable-looking weather-themed headpiece.
The Design: What Makes Nimbus the Elephant Different
Nimbus uses a 36-stitch head rather than an extra-wide spherical head because the cloud adds considerable visual mass above the face. Large double-layer ears are attached behind the eye line, keeping the elephant silhouette visible without covering the eyelashes. The trunk begins as a narrow tube and widens near its base, which lets it curve upward while sitting firmly against the face. A broad lower body supports the head and prevents the finished blue elephant amigurumi from tipping forward. The most frequent error in a rain cloud elephant crochet pattern is placing the ears too far toward the front. That position crowds the eyes, conceals the cheek patches and makes the trunk appear off-centre. Pin both ears behind the midpoint of the head before sewing. The maker then checks the complete face from directly ahead, not only from the side.
Project Info at a Glance
| Skill Level | Time | Finished Size | Hook | Best For |
|---|---|---|---|---|
| Intermediate | 7–9 hours | Approximately 20 cm sitting | 3.5 mm | Nursery display or decorative shelf toy |
Materials and Tools
Yarn
- Powder blue — heavy DK or compact worsted chenille — approximately 50 g — Himalaya Dolphin Baby, YarnArt Dolce or a similar low-shed yarn.
- White — matching yarn weight — approximately 20–25 g — use the same fibre family as the blue yarn so the cloud does not appear unusually dense.
- Black — cotton or smooth acrylic — less than 2 g — used for eyelashes and optional mouth embroidery.
Tools
- 3.5 mm crochet hook
- 16 mm safety eyes
- Polyester stuffing
- Yarn needle
- Locking stitch markers
- Sewing pins
- Scissors
Plastic safety eyes are not suitable for toys intended for children under three. Embroidered eyes provide the safer construction for that age group.
Abbreviations
- MR — magic ring
- sc — single crochet
- inc — two single crochet stitches in one stitch
- dec — invisible decrease over two stitches
- sl st — slip stitch
- ch — chain
- BLO — back loop only
- FO — fasten off
An invisible decrease is worked through the front loops of the next two stitches before completing one single crochet through both loops.
Pattern — Step by Step
Work all spiral sections continuously unless a joined round or row is stated. Place the marker in the first stitch of every round.
Head
Yarn: powder blue. Original shaping based on standard six-stitch amigurumi expansion.
R1: 6 sc in MR (6)
R2: inc × 6 (12)
R3: (sc, inc) × 6 (18)
R4: (2 sc, inc) × 6 (24)
R5: (3 sc, inc) × 6 (30)
R6: (4 sc, inc) × 6 (36)
R7–R13: sc around (36)
Insert the safety eyes between R10 and R11, 8 visible stitches apart. Check that the trunk will fit between them before attaching the backs.
R14: (4 sc, dec) × 6 (30)
R15: (3 sc, dec) × 6 (24)
R16: (2 sc, dec) × 6 (18)
Stuff firmly around the eye stems and lightly across the final crown.
R17: (sc, dec) × 6 (12)
R18: dec × 6 (6)
Fasten off. Thread the tail through the front loops of the final six stitches and close the opening.
Body
Yarn: powder blue. Original medium-size amigurumi shaping.
R1: 6 sc in MR (6)
R2: inc × 6 (12)
R3: (sc, inc) × 6 (18)
R4: (2 sc, inc) × 6 (24)
R5: (3 sc, inc) × 6 (30)
R6: (4 sc, inc) × 6 (36)
R7–R13: sc around (36)
R14: (4 sc, dec) × 6 (30)
R15–R17: sc around (30)
R18: (3 sc, dec) × 6 (24)
R19–R20: sc around (24)
R21: (2 sc, dec) × 6 (18)
Stuff the base firmly. Keep the top 2 cm slightly softer so the head can be sewn level.
R22: (sc, dec) × 6 (12)
R23: dec × 6 (6)
Fasten off. Leave a 35 cm tail for attaching the body to the head.
Arms or Front Legs — Make 2
Yarn: powder blue. Standard amigurumi limb shaping.
R1: 6 sc in MR (6)
R2: inc × 6 (12)
R3: (sc, inc) × 6 (18)
R4–R5: sc around (18)
R6: (sc, dec) × 6 (12)
R7–R11: sc around (12)
R12: (2 sc, dec) × 3 (9)
Stuff the lower half only. Flatten the final opening.
R13: sc through both layers to close (4)
Fasten off. Leave a 25 cm sewing tail.
Back Legs — Make 2
Yarn: powder blue. The broad foot provides sitting stability.
R1: 6 sc in MR (6)
R2: inc × 6 (12)
R3: (sc, inc) × 6 (18)
R4: (2 sc, inc) × 6 (24)
R5–R6: sc around (24)
R7: (2 sc, dec) × 6 (18)
R8: (sc, dec) × 6 (12)
R9–R11: sc around (12)
Stuff the foot firmly and the ankle lightly.
R12: dec × 6 (6)
Fasten off. Leave a 30 cm tail. Do not draw the final opening tightly until the leg has been pinned to the body.
Outer Ears — Make 2
Yarn: powder blue. Comparable elephant patterns use circular or layered ear sections.
R1: 6 sc in MR (6)
R2: inc × 6 (12)
R3: (sc, inc) × 6 (18)
R4: (2 sc, inc) × 6 (24)
R5: (3 sc, inc) × 6 (30)
R6: (4 sc, inc) × 6 (36)
Fasten off. Leave a 35 cm tail.
Inner Ears — Make 2
Yarn: powder blue or a slightly lighter blue.
R1: 6 sc in MR (6)
R2: inc × 6 (12)
R3: (sc, inc) × 6 (18)
R4: (2 sc, inc) × 6 (24)
R5: (3 sc, inc) × 6 (30)
Fasten off. Leave a 25 cm tail.
Place one inner ear over each outer ear. Sew around the inner layer, leaving one outer round visible. Fold approximately 2 cm at the upper base before attaching the ear to the head.
Trunk
Yarn: powder blue. Work the first rounds tightly so the tip remains narrow.
R1: 6 sc in MR (6)
R2–R4: sc around (6)
R5: (sc, inc) × 3 (9)
R6–R8: sc around (9)
R9: (2 sc, inc) × 3 (12)
R10–R11: sc around (12)
R12: (sc, inc) × 6 (18)
Add a narrow roll of stuffing. Keep the final two rounds flat enough to sit against the head.
Fasten off. Leave a 35 cm tail. Bend the trunk upward and hold the curve with two hidden stitches along its underside.
Cheek Patches — Make 2
Yarn: powder blue. These flat circles create the rounded muzzle shown in the photograph.
R1: 6 sc in MR (6)
R2: inc × 6 (12)
R3: (sc, inc) × 6 (18)
Fasten off. Leave a 20 cm tail. Do not stuff.
Cloud Lobes — Make 5
Yarn: white. Make two small, two medium and one large lobe.
Small Lobes — Make 2
R1: 6 sc in MR (6)
R2: inc × 6 (12)
R3–R4: sc around (12)
R5: dec × 6 (6)
Fasten off. Leave a 25 cm tail.
Medium Lobes — Make 2
R1: 6 sc in MR (6)
R2: inc × 6 (12)
R3: (sc, inc) × 6 (18)
R4–R5: sc around (18)
R6: (sc, dec) × 6 (12)
R7: dec × 6 (6)
Fasten off. Leave a 30 cm tail.
Large Centre Lobe — Make 1
R1: 6 sc in MR (6)
R2: inc × 6 (12)
R3: (sc, inc) × 6 (18)
R4: (2 sc, inc) × 6 (24)
R5–R6: sc around (24)
R7: (2 sc, dec) × 6 (18)
R8: (sc, dec) × 6 (12)
R9: dec × 6 (6)
Fasten off. Leave a 35 cm tail.
Stuff every lobe lightly. Arrange them on a shallow arc, with the large lobe at the top centre, the medium lobes at both sides and the small lobes at the lower edges.
Cloud Base
Yarn: white. Work in joined rounds.
R1: 6 sc in MR, join with sl st (6)
R2: inc × 6, join (12)
R3: (sc, inc) × 6, join (18)
R4: (2 sc, inc) × 6, join (24)
R5: (3 sc, inc) × 6, join (30)
R6: (4 sc, inc) × 6, join (36)
Fasten off. Leave a 40 cm tail. Sew the five lobes to this base before attaching the cloud unit to the head.
Raindrops — Make 5
Yarn: white. Make three small and two long drops.
Small Drop
R1: 6 sc in MR (6)
R2: sc around (6)
R3: (sc, dec) × 2 (4)
Fasten off. Leave a 15 cm tail.
Long Drop
R1: 6 sc in MR (6)
R2–R3: sc around (6)
R4: (sc, dec) × 2 (4)
Fasten off. Leave a 15 cm tail.
Flatten each drop without stuffing. Sew them vertically between the cloud and the eye line.
Toenails
Yarn: white.
For each arm, embroider three short V-shaped nails over R2–R3. For each back leg, embroider four nails across the front edge. Each nail should span no more than one stitch width.
Eyelashes
Yarn: black smooth cotton.
Anchor the yarn behind one eye. Make one horizontal upper-lid stitch and three lashes measuring approximately 8 mm, 10 mm and 8 mm. Repeat on the other side while matching the angle rather than copying the exact stitch holes.
Assembly
- Position the head over the body opening. Sew through one full stitch from each part, checking the front view after every six stitches.
- Add a final pinch of stuffing through the remaining neck gap, then close the seam.
- Pin the cheek patches below the eyes, leaving a narrow central channel for the trunk. Sew around their outer edges.
- Centre the trunk between the patches. Attach its wide edge across approximately eight head stitches and secure the lower edge with two hidden stitches.
- Pin each layered ear behind the eyes. The folded upper edge should begin near R7 and the lower edge should finish near R14.
- Attach the arms between body R15 and R18. Angle them slightly forward rather than directly sideways.
- Sew the back legs across the lower third of the body. Test the sitting position on a level surface before closing either seam.
- Assemble the cloud lobes on the circular base. Stitch the completed cloud to the head across a 6 cm arc.
- Arrange the five raindrops between the cloud and the eyes. Keep at least one clear stitch between adjacent drops.
- Embroider the toenails and eyelashes, weave the remaining tails through several internal stitch paths and trim them.
The completed elephant measures approximately 20 cm in its seated position when worked at the stated gauge.
7 Technical Tips
- Stitch-marker drift: A misplaced round marker can rotate the decreases and pull the face sideways. Count every round at the 18-, 24-, 30- and 36-stitch stages.
- Understuffed neck: A neck gap wider than 5 mm allows the head to tilt under the cloud’s weight. Add small pieces of stuffing around the seam before the final six attachment stitches.
- Visible decrease lines: Standard two-stitch decreases can form diagonal ridges across chenille fabric. Work every decrease through the front loops only and keep the working loop close to the hook shaft.
- Late eye placement: The backs cannot be fitted after the head opening becomes too narrow. Install both eyes after R13 and test the 8-stitch spacing before locking them.
- Velvet tension changes: Loose stitches may expose stuffing between the 36-stitch plateau rounds. Change to a 3.25 mm hook when a gap exceeds roughly 2 mm.
- Uneven ear pinning: A vertical difference of one round is visible on oversized elephant ears. Mark the upper and lower attachment points on both sides before sewing either ear.
- Short woven tails: Chenille ends shorter than 8 cm can work back through the fabric. Weave each tail through three separate internal directions before trimming it.
Conclusion
Check the finished toy from the front before trimming the final yarn tails. Both ears should begin on the same head round, the trunk should divide the cheek patches evenly, and the centre cloud lobe should sit above the trunk rather than above either eye. Photograph the elephant against a plain background so the white cloud edge and blue ear outlines remain distinct. Save the finished rain cloud elephant amigurumi crochet pattern project to Pinterest, then share the result on Instagram with #NimbusRainElephant. Record the actual sitting height and yarn quantity in your project notes. Which raindrop arrangement gives your elephant the clearest face: a centred group of five or an uneven storm pattern?









