Introduction
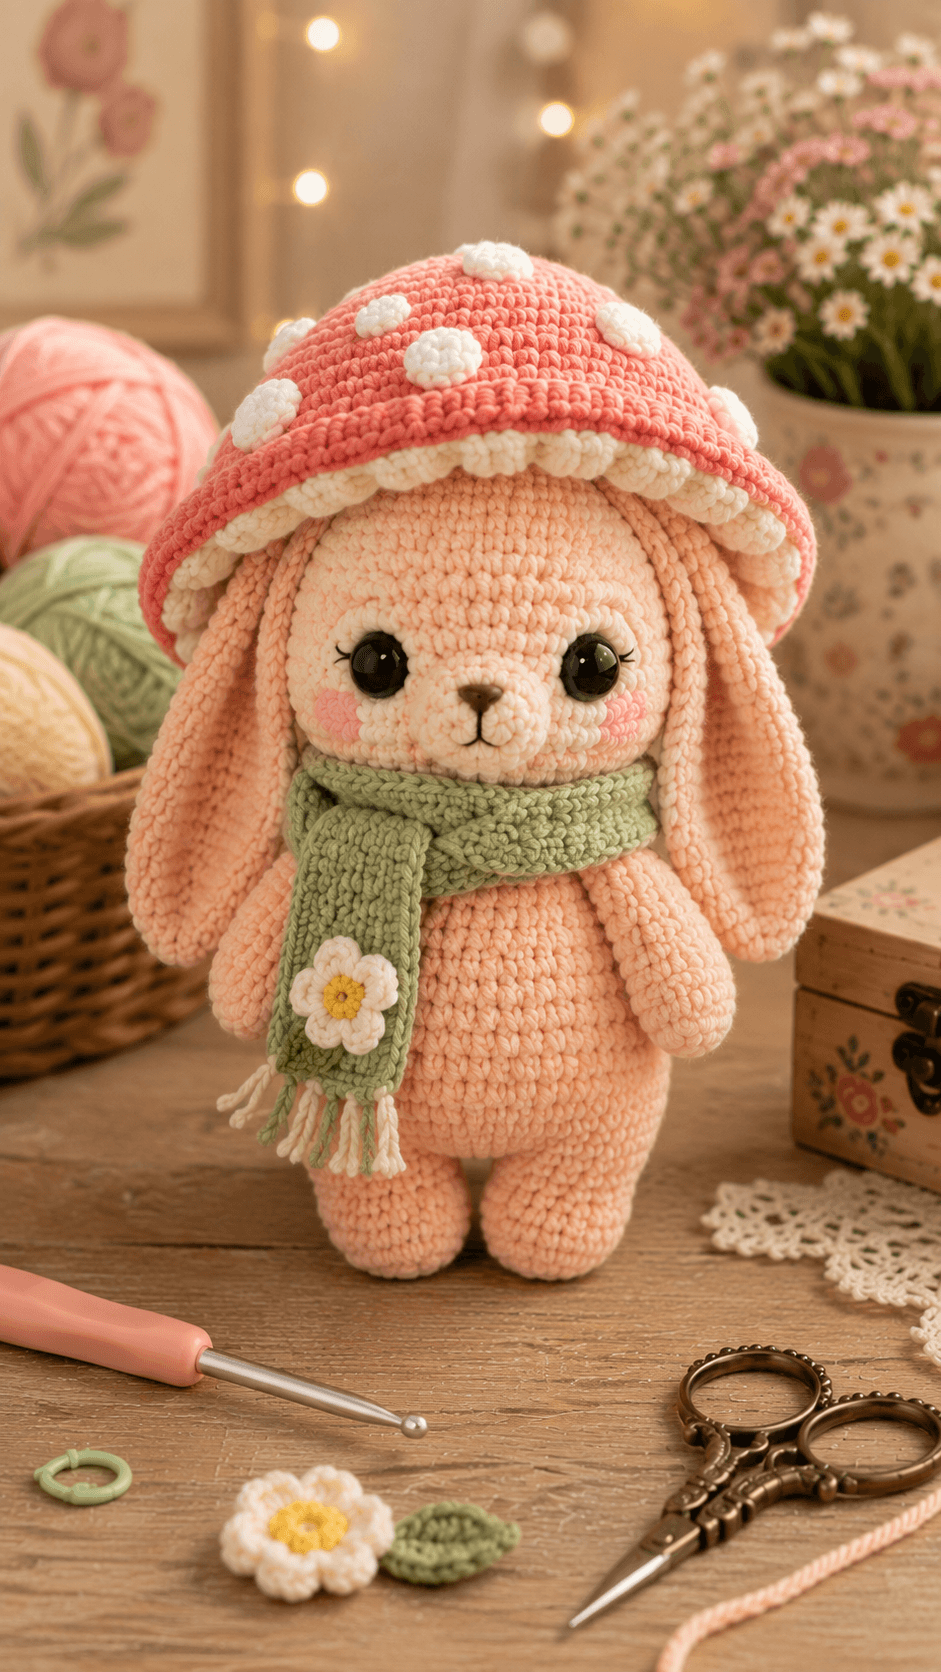
A lop-eared rabbit cannot wear a wide mushroom cap until the ear roots and brim are planned as one structure. This mushroom bunny amigurumi crochet pattern uses chunky yarn, a 4 mm hook and shaped accessories to produce a figure approximately 26 cm tall. The project suits an intermediate maker who can work continuous rounds, sew shaped pieces and control firm stuffing. Its broad feet also create a stable display figure without internal supports.
The Design: What Makes This Mushroom Bunny Different
The head reaches a 36-stitch plateau so the face remains wide enough for the large eyes, separate muzzle and low ear placement. Each ear is flattened rather than heavily stuffed; that construction produces a hanging lop shape instead of two rigid tubes. The mushroom cap uses a shallow dome above a separate cream gill layer, allowing the brim to project beyond the forehead without hiding the eyes. A weighted oval body and broad back legs counterbalance the cap. This crochet bunny with mushroom hat also includes a narrow scarf that visually separates the head from the torso. A common error in a lop-eared bunny crochet pattern is sewing the ears too high. That placement makes them point outward and pushes the cap upward rather than letting both pieces frame the face.
Project Info at a Glance
| Skill Level | Time | Finished Size | Hook | Best For |
|---|---|---|---|---|
| Intermediate | 10–14 hours | Approximately 26 cm | 4 mm | Woodland displays, nursery shelves and seasonal market stock |
The 26 cm size, chunky yarn, 4 mm hook and 9 mm eye specification are based on a comparable medium bunny pattern. The photographed proportions may be reproduced more closely with 12 mm eyes, provided the toy is not intended for a child under three years old.
Materials and Tools
Yarn
- Light peach — chunky weight — 100 g — Paintbox Yarns Simply Chunky or a comparable smooth cotton-blend yarn
- Coral pink — chunky weight — 55 g — used for the mushroom cap
- Cream — chunky weight — 30 g — used for the gills, muzzle and cap spots
- Sage green — chunky weight — 30 g — used for the scarf and leaf
- White — DK or worsted weight — 10 g — used for the flower petals
- Yellow — DK or worsted weight — 3 g — used for the flower center
- Blush pink — DK weight — 5 g — used for the cheek patches
- Brown and black — small lengths — used for the nose, mouth and eyelashes
Tools
- 4 mm crochet hook
- 9 mm safety eyes, or 12 mm eyes for a larger-eyed face
- Polyester stuffing, approximately 60–75 g
- Yarn needle
- Locking stitch markers
- Dressmaking pins
- Scissors
Abbreviations
- MR — magic ring
- sc — single crochet
- inc — two single crochet stitches in one stitch
- dec — invisible decrease over two stitches
- sl st — slip stitch
- ch — chain
- hdc — half double crochet
- dc — double crochet
- BLO — back loop only
- FLO — front loop only
An invisible decrease is worked through the front loops of the next two stitches before completing one single crochet through both loops.
Pattern — Step by Step
Work in a continuous spiral unless a joined round or row is stated. Place a marker in the first stitch of every round.
Head
Yarn: light peach — standard six-stitch amigurumi shaping.
R1: 6 sc in MR (6)
R2: inc ×6 (12)
R3: (sc, inc) ×6 (18)
R4: (2 sc, inc) ×6 (24)
R5: (3 sc, inc) ×6 (30)
R6: (4 sc, inc) ×6 (36)
R7–R15: sc around (36)
R16: (4 sc, dec) ×6 (30)
R17: sc around (30)
R18: (3 sc, dec) ×6 (24)
R19: (2 sc, dec) ×6 (18)
R20: (sc, dec) ×6 (12)
R21: dec ×6 (6)
R22: close the remaining opening through the front loops (6)
Insert the eyes between R11 and R12 with 8 visible stitches between them. Stuff firmly after R18, adding small pieces around the eye posts.
Fasten off. Leave a 25 cm tail for sewing.
Body
Yarn: light peach — standard six-stitch amigurumi shaping.
R1: 6 sc in MR (6)
R2: inc ×6 (12)
R3: (sc, inc) ×6 (18)
R4: (2 sc, inc) ×6 (24)
R5: (3 sc, inc) ×6 (30)
R6: (4 sc, inc) ×6 (36)
R7–R15: sc around (36)
R16: (4 sc, dec) ×6 (30)
R17–R19: sc around (30)
R20: (3 sc, dec) ×6 (24)
R21–R22: sc around (24)
R23: (2 sc, dec) ×6 (18)
R24: sc around (18)
Stuff the lower third firmly and the neck area moderately. Keep the final opening flat enough to support the head.
Fasten off. Leave a 30 cm tail for sewing.
Arms (Make 2)
Yarn: light peach — standard amigurumi math.
R1: 6 sc in MR (6)
R2: inc ×6 (12)
R3–R5: sc around (12)
R6: (2 sc, dec) ×3 (9)
R7–R13: sc around (9)
R14: (sc, dec) ×3 (6)
Stuff the hand through R6. Leave the upper half almost unstuffed so the arm hangs against the body.
Flatten the opening and crochet 3 sc through both layers. Fasten off, leaving a 20 cm tail.
Back Legs (Make 2)
Yarn: light peach — standard amigurumi math.
R1: 6 sc in MR (6)
R2: inc ×6 (12)
R3: (sc, inc) ×6 (18)
R4–R6: sc around (18)
R7: (sc, dec) ×6 (12)
R8–R11: sc around (12)
R12: dec ×6 (6)
Pack the foot firmly. Add less stuffing above R7 so the leg can be pinned flush against the lower body.
Fasten off. Leave a 25 cm tail.
Lop Ears (Make 2)
Yarn: light peach — elongated oval shaping derived from standard amigurumi increases.
R1: 6 sc in MR (6)
R2: inc ×6 (12)
R3: (sc, inc) ×6 (18)
R4–R13: sc around (18)
R14: (4 sc, dec) ×3 (15)
R15–R17: sc around (15)
R18: (3 sc, dec) ×3 (12)
R19–R21: sc around (12)
R22: (2 sc, dec) ×3 (9)
Do not stuff. Flatten each ear, align the side edges and rotate the flattened seam toward the back of the head during assembly.
Crochet 4 sc through both layers. Fasten off, leaving a 30 cm tail.
Muzzle
Yarn: cream — standard amigurumi math.
R1: 6 sc in MR (6)
R2: inc ×6 (12)
R3: (sc, inc) ×6 (18)
R4: sc around (18)
R5: (sc, dec) ×6 (12)
Add a small amount of stuffing. Embroider a brown triangular nose across two stitches, then add a vertical line and two short mouth curves.
Fasten off. Leave a 25 cm tail.
Cheek Patches (Make 2)
Yarn: blush pink — flat-circle construction.
R1: 6 sc in MR (6)
R2: inc ×6 (12)
Join with a sl st. Fasten off, leaving a 15 cm tail.
Mushroom Cap
Yarn: coral pink — standard six-stitch shaping with an extended brim.
R1: 6 sc in MR (6)
R2: inc ×6 (12)
R3: (sc, inc) ×6 (18)
R4: (2 sc, inc) ×6 (24)
R5: (3 sc, inc) ×6 (30)
R6: (4 sc, inc) ×6 (36)
R7: (5 sc, inc) ×6 (42)
R8–R10: sc around (42)
R11: (6 sc, inc) ×6 (48)
R12–R14: sc around (48)
R15: BLO sc around (48)
R16: (6 sc, dec) ×6 (42)
Stuff only the center dome. Leave the outer 4 cm of the cap unstuffed so the brim curves downward.
Fasten off. Leave a 35 cm tail.
Cream Gill Layer
Yarn: cream — worked as a shallow disc.
R1: 6 sc in MR (6)
R2: inc ×6 (12)
R3: (sc, inc) ×6 (18)
R4: (2 sc, inc) ×6 (24)
R5: (3 sc, inc) ×6 (30)
R6: (4 sc, inc) ×6 (36)
R7: (5 sc, inc) ×6 (42)
R8: (6 sc, inc) ×6 (48)
R9: (sl st, 3 dc in next stitch) ×24 around (96 worked stitches)
The final round forms the scalloped gills visible below the coral brim.
Fasten off. Leave a 35 cm tail.
Mushroom Spots (Make 9)
Yarn: cream — flat circles in two sizes.
Small spots, make 5: R1: 6 sc in MR (6).
Large spots, make 4: R1: 6 sc in MR (6); R2: inc ×6 (12).
Join each spot with a sl st. Fasten off, leaving a 12 cm sewing tail.
Scarf
Yarn: sage green — worked in rows.
Row 1: ch 8, sc in second ch from hook and across (7)
Row 2–Row 52: ch 1, turn, BLO sc across (7)
Edging: ch 1, work sc evenly around all four edges, placing 3 sc in each corner.
The finished scarf should measure approximately 4 cm wide and 42 cm long before fringe is added.
Fasten off. Weave in the working tail.
Scarf Fringe
Cut twelve 10 cm strands in cream and sage. Fold one strand in half, pull the loop through a short edge of the scarf and draw both ends through the loop. Attach six strands to each end, then trim the fringe to 4 cm.
Daisy Appliqué
Yarn: yellow and white — joined rounds.
Center R1: with yellow, 6 sc in MR (6)
Center R2: inc ×6 (12)
Petals R3: change to white; repeat (sl st in next stitch, ch 3, 2 dc in next stitch, ch 3, sl st in next stitch) four times.
Fasten off. Leave a 20 cm tail for attaching the flower to one scarf end.
Assembly
- Pin the head to the body opening and check that the eyes face directly forward. Sew twice around the 18-stitch neck opening.
- Position the muzzle between head R12 and R17. The top edge should sit one round below the lower line of the eyes.
- Sew the cheek patches beside the muzzle between R13 and R16. Keep each patch at least one stitch away from the muzzle edge.
- Add three short black eyelash stitches outside each eye. Knot the yarn inside the head or bury both tails through dense stuffing.
- Pin the ears between head R5 and R8, approximately six stitches apart at the crown. Angle their flattened seams toward the back.
- Attach the arms to body R19, leaving approximately eight body stitches between the front edges. Point the rounded hands slightly inward.
- Sew the legs across body R4 to R10. Check the figure on a flat surface before completing the second seam.
- Sew the cream gill layer beneath the mushroom cap. Place the scalloped edge approximately 1 cm inside the coral brim.
- Distribute the nine cream spots across the cap, then sew the completed hat around the crown without catching the ear fronts.
- Wrap the scarf once around the neck, cross the ends at the front and attach the daisy to the longer end. Bury every remaining tail inside the nearest stuffed section.
The completed figure should stand without wire when both feet and the lower body share a level base.
7 Technical Tips
- Marker drift: Moving the stitch marker one stitch late shifts every decrease line around the head. Count the final six stitches of each shaped round before beginning the next one.
- Understuffed neck: A soft 18-stitch neck allows the mushroom cap to pull the head backward. Pack the upper 3 cm of the body until it resists firm thumb pressure.
- Visible decrease gaps: A conventional decrease can expose stuffing on the head and cap. Work each decrease through the front loops only and keep the working loop close to the hook throat.
- Incorrect eye timing: Closing beyond head R18 makes the washers difficult to fit. Install both eyes between R11 and R12 before the opening decreases below 24 stitches.
- Loose chunky-yarn tension: A gap wider than 2 mm will show filling after the toy is stuffed. Change to a 3.5 mm hook rather than pulling each stitch hard enough to distort the fabric.
- Unbalanced pinning: A 5 mm difference in leg height can make the bunny lean. Pin both legs, place the figure on a table and compare the lowest foot rounds before sewing.
- Short buried tails: A tail shorter than 12 cm may work out through the surface. Thread each tail through at least 5 cm of dense stuffing, reverse direction once and trim after the yarn retracts.
Conclusion
Check the cap diameter before completing the final assembly: its 48-stitch brim should clear both eyes while overlapping the ear roots. The next practical step is to crochet one ear and test its length against the unfinished head before making the second. That comparison catches tension differences early and prevents two visibly unequal lop ears. Save the finished mushroom bunny amigurumi crochet pattern to a dedicated Pinterest project board, then post the completed figure on Instagram with #MushroomBunnyPattern. Record the yarn brand, hook size and final height in the caption so another maker can compare scale. Did you place the mushroom brim above the eyebrows, or lower it to create a deeper woodland cap?









