Introduction
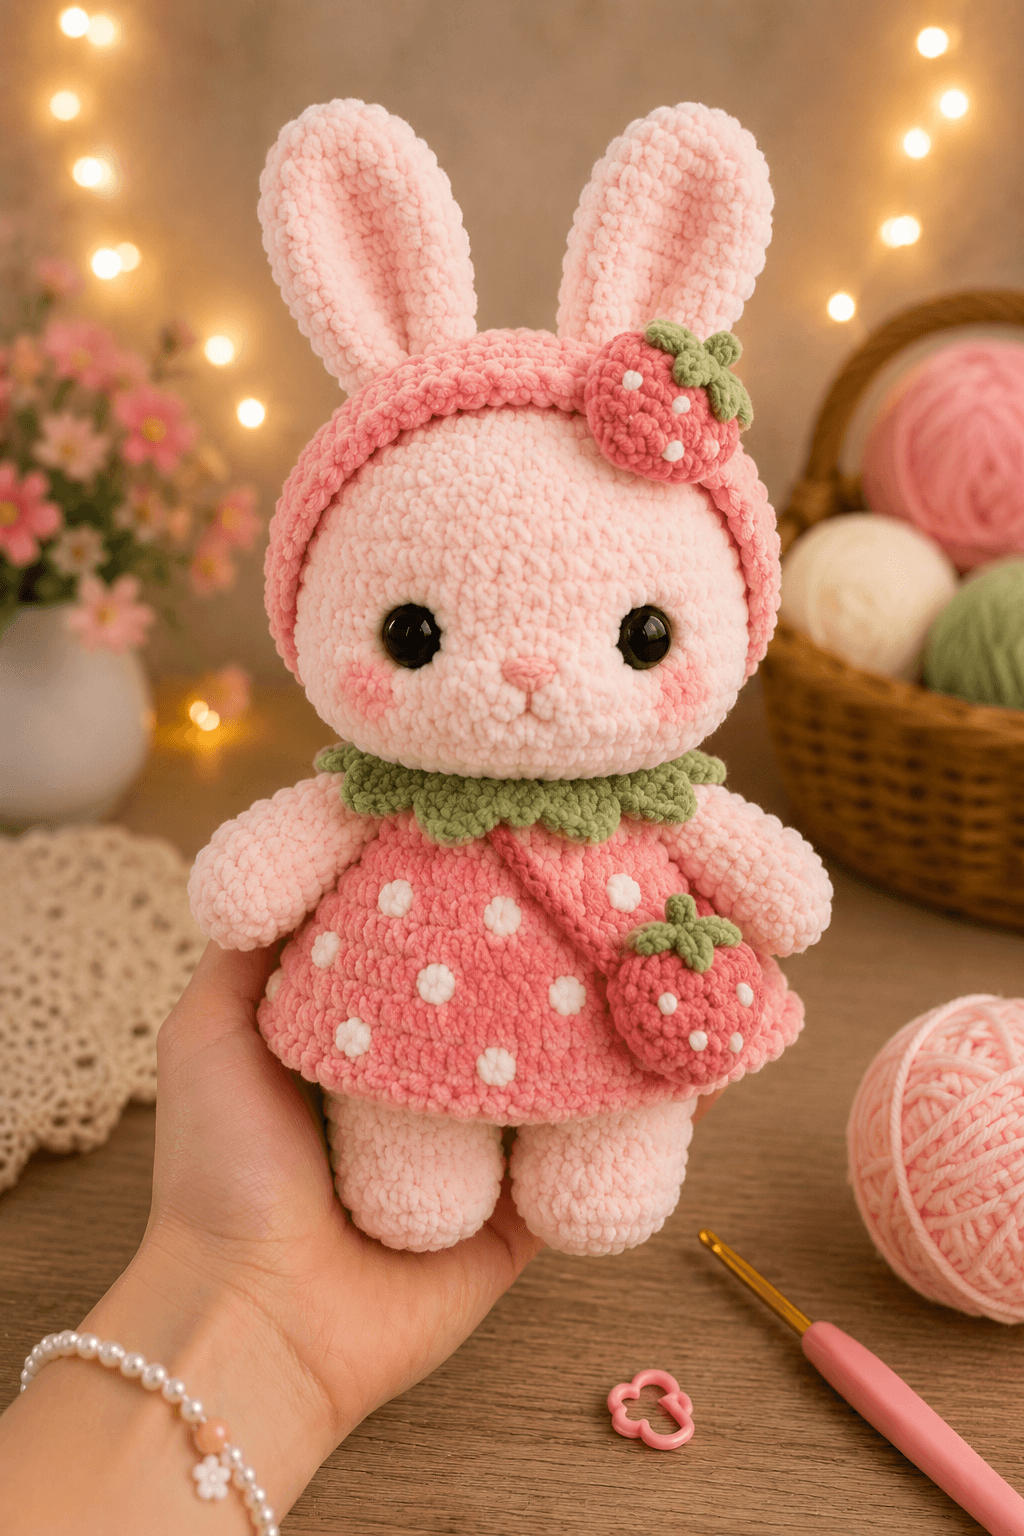
A strawberry cannot grow rabbit ears, so this design separates the fruit costume from the bunny’s anatomy. This strawberry bunny amigurumi uses chunky chenille, a 5 mm hook and 12 mm eyes to produce a figure about 21–25 cm tall. The project suits an intermediate maker because it includes shaped ears, layered clothing and several sewn accessories. Its removable-look dress also gives market sellers a clear color-customization option.
The Design: What Makes This Strawberry Bunny Different
The head uses a 36-stitch plateau rather than a narrow sphere. That extra width supports the large eyes, raised muzzle and cheek patches without crowding the face. Two elongated ears begin as rounded tubes, remain unstuffed and flatten at their bases; this keeps them upright while preserving the shallow inner-ear recess visible in the photograph.
A separate crochet strawberry dress creates the flared silhouette. The rabbit body remains compact underneath, so the hem can spread without tipping the figure forward. The leafy collar covers the neck seam and repeats the green strawberry tops on the headpiece and purse.
A common mistake in a chenille bunny amigurumi is attaching the ears too far apart. The head then reads as a bear with long appendages. On this strawberry rabbit crochet design, the inner ear edges should sit about four head stitches apart.
Project Info at a Glance
| Skill Level | Time | Finished Size | Hook | Best For |
|---|---|---|---|---|
| Intermediate | 8–11 hours | About 21–25 cm | 5.0 mm | Display dolls, craft markets and seasonal collections |
The 21 cm benchmark is documented for a chenille bunny made with a 5.5 mm hook. The longer ears, dress and individual tension may move this version toward 25 cm.
Materials and Tools
Yarn
- Pale blush pink — chunky chenille, category 5–6 — 80 g — Premier Parfait Chunky, Hobbii Baby Snuggle or a comparable velvet yarn
- Strawberry pink — chunky chenille, category 5–6 — 65 g — use a saturated coral-rose shade
- Sage green — chunky chenille, category 5–6 — 20 g — choose a muted leaf green
- Cream white — chunky chenille or smooth worsted yarn — 8 g — for seeds
- Nose pink — smooth cotton or acrylic yarn — 1 g — for the embroidered nose
Published strawberry-bunny projects use chenille with hooks from 4.5 to 5.5 mm. A tighter 5 mm hook is specified here because the dress and accessories add weight to the body.
Tools
- 5.0 mm crochet hook
- 12 mm safety eyes
- Polyester stuffing
- Blunt yarn needle
- Locking stitch markers
- Scissors
- Straight pins
- Row counter
- Optional smooth sewing yarn matching each chenille color
Do not use safety eyes on an item intended for a baby or a child who may pull or chew small components. Embroidered eyes are the appropriate substitution for that use.
Abbreviations
- MR — magic ring
- sc — single crochet
- inc — two single crochet stitches in one stitch
- dec — single crochet two stitches together
- sl st — slip stitch
- ch — chain
- BLO — back loop only
- FLO — front loop only
- hdc — half double crochet
- dc — double crochet
- st/sts — stitch/stitches
For an invisible decrease, insert the hook through the front loops of the next two stitches, yarn over, draw through both front loops, then complete one single crochet.
Pattern — Step by Step
Work in a continuous spiral unless a section states otherwise. Place the marker in the first stitch of each round.
Head
Yarn: pale blush pink — Original 36-stitch construction based on standard amigurumi sphere math.
R1: 6 sc in MR (6)
R2: inc ×6 (12)
R3: (sc, inc) ×6 (18)
R4: (2 sc, inc) ×6 (24)
R5: (3 sc, inc) ×6 (30)
R6: (4 sc, inc) ×6 (36)
R7–R12: sc around (36)
R13: (4 sc, dec) ×6 (30)
R14: (3 sc, dec) ×6 (24)
Insert the 12 mm eyes between R10 and R11, approximately seven visible stitches apart. Fit the washers before the opening becomes too small.
R15: (2 sc, dec) ×6 (18)
R16: (sc, dec) ×6 (12)
Stuff firmly. Add small pieces around the lower sides rather than forcing one large wad through the opening.
R17: dec ×6 (6)
R18: sc around (6)
Fasten off. Leave a 20 cm tail, pass it through the front loops and pull the opening closed.
Muzzle
Yarn: pale blush pink — Standard oval expansion.
Ch 5.
R1: Starting in the second ch from the hook, 3 sc, 3 sc in final ch; work along the opposite side with 2 sc, inc in the last ch (10)
R2: inc, 2 sc, inc ×3, 2 sc, inc ×2 (16)
R3: sc around (16)
Add a small amount of stuffing. The muzzle should remain shallow rather than forming a projecting snout.
Fasten off. Leave a 25 cm sewing tail.
Embroider a small inverted triangle nose across two stitches using smooth pink yarn. Add one short vertical stitch below its center.
Cheek Patches — Make 2
Yarn: strawberry pink — Flat-circle math.
R1: 6 sc in MR (6)
R2: inc ×6 (12)
Sl st in the next stitch.
Fasten off. Leave a 15 cm tail. Flatten each circle before sewing.
Body
Yarn: pale blush pink — Original 36-stitch body using standard six-stitch expansions.
R1: 6 sc in MR (6)
R2: inc ×6 (12)
R3: (sc, inc) ×6 (18)
R4: (2 sc, inc) ×6 (24)
R5: (3 sc, inc) ×6 (30)
R6: (4 sc, inc) ×6 (36)
R7–R11: sc around (36)
R12: (4 sc, dec) ×6 (30)
R13–R14: sc around (30)
R15: (3 sc, dec) ×6 (24)
R16: sc around (24)
R17: (2 sc, dec) ×6 (18)
Stuff the lower half firmly enough to support the head. Keep the upper edge slightly softer so the neck seam can be compressed during assembly.
R18: (sc, dec) ×6 (12)
R19: dec ×6 (6)
R20: sc around (6)
Fasten off. Leave a 30 cm tail.
Arms — Make 2
Yarn: pale blush pink — Standard narrow-limb shaping.
R1: 6 sc in MR (6)
R2: inc ×6 (12)
R3–R4: sc around (12)
R5: (2 sc, dec) ×3 (9)
R6–R9: sc around (9)
Stuff only the rounded hand and the lower half of the arm. Leave the upper section flat.
Fold the opening closed and crochet 4 sc through both layers (4).
Fasten off. Leave a 25 cm tail.
Back Legs — Make 2
Yarn: pale blush pink — Standard oval foot with a 12-stitch leg.
Ch 5.
R1: Starting in the second ch, 3 sc, 3 sc in final ch; work along the opposite side with 2 sc, inc (10)
R2: inc, 2 sc, inc ×3, 2 sc, inc ×2 (16)
R3: BLO sc around (16)
R4: 4 sc, dec ×4, 4 sc (12)
R5–R8: sc around (12)
Stuff the foot firmly and the leg moderately. Keep the top edge flat.
Fold the opening and crochet 6 sc through both layers (6).
Fasten off. Leave a 30 cm tail.
Outer Ears — Make 2
Yarn: pale blush pink — Long unstuffed tube.
R1: 6 sc in MR (6)
R2: inc ×6 (12)
R3: (sc, inc) ×6 (18)
R4–R8: sc around (18)
R9: (sc, dec) ×6 (12)
R10–R14: sc around (12)
R15: (2 sc, dec) ×3 (9)
Do not stuff. Press the ear lengthwise, placing the start of each round toward the back.
Fold the opening flat and crochet 4 sc through both layers (4).
Fasten off. Leave a 35 cm tail.
Inner Ears — Make 2
Yarn: a lighter pale pink or the main blush yarn — Worked as a flat oval panel.
Ch 9.
Row 1: Starting in the second ch, 7 sc, 3 sc in final ch; work along the opposite side with 6 sc, inc (18)
Row 2: inc, 6 sc, inc ×3, 6 sc, inc ×2 (24)
Row 3: sc around (24)
Fasten off. Leave a 30 cm tail.
Position each panel centrally on an outer ear, leaving one full outer-ear round visible around the sides. Sew through the surface loops only so the stitches do not show on the back.
Tail
Yarn: pale blush pink — Standard small sphere.
R1: 6 sc in MR (6)
R2: inc ×6 (12)
R3: sc around (12)
R4: (sc, dec) ×4 (8)
Stuff lightly.
Fasten off. Leave a 20 cm tail.
Strawberry Dress
Yarn: strawberry pink — Original flared garment constructed separately.
Ch 30. Join with a sl st, taking care not to twist.
R1: ch 1, sc around (30)
R2: (4 sc, inc) ×6 (36)
R3–R5: sc around (36)
R6: (5 sc, inc) ×6 (42)
R7–R9: sc around (42)
R10: (6 sc, inc) ×6 (48)
R11–R13: sc around (48)
R14: BLO sc around (48)
R15: (sl st, skip 1 st, 5 dc in next st, skip 1 st) ×12
Fasten off. Weave in the tail on the inside.
Create approximately 12 cream seeds. For each seed, make three short satin stitches over one chenille stitch. Stagger them rather than arranging them in straight vertical lines.
The dress should sit below the arms and cover most of the legs’ upper edges. It may be sewn permanently at R1 or left removable when the head has not yet been attached.
Leaf Collar
Yarn: sage green — Six-lobed flat collar.
Ch 30. Join with a sl st.
R1: ch 1, sc around (30)
R2: Repeat six times: sl st in next st, sc in next st, hdc in next st, 3 dc in next st, hdc in next st
Join with a sl st.
Fasten off. Leave a 25 cm tail for anchoring the back of the collar.
Headband
Yarn: strawberry pink — Flat strip measured against the finished head.
Ch 37.
Row 1: Starting in the second ch, sc across (36)
Row 2: ch 1, turn, BLO sc across (36)
Row 3: ch 1, turn, sc across (36)
Fasten off. Leave a 30 cm tail at each end.
Wrap the strip across the top and sides of the head. Overlap the ends by two stitches at the lower back and sew them together. Tack the band at four points so it cannot slide over the eyes.
Headband Strawberry
Yarn: strawberry pink — Small tapered berry.
R1: 6 sc in MR (6)
R2: inc ×6 (12)
R3: (sc, inc) ×6 (18)
R4–R5: sc around (18)
R6: (sc, dec) ×6 (12)
R7: dec ×6 (6)
Stuff before completing the final decreases.
Fasten off. Close the opening and leave a 25 cm tail.
Add five or six cream seeds with short straight stitches.
Strawberry Leaves — Make 2 Sets
Yarn: sage green — One set for the headband berry and one for the purse.
R1: 6 sc in MR (6)
R2: Repeat six times: ch 4, starting in the second ch make sl st, sc, hdc, then sl st into the next MR stitch
Fasten off. Leave a 20 cm tail.
Sew one leaf set over the headband strawberry’s closing point.
Strawberry Purse
Yarn: strawberry pink — Small tapered pouch.
R1: 6 sc in MR (6)
R2: inc ×6 (12)
R3: (sc, inc) ×6 (18)
R4: (2 sc, inc) ×6 (24)
R5–R7: sc around (24)
R8: (2 sc, dec) ×6 (18)
R9: (sc, dec) ×6 (12)
R10: dec ×6 (6)
Stuff lightly. The purse needs enough structure to hold its berry shape without becoming spherical.
Fasten off and close the opening. Add eight cream seeds, then sew the second green leaf set over the top.
Crossbody Strap
Yarn: strawberry pink — Measured chain strap.
Ch 46.
Row 1: Starting in the second ch, sl st across (45)
Fasten off. Leave a 20 cm tail at both ends.
Attach one end to each side of the purse beneath the leaves. The finished strap should pass from the bunny’s left shoulder to the purse at the right hip without pulling the dress upward.
Assembly
- Place the head above the body with both round openings centered. Sew twice around the neck seam, catching one full stitch from each piece on every pass.
- Pin the muzzle across the lower front of the head. Its upper edge should sit one round below the eyes; sew around the oval while keeping the stuffing shallow.
- Position the cheek patches beside the muzzle, approximately one stitch below the lower edge of each eye. Sew through the back loops of the patches for a clean circular edge.
- Attach the outer ears across head R4–R6. Leave about four visible stitches between their inner edges and angle the bases outward by no more than one stitch.
- Fit the dress over the body. Place its neckline below the neck seam, align the seed pattern at the front and tack the top edge at six evenly spaced points.
- Sew the arms at the sides of the upper body, immediately below the dress neckline. Angle both hands downward so they frame the torso rather than project horizontally.
- Sew the back legs beneath the body with six visible body stitches between their inner edges. The oval feet must face forward and rest on the same horizontal plane.
- Attach the tail at the center back, beneath the dress flare. Catch the tail through at least eight body stitches so the dress does not displace it.
- Place the green collar around the neck and anchor it at the center back. Fit the headband, sew the strawberry near the rabbit’s right ear and tack the berry through both the band and head fabric.
- Lay the purse strap diagonally across the chest, tack it beneath one collar lobe and attach the purse at the opposite hip. Weave every remaining tail through at least three direction changes inside the fabric.
The completed figure has a centered head, level feet, an unobstructed face and three repeated strawberry motifs.
7 Technical Tips
- Stitch-marker drift: Chenille can hide the first stitch and move the apparent seam by two or three stitches. Count every round at each increase or decrease transition rather than relying only on the marker’s visual position.
- Understuffed neck: A neck that compresses by more than 8 mm will allow the large head to tilt. Pack the upper body until it resists finger pressure, then add a small final plug of stuffing before sewing.
- Visible decrease gaps: A conventional two-stitch decrease can expose white stuffing between chenille loops. Work every head and body decrease through the front loops only, and do not stretch the completed decrease while inserting the next stitch.
- Late eye placement: The 12 mm eye washers become difficult to fit after the head reaches 18 stitches. Install them between R10 and R11 before completing R15, with roughly seven visible stitches separating the posts.
- Velvet tension failure: Pulling chenille too tightly can strip its pile and leave a bare core at the magic ring. Close each ring in two stages and stop as soon as the six stitches meet at the center.
- Misaligned pinning: A three-stitch height difference between the ears makes the headband slope across the forehead. Count from the center of the magic ring to each ear base and compare both measurements before sewing.
- Loose tail weaving: A chenille tail woven in one direction can work free after handling. Pass each end horizontally, vertically and diagonally through the stuffing cavity before trimming it flush.
Conclusion
Check the finished strawberry bunny from the front, side and back before trimming the final yarn ends. The eyes should remain level, the four limbs should support the body without rotation, and the purse must hang below the arm rather than cover the seeded dress. Your next concrete step is to record the yarn brand, hook size and final height in the project notes; those measurements make later color variants easier to reproduce. Share the completed strawberry bunny amigurumi on Pinterest and Instagram with #StrawberryBunnyAmigurumi. Which detail will define your version: longer inner ears, a darker leaf collar or a larger crossbody strawberry?









