Introduction
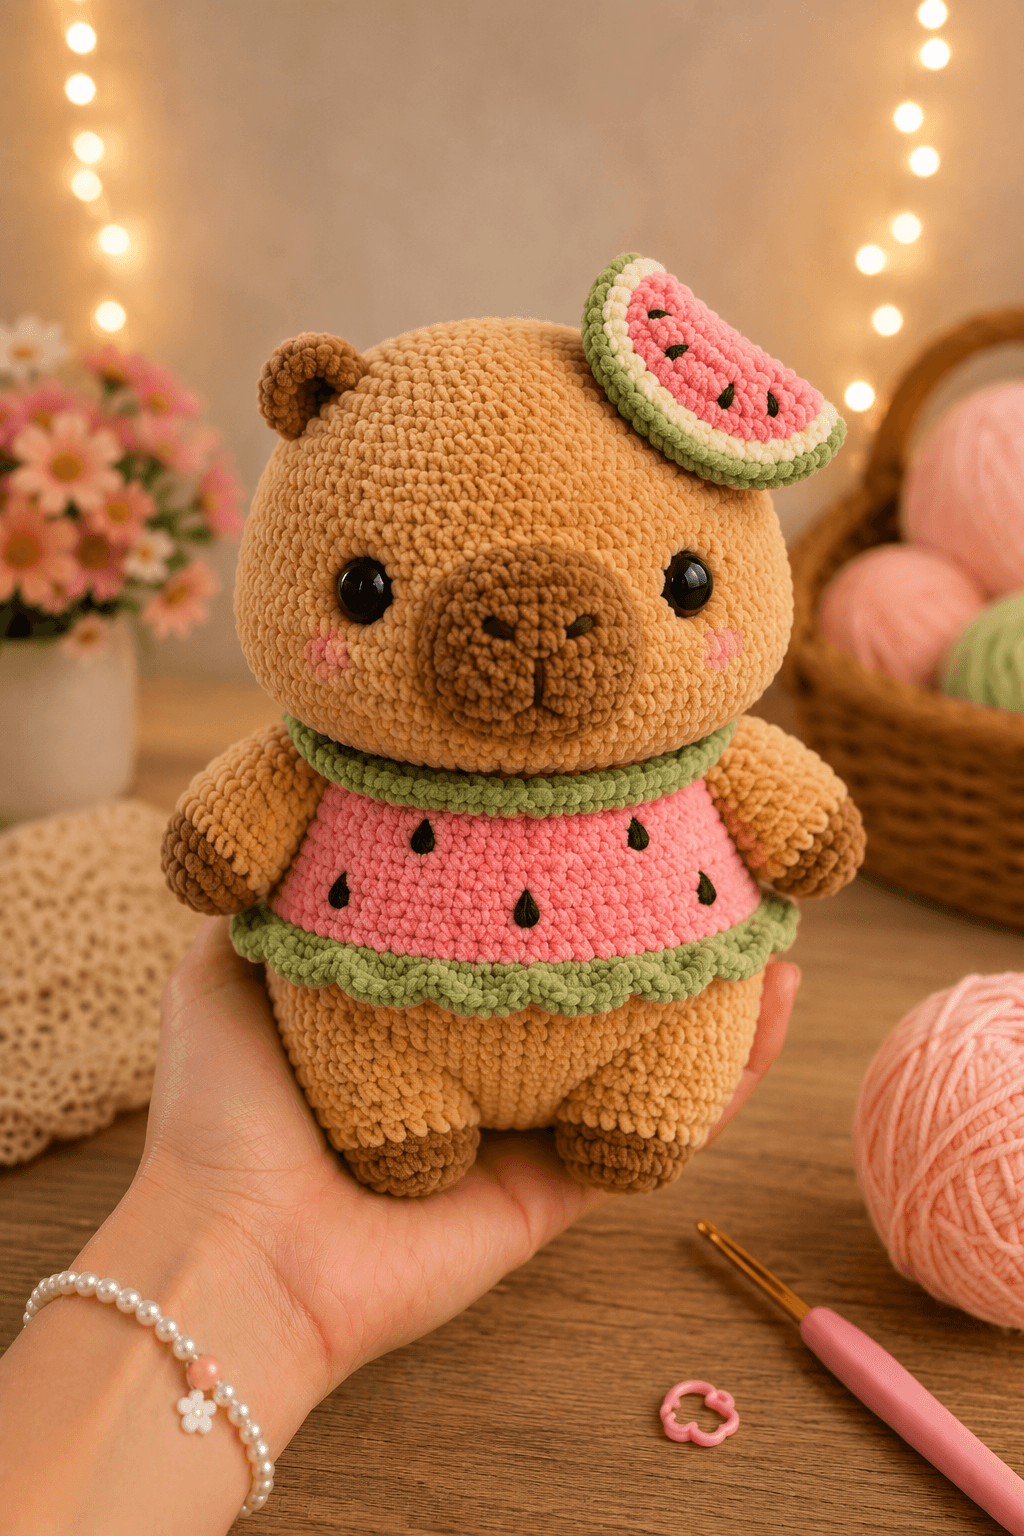
A capybara’s long rectangular muzzle must project forward without turning the head into a bear-shaped sphere. This capybara amigurumi crochet pattern uses bulky chenille yarn, a 5 mm hook, and 16 mm safety eyes to create an approximately 27 cm seated figure. The intermediate project includes a watermelon tunic, scalloped rind trim, embroidered seeds, and a padded watermelon-slice hat.
The Design: What Makes This Watermelon Capybara Different
The head holds a 42-stitch plateau because the photographed character has a broad skull, full cheeks, and a muzzle that occupies almost one-third of the face width. A separate oval snout supplies forward projection while preserving the capybara’s blunt profile. Small rounded ears sit high on the head rather than extending sideways like bear ears.
The body is pear-shaped and wider at the base. Short back legs provide two stable contact points, while the lightly stuffed arms sit over the watermelon garment. This proportion is central to a chunky capybara crochet pattern because a narrow torso would not support the large head.
The outfit is constructed as a fitted pink band with green edging. Black seed embroidery is added before the garment is fixed to the body. A frequent mistake is spacing the seeds after the tunic has been sewn in place; the curved surface then makes the rows look uneven.
Project Info at a Glance
| Skill Level | Working Time | Finished Size | Hook | Construction |
|---|---|---|---|---|
| Intermediate | 10–13 hours | Approximately 27 cm seated | 5.0 mm | Continuous spirals with sewn clothing and accessories |
Published capybara patterns vary widely in scale. One listed design measures approximately 15 cm tall by 17 cm long, while another reaches about 45 cm in length. The photographed chenille figure falls between those examples and is designed here at approximately 27 cm seated. Reference measurements are available from Amigurumi.com and Ravelry.
Materials and Tools
Yarn
- Caramel brown — CYC #5 bulky chenille — approximately 170 g — head, body, ears, arms, and legs
- Dark brown — CYC #5 bulky chenille — approximately 35 g — muzzle, paws, and ear centers
- Watermelon pink — CYC #5 bulky chenille — approximately 75 g — tunic and hat slice
- Leaf green — CYC #5 bulky chenille — approximately 35 g — neckline, hem, and outer rind
- Ivory — CYC #5 bulky chenille — approximately 15 g — inner rind stripe
- Black — worsted yarn or embroidery thread — approximately 3 g — nose, mouth, and watermelon seeds
- Blush pink — DK yarn or embroidery thread — approximately 2 g — cheek patches
Tools
- 5.0 mm crochet hook
- 16 mm safety eyes
- Polyester stuffing
- Yarn needle
- Locking stitch markers
- Dressmaking pins
- Scissors
Miniature capybara tutorials may use cotton yarn and a 2.5 mm hook, while plush versions require thicker yarn and larger tools. The 5 mm hook specified here creates a dense fabric with bulky chenille while keeping the finished figure close to the scale shown in the photograph. A small cotton reference is available from the Mumumis capybara tutorial.
Safety eyes are not suitable for toys intended for children under three years old. Replace them with embroidered eyes when the figure will be handled by a young child.
Abbreviations
- MR — magic ring
- sc — single crochet
- hdc — half double crochet
- dc — double crochet
- inc — two single crochet stitches in one stitch
- dec — invisible decrease
- sl st — slip stitch
- ch — chain
- BLO — back loop only
- FLO — front loop only
- FO — fasten off
For an invisible decrease, insert the hook through the front loops of the next two stitches, yarn over, pull through both front loops, then complete one single crochet.
Pattern — Step by Step
Work in a continuous spiral unless a section states that the rounds are joined or the rows are turned. Place a stitch marker in the first stitch of every round.
Head
Yarn: caramel brown. The head uses a 42-stitch plateau to match the large size shown in the photograph.
R1: 6 sc in MR (6)
R2: inc ×6 (12)
R3: (sc, inc) ×6 (18)
R4: (2 sc, inc) ×6 (24)
R5: (3 sc, inc) ×6 (30)
R6: (4 sc, inc) ×6 (36)
R7: (5 sc, inc) ×6 (42)
R8–R15: sc around (42)
R16: (5 sc, dec) ×6 (36)
Place the safety eyes between R11 and R12 with approximately 11 visible stitches between their inner edges. Check the placement with the muzzle pinned between them before attaching the washers.
R17: (4 sc, dec) ×6 (30)
R18: (3 sc, dec) ×6 (24)
R19: (2 sc, dec) ×6 (18)
Stuff the head firmly. Pack small pieces behind the eye stems and add extra filling to both cheeks.
R20: (sc, dec) ×6 (12)
R21: dec ×6 (6)
Fasten off. Leave a 20 cm tail, pass it through the front loops of the remaining stitches, and pull the opening closed.
Body
Yarn: caramel brown.
R1: 6 sc in MR (6)
R2: inc ×6 (12)
R3: (sc, inc) ×6 (18)
R4: (2 sc, inc) ×6 (24)
R5: (3 sc, inc) ×6 (30)
R6: (4 sc, inc) ×6 (36)
R7: (5 sc, inc) ×6 (42)
R8–R11: sc around (42)
R12: (5 sc, dec) ×6 (36)
R13–R14: sc around (36)
R15: (4 sc, dec) ×6 (30)
R16–R17: sc around (30)
R18: (3 sc, dec) ×6 (24)
R19: sc around (24)
R20: (2 sc, dec) ×6 (18)
Stuff the lower body firmly so the starting round stays flat. Add slightly less stuffing near the neck opening.
R21: (sc, dec) ×6 (12)
R22: dec ×6 (6)
Fasten off and leave a 40 cm tail for sewing the body to the head.
Arms — Make 2
Begin with dark brown yarn.
R1: 6 sc in MR (6)
R2: inc ×6 (12)
R3–R4: sc around (12)
Change to caramel brown.
R5: sc around (12)
R6: (2 sc, dec) ×3 (9)
R7–R11: sc around (9)
R12: (sc, dec) ×3 (6)
Stuff the dark paw and lower arm. Leave the final three rounds unstuffed so the upper edge can lie flat against the body.
Flatten the opening and crochet 3 sc through both layers. Fasten off and leave a 25 cm sewing tail.
Back Legs — Make 2
Begin with dark brown yarn.
R1: 6 sc in MR (6)
R2: inc ×6 (12)
R3: (sc, inc) ×6 (18)
R4–R5: sc around (18)
Change to caramel brown.
R6: sc around (18)
R7: (sc, dec) ×6 (12)
R8–R12: sc around (12)
R13: dec ×6 (6)
Stuff each foot firmly and the upper leg moderately. Shape the dark section into a flat oval while filling it.
Fasten off and leave a 30 cm tail for assembly.
Outer Ears — Make 2
Yarn: caramel brown.
R1: 6 sc in MR (6)
R2: inc ×6 (12)
R3: (sc, inc) ×6 (18)
R4: sc around (18)
R5: (sc, dec) ×6 (12)
Do not stuff. Flatten each ear lightly and crochet 6 sc through both layers. Fasten off and leave a 25 cm sewing tail.
Inner Ear Circles — Make 2
Yarn: dark brown.
R1: 6 sc in MR (6)
R2: inc ×6 (12)
Slip stitch into the next stitch. Fasten off and leave a 15 cm tail. Sew one inner circle to the front of each caramel ear, leaving a narrow border visible.
Muzzle
Yarn: dark brown. Work around both sides of the foundation chain to form a horizontal oval.
Ch 7.
R1: Starting in the second ch from the hook, 5 sc, 3 sc in the final ch, continue along the opposite side with 4 sc, inc (14)
R2: inc, 4 sc, inc ×3, 4 sc, inc ×2 (20)
R3: sc around (20)
R4: (3 sc, dec) ×4 (16)
Stuff the center lightly. Keep the outer edge soft enough to sit flush against the head.
Fasten off and leave a 35 cm tail for sewing.
Nose and Mouth
Yarn: black.
Embroider a horizontal oval approximately 2 cm wide across the upper center of the muzzle. Pass the yarn repeatedly through the same outline until no dark brown stitches remain visible beneath it.
Bring one vertical stitch down approximately 1.5 cm from the center of the nose. Add two short diagonal stitches at the lower end to form the divided mouth.
Cheek Patches — Make 2
Yarn: blush pink. Use a 3 mm hook with DK yarn for flatter patches.
R1: 6 sc in MR (6)
R2: inc ×6 (12)
Slip stitch into the next stitch. Fasten off and leave a 15 cm sewing tail. Do not stuff.
Tail
Yarn: caramel brown. A capybara has a greatly reduced external tail, so this piece remains small.
R1: 6 sc in MR (6)
R2: inc ×6 (12)
R3: sc around (12)
R4: dec ×6 (6)
Stuff lightly. Fasten off and leave a 20 cm tail for attaching the piece low on the back.
Watermelon Tunic
Yarn: watermelon pink. Work in joined rounds. Test the foundation chain around the stuffed body before joining.
Ch 37. Join with a sl st to form a ring, taking care not to twist the chain.
R1: ch 1, sc around, join with sl st (36)
R2–R7: ch 1, sc around, join with sl st (36)
R8: ch 1, (5 sc, inc) ×6, join with sl st (42)
R9–R11: ch 1, sc around, join with sl st (42)
Do not fasten off. Change to leaf green for the lower rind.
Lower Rind and Scalloped Hem
Continue from the tunic with leaf green yarn.
R12: ch 1, sc around, join with sl st (42)
R13: ch 1, sc around in BLO, join with sl st (42)
R14: (sl st, 4 dc in next stitch, sl st in next stitch) ×14
Fasten off and weave the end into the inside of the garment. The final round produces the curved rind edge shown in the photograph.
Green Neckline
Yarn: leaf green.
Join the yarn to any foundation chain at the top edge of the tunic. Work 36 sc evenly around and join with a sl st.
R2: ch 1, sc around in BLO, join with sl st (36)
Fasten off. Fold the second round slightly outward to form a narrow raised collar.
Watermelon Seeds — Make 7
Yarn: black. Embroider the seeds before sewing the tunic to the body.
For each seed, make one vertical stitch approximately 1.5 cm long. Place two shorter diagonal stitches into its lower endpoint, then fill the outline with two or three additional passes.
Arrange three seeds across the upper section and four across the lower section. Offset the second row so no two seeds form a rigid vertical line.
Watermelon-Slice Hat: Pink Center
Yarn: watermelon pink. Work in turned rows to create a half-circle.
R1: 6 sc in MR, do not join (6)
R2: ch 1, turn, inc ×6 (12)
R3: ch 1, turn, (sc, inc) ×6 (18)
R4: ch 1, turn, (2 sc, inc) ×6 (24)
R5: ch 1, turn, (3 sc, inc) ×6 (30)
Do not fasten off. Change to ivory for the inner rind.
Hat Inner Rind
Yarn: ivory.
R6: ch 1, turn, (4 sc, inc) ×6 (36)
Change to leaf green.
Hat Outer Rind
Yarn: leaf green.
R7: ch 1, turn, (5 sc, inc) ×6 (42)
R8: ch 1, turn, sc across in BLO (42)
Fasten off and leave a 35 cm tail. The final green row should curl slightly toward the back of the slice.
Hat Backing
Yarn: leaf green. Make a second half-circle.
R1: 6 sc in MR, do not join (6)
R2: ch 1, turn, inc ×6 (12)
R3: ch 1, turn, (sc, inc) ×6 (18)
R4: ch 1, turn, (2 sc, inc) ×6 (24)
R5: ch 1, turn, (3 sc, inc) ×6 (30)
R6: ch 1, turn, (4 sc, inc) ×6 (36)
R7: ch 1, turn, (5 sc, inc) ×6 (42)
Fasten off and leave a 40 cm tail. Place the backing behind the colored slice with the wrong sides together.
Whipstitch around the curved edge, add a thin layer of stuffing, then close the straight upper edge. Do not overfill; the hat should remain approximately 2 cm thick.
Hat Seeds — Make 4
Yarn: black.
Embroider four teardrop-shaped seeds across the pink section before joining the front to the backing. Each finished seed should measure approximately 1.2 cm long.
Hat Attachment Strap
Yarn: leaf green.
Ch 24. Starting in the second chain from the hook, sl st in each chain (23).
Fasten off and leave a 15 cm tail at both ends. Sew the strap to the underside of the slice so it passes behind one ear and prevents the accessory from rotating forward.
Assembly
- Center the head over the body and pin the neck seam at the front, back, and both sides. Sew through both pieces twice, adding a final amount of stuffing beneath the chin before closing the seam.
- Position the ears between R4 and R8 of the head. Keep approximately 18 visible stitches between their inner edges and angle each opening slightly forward.
- Pin the muzzle across the lower center of the face, with its upper edge approximately one round below the safety eyes. Sew around the oval while adding a small amount of stuffing beneath its center.
- Attach one blush cheek patch below and outside each eye. Leave at least one visible caramel stitch between the cheek and the muzzle seam.
- Sew the back legs beneath the body with approximately five visible stitches between them. Place the figure on a flat surface before tightening the seams so both dark paws touch evenly.
- Attach the arms to the upper sides of the body, approximately two rounds below the neck. Angle the dark paws inward so they rest over the upper edge of the tunic.
- Place the watermelon tunic around the body and align its seed arrangement with the front center. Tack the neckline beneath the head and secure the lower edge at four hidden points.
- Sew the small tail to the lower back beneath the scalloped hem. Keep most of the piece concealed so only its rounded edge remains visible.
- Set the watermelon slice above one eye and behind the nearest ear. Attach the hidden strap, then add two small tacking stitches through the hat backing when a fixed accessory is required.
- Weave every remaining yarn tail through at least 3 cm of stuffed fabric, change direction once, and trim the end only after it retracts beneath the chenille surface.
The completed capybara should sit on both back paws with the head centered, the tunic hem level, and the watermelon slice angled above one side of the face.
7 Technical Tips
- Head-round drift: Losing the first stitch can rotate the safety-eye line several stitches before the head reaches its plateau. Move the marker immediately after completing the first stitch of every round.
- Collapsed muzzle: A loosely filled oval sinks between the eyes and removes the capybara’s projecting profile. Add stuffing until the center extends approximately 3 cm from the face while the edge remains flexible.
- Visible decrease gaps: Standard decreases expose the inner cord of chenille yarn around the closing rounds. Work through the front loops only and keep the active loop close to the 5 mm hook shaft.
- Late eye installation: Safety-eye washers become difficult to attach after the head decreases below 30 stitches. Insert both eyes after R16 and test the muzzle position before locking them in place.
- Twisted tunic: A twisted foundation chain causes the green hem to rise at one side. Lay the entire chain flat on the table and inspect every loop before joining it into a ring.
- Uneven seed spacing: Seeds placed directly above one another create rigid columns across the pink garment. Offset the second row by approximately three stitches and maintain at least 4 cm between neighboring seeds.
- Top-heavy hat: Excess stuffing can pull the watermelon slice over the nearest eye. Keep the slice no thicker than 2 cm and attach its strap directly behind the ear base.
Conclusion
Inspect the capybara from the front before securing the garment and hat permanently. The muzzle should project evenly between the eyes, both ears must remain visible, and the green hem should run level around the body. Record the yarn brand, hook size, and final seated height because chenille thickness can alter the result by several centimeters. The next step is to pin the seven tunic seeds and photograph their spacing before embroidering them. Save the finished project to Pinterest and share the watermelon variation on Instagram with #WatermelonCapybara. This capybara amigurumi crochet pattern can also be adapted with a removable tunic. Should the hat slice tilt toward the left ear or the right ear on your version?









