Introduction
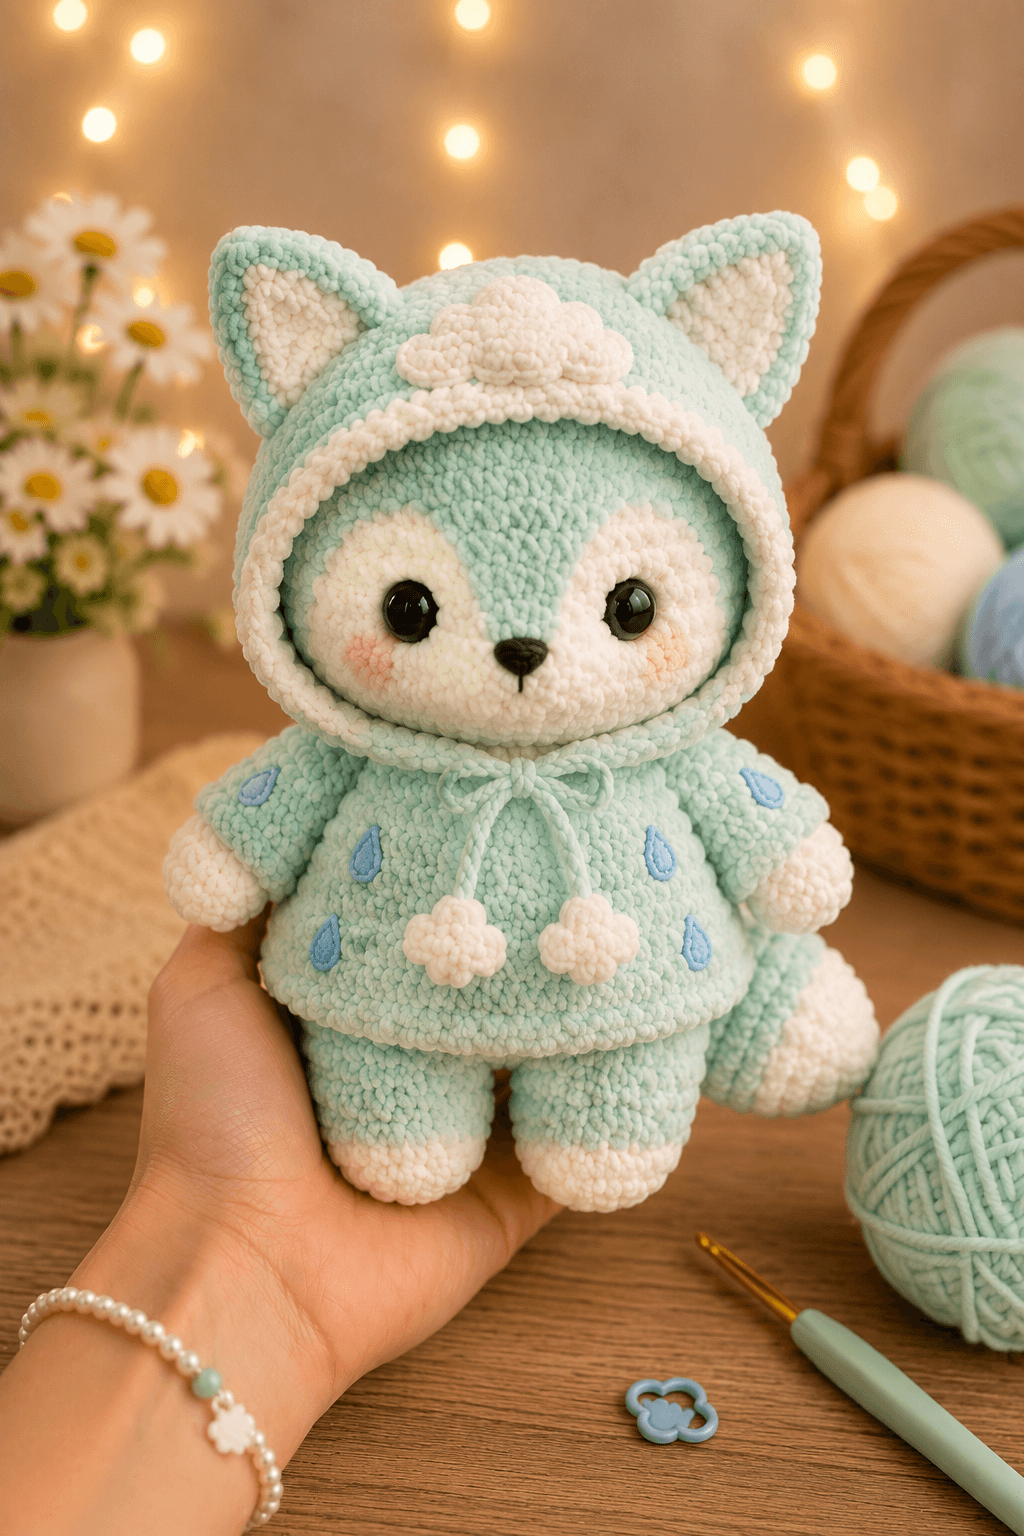
A fox’s muzzle widens below the eyes while its forehead narrows into a central blaze; that geometry controls this design. This fox amigurumi crochet pattern uses bulky velvet yarn, a 4 mm hook, and 16 mm safety eyes to produce a 25 cm intermediate project. The separate cloud hood and rain cape conceal the head-to-body seam, making the finished figure suitable for display photography or seasonal market collections.
The Design: What Makes the Mint Rain Fox Different
The head stops at a 36-stitch plateau and holds that width for six rounds. This creates enough horizontal space for two broad cheek patches without turning the face into a sphere. A narrow mint blaze is sewn over the center line so the white muzzle remains visually divided.
Short legs keep the body close to the table. That choice supports the oversized head and heavy hood, while the thick tail supplies a third contact point behind the figure. For this chunky fox crochet pattern, attach the tail low rather than centering it on the back.
The hood is constructed separately from the ears. Openings are not cut into the fabric; the hood sits behind the ear bases and frames them. A frequent mistake in a hooded fox crochet pattern is sewing the hood to the face before checking ear clearance. That compresses the ears and pulls the eye line upward.
Project Info at a Glance
| Skill Level | Time | Finished Size | Hook | Best For |
|---|---|---|---|---|
| Intermediate | 9–12 hours | Approximately 25 cm seated | 4.0 mm | Display pieces, seasonal collections, and photo props |
The finished measurement is based on a comparable published bulky fox pattern measuring approximately 25.4 cm.
Materials and Tools
Yarn
- Pale mint — CYC #5 bulky velvet or chenille — approximately 140 g — suggested type: Lion Brand Feels Like Bliss or similar plush yarn
- Ivory — CYC #5 bulky velvet or chenille — approximately 45 g — used for cheeks, paws, ears, cloud, hood trim, and tail tip
- Sky blue — DK or worsted yarn — approximately 8 g — used for the raindrop appliqués
- Blush pink — DK yarn or embroidery thread — less than 2 g — used for cheek shading
- Black — embroidery thread — used for the nose and mouth
Tools
- 4.0 mm crochet hook
- 16 mm safety eyes
- Polyester stuffing
- Yarn needle
- Locking stitch markers
- Dressmaking pins
- Scissors
Safety eyes are not suitable for toys intended for children under three years old. Embroider the eyes when the finished fox will be handled by a young child.
Abbreviations
- MR — magic ring
- sc — single crochet
- inc — two single crochet stitches in one stitch
- dec — invisible decrease
- sl st — slip stitch
- ch — chain
- BLO — back loop only
- FO — fasten off
For an invisible decrease, insert the hook through the front loops of the next two stitches, yarn over, pull through both front loops, then complete one single crochet.
Pattern — Step by Step
Work in a continuous spiral unless a section states otherwise. Place a stitch marker in the first stitch of every round.
Head
Yarn: pale mint
R1: 6 sc in MR (6)
R2: inc ×6 (12)
R3: (sc, inc) ×6 (18)
R4: (2 sc, inc) ×6 (24)
R5: (3 sc, inc) ×6 (30)
R6: (4 sc, inc) ×6 (36)
R7–R12: sc around (36)
R13: (4 sc, dec) ×6 (30)
Place the safety eyes between R9 and R10, approximately eight visible stitches apart. Add the washers before stuffing.
R14: (3 sc, dec) ×6 (24)
R15: (2 sc, dec) ×6 (18)
Stuff the head firmly, adding small pieces around the eye stems to prevent dents.
R16: (sc, dec) ×6 (12)
R17: dec ×6 (6)
Fasten off. Thread the tail through the front loops of the remaining stitches and pull the opening closed.
Body
Yarn: pale mint
R1: 6 sc in MR (6)
R2: inc ×6 (12)
R3: (sc, inc) ×6 (18)
R4: (2 sc, inc) ×6 (24)
R5: (3 sc, inc) ×6 (30)
R6: (4 sc, inc) ×6 (36)
R7–R10: sc around (36)
R11: (4 sc, dec) ×6 (30)
R12: sc around (30)
R13: (3 sc, dec) ×6 (24)
R14: sc around (24)
R15: (2 sc, dec) ×6 (18)
Stuff the lower half firmly and leave the upper section slightly softer so the neck can be shaped during assembly.
R16: (sc, dec) ×6 (12)
R17: dec ×6 (6)
Fasten off. Leave a 30 cm tail for sewing the body to the head.
Front Legs and Arms — Make 2
Begin with ivory yarn.
R1: 6 sc in MR (6)
R2: inc ×6 (12)
R3: sc around (12)
R4: (2 sc, dec) ×3 (9)
Change to pale mint.
R5–R9: sc around (9)
R10: (sc, dec) ×3 (6)
Stuff the paw and the lower half of the arm only. Leave the top unstuffed so it lies flat against the cape.
Flatten the opening and crochet 3 sc through both layers. Fasten off and leave a 20 cm sewing tail.
Back Legs — Make 2
Begin with ivory yarn.
R1: 6 sc in MR (6)
R2: inc ×6 (12)
R3: (sc, inc) ×6 (18)
R4: sc around (18)
R5: (sc, dec) ×6 (12)
Change to pale mint.
R6–R9: sc around (12)
R10: dec ×6 (6)
Stuff the foot firmly and the upper leg lightly.
Fasten off. Leave a 25 cm tail for attaching each leg beneath the body.
Outer Ears — Make 2
Yarn: pale mint
R1: 6 sc in MR (6)
R2: sc around (6)
R3: (sc, inc) ×3 (9)
R4: sc around (9)
R5: (2 sc, inc) ×3 (12)
R6: sc around (12)
R7: (3 sc, inc) ×3 (15)
R8: sc around (15)
Do not stuff. Flatten the opening and crochet 7 sc through both layers. Fasten off and leave a 25 cm sewing tail.
Inner Ear Panels — Make 2
Yarn: ivory
Ch 2.
Row 1: 2 sc in the second ch from the hook (2)
Row 2: ch 1, turn, inc in each stitch (4)
Row 3: ch 1, turn, sc across (4)
Row 4: ch 1, turn, inc, 2 sc, inc (6)
Row 5: ch 1, turn, sc across (6)
Fasten off and leave a 15 cm tail. Sew one panel to the front of each outer ear, leaving a narrow mint border.
Cheek Patches — Make 2
Yarn: ivory
R1: 6 sc in MR (6)
R2: inc ×6 (12)
R3: (sc, inc) ×6 (18)
Slip stitch into the next stitch. Fasten off and leave a 25 cm tail. Keep each circle flat and do not stuff.
Forehead Blaze
Yarn: pale mint
Ch 8.
Row 1: Starting in the second ch from the hook, 7 sc (7)
Row 2: ch 1, turn, dec, 3 sc, dec (5)
Row 3: ch 1, turn, dec, sc, dec (3)
Row 4: ch 1, turn, dec, sc (2)
Row 5: ch 1, turn, dec (1)
Fasten off and leave a 20 cm tail. Position the wide edge above the eyes and point the narrow end toward the nose.
Muzzle
Yarn: ivory
R1: 6 sc in MR (6)
R2: inc ×6 (12)
R3: (sc, inc) ×6 (18)
R4: sc around (18)
Fasten off and leave a 25 cm tail. Add a small amount of stuffing before the final stitches are sewn to the face.
Tail
Begin with ivory yarn.
R1: 6 sc in MR (6)
R2: inc ×6 (12)
R3: (sc, inc) ×6 (18)
R4–R5: sc around (18)
Change to pale mint.
R6–R9: sc around (18)
R10: (sc, dec) ×6 (12)
R11–R14: sc around (12)
R15: (2 sc, dec) ×3 (9)
R16–R17: sc around (9)
Stuff the tip firmly and reduce the stuffing toward the open end. Bend the tail slightly while filling it.
Flatten the opening and crochet 4 sc through both layers. Fasten off and leave a 30 cm sewing tail.
Rain Cape
Yarn: pale mint. Work in turned rows.
Ch 25.
Row 1: Starting in the second ch from the hook, 24 sc (24)
Row 2: ch 1, turn, (3 sc, inc) ×6 (30)
Row 3: ch 1, turn, sc across (30)
Row 4: ch 1, turn, (4 sc, inc) ×6 (36)
Row 5: ch 1, turn, sc across (36)
Row 6: ch 1, turn, (5 sc, inc) ×6 (42)
Row 7–Row 12: ch 1, turn, sc across (42)
Row 13: ch 1, turn, sc across in BLO (42)
Fasten off and weave in the end. Join ivory yarn at one lower corner and work one row of sc around the side, lower edge, and opposite side. Fasten off.
Hood
Yarn: pale mint. Work in turned rows.
Ch 23.
Row 1: Starting in the second ch from the hook, 22 sc (22)
Row 2–Row 18: ch 1, turn, sc across (22)
Fold the rectangle in half so the short edges meet. Sew the back edge closed from the fold downward for approximately 8 cm, leaving the front and lower edges open.
Join ivory yarn at one lower front corner. Work sc evenly around the face opening, placing two extra stitches at each upper corner so the trim lies flat. Fasten off.
Attach the lower edge of the hood to the cape neckline. Leave both front corners free for the ties.
Hood Ties — Make 2
Yarn: pale mint
Ch 24. Slip stitch into the second chain from the hook and in each remaining chain.
Fasten off. Sew one tie to each front corner of the hood.
Pom-Poms — Make 2
Yarn: ivory
R1: 6 sc in MR (6)
R2: inc ×6 (12)
R3: sc around (12)
R4: dec ×6 (6)
Add a small amount of stuffing. Fasten off, close the opening, and sew one pom-pom to the end of each hood tie.
Cloud Appliqué
Yarn: ivory
R1: 6 sc in MR (6)
R2: inc ×6 (12)
R3: (sc, inc) ×6 (18)
R4: sc, 5 dc in next stitch, skip 1 stitch, sl st, skip 1 stitch, 5 dc in next stitch, skip 1 stitch, sl st, skip 1 stitch, 5 dc in next stitch, skip 1 stitch, sl st across the remaining stitches.
Fasten off and leave a 25 cm tail. Shape the three raised sections into rounded cloud lobes while sewing the appliqué to the top front of the hood.
Raindrop Appliqués — Make 6
Yarn: sky blue
R1: 6 sc in MR (6)
R2: inc ×6 (12)
Do not join. Pinch one side of the circle into a point and secure the shape with the yarn tail. Fasten off and leave a 15 cm sewing tail.
Assembly
- Pin the head to the body with the face centered above the body’s starting round. Sew around the neck twice, adding stuffing beneath the seam before closing the final gap.
- Place the ears between R3 and R7 of the head. Keep approximately nine visible stitches between their inner edges, then sew along the flattened bases.
- Position the cheek patches beneath and slightly outside the eyes. Their inner edges should nearly meet at the center of the face.
- Set the muzzle over the lower inner edges of both cheek patches. Stuff lightly, sew around the edge, and embroider a small triangular black nose with one vertical mouth stitch.
- Center the forehead blaze between the ears. Sew the broad edge above the eyes and align its point with the center of the nose.
- Attach the front legs to the upper sides of the body approximately two rounds below the neck. Angle each paw slightly forward.
- Sew the back legs beneath the body with approximately four visible stitches between them. Check that both feet touch the same flat surface before tightening the seams.
- Attach the tail low on the back-left or back-right side. Curve the white tip toward the front so it acts as a support point.
- Place the cape around the body, sew the neckline beneath the head, and position the hood behind the ears. Add the cloud, ties, pom-poms, and six evenly spaced raindrops.
- Weave every yarn tail through at least 3 cm of dense fabric, trim the ends, and add small blush stitches beneath the eyes.
The completed fox should sit on both back paws and the lower curve of its tail without support from the front legs.
7 Technical Tips
- Stitch-marker drift: Velvet yarn can hide the first stitch and shift facial placement by one or two stitches per round. Move the marker immediately after completing the first stitch, not after finishing the round.
- Uneven stuffing: A soft lower head allows the safety-eye washers to tilt inward. Pack stuffing firmly behind each eye and maintain approximately 2 cm of dense filling between the washer and the outer surface.
- Visible decrease gaps: Standard decreases expose dark holes along the head’s closing rounds. Work through the front loops only and keep the working loop no taller than the shaft of the 4 mm hook.
- Incorrect eye timing: Eyes inserted after R14 cannot be secured because the opening becomes too narrow for the washers. Install them after R13 and before the head decreases to 24 stitches.
- Velvet tension changes: Pulling tightly can strip the plush coating from the core thread. Keep each loop wide enough to slide along the hook throat without resistance.
- Asymmetrical pinning: Sewing the legs without testing the base can leave one foot several millimeters above the table. Pin both legs and the tail, then set the fox on a flat surface before making permanent stitches.
- Loose tail weaving: A short woven end can work free through chenille fabric. Pass each finishing tail through at least 3 cm of stuffed fabric, change direction once, and trim only after the yarn retracts into the body.
Conclusion
Check the finished figure from the front before securing the hood permanently. The ear tips should remain visible, the ivory trim should frame both cheek patches evenly, and the cloud should sit directly above the forehead blaze. Photograph the fox beside a ruler or yarn label to document the final gauge before making a second version. Save the project to Pinterest and share the completed rain-cape variation on Instagram with #MintRainFox. This fox amigurumi crochet pattern can also be adapted by changing the cape appliqués while retaining the same body construction. Which raindrop placement produces the clearest balance around the fox’s front legs?









