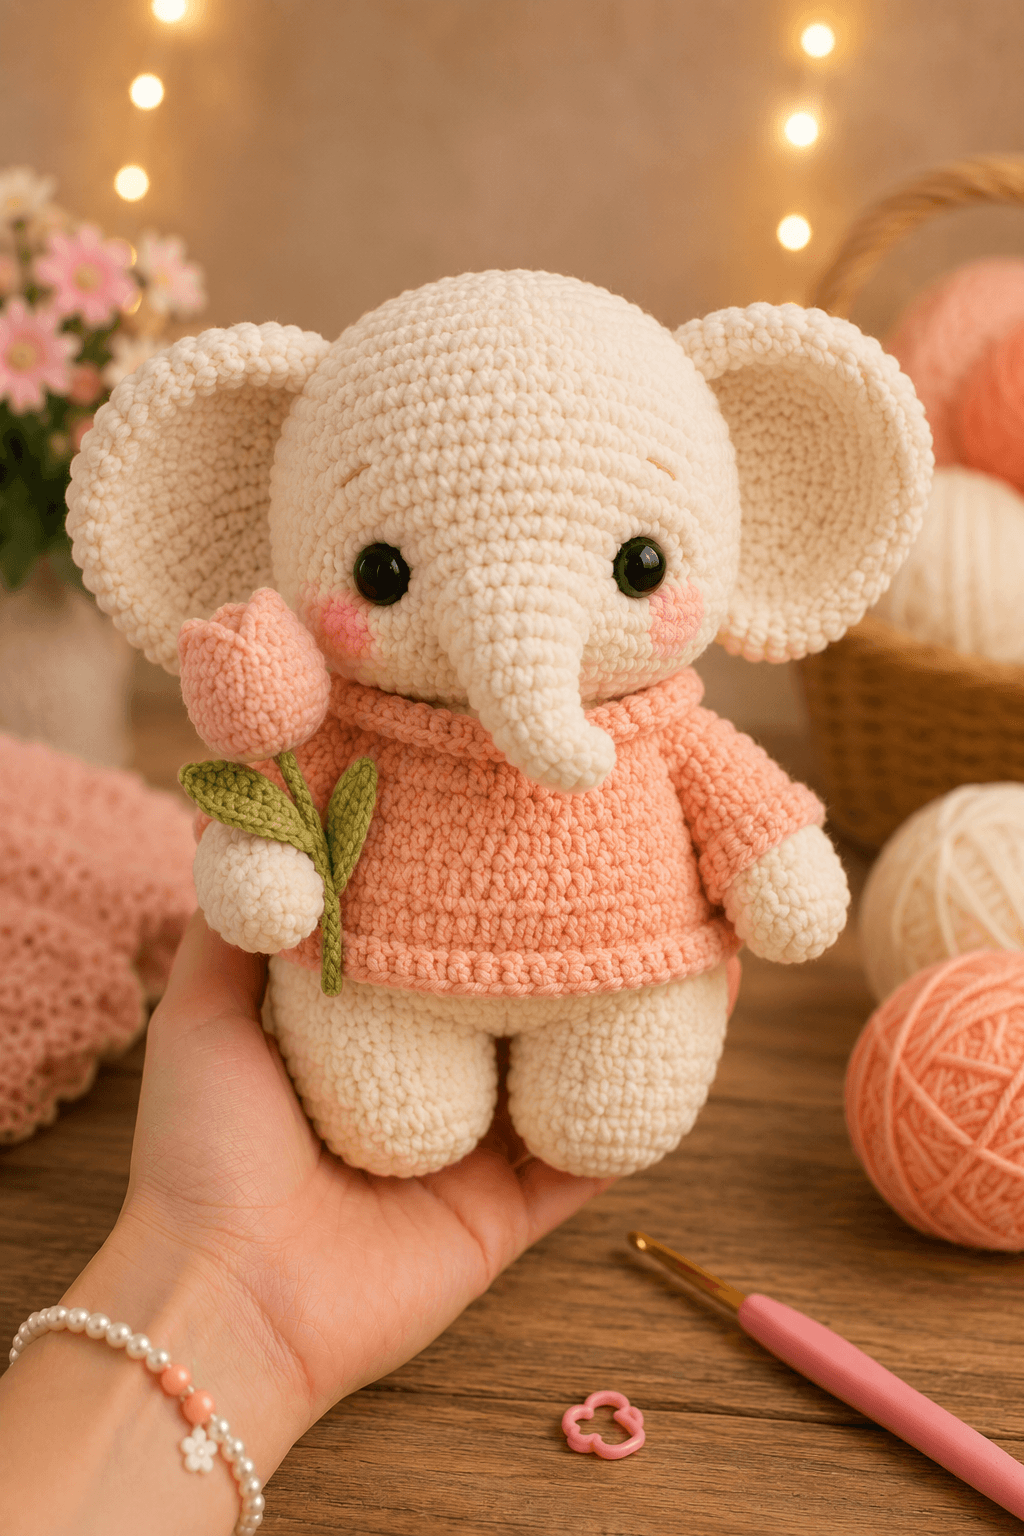
An elephant’s trunk must taper without twisting, while its ears need enough width to frame the head rather than pull it backward. This baby elephant amigurumi crochet pattern uses DK yarn, a 2.5 mm hook and firm spiral construction to produce a seated figure about 20 cm tall. The project suits intermediate crocheters and creates a stable display toy with a removable-looking sweater and a crocheted tulip.
The Design: What Makes This Baby Elephant Different
This design depends on three proportions: a broad head, low-set circular ears and a narrow trunk that reaches below the cheeks. The head expands to 36 stitches, giving the face enough width for 10 mm safety eyes without making the body top-heavy. Each ear is worked as a shallow cup rather than a flat disc, which helps it follow the curve of the head.
The body has a level base and two separately attached back legs. That structure keeps the crochet elephant amigurumi seated after stuffing. The sweater ends above the leg seam so the lower body remains visible. A frequent mistake in a baby elephant crochet pattern is placing the ears too high. High placement makes the head resemble a mouse, while low placement creates the expected elephant silhouette.
Project Information at a Glance
| Skill Level | Time | Finished Size | Hook | Best For |
|---|---|---|---|---|
| Intermediate | 8–11 hours | Approximately 20 cm seated | 2.5 mm | Nursery display, shelf décor and handmade gifts |
Finished measurements vary with yarn, hook choice and tension. Comparable elephant amigurumi patterns use compact single-crochet fabric, separate ears and tightly stuffed body sections. Reference examples include Esther the Elephant and the Craft Passion elephant pattern.
Materials and Tools
Yarn
- Warm cream — DK cotton or cotton-acrylic yarn — approximately 90 g — for the head, body, ears, trunk, arms and legs
- Peach — DK cotton or cotton-acrylic yarn — approximately 35 g — for the sweater and tulip
- Blush pink — DK cotton yarn — approximately 5 g — for the cheek patches
- Olive green — DK cotton yarn — approximately 8 g — for the flower stem and leaves
Tools
- 2.5 mm crochet hook
- 10 mm safety eyes
- Polyester stuffing
- Yarn needle
- Stitch markers
- Scissors
- Dressmaker pins
- Optional floral wire for a rigid flower stem; omit it when making the item for a child
Abbreviations
- MR — magic ring
- sc — single crochet
- inc — two single crochet stitches in one stitch
- dec — decrease two stitches together
- sl st — slip stitch
- ch — chain
- BLO — back loop only
- FLO — front loop only
- st/sts — stitch/stitches
For an invisible decrease, insert the hook through the front loops of the next two stitches, yarn over and complete one single crochet through both front loops.
Pattern — Step by Step
Work in a continuous spiral unless a section states otherwise. Mark the first stitch of every round and move the marker upward after each completed round.
Head
Yarn: warm cream. The six-stitch increase sequence follows standard amigurumi sphere construction.
R1: 6 sc in MR (6)
R2: inc × 6 (12)
R3: (sc, inc) × 6 (18)
R4: (2 sc, inc) × 6 (24)
R5: (3 sc, inc) × 6 (30)
R6: (4 sc, inc) × 6 (36)
R7–R14: sc around (36)
R15: (4 sc, dec) × 6 (30)
R16: (3 sc, dec) × 6 (24)
Insert the 10 mm safety eyes between R11 and R12, approximately eight stitches apart. Add the washers before stuffing.
R17: (2 sc, dec) × 6 (18)
R18: (sc, dec) × 6 (12)
R19: dec × 6 (6)
Stuff the head firmly before the opening becomes too narrow. Fasten off and leave a 25 cm tail for sewing.
Body
Yarn: warm cream.
R1: 6 sc in MR (6)
R2: inc × 6 (12)
R3: (sc, inc) × 6 (18)
R4: (2 sc, inc) × 6 (24)
R5: (3 sc, inc) × 6 (30)
R6: (4 sc, inc) × 6 (36)
R7–R11: sc around (36)
R12: (4 sc, dec) × 6 (30)
R13–R15: sc around (30)
R16: (3 sc, dec) × 6 (24)
R17–R19: sc around (24)
R20: (2 sc, dec) × 6 (18)
R21: sc around (18)
R22: (sc, dec) × 6 (12)
R23: dec × 6 (6)
Stuff the lower half firmly and keep the neck area slightly softer so the head can settle into position. Fasten off and weave the tail through the remaining front loops.
Trunk
Yarn: warm cream. Stuff only the wide upper section.
R1: 6 sc in MR (6)
R2: inc × 6 (12)
R3–R4: sc around (12)
R5: (2 sc, dec) × 3 (9)
R6–R10: sc around (9)
R11: (sc, dec) × 3 (6)
R12–R14: sc around (6)
Do not pack stuffing into the final three rounds. Flatten the open edge lightly. Fasten off and leave a 25 cm sewing tail.
Ears — Make 2
Yarn: warm cream. Work these pieces in joined rounds to create a clean outer edge.
R1: 6 sc in MR, join with sl st (6)
R2: ch 1, inc × 6, join (12)
R3: ch 1, (sc, inc) × 6, join (18)
R4: ch 1, (2 sc, inc) × 6, join (24)
R5: ch 1, (3 sc, inc) × 6, join (30)
R6: ch 1, (4 sc, inc) × 6, join (36)
R7: ch 1, sc around, join (36)
Fasten off and leave a 30 cm tail. Fold a narrow pleat at the lower edge before attaching each ear; this gives the disc a cupped shape.
Arms — Make 2
Begin with warm cream and change to peach for the sleeve.
R1: 6 sc in MR (6)
R2: inc × 6 (12)
R3: (sc, inc) × 6 (18)
R4–R6: sc around (18)
R7: (sc, dec) × 6 (12)
R8: sc around (12)
Change to peach.
R9–R14: sc around (12)
R15: (2 sc, dec) × 3 (9)
R16: sc around (9)
Stuff the hand and lower sleeve. Leave the top section unstuffed, flatten it and crochet through both layers with 4 sc. Fasten off and leave a 20 cm tail.
Back Legs — Make 2
Yarn: warm cream.
R1: 6 sc in MR (6)
R2: inc × 6 (12)
R3: (sc, inc) × 6 (18)
R4: (2 sc, inc) × 6 (24)
R5–R8: sc around (24)
R9: (2 sc, dec) × 6 (18)
R10–R13: sc around (18)
R14: (sc, dec) × 6 (12)
R15: sc around (12)
R16: dec × 6 (6)
Stuff each leg firmly, concentrating the filling in the foot and lower half. Fasten off and leave a 25 cm tail for attachment.
Cheek Patches — Make 2
Yarn: blush pink. Work as flat circles.
R1: 6 sc in MR (6)
R2: inc × 6 (12)
Join with a slip stitch. Fasten off and leave a 15 cm tail. Keep the patches flat and do not stuff them.
Sweater Body
Yarn: peach. Check the circumference against the stuffed body after R2.
Ch 37 and join with sl st, taking care not to twist the chain.
R1: ch 1, sc around, join (36)
R2: ch 1, sc in BLO around, join (36)
R3–R8: ch 1, sc around, join (36)
R9: ch 1, (4 sc, dec) × 6, join (30)
R10–R12: ch 1, sc around, join (30)
R13: ch 1, (3 sc, dec) × 6, join (24)
R14: ch 1, sc around, join (24)
Fasten off. Add one round of slip stitches around the lower edge to form the visible hem. Position the sweater before the head is permanently attached.
Sweater Collar
Yarn: peach.
Ch 31.
Row 1: sc in the second ch from the hook and across (30)
Row 2: ch 1, turn, sc in BLO across (30)
Fasten off with a 20 cm tail. Wrap the strip around the neck opening and overlap the ends by approximately 1 cm.
Tulip Flower
Yarn: peach.
R1: 6 sc in MR (6)
R2: inc × 6 (12)
R3: (sc, inc) × 6 (18)
R4–R7: sc around (18)
R8: (sc, dec) × 6 (12)
Stuff lightly. Flatten the top opening and divide it visually into three sections. Sew the opposing edges inward to form three rounded tulip petals. Fasten off and secure the yarn inside the flower.
Flower Stem
Yarn: olive green.
Ch 26. Starting in the second chain from the hook, sl st in each chain across (25). Fasten off with a 20 cm tail.
For a display-only piece, the chain may be worked around covered floral wire. A child-safe version must contain yarn only.
Leaves — Make 2
Yarn: olive green. Work on both sides of the foundation chain.
Ch 8.
Side 1: sl st in second ch from hook, sc, 2 half double crochet, 2 sc, 3 sc in final ch.
Side 2: working down the opposite side, 2 sc, 2 half double crochet, sc, sl st.
Fasten off and leave a 15 cm tail. Pin one leaf slightly higher than the other before sewing both to the stem.
Assembly
- Place the head on the narrow end of the body. Sew around the neck twice, catching one full stitch from both pieces with each pass.
- Position the sweater around the body with its hem sitting approximately 1 cm above the lower body curve. Secure the upper edge beneath the head with small hidden stitches.
- Pin the trunk between the eyes, beginning near R10 of the head. Sew the wide end to the face and curve the narrow end downward while attaching the first few side stitches.
- Attach the cheek patches directly below and slightly outside the eyes. Keep the inner edge of each patch about one stitch from the trunk.
- Fold a small pleat into the lower edge of each ear. Attach the ears from approximately R7 to R15 of the head, with their lower edges level with the cheeks.
- Place the arms on the upper sides of the body. Sew the flattened edges through the sweater and body so the hands angle slightly forward.
- Pin the back legs to the lower front of the body with a gap of one to two stitches between them. Check that both feet touch the same horizontal surface before sewing.
- Wrap the collar around the neck and join its short ends at the back. Tack the lower collar edge to the sweater at four evenly spaced points.
- Sew the tulip to the stem, then attach the two leaves. Tack the flower stem to one hand at two points so the accessory remains upright.
- Weave every yarn tail through at least 3 cm of dense fabric, reverse direction once and trim the excess inside the figure.
The completed elephant should sit without support, with the trunk centered and both ear edges positioned at equal heights.
7 Technical Tips
- Stitch-marker drift: A spiral round can shift several stitches by the time the head reaches R14. Count each 36-stitch plateau round before moving the marker.
- Uneven stuffing: Soft filling behind one eye causes the face to collapse when the trunk is attached. Pack the head until firm, then add small pieces behind both eye washers.
- Visible decreases: Standard two-stitch decreases create horizontal gaps on the head and body. Work every decrease through the front loops only and keep the working loop close to the hook shaft.
- Incorrect eye timing: The eye washers cannot be added after R17 without reopening the head. Fit both 10 mm eyes between R11 and R12 before the opening decreases below 24 stitches.
- Loose tension: DK yarn worked with a hook larger than 3 mm may expose stuffing between stitches. Test a 12-stitch sample and reduce the hook size when white filling remains visible.
- Unbalanced pinning: A 3 mm difference in ear height is noticeable on a round elephant head. Measure from the center of each eye to the upper ear seam before sewing.
- Escaping yarn tails: A tail woven in only one direction can pull free under pressure. Run each tail through 3 cm of fabric, reverse through a neighboring row and trim it inside the stuffed section.
Finishing the Baby Elephant
Check the figure from the front, back and both sides before closing the final seams. The trunk should divide the face evenly, the lower ear pleats should match, and the feet must rest on one level surface. Photograph the elephant beside a ruler to record the finished height, yarn type and hook size for later projects. The next practical step is to save those measurements with a labeled yarn sample.
Share the finished baby elephant amigurumi crochet pattern project on Pinterest and Instagram with #TulipBabyElephant. When comparing versions, note one design choice: did you keep the trunk straight as shown, or add a slight upward curve at the tip?









