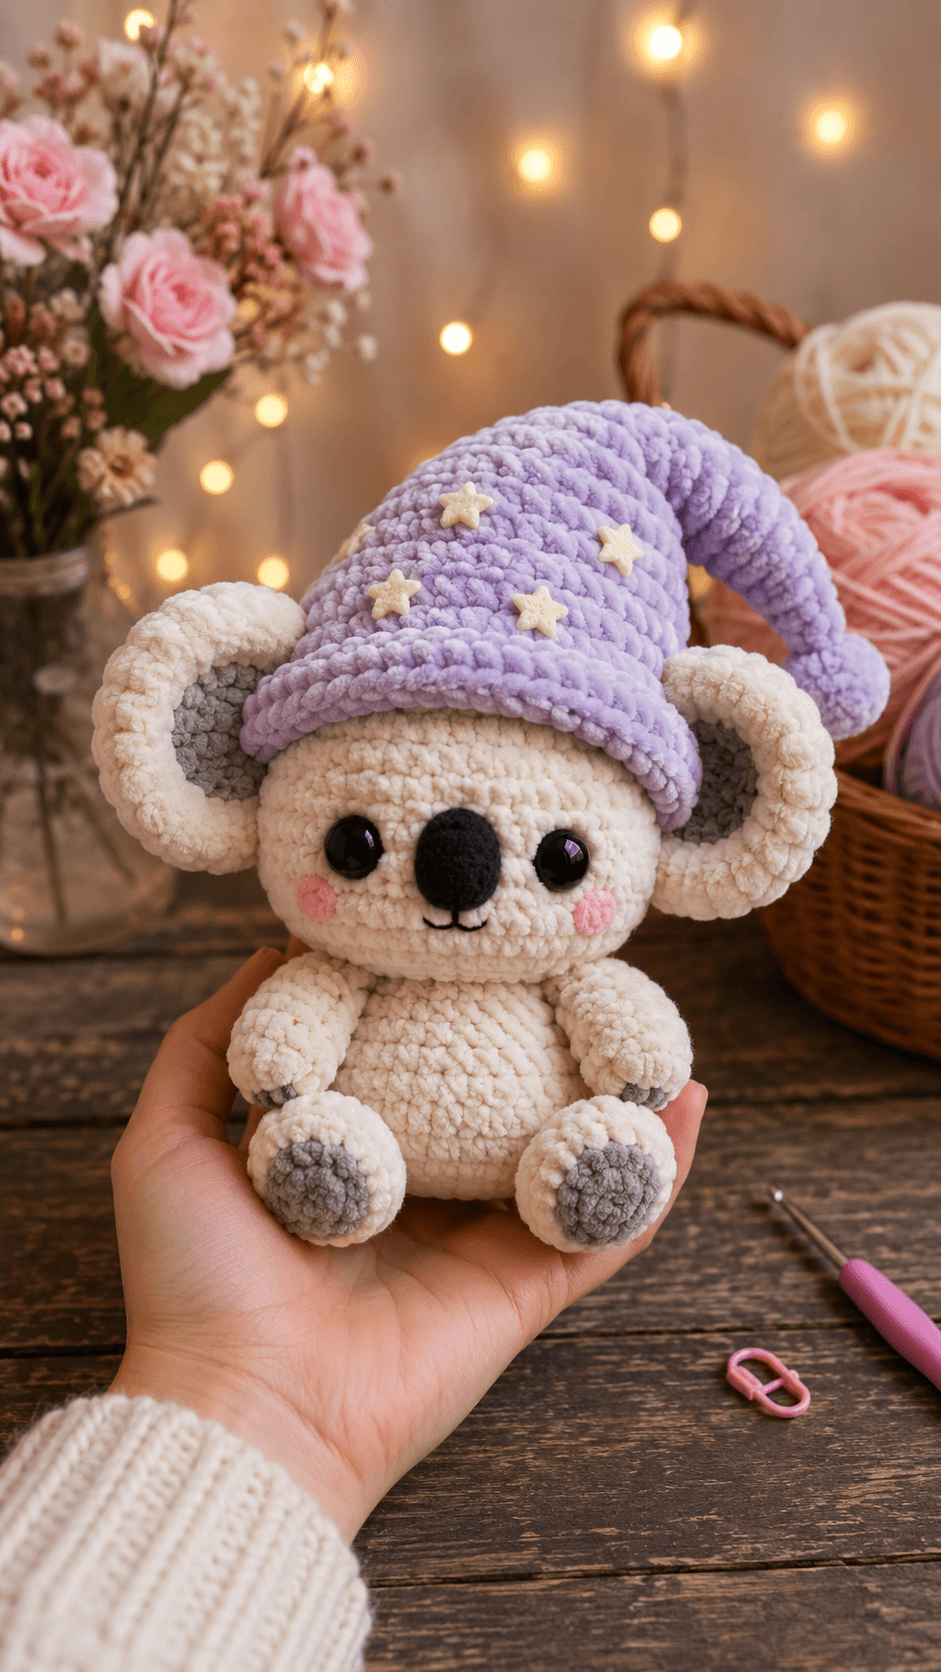
A koala’s ears must remain wider than its skull, even after a nightcap compresses the crown. This koala amigurumi crochet pattern uses super-bulky chenille yarn, a 5 mm hook, and 16–18 mm eyes to make a sitting figure about 22 cm tall. The intermediate project includes layered ears, separate paw pads, cheek patches, and a removable lavender cap that conceals the upper head seam.
The Design: What Makes This Sleepy Koala Different
The ears carry most of the character recognition, so each one uses a gray inner disk and a larger cream outer layer. That construction creates a thick rim without stuffing the ear into a ball. The head expands to a 36-stitch plateau, providing enough width for the large nose and widely spaced eyes while keeping the body smaller by comparison. Gray paw pads repeat the inner-ear color and prevent the cream limbs from merging visually with the torso. The long koala nightcap bends under its own weight instead of standing upright, which preserves the sleeping silhouette. A common error in a plush koala crochet pattern is placing the ears directly beside the eyes. They should sit higher, with their upper edges partly covered by the cap brim.
Project Info at a Glance
| Skill Level | Time | Finished Size | Hook | Best For |
|---|---|---|---|---|
| Intermediate | 8–10 hours | Approximately 22 cm sitting | 5 mm | Nursery display, bedtime décor, or a shelf-size plush figure |
Published koala patterns commonly finish near 20–22 cm, while a super-bulky chenille version made with a 5 mm hook can reach approximately 24 cm. Tension, stuffing density, and yarn brand will affect the final measurement.
Materials and Tools
Yarn
- Cream — super-bulky chenille yarn — approximately 110 g — Premier Parfait Chunky, Himalaya Dolphin Baby, or an equivalent plush yarn
- Lavender — super-bulky chenille yarn — approximately 55 g — used for the nightcap
- Medium gray — super-bulky chenille yarn — approximately 25 g — used for the ear centers and paw pads
- Black — bulky velvet yarn or doubled worsted yarn — approximately 8 g — used for the nose
- Pale pink — bulky or worsted yarn scrap — approximately 3 g — used for the cheek patches
- Cream cotton — small scrap — used for optional crocheted stars
Tools
- 5 mm crochet hook
- 16–18 mm safety eyes
- Polyester stuffing
- Yarn needle
- Locking stitch markers
- Long sewing pins
- Scissors
- Five small star buttons or crocheted stars
Safety eyes and decorative buttons are small components. Replace them with embroidered details when making the koala for a young child.
Abbreviations
- MR — magic ring
- sc — single crochet
- inc — two single crochet in one stitch
- dec — single crochet two stitches together
- sl st — slip stitch
- ch — chain
- hdc — half double crochet
- dc — double crochet
- BLO — back loop only
An invisible decrease is worked through the front loops of the next two stitches to reduce the ridge that a standard decrease produces in chenille fabric.
Pattern — Step by Step
Work in continuous spirals unless a section specifies turning rows or joined rounds. Place a marker in the first stitch and move it after every completed round.
Head
Yarn: cream — original six-stitch amigurumi shaping.
R1: 6 sc in MR (6)
R2: inc ×6 (12)
R3: (1 sc, inc) ×6 (18)
R4: (2 sc, inc) ×6 (24)
R5: (3 sc, inc) ×6 (30)
R6: (4 sc, inc) ×6 (36)
R7–R13: sc around (36)
R14: (4 sc, dec) ×6 (30)
Insert the safety eyes between R10 and R11. Leave approximately seven visible stitches between the posts and check their level before fitting the washers.
R15: (3 sc, dec) ×6 (24)
R16: (2 sc, dec) ×6 (18)
Stuff the head firmly around the eye stems. Keep the lower edge slightly softer for sewing.
R17: (1 sc, dec) ×6 (12)
R18: dec ×6 (6)
Fasten off. Close the opening and leave a 35 cm tail.
Body
Yarn: cream — original six-stitch amigurumi shaping.
R1: 6 sc in MR (6)
R2: inc ×6 (12)
R3: (1 sc, inc) ×6 (18)
R4: (2 sc, inc) ×6 (24)
R5: (3 sc, inc) ×6 (30)
R6: (4 sc, inc) ×6 (36)
R7–R10: sc around (36)
R11: (4 sc, dec) ×6 (30)
R12–R13: sc around (30)
R14: (3 sc, dec) ×6 (24)
R15–R16: sc around (24)
R17: (2 sc, dec) ×6 (18)
Fill the lower body firmly enough to create a flat sitting base. Add less stuffing near the neck.
R18: (1 sc, dec) ×6 (12)
R19: dec ×6 (6)
Fasten off. Close the opening and leave a 35 cm sewing tail.
Arms (Make 2)
Yarn: cream.
R1: 6 sc in MR (6)
R2: inc ×6 (12)
R3–R5: sc around (12)
R6: (1 sc, dec) ×4 (8)
R7–R10: sc around (8)
Stuff the lower two-thirds. Leave the final two rounds unstuffed and flatten the opening.
Fasten off. Leave a 25 cm sewing tail.
Back Legs (Make 2)
Yarn: cream.
R1: 6 sc in MR (6)
R2: inc ×6 (12)
R3: (1 sc, inc) ×6 (18)
R4–R6: sc around (18)
R7: (1 sc, dec) ×6 (12)
R8–R9: sc around (12)
R10: dec ×6 (6)
Stuff firmly before completing R10. Shape each foot into a horizontal oval.
Fasten off. Close the opening and leave a 30 cm tail.
Front Paw Pads (Make 2)
Yarn: gray.
R1: 6 sc in MR (6)
R2: inc ×6 (12)
Slip stitch to the first stitch. Fasten off and leave a 20 cm sewing tail.
Back Paw Pads (Make 2)
Yarn: gray.
R1: 6 sc in MR (6)
R2: inc ×6 (12)
R3: (1 sc, inc) ×6 (18)
Slip stitch to the first stitch. Fasten off and leave a 25 cm sewing tail.
Outer Ears (Make 2)
Yarn: cream.
R1: 6 sc in MR (6)
R2: inc ×6 (12)
R3: (1 sc, inc) ×6 (18)
R4: (2 sc, inc) ×6 (24)
R5–R6: sc around (24)
Do not stuff. Fasten off and leave a 40 cm sewing tail.
Inner Ears (Make 2)
Yarn: gray.
R1: 6 sc in MR (6)
R2: inc ×6 (12)
R3: (1 sc, inc) ×6 (18)
R4: (2 sc, inc) ×6 (24)
Fasten off and leave a 30 cm tail. Position each gray circle against an outer ear and sew around its edge. Fold the completed ear slightly at the bottom to produce a shallow cup.
Nose
Yarn: black.
R1: 6 sc in MR (6)
R2: inc ×6 (12)
R3: (1 sc, inc) ×6 (18)
R4–R5: sc around (18)
R6: (1 sc, dec) ×6 (12)
Add a small amount of stuffing. Flatten the back into a vertical oval approximately 4 cm tall.
Fasten off and leave a 30 cm sewing tail.
Cheek Patches (Make 2)
Yarn: pale pink.
R1: 6 sc in MR (6)
R2: inc ×6 (12)
Slip stitch to the first stitch. Fasten off and leave a 20 cm tail.
Tail
Yarn: cream.
R1: 6 sc in MR (6)
R2: inc ×6 (12)
R3–R4: sc around (12)
R5: dec ×6 (6)
Add a small amount of stuffing before the final decrease round.
Fasten off. Close the opening and leave a 25 cm tail.
Nightcap
Yarn: lavender. Work in continuous rounds.
R1: 6 sc in MR (6)
R2–R3: sc around (6)
R4: (1 sc, inc) ×3 (9)
R5–R6: sc around (9)
R7: (2 sc, inc) ×3 (12)
R8–R9: sc around (12)
R10: (3 sc, inc) ×3 (15)
R11–R12: sc around (15)
R13: (4 sc, inc) ×3 (18)
R14–R15: sc around (18)
R16: (2 sc, inc) ×6 (24)
R17–R18: sc around (24)
R19: (3 sc, inc) ×6 (30)
R20–R21: sc around (30)
R22: (4 sc, inc) ×6 (36)
R23–R25: sc around (36)
R26: (5 sc, inc) ×6 (42)
R27–R30: sc around (42)
Test the cap on the head. The lower edge should overlap the crown without covering the safety eyes.
R31: BLO sc around (42)
Do not fasten off.
Nightcap Brim
Continue with lavender in joined rounds.
Brim R1: ch 1, hdc in each stitch around, sl st to first hdc (42)
Brim R2: ch 1, hdc in each stitch around, sl st to first hdc (42)
Fasten off and weave in the tail. Fold the brim upward along R31.
Nightcap Pom-Pom
Yarn: lavender.
R1: 6 sc in MR (6)
R2: inc ×6 (12)
R3–R4: sc around (12)
R5: dec ×6 (6)
Stuff firmly before closing.
Fasten off and leave a 20 cm tail. Sew the pom-pom to the narrow tip of the nightcap.
Crocheted Stars (Make 5)
Yarn: cream cotton. Use a 2.5–3 mm hook for this section.
R1: 5 sc in MR, sl st to first sc (5).
For each point: ch 3, sl st in second ch from hook, sc in next ch, sl st into the next stitch of R1. Repeat five times.
Fasten off and leave a 15 cm tail. Sew the stars across the front and side of the cap. Small flat buttons may replace the crocheted pieces on an adult display item.
Assembly
- Position the head over the narrow end of the body. Sew around the neck twice, adding a small amount of stuffing beneath the seam before closing the final section.
- Pin both ears to the sides of the head between approximately R5 and R12. Their upper edges should extend above the crown while their lower edges sit level with the eyes.
- Center the nose between the eyes, with its top edge aligned near the lower eye line. Sew around the oval and keep the stuffing centered.
- Embroider a short vertical line from the nose base, then add two shallow mouth curves. Each curve should span about two stitches.
- Attach the cheek patches below and outside the eyes. Check that both patches sit on the same round before sewing.
- Sew one gray pad to the rounded end of each arm. Attach the arms to the upper body with their paws angled inward.
- Stitch the larger gray pads to the front of the back legs. Sew the legs to the lower body and test the sitting balance before tightening the final stitches.
- Attach the tail to the lower back. Position it close enough to the base to act as a third support point without lifting the body.
- Place the nightcap over the crown and arrange the tip toward one side. Tack the brim to the head at three hidden points when a fixed accessory is preferred.
- Sew or embroider the five stars onto the cap, weave the remaining yarn tails through at least 5 cm of stuffing, and trim them inside the fabric.
The completed koala should sit on both back legs and the lower body without side support.
7 Technical Tips
- Ear collapse: A single chenille circle can fold behind the head and lose its outline. Join a 24-stitch inner disk to a 24-stitch outer ear, then pinch the lower 2 cm before attachment.
- Cap slippage: A loose brim can fall over the eyes when the long tip bends. Test the 42-stitch opening before adding the brim and reduce it by one six-stitch decrease round when it moves more than 1 cm.
- Eye misalignment: Chenille hides individual stitch columns, causing one eye to sit higher. Insert temporary pins first and measure from each eye post to the center of the magic ring.
- Nose distortion: Excess stuffing turns the black oval into a sphere. Fill only the front half and stop when the finished nose projects approximately 1.5 cm from the face.
- Visible decrease gaps: Pulling through both loops can expose stuffing along the head closure. Work every decrease through the front loops and tighten the completed stitch before starting the next one.
- Unstable sitting base: Legs sewn at different heights cause the body to lean. Pin both legs so their lowest points share one horizontal line, then test the koala on a flat surface.
- Loose buried tails: Chenille ends can work back through a short seam. Run each tail through at least 5 cm of stuffing, reverse direction, and pass through another 5 cm before cutting.
Conclusion
Inspect the koala before closing the last attachment seams. Both ears should remain visible beyond the cap, the nose should sit on the facial center line, and the gray paw pads should face forward rather than downward. Record the finished height and cap circumference in the project notes because chenille brands can produce measurable size differences. Save this koala amigurumi crochet pattern to Pinterest and share the completed figure on Instagram with #SleepyStarKoala. For a second version, change one structural feature rather than several at once: shorten the cap, widen the ear rims, or reduce the nose by one round. Should the next nightcap curve over the koala’s left ear or its right ear?









