Introduction
A baby dragon’s wings must clear its oversized head without forcing the body to lean forward. This baby dragon amigurumi crochet pattern balances that structure with a 42-stitch head, a weighted tail and wings attached above the body midpoint. Bulky chenille yarn and a 4.5 mm hook produce an intermediate project measuring approximately 29 cm seated. The separate belly, horns, crest and toe pads also allow damaged details to be replaced individually.
The Design: What Makes This Baby Dragon Different
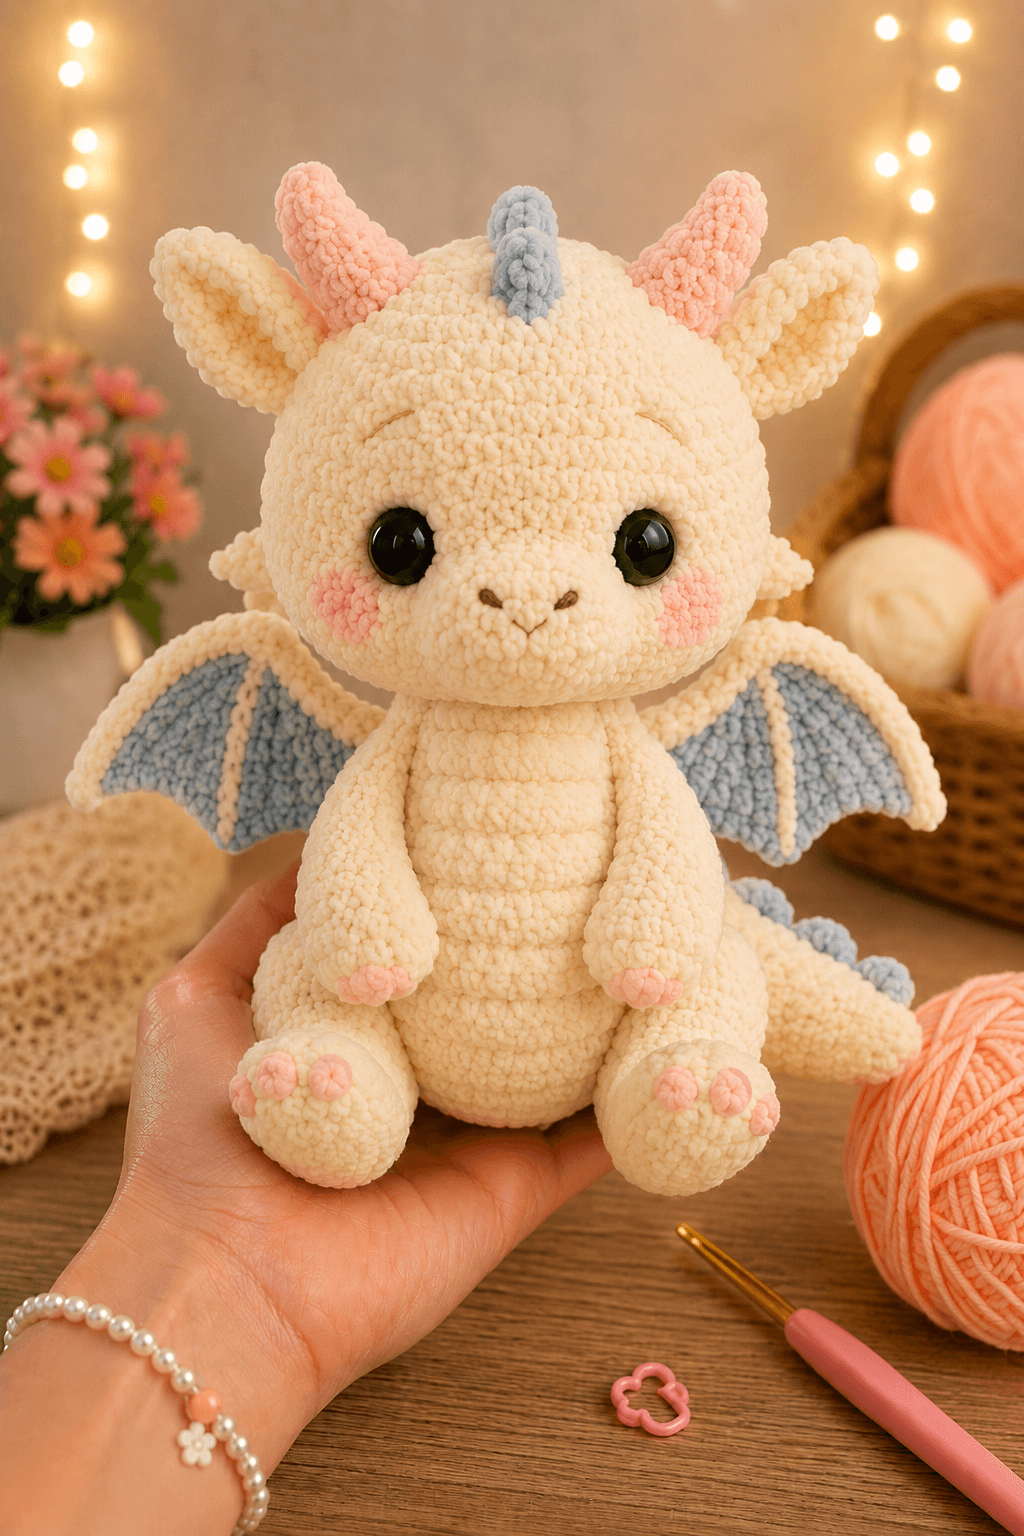
The head reaches a 42-stitch plateau, creating the broad forehead and rounded cheeks visible in the reference image. Its muzzle is worked separately and lightly stuffed, which adds projection without extending into a long reptilian snout. Two tall horns frame a three-piece blue crest rather than competing with it for space.
The wings use flat turning rows with blue inner panels and cream borders. Their upper edges rise behind the shoulders, while the lower points angle away from the legs. This placement prevents the crochet dragon with wings from becoming back-heavy. A thick tail adds a third support point behind the seated body. One common error in a plush dragon crochet pattern is attaching both wings along a single vertical seam. The fabric then folds backward and hides the blue panels. This chenille dragon amigurumi anchors each wing along an angled line across the upper back.
Project Info at a Glance
| Skill Level | Time | Finished Size | Hook | Best For |
|---|---|---|---|---|
| Intermediate | 14–18 hours | Approximately 29 cm seated | 4.5 mm | Wing shaping, chenille construction and multipart assembly |
Published dragon projects vary from 23 cm in DK yarn to 30–40 cm in super-bulky chenille. The finished measurement here assumes consistent bulky yarn across all stuffed pieces.
Materials and Tools
Yarn
- Cream — bulky chenille, weight 5 — 210–240 g — for the head, muzzle, body, limbs, ears, tail and wing borders
- Powder blue — bulky chenille, weight 5 — 45–60 g — for the wing panels, head crest and tail spikes
- Peach pink — bulky chenille, weight 5 — 30–40 g — for the horns, cheek patches, hand pads and toe pads
- Light brown — smooth worsted yarn — small quantity — for the nostrils and mouth
- Black embroidery yarn — small quantity — for optional eye shaping
Tools
- 4.5 mm crochet hook
- Two 18 mm safety eyes
- Polyester stuffing
- Yarn needle
- Embroidery needle
- Locking stitch markers
- Long sewing pins
- Scissors
- Optional pipe cleaners for display-only wing support
Do not use wire or plastic safety eyes in a dragon intended for a child under three. Embroidered eyes and unreinforced fabric wings are the safer substitutions.
Abbreviations
- MR — magic ring
- sc — single crochet
- inc — two single crochets in one stitch
- dec — single crochet decrease
- sl st — slip stitch
- ch — chain
- hdc — half double crochet
- dc — double crochet
- BLO — back loop only
- FLO — front loop only
For an invisible decrease, insert the hook through the front loops of the next two stitches, pull up one loop through both front loops, then complete a single crochet.
Pattern — Step by Step
Work stuffed parts in continuous spirals unless a section specifies turning rows. Place a locking marker through both loops of the first stitch in every round.
Head
Yarn: cream. Original shaping follows standard six-stitch amigurumi expansion.
R1: 6 sc in MR (6)
R2: inc ×6 (12)
R3: (sc, inc) ×6 (18)
R4: (2 sc, inc) ×6 (24)
R5: (3 sc, inc) ×6 (30)
R6: (4 sc, inc) ×6 (36)
R7: (5 sc, inc) ×6 (42)
R8–R14: 42 sc (42)
R15: (5 sc, dec) ×6 (36)
R16: (4 sc, dec) ×6 (30)
R17: (3 sc, dec) ×6 (24)
Insert the eyes between R11 and R12 with approximately 10 stitches between their inner edges. Pin the muzzle below them before fitting the washers. Stuff the forehead and sides firmly, leaving the lower center slightly softer.
R18: (2 sc, dec) ×6 (18)
R19: (sc, dec) ×6 (12)
R20: dec ×6 (6)
R21: close the remaining opening (6)
Fasten off. Draw the tail through the front loops of the final six stitches and pull the opening closed.
Body
Yarn: cream.
R1: 6 sc in MR (6)
R2: inc ×6 (12)
R3: (sc, inc) ×6 (18)
R4: (2 sc, inc) ×6 (24)
R5: (3 sc, inc) ×6 (30)
R6: (4 sc, inc) ×6 (36)
R7: (5 sc, inc) ×6 (42)
R8–R11: 42 sc (42)
R12: (5 sc, dec) ×6 (36)
R13–R15: 36 sc (36)
R16: (4 sc, dec) ×6 (30)
R17–R18: 30 sc (30)
R19: (3 sc, dec) ×6 (24)
Stuff the base firmly and flatten it slightly against the work surface. Reduce the stuffing pressure near the neck so the head seam does not form a hard ridge.
R20: (2 sc, dec) ×6 (18)
R21: (sc, dec) ×6 (12)
R22: dec ×6 (6)
Fasten off and leave a 40 cm tail for assembly.
Belly Panel
Yarn: cream. Work as a flat oval even though the body uses the same color; the raised edge creates the segmented belly visible in the photograph.
R1: 6 sc in MR (6)
R2: inc ×6 (12)
R3: (sc, inc) ×6 (18)
R4: (2 sc, inc) ×6 (24)
R5: (3 sc, inc) ×6 (30)
Fasten off with a 35 cm tail. Stretch the circle vertically into an oval. Embroider four shallow horizontal lines across the panel after it is sewn to the body.
Arms — Make 2
Yarn: cream.
R1: 6 sc in MR (6)
R2: inc ×6 (12)
R3: (sc, inc) ×6 (18)
R4–R5: 18 sc (18)
R6: (sc, dec) ×6 (12)
R7–R13: 12 sc (12)
R14: (sc, dec) ×4 (8)
Stuff the hand and lower arm firmly. Use less stuffing in R11–R14 so the upper arm can lie flat against the body.
Flatten the opening and work 4 sc through both layers. Fasten off with a 30 cm sewing tail.
Hand Pads — Make 2
Yarn: peach pink. Work as flat circles.
R1: 6 sc in MR (6)
R2: inc ×6 (12)
Fasten off with a 15 cm tail. Sew one pad to the rounded end of each arm.
Back Legs — Make 2
Yarn: cream.
R1: 6 sc in MR (6)
R2: inc ×6 (12)
R3: (sc, inc) ×6 (18)
R4: (2 sc, inc) ×6 (24)
R5–R7: 24 sc (24)
R8: (2 sc, dec) ×6 (18)
R9–R11: 18 sc (18)
R12: (sc, dec) ×6 (12)
R13: 12 sc (12)
R14: dec ×6 (6)
Stuff firmly through R10. Shape the front into a broad foot while keeping the upper edge compressible.
Fasten off with a 35 cm tail.
Toe Pads — Make 6
Yarn: peach pink.
R1: 6 sc in MR (6)
R2: 6 sc (6)
Fasten off with a 12 cm tail. Close the opening without stuffing. Sew three pads across the front of each foot with approximately one stitch between them.
Outer Ears — Make 2
Yarn: cream.
R1: 6 sc in MR (6)
R2: inc ×6 (12)
R3: (sc, inc) ×6 (18)
R4–R6: 18 sc (18)
R7: (sc, dec) ×6 (12)
Do not stuff. Flatten each ear and work 6 sc through both layers. Fasten off with a 30 cm tail.
Horns — Make 2
Yarn: peach pink.
R1: 6 sc in MR (6)
R2–R3: 6 sc (6)
R4: (sc, inc) ×3 (9)
R5–R6: 9 sc (9)
R7: (2 sc, inc) ×3 (12)
R8–R9: 12 sc (12)
Stuff in small sections. Concentrate the filling near the base and bend the tip slightly backward.
Fasten off with a 30 cm sewing tail.
Muzzle
Yarn: cream.
R1: 6 sc in MR (6)
R2: inc ×6 (12)
R3: (sc, inc) ×6 (18)
R4: (2 sc, inc) ×6 (24)
R5–R6: 24 sc (24)
R7: (2 sc, dec) ×6 (18)
Add enough stuffing to project approximately 3 cm from the face. Keep the final round flat for sewing.
Fasten off with a 40 cm tail.
Cheek Patches — Make 2
Yarn: peach pink. Work as flat circles.
R1: 6 sc in MR (6)
R2: inc ×6 (12)
Fasten off with a 20 cm tail. Stretch each circle into a shallow horizontal oval.
Head Crest Spikes — Make 3
Yarn: powder blue. Make two short spikes and one long center spike.
Short spikes:
R1: 6 sc in MR (6)
R2–R3: 6 sc (6)
R4: (sc, inc) ×3 (9)
R5: 9 sc (9)
Long center spike:
R1: 6 sc in MR (6)
R2–R5: 6 sc (6)
R6: (sc, inc) ×3 (9)
R7–R8: 9 sc (9)
Stuff each crest piece lightly. Fasten off with a 25 cm tail.
Inner Wing Panels — Make 2
Yarn: powder blue. Work in turning rows. The bracketed number is the stitch count at the end of each row.
Ch 15.
Row 1: Starting in the second ch from the hook, 14 sc (14)
Row 2: ch 1, turn, inc, 12 sc, inc (16)
Row 3: ch 1, turn, 16 sc (16)
Row 4: ch 1, turn, inc, 14 sc, inc (18)
Row 5: ch 1, turn, 18 sc (18)
Row 6: ch 1, turn, 14 sc, leave 4 stitches unworked (14)
Row 7: ch 1, turn, 14 sc (14)
Row 8: ch 1, turn, 10 sc, leave 4 stitches unworked (10)
Row 9: ch 1, turn, 10 sc (10)
Row 10: ch 1, turn, 6 sc, leave 4 stitches unworked (6)
Row 11: ch 1, turn, 6 sc (6)
Row 12: ch 1, turn, dec, 2 sc, dec (4)
Fasten off. The stepped edge forms three wing points.
Wing Borders — Make 2
Yarn: cream.
Join cream yarn at the narrow top of one blue panel. Work sc evenly around the outer edge, placing 3 sc in each of the three lower points and 2 sc in the upper corner. Continue until the border reaches the starting point.
Fasten off with a 45 cm tail. Surface-crochet or embroider two cream support lines from the upper inner corner toward the lower wing points.
Tail
Yarn: cream.
R1: 6 sc in MR (6)
R2: inc ×6 (12)
R3: (sc, inc) ×6 (18)
R4: (2 sc, inc) ×6 (24)
R5–R8: 24 sc (24)
R9: (2 sc, dec) ×6 (18)
R10–R13: 18 sc (18)
R14: (sc, dec) ×6 (12)
R15–R18: 12 sc (12)
R19: dec ×6 (6)
R20: 6 sc (6)
Stuff the base firmly and reduce the amount toward the tip. Curve the tail to one side while adding each section of stuffing.
Fasten off with a 45 cm sewing tail.
Back and Tail Spikes — Make 4
Yarn: powder blue.
R1: 6 sc in MR (6)
R2–R3: 6 sc (6)
R4: (sc, inc) ×3 (9)
R5: 9 sc (9)
R6: (2 sc, inc) ×3 (12)
Do not stuff. Flatten the base and work 6 sc through both layers. Fasten off with a 25 cm tail.
Assembly
- Sew the head to the body through the upper body rounds and lower head rounds. Add stuffing beneath the neck seam before closing the final 4 cm.
- Stretch the belly panel vertically and pin it from Body R8 to R19. Sew around the edge, then embroider four horizontal segment lines approximately 2 cm apart.
- Center the muzzle below the eyes with its upper edge between Head R12 and R13. Sew three-quarters around, adjust the stuffing and close the seam.
- Embroider two short brown nostrils across the upper muzzle. Add one central downward stitch and two shallow mouth curves beneath it.
- Sew the pink cheek patches below and outside the eyes. Attach the cream ears across Head R6–R11, then position the pink horns between the ears and crown center.
- Arrange the three blue crest pieces along the head centerline. Place the long spike in front and the shorter spikes directly behind it.
- Attach the back legs to the lower front of the body and sew the arms between Body R15 and R19. Keep both hands directed toward the belly panel.
- Pin each wing along an angled line from the upper back toward the side of Body R14. Sew the cream border to the body while leaving the blue panel free.
- Attach the tail across Body R6–R11 and add one hidden anchor stitch farther along its curve. Sew the four blue spikes from the lower back toward the tail tip.
- Check both wing angles, toe-pad spacing and horn height from the front. The finished dragon should rest on its legs, lower body and tail without pressure on either wing.
The completed dragon has five structural contact points: two feet, the lower body, the tail base and the curved tail section.
7 Technical Tips
- Head-marker drift: A hidden round start can rotate the muzzle several stitches away from the crest. Add a second marker at the visual front after Head R7 and retain it until the eyes are installed.
- Muzzle collapse: Filling the muzzle only at its edges produces a hollow center. Pack the middle until it projects about 3 cm, then leave the final stitch round soft enough to follow the head curve.
- Visible decrease gaps: Two-loop decreases expose pale stuffing through cream chenille. Work every decrease through the next two front loops and keep the working loop no wider than the 4.5 mm hook shaft.
- Wing rotation: A vertical attachment seam makes the wing face backward. Pin the upper edge near the shoulder and place the lower anchor approximately 5 cm outward and downward before sewing.
- Unequal horn angles: Horns attached without measured reference points can lean in opposite directions. Place both bases on the same head round and keep approximately eight stitches between their inner edges.
- Unstable tail: A lightly stuffed tail cannot support the rear of the body. Pack the first eight rounds firmly, then reduce the filling by roughly half from R14 toward the tip.
- Loose chenille ends: Short woven tails can withdraw when the wings are handled. Weave each wing, horn and spike tail in three directions through at least 5 cm of fabric before trimming.
Conclusion
Pin both wings and the tail before sewing any of those parts permanently. Their combined angle determines whether the dragon sits level or pitches forward under its head. Record the finished head circumference, wing span and tail curve before changing yarn brands because chenille thickness can alter all three measurements. Save this baby dragon amigurumi crochet pattern to Pinterest and share front, rear and side photographs on Instagram using #CloudWingBabyDragon. The next concrete step is to crochet one blue wing panel and test its lower point against the finished body. Would you keep three blue crest spikes on this dragon’s head, or extend the ridge between both horns?









