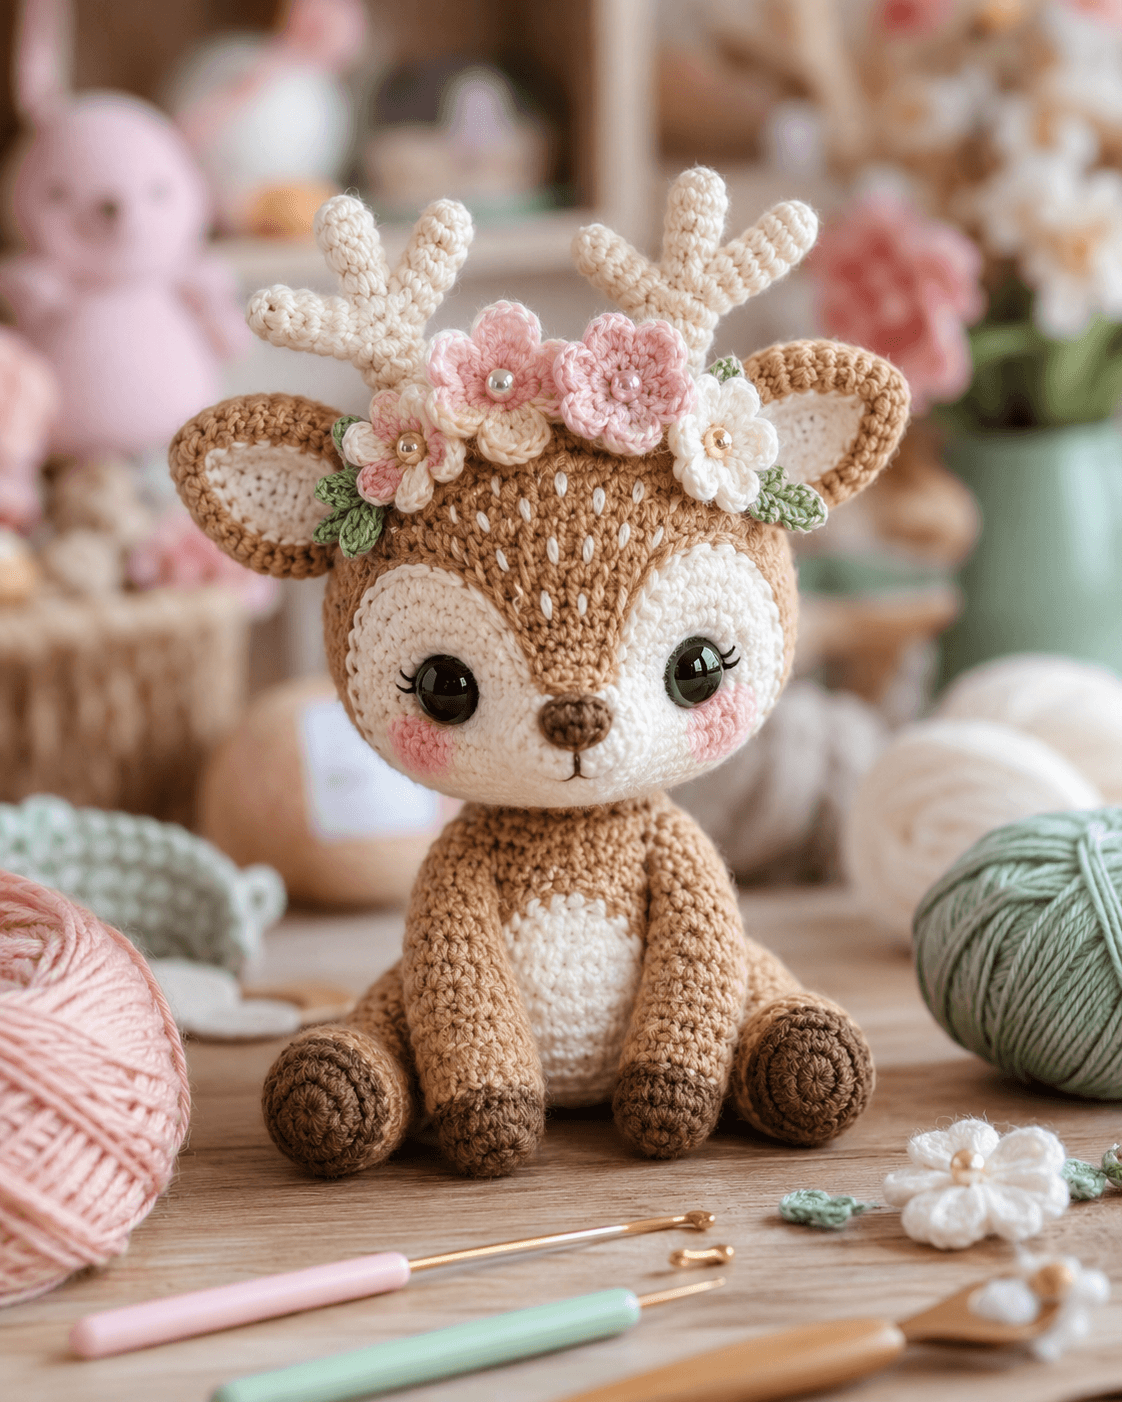
Antlers make deer proportions unforgiving. This deer amigurumi crochet pattern is built around a wide fawn face, a narrow muzzle, upright ears, short seated legs, and separate floral antlers that sit like a crown across the forehead. Use DK to light-worsted yarn with a 3.0 mm hook for a compact finish. The project suits an intermediate maker because placement and symmetry matter more than stitch complexity.
The Design: What Makes This Deer Different
This deer is not shaped like a generic woodland doll with antlers added at the end. The head is oversized, the muzzle is small and centered low, and the eye area stays open so the white facial patches remain visible from the front. That matters because the photo depends on contrast: tan upper head, white lower face, dark nose, pink cheeks, and a floral antler band that spans from ear to ear. A second structural choice is the seated body. Long legs would pull attention away from the face, so the limbs stay short and rounded. The third choice is separate antler branches. Flat appliqué antlers would disappear behind the flowers, while stuffed branches keep the crown readable. One common mistake in a deer crochet pattern is placing the ears too low. Then the flowers crowd the head and the antlers lose height.
Project Info at a Glance
| Skill Level | Time | Finished Size | Hook | Best For |
|---|---|---|---|---|
| Intermediate | 8–10 hours | About 20 cm seated | 3.0 mm | Shelf decor, nursery display, gift make |
Materials and Tools
Yarn
- Light brown — DK or light worsted — about 55 g — for head, body, arms, outer ears
- White or cream — same weight — about 25 g — for face, belly, inner ears, antlers, flowers
- Medium brown — same weight — about 15 g — for hooves and nose
- Pink — scrap amount — for flowers and cheek patches
- Sage green — scrap amount — for leaves
- Embroidery thread or pearl beads — optional — for flower centers and forehead accents
Tools
- Hook 3.0 mm
- 10 mm safety eyes
- Polyester stuffing
- Tapestry needle
- Stitch markers
- Scissors
- Straight pins
Abbreviations
MR = magic ring, sc = single crochet, inc = increase, dec = decrease, sl st = slip stitch, ch = chain, BLO = back loop only, FO = fasten off. Use invisible decrease on visible shaping rounds so the face stays smooth around the muzzle and cheek area.
Pattern — Step by Step
Continuous spiral unless noted.
Head (Make 1)
Yarn: light brown for upper head, white for face patch area — Standard amigurumi math adapted to photo proportions
R1: 6 sc in MR (6)
R2: inc x6 (12)
R3: [sc, inc] x6 (18)
R4: [2 sc, inc] x6 (24)
R5: [3 sc, inc] x6 (30)
R6: [4 sc, inc] x6 (36)
R7–13: sc around (36)
R14: [4 sc, dec] x6 (30)
R15: sc around (30)
R16: [3 sc, dec] x6 (24)
R17: sc around (24)
Insert eyes between R10 and R11, about 8 stitches apart. Stuff firmly before closing.
R18: [2 sc, dec] x6 (18)
R19: [sc, dec] x6 (12)
R20: dec x6 (6)
FO. Leave a 25 cm tail.
Face Patch Left (Make 1)
Yarn: white — Large curved appliqué under one eye
Ch 7.
Round 1: starting in 2nd ch from hook, sc 5, 3 sc in last ch, rotate, sc 4, inc in last st (14)
Round 2: inc, sc 4, inc x3, sc 4, inc x2 (20)
Shape slightly while sewing so the rounded side frames the outer cheek.
FO. Leave a 20 cm tail.
Face Patch Right (Make 1)
Yarn: white — Mirror of left patch
Ch 7.
Round 1: starting in 2nd ch from hook, sc 5, 3 sc in last ch, rotate, sc 4, inc in last st (14)
Round 2: inc, sc 4, inc x3, sc 4, inc x2 (20)
FO. Leave a 20 cm tail.
Muzzle (Make 1)
Yarn: white — Small centered snout
R1: 6 sc in MR (6)
R2: inc x6 (12)
R3: sc around (12)
R4: [sc, dec] x4 (8)
Stuff lightly. Embroider the nose after sewing or work the nose separately and add later.
FO. Leave a 20 cm tail.
Nose (Make 1)
Yarn: medium brown
R1: 6 sc in MR (6)
R2: [sc, inc] x3 (9)
Flatten into a slight triangle-oval while attaching.
FO. Leave a 12 cm tail.
Ears (Make 2)
Yarn: outer light brown, inner white
Outer ear:
R1: 6 sc in MR (6)
R2: inc x6 (12)
R3: [sc, inc] x6 (18)
R4–5: sc around (18)
R6: [sc, dec] x6 (12)
Inner ear patch:
Ch 6.
Round 1: starting in 2nd ch from hook, sc 4, 3 sc in last ch, rotate, sc 3, inc in last st (12)
Sew the inner patch inside the ear. Fold the base slightly before attachment.
FO. Leave 20 cm tails on outer ears.
Body (Make 1)
Yarn: light brown — Standard amigurumi math adapted to seated silhouette
R1: 6 sc in MR (6)
R2: inc x6 (12)
R3: [sc, inc] x6 (18)
R4: [2 sc, inc] x6 (24)
R5: [3 sc, inc] x6 (30)
R6: [4 sc, inc] x6 (36)
R7–10: sc around (36)
R11: [4 sc, dec] x6 (30)
R12–13: sc around (30)
R14: [3 sc, dec] x6 (24)
R15: sc around (24)
Stuff the lower body firmly so the deer sits level. Keep the top section slightly softer.
R16: [2 sc, dec] x6 (18)
R17: sc around (18)
FO. Leave a 30 cm tail.
Belly Patch (Make 1)
Yarn: white — Oval front appliqué
Ch 8.
Round 1: starting in 2nd ch from hook, sc 6, 3 sc in last ch, rotate, sc 5, inc in last st (16)
Round 2: inc, sc 5, inc x3, sc 5, inc x2 (22)
FO. Leave a 20 cm tail.
Arms / Front Legs (Make 2)
Yarn: start medium brown, switch to light brown
R1: 6 sc in MR (6)
R2: inc x6 (12)
R3: sc around (12)
Change to light brown.
R4: [sc, dec] x4 (8)
R5–9: sc around (8)
Stuff hoof area and lower half only. Flatten top edge.
FO. Leave 20 cm tails.
Back Legs (Make 2)
Yarn: start medium brown, switch to light brown
R1: 6 sc in MR (6)
R2: inc x6 (12)
R3: [sc, inc] x6 (18)
R4: sc around (18)
Change to light brown.
R5: [sc, dec] x6 (12)
R6–8: sc around (12)
Stuff moderately. Flatten the top edge so each leg angles outward in a seated pose.
FO. Leave 25 cm tails.
Antler Base Branch (Make 2)
Yarn: white — Main antler branch
Ch 9.
Row 1: starting in 2nd ch from hook, sc 8
FO. Leave 20 cm tail.
Antler Side Branch Small (Make 2)
Yarn: white
Ch 5.
Row 1: starting in 2nd ch from hook, sc 4
FO. Leave 15 cm tail.
Antler Side Branch Large (Make 2)
Yarn: white
Ch 6.
Row 1: starting in 2nd ch from hook, sc 5
FO. Leave 15 cm tail.
Assemble Antlers (Make 2)
Sew one small and one large side branch to each main branch. Keep both antlers mirrored.
Five-Petal Flowers (Make 4)
Yarn: pink, white, or cream — Floral crown pieces
R1: 5 sc in MR (5)
Round 2: [sl st in next st, ch 2, 2 dc, ch 2, sl st in same st] x5 petals
Add a pearl bead or embroidered knot to the center if desired.
FO. Leave 12 cm tails.
Small Bud Flowers (Make 3)
Yarn: pink or cream
R1: 6 sc in MR (6)
Round 2: [sl st, ch 2, 2 dc in next st] x3
FO. Leave 10 cm tails.
Leaves (Make 6)
Yarn: sage green
Ch 6.
Row 1: starting in 2nd ch from hook, sl st, sc, hdc, sc, sl st
FO. Leave 10 cm tails.
Forehead Spot Embroidery
Use white yarn to add small vertical seed-like stitches down the tan forehead centerline.
Cheek Patches (Make 2)
Yarn: pink — Flat circles
R1: 6 sc in MR (6)
R2: inc x6 (12)
FO. Leave 12 cm tails.
Assembly
- Sew the belly patch to the front center of the body before attaching the limbs.
- Sew the head to the body with the face angled slightly forward, not fully upright.
- Pin both white face patches first so they mirror each other under the eyes.
- Attach the eyes through the open face area or sew them after patch placement if preferred.
- Sew the muzzle centered low on the face, then attach the nose and embroider the mouth line.
- Attach the ears high on the head, one on each side, with a slight outward tilt.
- Sew the front legs long and close to the body center so they fall straight down in the seated pose.
- Attach the back legs low and slightly forward so the toy rests on both feet.
- Sew the antlers behind the flower line and in front of the ears, keeping both branches level.
- Add flowers, leaves, cheek patches, and forehead embroidery last, then adjust stuffing by hand.
The finished deer should sit without rocking, with both antlers visible above the floral crown and both ears still clear from the front view.
7 Technical Tips
- Pin both antlers before sewing either one down. A height difference of even 5 mm is obvious because the branches frame the crown symmetrically.
- Do not oversize the muzzle. On a 36-stitch head, a snout wider than 12 stitches starts covering too much of the white face area.
- Place the ears before the flowers. If the floral crown goes on first, the ear angle often shifts lower and the antlers lose definition.
- Stuff the back legs more firmly than the front legs. Soft hind legs flatten under body weight and make the seated pose tilt backward.
- Keep the eyes on the same round and the same distance from the muzzle centerline. A difference of one stitch changes the entire expression.
- Sew the face patches with very small whip stitches. Large stitches show through the white yarn and break the clean front contrast.
- Anchor the flowers through the head, not only to the antler stems. That spreads tension and stops the crown from twisting after handling.
Conclusion
This deer amigurumi crochet pattern works because the structure protects the face. The head stays broad, the muzzle stays compact, the ears hold the outer width, and the antlers rise above the floral line instead of competing with it. Make the head first, test the face patch placement with pins, and attach the crown only after the ears are fixed. That order keeps the silhouette balanced. Share the finished piece on Pinterest and Instagram with #FloralDeerAmigurumi. One practical question remains: did your antlers sit high enough to stay visible above the flowers from a straight front view?